How to replace the fuel pressure regulator
Content
Fuel pressure regulators help the fuel injector release the correct amount of fuel and maintain a constant fuel pressure for optimal fuel utilization.
The fuel pressure regulator is a device designed to maintain a constant fuel pressure for proper fuel atomization.
Inside the regulator housing there is a spring that presses on the diaphragm. The spring pressure is pre-set by the manufacturer for the desired fuel pressure. This allows the fuel pump to simultaneously pump enough fuel and enough pressure to overcome the spring pressure. Excess fuel that is not required is sent back to the fuel tank via the fuel return line.
When the car's engine is idling, there is less fuel pressure going into the regulator. This is done by the engine vacuum pulling on the diaphragm inside the fuel pressure regulator, compressing the spring. When the throttle is open, the vacuum drops and allows the spring to push out the diaphragm, causing high fuel pressure to build up in the fuel rail.
The fuel pressure regulator works with the fuel rail sensor. When the pump delivers fuel, the fuel rail sensor detects the presence of fuel. The fuel pressure regulator provides a constant pressure in the fuel rail to deliver fuel to the injectors for proper atomization.
When the fuel pressure regulator starts to malfunction, there are some basic symptoms that will alert the vehicle owner that something is wrong.
The car will start with difficulty starting, causing the starter to run longer than usual. In addition, the engine may start to run erratically. There may even be instances where problems with the fuel rail pressure sensor will cause the engine to simply shut down during normal operation.
Engine light codes associated with the fuel pressure regulator on vehicles with computers:
- P0087
- P0088
- P0170
- P0171
- P0172
- P0173
- P0174
- P0175
- P0190
- P0191
- P0192
- P0193
- P0194
- P0213
- P0214
Part 1 of 6: Check the condition of the fuel pressure regulator
Step 1: start the engine. Check the instrument panel for an engine light. Listen to the engine for misfiring cylinders. Feel any vibrations while the engine is running.
- Attention: If the fuel pressure regulator is completely out of order, the engine may not start. Do not attempt to crank the starter more than five times or the battery will drop in performance.
Step 2: Check the vacuum hoses.. Stop the engine and open the hood. Check for broken or damaged vacuum hoses around the fuel pressure regulator.
Torn vacuum hoses can cause the regulator to not work and the engine to idle.
Part 2 of 6: Preparing to Replace the Fuel Pressure Regulator
Having all the necessary tools and materials in place before starting work will allow you to get the job done more efficiently.
Necessary materials
- Hex key set
- socket wrenches
- combustible gas detector
- Electric cleaner
- Fuel Hose Quick Disconnect Kit
- Fuel resistant gloves
- Lint-free fabric
- Protective clothing
- Ratchet with metric and standard sockets
- Safety glasses
- Small flat screwdriver
- Wrench
- Torque bit set
- Wheel chocks
Step 1: Park your vehicle on a level, firm surface.. Make sure the transmission is in park (for automatic transmission) or 1st gear (for manual transmission).
Step 2: Attach the front wheels. Place wheel chocks around tires that will remain on the ground. In this case, the wheel chocks will be located around the front wheels, since the rear of the car will be raised. Apply the parking brake to block the rear wheels from moving.
Step 3: Install a nine volt battery in the cigarette lighter.. This will keep your computer running and save the current settings in the car. If you don't have a XNUMX-volt power-saving device, you can skip this step.
Step 4: Disconnect the battery. Open the car hood to disconnect the battery. Remove the ground cable from the negative battery terminal to disconnect power to the fuel pump.
AttentionA: It is important to protect your hands. Be sure to wear protective gloves before removing any battery terminals.
Functions: It is best to follow the vehicle owner's manual to properly disconnect the battery cable.
Part 3 of 6: Remove the Fuel Pressure Sensor
Step 1: Remove the engine cover. Remove the cover from the top of the engine. Remove any brackets that may interfere with the fuel pressure regulator.
- AttentionNote: If your engine has an air intake mounted transversely or overlapping the fuel pressure regulator, you must remove the air intake before removing the fuel pressure regulator.
Step 2 Locate the schrader valve or control port on the fuel rail.. Wear safety goggles and protective clothing. Place a small pallet under the rail and cover the port with a towel. Using a small flathead screwdriver, open the valve by pressing on the Schrader valve. This will relieve the pressure in the fuel rail.
- Attention: If you have a test port or schrader valve, you will need to remove the fuel supply hose to the fuel rail. In this case, you will need a pallet for the fuel rail supply hose and a tool kit for quickly disconnecting the fuel hose. Use a suitable fuel hose quick disconnect tool to remove the fuel hose from the fuel rail. This will relieve the pressure in the fuel rail.
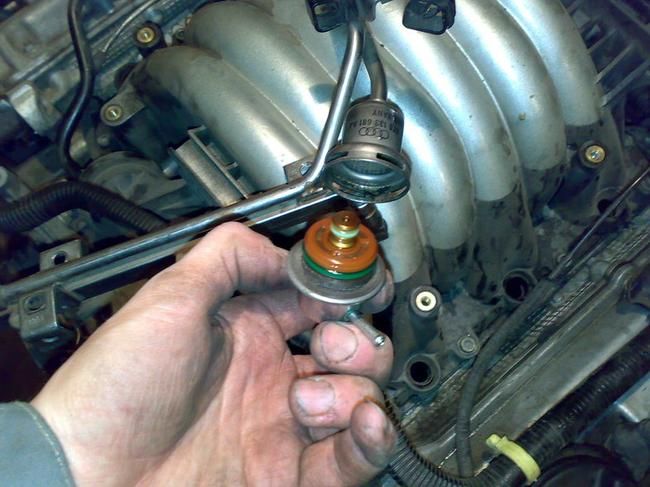
Step 3: Remove the vacuum line from the fuel pressure regulator.. Remove the fasteners from the fuel pressure regulator. Remove the fuel pressure regulator from the fuel rail.
Step 4: Clean the fuel rail with a lint-free cloth.. Check the condition of the vacuum hose from the engine manifold to the fuel pressure regulator.
- Attention: Replace vacuum hose from engine intake manifold to fuel pressure regulator if cracked or perforated.
Part 4 of 6: Install the New Fuel Pressure Regulator
Step 1: Install a new fuel pressure regulator to the fuel rail.. Tighten fasteners by hand. Tighten the mounting hardware to 12 in-lbs, then 1/8 turn. This will secure the fuel pressure regulator to the fuel rail.
Step 2: Connect the vacuum hose to the fuel pressure regulator.. Install any brackets you had to remove to remove the old regulator. Also install the air intake if you had to remove it. Be sure to use new gaskets or o-rings to seal the engine intake.
- Attention: If you had to disconnect the fuel pressure line to the fuel rail, be sure to reconnect the hose to the fuel rail.
Step 3: Replace the engine cover. Install the engine cover by snapping it into place.
Part 5 of 6: Leak Check
Step 1 Connect the battery. Open the car hood. Reconnect the ground cable to the negative battery post.
Remove the nine volt fuse from the cigarette lighter.
Tighten the battery clamp to ensure a good connection.
- AttentionA: If you have not used a nine volt battery saver, you will need to reset all settings in your vehicle such as the radio, power seats, and power mirrors.
Step 2: Remove the wheel chocks. Remove the wheel chocks from the rear wheels and set them aside.
Step 3: turn on the ignition. Listen for the fuel pump to turn on. Switch off the ignition after the fuel pump stops making noise.
- AttentionA: You will need to turn the ignition key on and off 3-4 times to make sure the entire fuel rail is full of fuel and pressurized.
Step 4: Check for leaks. Use a combustible gas detector and check all connections for leaks. Smell the air for the smell of fuel.
Part 6 of 6: Test drive the car
Step 1: Drive the car around the block. During the check, listen for incorrect reproduction of the engine cylinders and feel strange vibrations.
Step 2: Check for warning lights on the dashboard.. Watch the fuel level on the dashboard and check for the engine light to come on.
If the engine light comes on even after replacing the fuel pressure regulator, further diagnostics of the fuel system may be required. This problem may be related to a possible electrical problem in the fuel system.
If the problem persists, contact a certified technician, such as AvtoTachki, to check the fuel pressure regulator and diagnose the problem.
