How to replace the rotor and distributor cap
Content
The distributor caps and rotors keep the distributor clean and separated from the engine. It may be necessary to replace the distributor caps if the machine does not start.
For those who attended auto repair in high school, replacing the distributor cap and rotor was one of the first mechanical repairs they remember. As technology has improved and electronic ignition systems have gradually become the norm, the lost art of replacing these critical parts that could be found on almost every vehicle until the mid-2000s has become less common. However, there are still millions of vehicles on America's roads that require this service to be performed every 50,000 miles.
On older cars, trucks, and SUVs without fully computerized electronic ignition systems, the distributor cap and rotor are vital in transmitting voltage from the ignition coil directly to each cylinder. As soon as the spark plug receives electricity from the spark plug wires, the air-fuel mixture in the cylinder ignites and the combustion process begins. The coil supplies power directly to the rotor, and as the rotor spins, distributes that electricity to each cylinder via plug wires attached to the distributor cap. When the tip of the rotor passes through contact with the cylinder, a high voltage pulse travels from the coil to the cylinder through the rotor.
These components are subjected to high levels of stress every time the engine is running, and if not maintained and replaced on a regular basis, engine efficiency can and often will suffer. During scheduled maintenance when the distributor cap and rotor are replaced, it is common to check the ignition timing to make sure everything is still aligned as it should.
Like any other mechanical component, the distributor cap and rotor have several indicators of wear or damage. In fact, as shown in the image above, there are several issues that can cause a distributor cap to fail, including:
- Small cracks in the hull
- Broken spark plug wire tower
- Excessive carbon tracks built into the distributor cap terminal
- Burnt distributor cap terminals
These two parts go hand in hand in replacement and maintenance, much like oil and an oil filter. Because the rotor and distributor cap can fail over time due to being in harsh environments, it's important to know the symptoms this part will emit before it fails completely.
Some of the common signs of a damaged or broken distributor cap or rotor may include the following:
The Check Engine light comes on: The distributor cap and rotor are vital parts of the ignition system on most older cars on the road today. However, on most cars made after 1985, the Check Engine light was connected to the main components, including the distributor, and came on when there was a problem. In most cases, the Check Engine light comes on when the distributor cap is cracked and there is condensation inside, or if the electrical signal from the distributor is intermittent.
Car won't start: If the distributor cap or rotor is broken, voltage cannot be supplied to the spark plugs, meaning the engine will not start. Very often, both the rotor and the distributor cap fail at the same time; especially if the rotor fails first.
Engine running rough: At the bottom of the distributor cap, there are small electrodes called terminals. When these terminals become carbonized or burnt due to excessive voltage exposure, the engine may idle and run rough. Essentially, in this case, the engine skips a cylinder out of ignition order. For the purposes of this HOW TO DO article, we will focus on the best recommended methods for replacing the distributor cap and rotor. However, it is recommended that you purchase and review a service manual to find out the exact steps if they are different for your vehicle.
Part 1 of 3: Determining when to replace the distributor cap and rotor
According to most service manuals, a combined distributor cap and rotor replacement is recommended for most domestic and imported vehicles at least every 50,000 to 25,000 miles. During routine adjustments that happen every XNUMX miles, the distributor cap and rotor are often checked for signs of premature wear and replaced if damaged. While distributor caps and rotors vary in design depending on vehicle manufacturer, engine size, and other factors, the process and steps for replacing them are fairly similar on most engines.
In many cases, the reason the distributor cap and rotor fail at the same time is because they work together to do the same task; which distributes voltage from the ignition coil to the spark plug. As the rotor begins to wear out, the lower terminals on the distributor cap wear out. If the distributor cover cracks, condensation can get inside the cover, which will literally drown out the electrical signal.
Replacing the distributor cap and rotor at the same time should be done every 50,000 miles, whether they are damaged or not. If your car doesn't get many miles every year, it's also a good idea to replace them every three years. This task is very easy to accomplish, as most cars with this setup have valve covers that are very easy to access. Most maintenance manuals state that this task should take about an hour to complete.
- A warningA: Every time you work on electrical components, you must disconnect the battery cables from the terminals. Always disconnect the positive and negative terminals before removing any vehicle components. It is always recommended to review the manufacturer's service manual in its entirety before attempting this job. As we stated above, the instructions below are the general steps for replacing the distributor cap and rotor. If you are not comfortable with this job, always contact an ASE certified mechanic.
Part 2 of 3: Preparing the Vehicle for Replacing the Distributor Cover and Rotor
When you decide to remove the distributor cap and rotor, there are a few things you need to do before you actually get started. The first step is to purchase a spare distributor cap and rotor kit. Most OEMs sell these two items as a kit so they can be replaced at the same time. There are also several aftermarket suppliers who also make vehicle specific kits. In some cases, kits will come with stock hardware, gaskets, and sometimes new spark plug wires.
If your sets include these items, it is recommended that you use them all; especially the new distributor cap and rotor bolts. Some rotors sit loosely on the distributor shaft; while others are fixed with a screw. If on your car the rotor is fixed with a screw; always use a new screw. According to most service manuals, the job of removing the distributor cap and the rotor itself only takes about an hour. The most time-consuming part of this work will be the removal of auxiliary components that restrict access to the distributor. It is also very important to take the time to mark the location of the distributor, distributor cap, spark plug wires and rotor on the bottom of the distributor before it is removed; and in the process of removal. Mislabeling wires and installing a new distributor cap in the same way that the old one was removed can lead to ignition problems.
You do not have to lift the vehicle on a hydraulic lift or jacks to do this job. The distributor is usually located at the top of the engine or on the side of it. In most cases, the only part you will have to remove to gain access to it is the engine cover or air filter housing.
In general, the materials you will need to remove and replace the distributor and o-ring; after removal of auxiliary components will include the following:
Necessary materials
- Clean shop rag
- Replacing the distributor cap and rotor kit
- Flat and Phillips screwdrivers
- Socket set and ratchet
After gathering all of these materials and reading the instructions in your service manual, you should be ready to get the job done.
Part 3 of 3: Replacing the distributor cap and rotor
As with any service, replacing the distributor cap and rotor begins with easy access to all the tools and supplies needed to complete the task. You do not need to jack up the vehicle or use a hydraulic lift to do this job. Please refer to the service manual for detailed instructions as the steps listed below are general steps.
Step 1: Disconnect the battery cables: Disconnect the positive and negative battery cables and place them away from the battery terminals before proceeding.
Step 2: Remove the engine cover and air filter housing: In many cases, you will have to remove the engine cover and air filter housing to have easy access to remove the distributor cover and rotor. Refer to the service manual for exact instructions on how to remove these components.
Step 3: Mark the distributor components: Before removing the distributor cap, you should take some time to mark the location of each component. This is vital to consistency and reducing the chance of misfires when installing a new rotor and distributor cap.
Note the following individual components:
- Spark Plug Wires: Use a marker or tape to mark the location of each spark plug wire as you remove them. A good tip is to start at the 12 o'clock mark on the distributor cap and mark them in order, moving clockwise. This ensures that when the spark plug wires are reinstalled on the new distributor cap, they will be in good order.
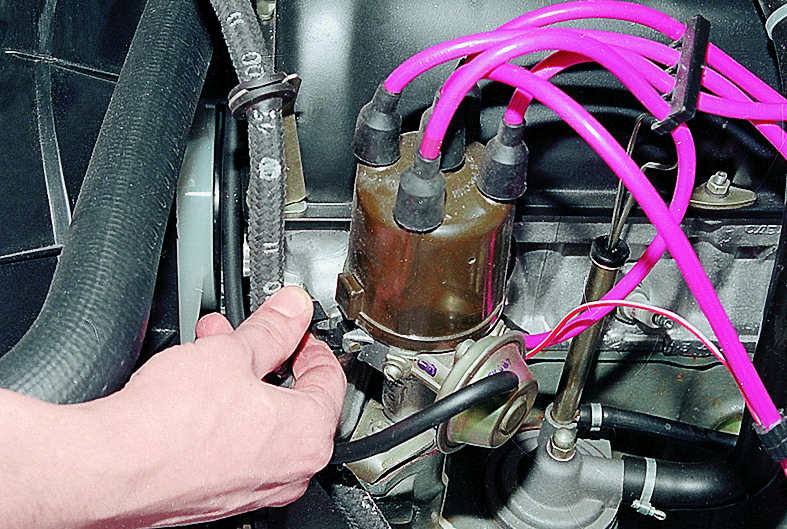
Step 4: Disconnect spark plug wires: After you have marked the spark plug wires, remove the spark plug wires from the distributor cap.
Step 5: Remove the distributor cap: Once the plug wires have been removed, you will be ready to remove the distributor cap. Typically the distributor is held in place with two or three bolts or a few clips on the side of the cover. Locate those bolts or clips and remove them with a socket, extension and ratchet. Remove them one at a time, then remove the old distributor cap from the distributor.
Step 6: Mark the location of the rotor: When you remove the distributor cap, you will see the rotor in the center of the distributor body. The rotor will have a pointed end and a blunt end. Using a screwdriver, place the screwdriver along the edge of the rotor as shown. This will help you mark where the "sharp end" of the new rotor should be.
Step 7: Loosen the rotor screw and remove the rotor: On some distributors, the rotor is attached to a small screw, usually in the middle of the rotor or along the edge. If your rotor has this screw, carefully remove the screw with a magnetized screwdriver. You do NOT want this screw to fall into the distributor shaft as it could get caught in the engine and give you a huge headache.
If you have a rotor without a screw, or after the screw has been removed, remove the old rotor from the distributor. Match it with a new one before throwing it away.
Step 7: Install the new rotor: Once the old rotor has been removed, no other maintenance is usually required. Some people like to use a can of compressed air to spray into the dispenser to loosen any debris or excess carbon buildup. However, when installing a new rotor, be sure to do the following:
Install the rotor exactly in the same place as the old rotor. Use the guide marks you made in step 6 to make sure the pointed end is facing in that direction.
Install a new screw from the kit in the rotor hole (if present) DO NOT USE THE OLD SCREW
Step 8: Install the new distributor cap: Depending on the type of distributor cover, it can only be installed in one or two possible ways. The holes where the screws attach the cover to the distributor or the clamps must match. However, the distributor cap is not designed to be installed in only one direction. As long as the clips or screws line up with the holes or locations on the distributor cap, and the cap is snug against the distributor, you should be fine.
Step 9: Reinstall spark plug wires and coil wires: When you marked the location of the spark plug wires, you did so to make it easier to install them on the new cap. Follow the same pattern to install the spark plug wires on the same support where they were installed on the old distributor cap. The coil wire goes to the center pin on the distributor cap.
Step 10. Replace the engine cover and air cleaner housing..
Step 11: Connect the battery cables.
Some mechanics consider it a good idea to check the ignition timing after replacing the rotor and distributor cap. If you have the necessary tools and want to take this extra security measure; anyway it's a good idea. However, this is not required; especially if you followed the steps above to make sure the rotor, distributor cap, or spark plug wires were properly installed.
When you have completed this task, the job of replacing the distributor cap and rotor is complete. If you've gone through the steps in this article and aren't sure you can complete this project, or if you need an extra team of professionals to fix a problem, contact AvtoTachki.com today and one of our local ASE certified mechanics will be happy to help you. replace the distributor cap and slider.