How to replace the speedometer cable and housing on most vehicles
The cable and speedometer housing fail when the speedometer needle does not work, only works erratically or a screech is heard under the dashboard.
Most of the time, we all take the speedometer for granted. We get in the car, start it and take off. We just expect it to work without thinking about how it does its job until it fails.
The speedometer needle may jump around, show a speed on the dial that just doesn't seem right, or not work at all. These are all signs of a possible problem with the speedometer cable and / or its housing. There are a few individual components that can contribute to erratic speedometer behavior, but the focus is on replacing the speedometer housing and cable.
Some vehicles are equipped with a speedometer drive that allows only the cable to be replaced, while others require the cable and housing assembly to be replaced. The housing may also need to be replaced due to damage or wear. Symptoms of a failed speedometer cable or housing include a speedometer that does not work or only works erratically and screeching sounds coming from the dashboard.
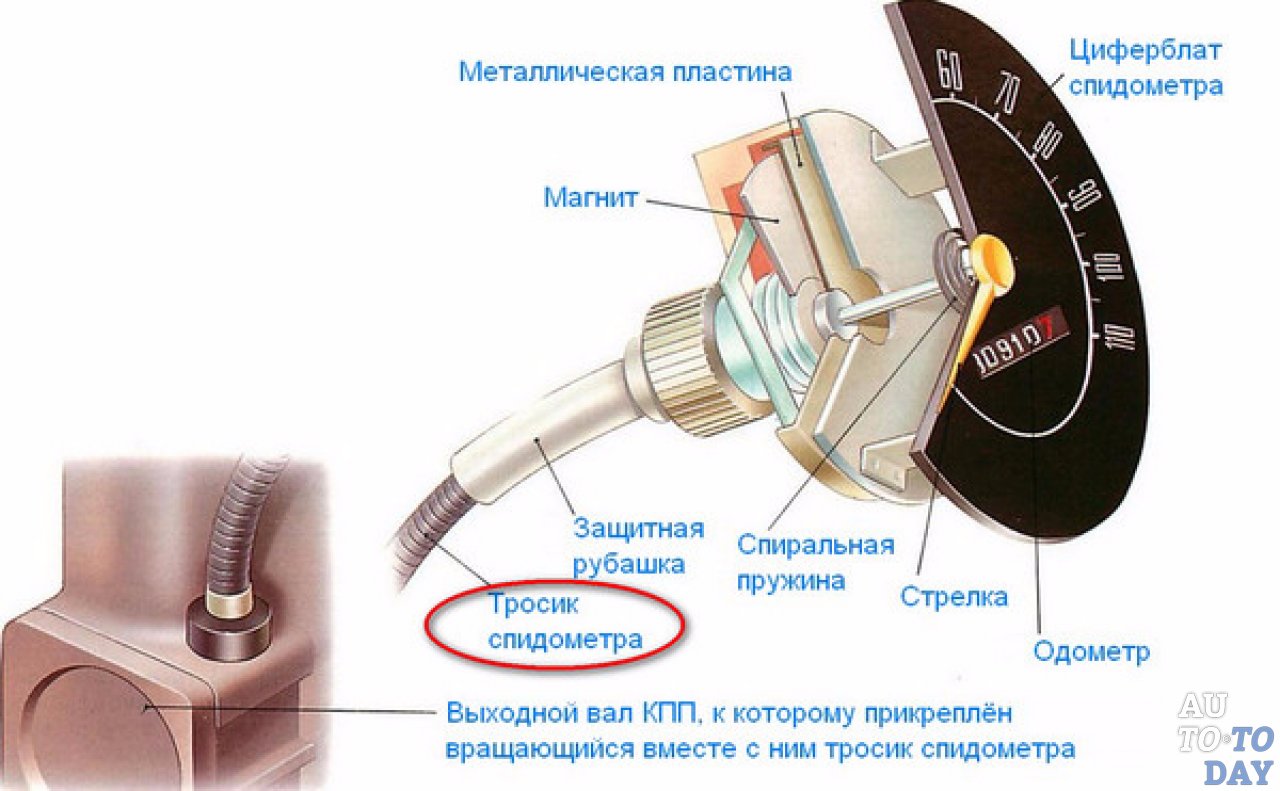
This article is written with a focus on the mechanical speedometer system, which uses a drive cable inside an outer casing. There is another style that uses an electronic sensor to send an electrical signal to the speedometer; however, in this article, we will focus on the mechanical style.
Part 1 of 1: Replacing the Speedometer Cable
Necessary materials
- Pallet
- Hydraulic jack
- Jack stands
- Screwdriver Set
- Socket set
- Wheel chocks
- Set of wrenches
Step 1: Raise the car and install the jacks.. Jack up the vehicle and jack stands using the factory recommended jacking points.
A warning: Never leave the weight of the vehicle on the jack. Always lower the jack and place the weight of the vehicle on the jack stands. Jack stands are designed to support the weight of a vehicle for an extended period of time whereas a jack is designed to support this type of weight only for a short period of time.
A warning: Always make sure that the jacks and stands are on a solid base. Installation on soft ground may cause injury.
Step 2: Install wheel chocks on both sides of the wheels that are still on the ground.. This reduces the chance that the vehicle will roll forward or backward and fall off the jack.
Step 3: Remove the speedometer cable from the transmission.. It could be secured with a threaded collar, any combination of bolts or nuts, or a locking clip.
Remove the speedometer housing from the gearbox.
- Attention: When you remove the speedometer cable, some transmission fluid may leak out. It is recommended to have a drain pan to collect lost fluid.
Step 4: Remove the speedometer cable from the speedometer.. The other end of the speedometer cable connects directly to the back of the speedometer.
To do this, you need to remove the latch that holds it in place. As with the transmission side, this can be a threaded ring, a bolt/nut, or a retaining clip. Remove this retainer and pull it out of the speedometer.
- Attention: Some speedometer cables can be accessed by simply reaching under the dash, while others may require removal of the access panel or instrument cluster. If the speedometer cable is not accessible, refer to the repair manual.
Step 5: Remove the firewall grommet. The speedometer cable housing has a bushing where it passes through the firewall.
Using a screwdriver, remove the grommet from the firewall. Remove all support brackets that hold the speedometer cable in place.
Step 6: Remove Speedometer Cable and Housing. Pay attention to the assembly route when you take it off.
Step 7: Compare the replaced speedometer cable with the removed one.. Lay the replacement speedometer cable next to the removed cable.
Make sure the length is the same and that the drive ends on the cable are the same as the one you removed.
Step 8: Transfer all necessary equipment. Transfer all necessary equipment to the replacement speedometer cable.
Any mounting brackets, eyelets, support brackets should be moved for replacement.
Step 9: Install Replacement Speedometer Cable and Housing. Install the replacement speedometer cable and housing back into the vehicle.
Be sure to install it the same way it was removed and make sure it is not twisted. Any kinks or bends will prevent the speedometer from working properly.
Step 10: Reinstall grommet on firewall.. With the spare speedometer cable installed, reinstall the firewall grommet.
It is best to apply a small amount of grease to the grommet before inserting it into the firewall, as this will help it sit. You can also use a dowel or a flat-blade screwdriver to seat the lug of the bushing in place.
Step 11. Reinstall the ends of the cable casing.. Reinstall both ends of the speedometer cable housing.
Be sure to hook the cable ends to the drive gears when installing them. Re-tighten the holding hardware.
Step 12: Remove Jack Stands. Jack up the car and remove the jack stands.
Place the car back on the ground.
Step 13: Test drive the car. Take the car for a walk to test the speedometer replacement cable.
At this point, the speedometer should run smoothly.
When the speedometer is working properly, it provides smooth operation. A properly functioning speedometer is not only aesthetically pleasing, but it can also prevent you from getting a ticket due to incorrect readings. If at any point you feel you could do with replacing the cable and speedometer housing on your vehicle, invite one of AvtoTachki certified mechanics to your home or work and have it done for you.