How to replace the windshield wiper rod
Car windshield wipers have a connection between the motor, arm and wiper blade. This wiper link may be bent and should be repaired immediately.
The wiper linkage transmits the movement of the wiper motor to the wiper arm and blade. Over time, the wiper arm can bend and wear out. This is especially true if the wipers are used in a region where a lot of snow and ice accumulates in winter. A bent or broken wiper link can cause the wipers to move out of order or not work at all. Obviously this is a safety issue, so don't leave your windshield wiper rod unrepaired.
Part 1 of 1: Replacing the wiper rod.
Necessary materials
- Free Repair Manuals - Autozone provides free online repair manuals for certain makes and models.
- Pliers (optional)
- Protective gloves
- Mounting (optional)
- Ratchet, extension and appropriately sized sockets
- Safety glasses
- Small flat screwdriver
- Wiper arm puller (optional)
Step 1: Move the wipers to the highest position.. Turn on the ignition and wipers. Stop the wipers when they are in the up position by turning the ignition off.
Step 2: Disconnect the negative battery cable. Disconnect the negative battery cable using a wrench or ratchet and an appropriately sized socket. Then set the cable aside.
Step 3: Remove the wiper arm nut cover.. Remove the wiper arm nut cover by prying it off with a small flathead screwdriver.
Step 4: Remove the wiper arm retaining nut.. Remove the wiper arm retaining nut using a ratchet, extension and socket of the appropriate size.
Step 5: Remove the wiper arm. Pull the wiper arm up and off the stud.
- Attention: In some cases, the wiper arm is pressed in and a special wiper arm puller is required to remove it.
Step 6: Raise the hood. Raise and support the hood.
Step 7: Remove the cover. Typically, there are two overlapping hood halves that are attached with screws and/or clips. Remove all retaining fasteners, and then gently pull the cover up. You may need to use a small flathead screwdriver to gently pry it off.
Step 8 Disconnect the engine electrical connector.. Press the tab and slide the connector.
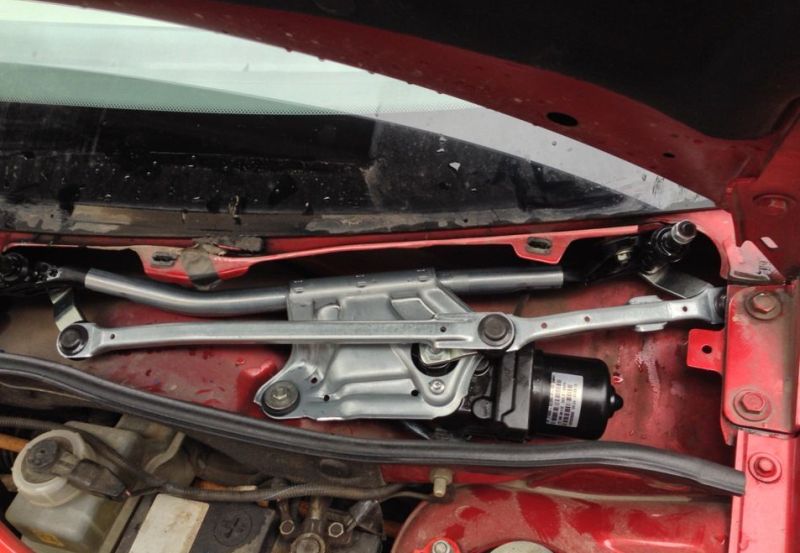
Step 9: Remove the linkage mounting bolts.. Loosen the linkage assembly mounting bolts using a ratchet and appropriately sized socket.
Step 10: Remove the linkage from the vehicle.. Lift the linkage up and out of the vehicle.
Step 11: Disconnect the connection from the engine.. The linkage can usually be carefully removed from the motor mounts using a flathead screwdriver or small pry bar.
Step 12: Connect the new connection to the motor.. Put traction on the engine. This can usually be done by hand, but pliers can be used carefully if necessary.
Step 13: Install the Lever Assembly. Install the linkage back into the vehicle.
Step 14 Install the linkage mounting bolts.. Tighten the linkage mounting bolts until snug with a ratchet and an appropriately sized socket.
Step 15: Reinstall the Connector. Connect the electrical connector to the linkage assembly.
Step 16: Replace the Hood. Reinstall the cover and secure it with fasteners and/or clips. Then you can lower the hood.
Step 17: Reinstall the wiper arm.. Slide the lever back onto the connecting pin.
Step 18: Install the wiper arm retaining nut.. Tighten the wiper arm retaining nut until snug using a ratchet, extension and appropriate size socket.
- Attention: It is helpful to apply red Loctite to the threads of the lock nut to prevent the nut from loosening.
Step 19 Install the pivot nut cover.. Install the pivot nut cover by snapping it into place.
Step 20: Connect the negative battery cable.. Connect the negative battery cable with a wrench or ratchet and an appropriately sized socket.
Replacing the windshield wiper rod is a serious job that is best left to a professional. If you decide that it is better to entrust this task to someone else, AvtoTachki offers a qualified windshield wiper rod replacement.