How to replace the air filter
Before it enters the engine, the engine air filter traps any dust and debris, acting as a shield to block its path. However, over time, these filters can accumulate a lot of dirt and clog and need to be replaced so they can continue to work properly. A dirty air filter makes it difficult for the engine to breathe, which can affect the overall performance of the vehicle. The engine filter is usually checked at every oil change or every 6 months. If you drive a lot, especially in dusty places, it is recommended to check the air filter monthly.
Replacing the air filter is something anyone can do and in most cases without using any tools. The first try may take extra time, but once you get the hang of it, most air filters can be replaced in as little as 5 minutes.
Part 1 of 2: Collect the necessary materials
The materials required will ultimately depend on the brand of car you are working on, but for most cars the following factors are common:
- 6" extension
- Air filter (new)
- Gloves
- ratchet
- Safety glasses
- Screwdriver
- Sockets - 8mm and 10mm (special for Toyota, Honda, Volvo, Chevy, etc.)
- Torx socket T25 (fits most Mercedes, Volkswagen and Audi vehicles)
Part 2 of 2: Replace the air filter
Step 1. Locate the air cleaner box.. Open the hood and locate the air cleaner box. The air cleaner box may vary in size and shape depending on the brand of vehicle. Two things that all air cleaner boxes have in common is that they are all black and plastic and are usually located closer to the front of the car, next to the engine. There's also an accordion-shaped black hose that connects it to the throttle body, making it more recognizable.
Step 2: Open the air cleaner box. Once discovered, note the type of fasteners that are used to keep the box closed. In most cases, these clasps are clips that can be undone by hand. In this case, release the clips to open the air cleaner housing and remove the air filter.
Step 3: Access the Air Cleaner Box. For air cleaner housings that are attached with screws or bolts, find the appropriate socket and ratchet, or find a screwdriver and loosen the fasteners. This will allow you to access the air filter.
Step 4: Remove engine trim panels.. Some Mercedes, Audi and Volkswagen air cleaner boxes also serve as engine decoration panels. Firmly but carefully remove the locking panel from the uprights. Once it is removed, flip it over and use the appropriate size Torx bit and ratchet to loosen the fasteners. This will allow you to access the air filter.
- Functions: Some vehicles with V6 or V8 engines may have two air filters that must be removed and replaced.
- Functions: When working on Toyota or Honda vehicles, a 6-inch extension may be required along with an appropriately sized socket and ratchet to reach and loosen the fasteners.
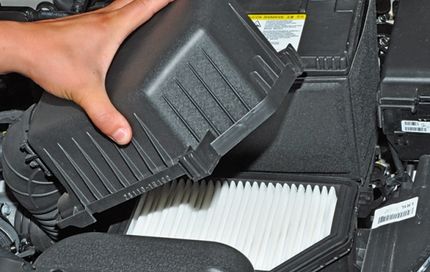
Step 5: Throw away the dirty air filter. Remove the dirty air filter from the air cleaner box and throw it in the trash can. Look inside the air cleaner box. If there is any trash, be sure to take the time to remove it. Using a vacuum cleaner can help remove dirt or other particles that shouldn't be there.
Step 4: Install a new air filter. Once the air cleaner housing has been cleaned, we can now install the new air filter by positioning it in the same way the previous air filter was inserted and closing the air cleaner housing.
Step 5: Attach Fasteners. Depending on the type of fasteners used, either fasten the previously loosened clamps or use an appropriate tool to securely tighten the fasteners.
Congratulations! You have successfully replaced the engine air filter. Doing this task yourself will definitely save you money every time you change your air filter. It will also bring you one step closer to being in tune with your car - the car will only work if the owner maintains it. If you have any problems, be sure to ask a certified mechanic, such as from AvtoTachki, to replace your air filter.