How to replace the air bypass valve
Content
Vehicle air bleed valves add clean air from the air pump to the emissions system to push pollutants out. Air valves are critical to the operation of a car.
Modern cars, trucks and SUVs have become highly efficient work machines. In fact, average fuel economy for a six-cylinder consumer sedan has grown by more than 85% over the past two decades as car manufacturers continue to advance the design and application of fuel and emissions systems. Efficiency in the emissions system, in particular, has increased dramatically, due in part to the use of components such as an air bleed valve or also known as an associated air bypass valve component.
The bleed valve is designed to enhance the clean combustion capability of a modern engine by adding clean air to the exhaust system to remove contaminants. The emission system of most vehicles manufactured after 2000 is controlled by an electronic engine control module (ECM) that receives information from several sensors and adjusts the wastegate or secondary air valve position on the fly to increase or decrease emissions. supply of clean air to the system.
The air diverter valve is a vacuum system that supplies compressed air from the air pump to the exhaust manifold. This compressed air does not contribute to the complete combustion of unburned hydrocarbon molecules, but also provides oxygen to improve the efficiency of the catalytic converter system. When the unit is operating as intended, the engines can burn up to 90% of the fuel supplied to the engine. Without it, combustion efficiency can drop to 75-80%. It is clear that proper maintenance of this component is critical to the overall performance of modern engines.
Part 1 of 4: Understanding the symptoms of a broken or damaged bleed valve
When the bypass valve is not working properly, it usually displays several general warning signs or symptoms that alert the driver or vehicle owner that there is a problem with the EGR system; which component is the secondary air bypass valve. Some of the common symptoms of a damaged or worn bleed valve may include the following:
Engine runs rough at idle and when accelerating. The purpose of the EGR system is to balance the burning of unburned carbon molecules found in the car's exhaust as soon as the engine completes its exhaust stroke. Unburned hydrocarbons are captured by the exhaust gas recirculation system, and fresh air is supplied to the exhaust system using a bypass valve and additional bypass valves. If there is no fresh air supply, the engine will run intermittently both at idle and under acceleration. Although the vehicle's ECM is supposed to regulate the fuel/air ratio, if this happens the engine will not be able to regulate if it is not getting enough fresh air.
Fuel economy is declining. When the bypass valve is broken, it cannot help burn off the unburned carbon molecules in the exhaust system. This reduces the fuel efficiency of the engine from 90% to 75%, which often means a 15 percentage point reduction in fuel economy. It will be hard to see it on the fuel pump at first, but over a long period of time it will leave a mark on the wallet.
The EGR or Check Engine lights come on on the dashboard.. When this component is broken or not working properly, the sensors that monitor the EGR, exhaust and intake systems generate OBD-II error codes and store them in the ECM. When this happens, the check engine light or the ERG warning light on the instrument panel comes on. The only way to fix this problem is to replace the bleed valve and reset the error codes with a professional diagnostic scanner.
This component is commonly found on domestic vehicles, including Ford and General Motors products. The diagram above shows how the air pump works in conjunction with the wastegate/bypass valve to supply fresh air to the exhaust system. As shown in the diagram, the air supply line runs from the air supply pump to the air bypass valve. The air bleed valve (in combination with a bypass valve) then supplies air from the pump to three different components (intake manifold, air cleaner, and exhaust passages).
As you can probably imagine, when that diverter or bypass valve is broken, clogged, or damaged, it will affect the overall performance of your car, truck, or SUV. The bypass valve is designed to last the lifetime of your vehicle, but like any mechanical component, it can break or wear out prematurely. The most common causes of valve failure include:
Air pump damaged. When the air pump is not running, it will not supply enough air to the bleed valve to "bleed" to the intake, air cleaner, or exhaust system. This can cause premature wear of the mechanical components inside this valve.
Debris enters the air bypass valve. Debris entering the air supply system can clog and obstruct the air flow inside the changeover valve. This will heat up the internal components of the device and may damage the valve.
Excessive exposure to excessive heat. Since this valve is often located on top of the engine and next to the exhaust system, it can wear out due to excessive heat; especially if it is made of plastic or polymers. Most bypass valves are made of metal, but some are made of hardened plastic.
As shown in the image above, there are three air lines connected to this component. The vent valve is usually attached to the bracket with two bolts (the two holes on the left side of the unit are for that purpose). The vacuum port is connected to the EGR vacuum, the outlet to the exhaust system is attached to the exhaust ports, and the inlet is supplied from an air or smoke pump. To remove this component, you need to disconnect three tubes, unscrew two bolts and install a replacement system. The job is pretty easy to do and can be done in minutes if you don't have to remove a few components to gain access.
Part 2 of 4: Preparing the vehicle for wastegate replacement
This component is usually attached to the top of the engine and the lines to be removed are fairly easy to access. Thanks to this, you do not have to lift the car on a hydraulic lift or jacks. However, sometimes if this component is damaged, the smoke pump or air pump may also be damaged. This is usually due to excess pressure that builds up inside the smog pump when the diverter valve is unable to distribute the air supply to the pump.
The damage that occurs to a smoke collection pump is usually due to rupture of seals or gaskets due to overpressure. Thus, it is recommended to inspect the smoke collection pump in the car at the same time as replacing the bypass valve or bypass valve.
To remove the bypass valve, you only need a few consumables and tools for most cars, trucks and SUVs. However, as with any replacement project, it's always a good idea to purchase and review a service manual for the car you're working on; as instructions, supplies and tools may be different for each vehicle.
- FunctionsA: It is recommended that you download OBD-II error codes before determining that this component is faulty, as the error code will give you a good starting point for diagnosing the specific component that is damaged or faulty. Very often, the sensor is also damaged, which can cause symptoms similar to a damaged or faulty air bleed valve. Be sure to check both sensors and valve for damage or bad connections before replacement.
Necessary materials
- Flat blade screwdriver
- Pair of needle nose pliers
- Other tools for removing engine covers and other components along the way (refer to service manual for detailed instructions and required tools)
- Penetrating Oil (WD-40 or PB Blaster works best)
- Safety glasses
- Set of sockets and ratchet (usually 10 mm bolts)
Part 3 of 4: Replacing the bleed valve
The process of removing and replacing the bleed valve will be unique to each vehicle; since in some cases this component is attached to the air bypass valve. For the purposes of this HOW TO DO article, we will assume that you are only replacing the air bleed valve; which is common with Ford and GM four-cylinder engines and some six-cylinder engines. This component is usually located on the passenger side of the engine bay and is attached to a bracket next to the exhaust system.
The steps below are general replacement steps. Please be sure to refer to your vehicle's service manual for the exact procedures and tools required to complete these replacement projects safely.
Step 1: Disconnect the battery connectors. Whenever you work under the hood of a vehicle, it is a good idea to disconnect the positive and negative battery cables from the terminals. Remove the positive and negative terminals first, then continue.
Step 2: Remove engine covers: On most vehicles, you will have to remove the engine cover to gain access to the bypass valve. Consult your vehicle's service manual for instructions on how to complete this process. Generally, you will follow these steps below:
- Remove the bolts securing the engine cover to the brackets underneath.
- Remove the air filter or air cleaner lines attached to the engine cover.
- Remove the electrical harnesses or sensors from the engine cover.
- Remove the car engine cover
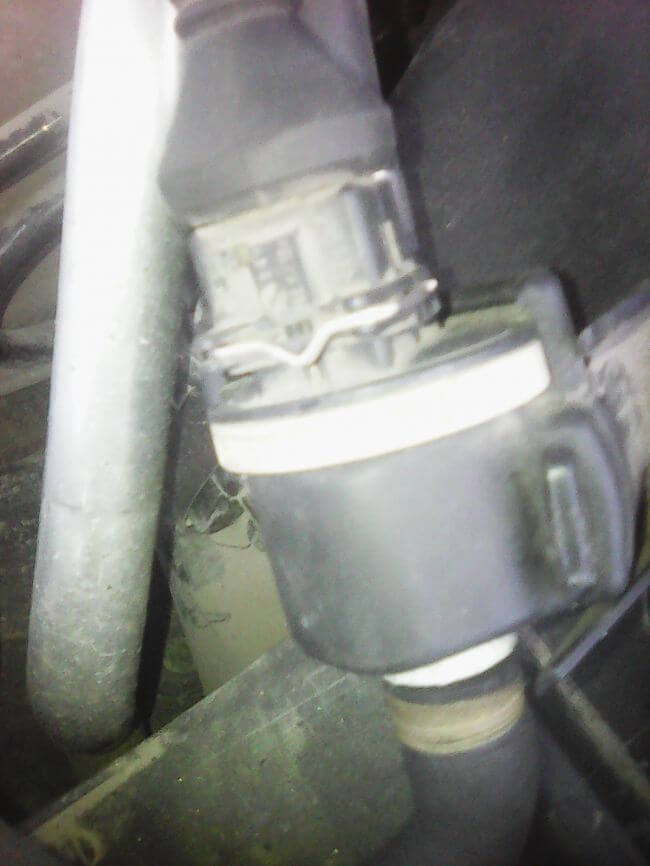
Step 3: Locate the air bypass valve. The image above shows what a bypass valve normally looks like and how it is connected to the engine. As you can see, on the left side is the main hose with a clamp; which connects to the air pump (smog pump), the vacuum line on the right side (with a 90 degree fitting) and the third line on the bottom, which connects to the exhaust ports. The block itself is attached to a bracket, inside of which it slides, and is secured with two bolts.
Step 4: Remove the vacuum line first: Before removing any other components, first disconnect the vacuum line connection. Sometimes the problem with the bleeder valve is that the vacuum line has been cut, damaged, or not securely attached to the bleeder valve.
Before removing it, inspect the vacuum line mount. If it has not been properly secured, reattach it and try starting the vehicle before replacing this part. If the problem persists, continue replacing the bleed valve.
Step 5: Disconnect the smoke pump line: Once you've removed the vacuum line, the next hose to remove from the bleed valve is the hose attached to the air or smoke collection pump. First, use needle-nosed pliers to remove the clamp attached to the fitting.
Slide the hose clamp off the male fitting on the vent valve. After the clamp is removed, grasp the vent valve with your right hand with both hands and begin to remove the hose with your left hand.
Most of the time this hose is very tight against the air bypass valve, so you may need to use a flat blade screwdriver to gently pry the hose. Another trick is to spray some penetrating oil on the inside of this hose to provide some lubrication. You will need to add penetrating oil inside the hose for installation, no need to worry about damaging the smoke pump hose using this trick.
Step 6: Remove the bolts securing the bypass valve to the bracket.. There are usually two bolts that secure the bypass valve to the bracket on the engine. Using an appropriately sized socket (usually 10mm), unscrew the two bolts.
On most vehicles, the bolts are attached to the brackets themselves, but can be secured with a nut on the other side. Refer to your service manual for exact removal instructions for your vehicle.
Step 7: Remove the exhaust manifold hose. Once the bleed valve is removed from the bracket, you can remove the exhaust manifold connection, which is usually located at the bottom of the valve.
It usually connects to a hose clamp, so use the same method to remove this hose as in step 5 above. Once this hose has been removed, remove the old vent valve from the engine bay and get ready to install the new block.
Step 8: Install a new bypass valve.. The process of installing a new bleed valve is the exact opposite of the removal described above. Follow these general steps, but refer to your vehicle's service manual for exact instructions.
- Place the new vent valve inside the bracket.
- Install the exhaust manifold hose to the bottom of the valve.
- Mount the bypass valve on the bracket and tighten the screws.
- Install smoke pump hose
- Install the vacuum line connection on the vent valve.
- Install the engine cover and accessories that need to be removed earlier.
- Connect battery cables
Part 4 of 4: Repair Check
When you have replaced the bypass valve, the first thing you need to do is reset the OBD-II error codes stored in the car's ECM. If you are unable to do this, contact an ASE Certified Mechanic to complete this step for you. If the error codes are not cleared before you start the car, this will disable the EGR system and repairing your bleed valve will make no difference.
Once you've cleared the error codes, it's pretty easy to check for repairs. Perform the following steps to ensure that the bleed valve replacement is correct.
Step 1: Start the engine with the hood open.
Step 2: Look under the bypass valve and check all three lines (vacuum, smoke pump and exhaust) for leaks..
Step 3: Check throttle response. Sit in the vehicle and test the throttle response by rapidly depressing the gas pedal several times. Make sure that the engine speed increases smoothly and the engine speed decreases smoothly.
Step 4: Take the car for a test drive. The best time to test your car is during a 10-15 mile test drive. Make sure you test on the highway to make sure the acceleration is good.
Step 5: Check Your Outliers. In most cases, the reason for replacing this part is because it has not been tested for emissions. Check the emissions to make sure the repairs were done correctly.
As you can see, the process of replacing this component is quite simple. However, if you've read this tutorial and decide you're not comfortable doing this project, contact one of our ASE certified mechanics from AvtoTachki and they'll be happy to complete your bleed valve replacement project for you.
