How to replace the ignition switch assembly
The ignition lock assembly can fail due to constant use or broken keys inside the toggle switch. To replace it, all you need is a few tools and a new cylinder.
When a driver wants to start the car, it's usually as simple as inserting the key and turning it forward. However, from time to time the situation can be complicated by the ignition switch assembly or small parts inside this device. The ignition lock assembly is a toggle switch and key mechanism that is used to supply power to the auxiliary components and engage the starter to start the ignition process. Usually there are no problems with the ignition switch. The part itself is designed for the entire life of the car. But over time, constant use, debris, or broken keys inside the tumblers can cause this part to fail. If the ignition switch assembly wears out, it will display several common side effects such as key insertion and removal problems or the car not starting at all.
Most modern cars that use remote keyless start have a key with a computer chip inside. This requires a different type of ignition system. The instructions below are for older vehicles without a chipped ignition key or engine start button. Please refer to your vehicle service manual or contact your local ASE certified mechanic for assistance with modern ignition systems.
Part 1 of 1: Replacing the Ignition Switch Assembly
Necessary materials
- Boxed socket wrenches or ratchet sets
- Flashlight or drop of light
- Standard size flat blade and Phillips screwdriver
- Replacing the ignition lock cylinder
- Protective equipment (safety goggles)
- Small flat blade screwdriver
Step 1: Disconnect the car battery. Locate the vehicle's battery and disconnect the positive and negative battery cables before continuing.
Step 2: Remove the steering column cover bolts.. There are usually three or four bolts on the sides and bottom of the steering column that must be removed to gain access to the ignition lock cylinder.
Locate the plastic covers that hide these bolts. Use a small flathead screwdriver to remove the plastic covers and set them aside.
Pay attention to the size and style of the bolts and use the appropriate bolt removal tool. In some cases, these will be Phillips or standard/metric bolts, which will require a socket and ratchet to remove properly.
Step 3: Remove the steering column covers. Once the bolts have been removed, you will be able to remove the steering column shrouds.
This becomes easier if you unlock the steering wheel with an adjustable lever located under or to the left of the steering column so you can move the steering wheel up and down to loosen the steering column shrouds.
Step 4: Locate the ignition switch. Once the covers have been removed, you should be able to locate the ignition lock cylinder.
Step 5: Remove the ignition cylinder cover.. Most vehicles have a plastic or metal clip above the ignition lock cylinder. To remove it, unscrew the small screw holding this cover in place, usually located on the bottom of the Switch. After the screw has been removed, carefully slide the cover off the ignition lock cylinder.
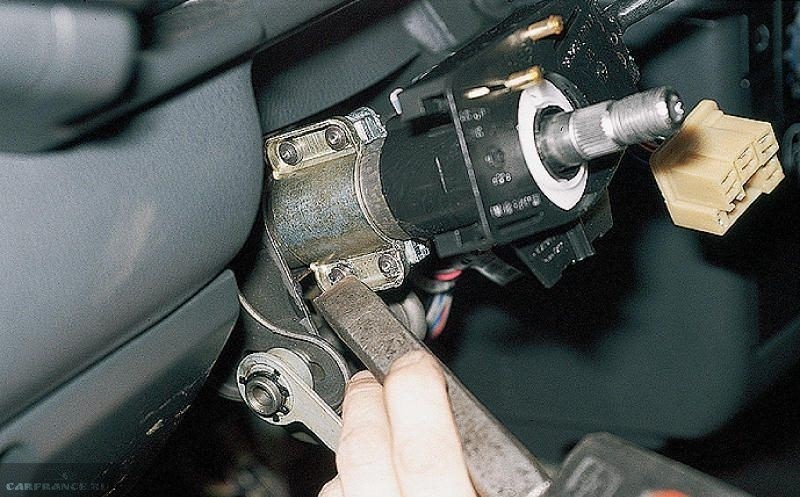
Step 6: Removing the Lock Cylinder. The process of removing the lock cylinder depends on the specific manufacturer. In most cases, this process will require you to insert the key and turn it to the first position, which will unlock the steering wheel. While you're doing this, use a flat-blade screwdriver to press down on the small metal push button located under the ignition lock cylinder. Pressing this switch unlocks the cylinder from the body.
Step 7: Remove the ignition lock cylinder from the body. After you have pressed the button and unlocked the ignition lock cylinder from the lock housing, the ignition lock cylinder can be removed. Without removing the key, carefully remove the ignition lock cylinder from the lock housing.
Step 8: Loosen the two screws on the top of the lock body.. You should be able to see two screws that are located on the top of the lock case after you have removed the ignition lock cylinder. Loosen these screws about four full turns.
Step 9: Install the new ignition lock cylinder.. In most cases, installing a new ignition lock cylinder is very easy. However, you should consult your vehicle's service manual for anything specific about your vehicle. For example, on some vehicles, it is necessary to push the lower spring of the ignition lock cylinder so that it does not get stuck inside the lock housing.
Step 10: Tighten the two screws on the top of the lock cylinder.. After the new ignition lock cylinder is securely fixed inside the housing, tighten the two screws on the top of the lock housing.
Step 11: Replace the ignition lock cover.. Replace the ignition switch cover and tighten the screw underneath.
Step 12: Replace the steering column covers.. Install the steering column covers in place.
Step 13: Check the operation of the new ignition lock cylinder.. Before reconnecting the battery, make sure your new ignition lock cylinder moves to all four positions with the new key. Check this feature three to five times to make sure the repair is done correctly.
Step 14: Connect the battery terminals. Reconnect the positive and negative terminals to the battery.
Step 15 Erase Error Codes with a Scanner. In some cases, the check engine light will come on on the dashboard if your ECM has detected a problem. If these error codes are not cleared before you check the engine start, it is possible that the ECM will prevent you from starting the vehicle. Be sure to clear any error codes with a digital scanner before testing the repair.
It is always best to consult your service manual and review their recommendations in full before undertaking this type of work. If you have read these instructions and are still not 100% sure that this repair has been completed, contact one of our local ASE certified mechanics from AvtoTachki to have the ignition switch replaced at your home or office.