How to change automatic transmission fluid
Content
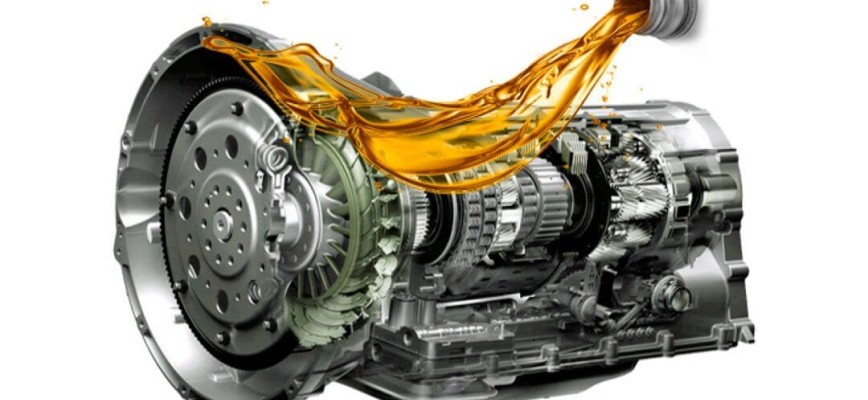
The gearbox, apart from the engine, is the most expensive part of a car. Like engine oil, transmission fluid needs to be changed periodically. Many automatic transmissions also have an internal filter that should…
The gearbox, apart from the engine, is the most expensive part of a car. Like engine oil, transmission fluid needs to be changed periodically. Many automatic transmissions also have an internal filter that must be replaced along with the fluid.
Transmission fluid has several functions:
- Transmission of hydraulic pressure and force to internal transmission components
- Help reduce friction
- Excess heat removal from high temperature components
- Lubricate the internal components of the transmission
The main threat to automatic transmission fluid is heat. Even if the transmission is maintained at the proper operating temperature, the normal operation of internal parts will still generate heat. This breaks down the liquid over time and can lead to gum and varnish formation. This can lead to valve sticking, increased fluid breakdown, fouling and damage to the transmission.
For this reason, it is important to change the transmission fluid according to the interval indicated in the owner's manual. This is usually every 2-3 years or 24,000 to 36,000 miles driven. If the vehicle is used frequently under severe conditions, such as when towing, the fluid should be changed once a year or every 15,000 miles.
The following steps will show you how to change transmission fluid on a conventional transmission using a dipstick.
- Attention: Many new cars don't have dipsticks. They may also have complex maintenance procedures or be sealed and completely unserviceable.
Step 1 of 4: Prepare the vehicle
In order to service your transmission safely and efficiently, you will need a few items in addition to basic hand tools.
Necessary materials
- Free Autozone Repair Manuals - Autozone provides free online repair manuals for certain makes and models.
- Jack and Jack stand
- Oil drain pan
- Protective gloves
- Chilton repair manuals (optional)
- Safety glasses
- Wheel chocks
Part 1 of 4: car preparation
Step 1: Block the wheels and apply the emergency brake.. Park the vehicle on a level surface and apply the emergency brake. Then place the wheel chocks behind the front wheels.
Step 2: Jack up the car. Place a jack under a strong part of the frame. With the vehicle in the air, place stands under the frame and lower the jack.
If you have any questions about where to place the jack on your particular vehicle, please refer to the repair manual.
Step 3: Place a drain pan under the car.
Part 2 of 4: Drain the transmission fluid
Step 1: Remove drain plug (if equipped).. Some transmission pans have a drain plug installed in the pan. Loosen the plug with a ratchet or wrench. Then remove it and let the fluid drain into the oil drain pan.
Part 3 of 4: Transmission Filter Replacement (If Equipped)
Some cars, mostly domestic ones, have a transmission filter. To access this filter and drain the transmission fluid, the transmission pan must be removed.
Step 1: Loosen the gearbox pan bolts.. To remove the pallet, unscrew all the front and side mounting bolts. Then loosen the rear stop bolts a few turns and pry or tap on the pan.
Let all liquid drain.
Step 2: Remove the transmission pan. Remove the two rear pan bolts, pull the pan down and remove its gasket.
Step 3 Remove the transmission filter.. Remove all filter mounting bolts (if any). Then pull the transmission filter straight down.
Step 4: Remove the transmission sensor screen seal (if equipped).. Remove the transmission sensor shield seal inside the valve body with a small screwdriver.
Be careful not to damage the valve body in the process.
Step 5: Install the new capture screen seal.. Install a new suction tube seal on the transmission filter intake tube.
Step 6: Install a New Transmission Filter. Insert the suction tube into the valve body and push the filter towards it.
Reinstall the filter retaining bolts until they are tight.
Step 7: Clean the transmission pan. Remove the old filter from the transmission pan. Then clean the pan using brake cleaner and a lint free cloth.
Step 8: Reinstall the transmission pan. Place a new gasket on the pallet. Install the pallet and fix it with stop bolts.
Tighten the fasteners until tight. Do not overtighten the bolts or you will deform the transmission pan.
If you are in any doubt, consult your vehicle repair manual for exact torque specifications.
Part 4 of 4: Fill with new transmission fluid
Step 1. Replace the transmission drain plug (if equipped).. Reinstall the gearbox drain plug and tighten it until it stops.
Step 2: Remove Jack Stands. Jack up the car in the same place as before. Remove the jack stands and lower the car.
Step 3: Locate and remove the transmission dipstick.. Locate the transmission dipstick.
As a rule, it is located on the side of the engine towards the rear and has a yellow or red handle.
Remove the dipstick and set it aside.
Step 4: Fill with transmission fluid. Using a small funnel, pour transmission fluid into the dipstick.
Consult your vehicle repair manual for the correct type and amount of fluid to add. Most auto parts stores can provide this information as well.
Insert the dipstick again.
Step 5: Let the engine warm up to operating temperature. Start the car and let it idle until it reaches operating temperature.
Step 6: Check the transmission fluid level. With the engine running, move the gear selector to each position while keeping your foot on the brake pedal. With the engine running, return the vehicle to the park position and remove the transmission dipstick. Wipe it off and re-insert. Pull it back out and make sure the liquid level is between the "Hot Full" and "Add" marks.
Add fluid if necessary, but do not overfill the transmission or damage may result.
- Attention: In most cases, the transmission fluid level should be checked with the engine running. Consult your owner's manual for the correct procedure for your vehicle.
Step 7: Remove the wheel chocks.
Step 8. Drive the car and check the fluid level again.. Drive the car for a couple of miles or so, then check the fluid level again, topping up as needed.
Performing a transfer service can be a messy and difficult job. If you prefer to have the work done for you, call AvtoTachki specialists.