How to tint a car window
Content
Window tinting is one of the most popular car tuning services today. It is used for several reasons, including:
- Improved visibility by reducing glare and bright sun
- Privacy while you are inside your car
- Solar UV Protection
- Security against theft of your belongings
Your windows can be tinted in three different ways, as shown in the table below:
- Functions: Percent visible light transmission (VLT%) is the amount of light that passes through the tinted glass. This is the exact measurement that law enforcement uses to determine if window tinting is within legal limits.
You may only need to tint one window. A situation may arise when:
- Window replaced due to vandalism
- Window tint peeling off
- Window tint was scratched
- Bubbles formed in window tinting
If you only need to set the window tint on one window, match the window tint as closely as possible to the rest of the windows. You can get tint and VLT% color samples and compare them to your windows, have a tint specialist or law enforcement officer measure your VLT%, or find the original window tint specifications on the invoice from the original installation.
- FunctionsA: Always check local regulations to ensure that your glass tint meets legal requirements. Check out a resource like this.
Necessary materials
- Clean cloth
- Razor blade or sharp knife
- Razor scraper
- Residue remover
- Scotch
- A small scraper
- Atomizer with distilled water
- Wiper
- window tint film
Part 1 of 3: Prepare the Window Surface
You will need to make sure that the inside surface of the window is free of dirt, debris, streaks, and old window film.
Step 1: Remove any existing window tint. Spray window cleaner on the window and use the scraper from the edge to clean it.
Hold the scraper at a 15-20 degree angle to the glass and clean the glass forward only.
Make sure the surface you are cleaning is smeared with window cleaner, which acts as a protective barrier against scratches on the glass.
- AttentionA: Old window tint that has been exposed to the sun is the hardest to remove and will take some time to remove.
Step 2: Remove residue from the window with window cleaner.. Use a clean rag dampened with a residue remover and rub the stubborn spots with your fingertip.
Step 3: Thoroughly clean the window. Spray glass cleaner onto a clean rag and wipe the window until there are no streaks.
A vertical movement works best followed by a horizontal movement. Lower the window slightly to clear the top edge that fits into the window guide.
Now everything is ready for applying the tint film on the windows. There are two options for applying tint film to windows: using a roll of tint film that needs to be cut and installed, or a pre-cut piece of film.
Part 2 of 3: Cut the window film to size
- Attention: If you are using a pre-cut tint film, skip to part 3.
Step 1: Cut the film to size. Expand the tint piece larger than the window and cut it off with a knife.
Step 2: Attach a piece of film to the window. After lowering the window a couple of inches, line up the top edge of the tint film with the top of the glass.
The rest of the film should overlap on the sides and bottom.
Attach the tint film securely to the windows with adhesive tape.
Step 3: Cut the tint film with a sharp knife.. Use the freehand method and remember to leave equal gaps around.
The edge of the window tint should be about ⅛ inch from the edge of the glass. At this stage, leave the bottom of the shade long.
Step 4: Cut the film along the marked line.. Remove the film from the window glass and cut along the cut line.
Be careful and precise as imperfections in the cuts can be seen.
Step 5: Check the trim and trim the bottom edge of the film.. Reattach the film to the window.
Raise the window all the way and check if the tint film fits.
After the window is rolled up to the very top, trim the bottom edge of the tint film tightly to the bottom edge.
Part 3 of 3: Apply window tint film
- Functions: Always pre-tint the window before applying to the window, even if you purchased pre-cut film, to make sure you have the correct size.
Step 1: Wet the inside of the window with distilled water.. The water acts as a buffer layer when adjusting the position of the tint film on the glass and activates the adhesive on the tint film.
Step 2: Carefully remove the protective tint film from the windows.. Avoid touching the adhesive side of the film as much as possible.
The adhesive will be exposed, and dust, hair, or fingerprints that touch it will remain permanently in the window tint.
Step 3: Apply the adhesive side of the window tint to the wet glass.. Place the film on the window where it should be and hold it carefully in place.
The edges will have a small ⅛ inch section where the window tint won't hit so it doesn't roll into the window groove where it can flake off.
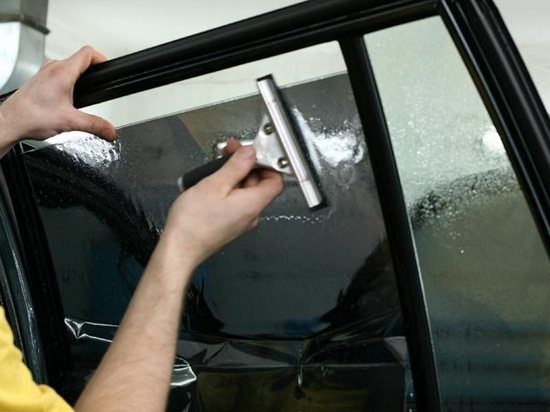
Step 4: Remove air bubbles in the paint. Using a small scraper, carefully push trapped air bubbles out to the outer edges.
Start in the middle and move around the window, pushing out air bubbles. At this time, water will also be pushed out from under the window film; just wipe with a cloth.
When all the bubbles are smoothed out, the window tint will have a slightly distorted, wavy appearance. This is normal and will smooth out when the window tint dries or gets warm in the sun.
Step 5: Let the window tint dry completely.. Wait seven days for the window tint to completely dry and harden before lowering the windows.
If you happen to roll down a window while the tint is still wet, it may peel or wrinkle and you will need to redo your window tint.
Do-it-yourself window tinting is an inexpensive option, although a professional installer produces the best results. If you are having difficulty or are uncomfortable with tinting your windows yourself, it may be best to find a window tinting shop.