Kia sorento valve
Content
Checking and adjusting valve clearances on a 2,0 liter engine. - G4KD and 2,4 liters. – G4KE The valve clearances must be checked and adjusted with a cold engine (coolant temperature 20˚C) with the cylinder head mounted on the block.
1. Remove engine cover (A).
2. Remove the cylinder head cover.
- Disconnect the ignition coil connector and remove the ignition coil.
- Disconnect the DCS cable (crankcase ventilation) (B).

Checking and adjusting valve clearances on a 2,0 liter engine. - G4KD and 2,4 liters. - G4KE - Disconnect the ventilation hose (A).
Checking and adjusting valve clearances on a 2,0 liter engine. - G4KD and 2,4 liters. – G4KE – Loosen the fixing screws and remove the cylinder head cover (A) together with the gasket.
Checking and adjusting valve clearances on a 2,0 liter engine. - G4KD and 2,4 liters. – G4KE H. Set the No. XNUMX piston to top dead center on the compression stroke. For this:
- Rotate the crankshaft pulley and align the pulley mark with the "T" mark on the plate as shown.
Checking and adjusting valve clearances on a 2,0 liter engine. - G4KD and 2,4 liters. - G4KE - Check and make sure that the mark on the camshaft sprocket (A) is aligned in a straight line with the surface of the cylinder head. If the hole does not line up with the mark, rotate the crankshaft 360˚.
4. Checking and adjusting the clearances in the valves of the 2,0 liter engine. - G4KD and 2,4 liters. – G4KE Measure the valve clearance. For this:
- Check the valve marked in the photo (cylinder #1, TDC/compression). Measure the valve clearance.
- Use a feeler gauge to measure the clearance between the cam and the base circle of the camshaft. Write down the measurements. They will be needed to determine the required position of the replacement cam. Engine coolant temperature 20˚С.
Maximum allowed free space:
0,10 - 0,30 mm (inlet),
0,20 - 0,40 mm (outside).
Checking and adjusting valve clearances on a 2,0 liter engine. - G4KD and 2,4 liters. - G4KE - Rotate the crankshaft pulley 360° and align the groove with the "T" mark on the lower timing chain cover.
- Check the valves marked in the photo (cylinder number 4, TDC / compression). Measure the valve clearance.
Checking and adjusting valve clearances on a 2,0 liter engine. - G4KD and 2,4 liters. – G4KE 5. Adjust intake and exhaust valve clearances. For this:
- Set the piston of cylinder No. 1 to TDC on the compression stroke.
- Mark the timing chain and camshaft sprockets.
- Remove the screw (A) from the service hole of the timing chain cover. (The bolt can only be installed once).
— Checking and adjusting the clearances in the valves of the 2,0 liter engine. - G4KD and 2,4 liters. – G4KE Insert the special tool into the service hole of the timing chain cover and release the latch.
-Checking and adjusting the backlash in the valves of the 2,0 liter engine. - G4KD and 2,4 liters. – G4KE Remove the front bearing caps (A) from the camshafts.
- Remove the exhaust camshaft bearing cap and the exhaust camshaft itself.
- Remove the intake camshaft bearing cap and the intake camshaft itself.
Support the timing chain when disconnecting it from the camshaft sprocket.
- Secure the timing chain by linking it.
Be careful not to drop any parts on the timing chain cover.
Checking and adjusting valve clearances on a 2,0 liter engine. - G4KD and 2,4 liters. – G4KE: Measure the thickness of the removed cam with a micrometer.
- Calculate the thickness of the new cam, the value should not exceed the standard.
See also: Misfires: symptoms, causes, step-by-step diagnostics
Valve clearance (at an engine coolant temperature of 20°C). T is the thickness of the removed cam, A is the measured valve clearance, N is the thickness of the new cam.
Input: N = T [A - 0,20 mm].
Outlet: N = T [A - 0,30 mm].
— Choose the thickness of the new cam as close to the standard value as possible.
Gasket size should be from 3 to 3,69 ± 0,015 mm, size number is 47.
- Install a new cam in the cylinder head.
- While holding the timing chain, install the intake camshaft and timing chain sprocket.
Align the marks on the timing chain and camshaft sprockets.
- Install the intake and exhaust camshafts.
- Install the front bearing cap.
- Install the service hole bolt. Tightening torque 11,8–14,7 Nm.
— Checking and adjusting the clearances in the valves of the 2,0 liter engine. - G4KD and 2,4 liters. – G4KE Turn the crankshaft 2 turns clockwise and move the marks (A) on the crankshaft sprocket and camshaft.
- Check valve clearance again.
Valve clearance (at engine coolant temperature: 20˚C).
Inlet: 0,17-0,23 mm.
Outlet: 0,27–0,33 mm.
Kia sorento valve adjustment
to begin with, we draw conclusions from 4WD58 after removing the cylinder head:
1 if the valves are clamped unmistakably remove the heads and grind. And in any case, take off your ears once and forget about it for 100 thousand km.
2. It’s not worth saving on oil, after good oil everything is clean inside.
3. Matching cups do not wear out.
4. Why are there lenses with a pitch of 0,015 in the original? It is not clear, all the same, only 0,05 can be caught with a probe
5. New glass does not save, after lapping the valves, even the thinnest catalog with a thickness of 3000 mm turns out to be too thick.
6. Chains pass 150 thousand without problems. If good oil - tensioners, shock absorbers and everything else - you can leave the old one (although I bought everything new in advance and installed new one). I couldn’t take a picture of the chains, they don’t want to take a picture, they add up
7 for 80 thousand mileage, blocks, pistons and everything else is perfect. There is no wear on the sleeves, not even felt with a fingernail.
8. Oil scraper so 100 thousand km.
9. The tuning procedure is very tedious and unpleasant, it takes a lot of time and nerves. If it's costing you dearly, it's best not to start. Camshafts must be removed once ... 15-20 for sure. EACH !
After polishing the heads, they were washed and purged. After that, they began to change the oil scrapers ... This is garbage, only pliers were saved, specially sharpened for them, and with half-meter tubes welded to the handles. Otherwise, don't download. Just the brute force of a hammer. The new ones are much easier to install.

The valves were dried, it is not difficult at all - there are many threaded holes in the head, and the fitting is very conveniently attached to any valve. In the process of breaking-breaking, I lost 2 firecrackers. I knew I could do it, so I bought 10 new ones in advance, two of them came in handy
Now you can customize. In words, the process is simple: we take glasses, arrange them, measure the area, calculate new glasses, assemble them with new ones .. yes, NOW!
I had two sets of glasses, mine is clean and mine is not a little dirty, I had to wash everything. The fact is that for verification it is necessary to find the thinnest glasses so that at least some kind of gap appears. It is unlikely that in a couple of hours they collected 6 glasses, with which there was at least some kind of gap.
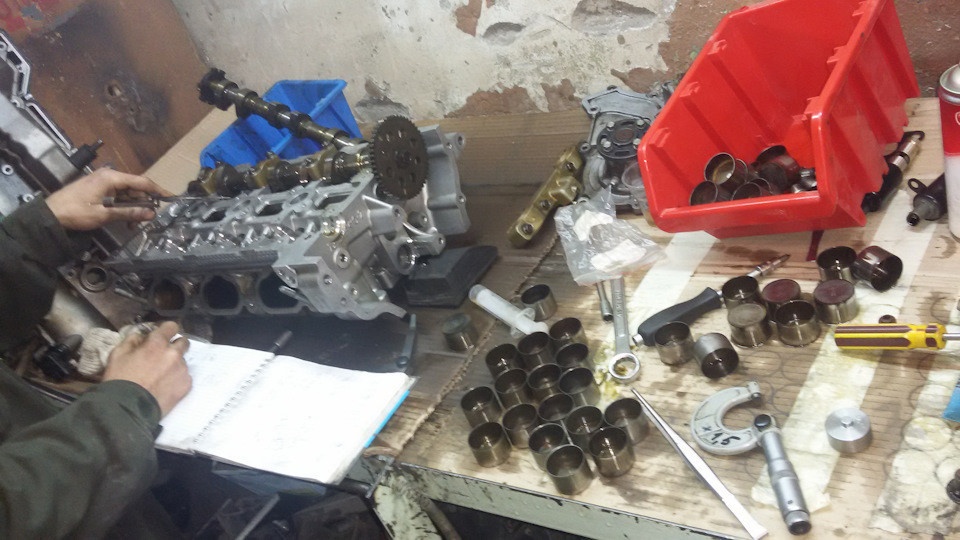
We put these cups in turn under 4 different camshafts and measured the gaps twice with feeler gauges. All results are recorded. The "charm" is that there are two heads, left and right. And it's easy to get confused, the brain thinks that it is correct, it looks from the radiator to the engine, to the right. Fig, go in the direction of travel. It took me a long time to figure this out...
According to the regulations, the valves of the Kia Sorento 2006 model year should be adjusted every 90 km; with HBO installed, it is recommended 000 times more often.
The KIA Sorento G6DB engine has a V6 engine and a volume of 3,3 liters. This work is done to ensure that the engine valves work in acceptable conditions, the fact is that the valves are cooled at rest.
The rest time is the time when the valves do not open or close. In order for the valves to close correctly, especially at very high heating temperatures and for a short time, the Sonata Veracruz Santa Fe Carnival Sorento needs a so-called thermal gap, and the smaller the better, but over time it increases due to wear or vice versa decreases, it depends specifically on the working conditions, so you need to check the gaps and, if necessary, adjust, that is, adjust. On the Sorento, this is done by installing Kia Sorento valve lifters of the desired thickness. Correctly install exactly the original Kia hydraulic lifters on the 3.3 DOHC CVVT V6 4W engine.
More accurate KIA engine specifications
| Year of car manufacture | 2006-2021 yyy |
| Engine power | 3342 sm2 |
| engine power | 248 horsepower |
| cylinder order | 1-2-3-4-5-6 |
| Candles | IFR5G-11 |
| Thermal play at the entrance | 0,17-0,23 mm |
| Thermal gap at the outlet | 0,27-0,33 mm |
Intake valve opening 14 degrees / 62 degrees.
Exhaust valve opening 42 degrees/16 degrees.
checked on a cold engine, the system is classic and similar to common Kia cerate engines, the gap is checked with a flat feeler gauge between the camshaft and the valve lifter, respectively, for each cylinder, the difference is only in the number of camshafts, valves and timing chain 2 pcs.
The step should be 0,17-0,23 mm, and the step 0,27-0,33 mm.
When the engine is running on gas, the clearances at the outlet, as a rule, decrease.
To change the gaps, flat feelers are used, to adjust the KIA Sorento 3.3 DOHC CVVT V6 valves, it is necessary to replace the Kia valve cup with a pusher of the required thickness, for this the “front end” is disassembled, the camshaft drive chain is removed, the camshaft bearings are unscrewed, then the camshafts are removed, under them there is valve lifters to be removed. After measuring the thickness of the cup with a micrometer, the necessary arithmetic is calculated taking into account the thermal gap. When disassembling, you can replace the timing chain for free, in fact, 2 of them are installed in series, it is not necessary to install a new hydraulic tensioner, of course, if the old one is in good condition and has no visible signs of wear.
glasses of different sizes filled inside.

I put on my glasses and somehow relaxed… Yes, and there was a lot of glue on the 4WD58… And winter came, I got tired, I decided to figure out what was taking me and where in terms of adjusting the valves. To begin with, I will show you this video .. watch with sound ...
Something seemed to me that one of the 5 cylinders is not working, although it pulls and starts up perfectly! He started digging! I have a diagnostic start, he always travels with me in the car ...


Checking and adjusting the valve clearance in a 2,0 liter engine. - g4kd and 2,4 liters. – g4ke
Checking and adjusting the valve clearances must be carried out on a cold engine (coolant temperature 20 ° C), with the cylinder head mounted on the block.
1. Remove engine cover (A).
2. Remove the cylinder head cover.
- Disconnect the ignition coil connector and remove the ignition coil.
- Disconnect the DCS cable (crankcase ventilation) (B).
- Disconnect the ventilation tube (A).
- Loosen the fixing screws and remove the cylinder head cover (A) together with the gasket.
3. Set the piston of the first cylinder to the top dead center of the compression stroke. For this:
- Rotate the crankshaft pulley and align the pulley mark with the "T" mark on the plate as shown.
- Check and make sure that the camshaft sprocket mark (A) is aligned in a straight line with the surface of the cylinder head.
If the hole does not line up with the mark, rotate the crankshaft 360˚.
4. Measure the valve clearance. For this:
- Check the valve marked in the photo (cylinder #1, TDC/compression). Measure the valve clearance.
- Use a feeler gauge to measure the clearance between the cam and the base circle of the camshaft.
Write down the measurements. They will be needed to determine the required position of the replacement cam. Engine coolant temperature 20˚С.
Maximum allowed free space:
0,10 - 0,30 mm (inlet),
0,20 - 0,40 mm (outside).
- Rotate the crankshaft pulley 360˚ and align the groove with the "T" mark on the lower timing chain cover.
- Check the valves marked in the photo (cylinder number 4, TDC / compression). Measure the valve clearance.
5. Adjust clearances on intake and exhaust valves. For this:
- Set the piston of cylinder No. 1 to TDC on the compression stroke.
- Mark the timing chain and camshaft sprockets.
- Remove the screw (A) from the service hole of the timing chain cover. (The bolt can only be installed once).
- Insert the special tool into the service hole of the timing chain cover and release the latch.
- Remove the front covers (A) from the camshafts.
- Remove the exhaust camshaft bearing cap and the exhaust camshaft itself.
- Remove the intake camshaft bearing cap and the intake camshaft itself.
Support the timing chain when disconnecting it from the camshaft sprocket.
- Secure the timing chain by linking it.
Be careful not to drop any parts on the timing chain cover.
- Measure the thickness of the removed cam with a micrometer.
- Calculate the thickness of the new cam, the value should not exceed the standard
Valve clearance (at an engine coolant temperature of 20°C). T is the thickness of the removed cam, A is the measured valve clearance, N is the thickness of the new cam.
Input: N = T [A - 0,20 mm].
Outlet: N = T [A - 0,30 mm].
— Choose the thickness of the new cam as close to the standard value as possible.
Gasket size should be from 3 to 3,69 ± 0,015 mm, size number is 47.
- Install a new cam in the cylinder head.
- While holding the timing chain, install the intake camshaft and timing chain sprocket.
Align the marks on the timing chain and camshaft sprockets.
- Install the intake and exhaust camshafts.
- Install the front bearing cap.
- Install the service hole bolt. Tightening torque 11,8–14,7 Nm.
- Turn the crankshaft 2 turns clockwise and move the marks (A) on the crankshaft and camshaft sprockets.
- Check valve clearance again.
Valve clearance (at engine coolant temperature: 20˚C).