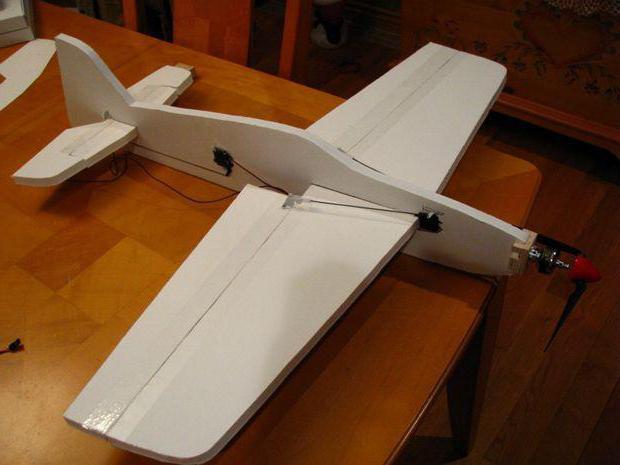
KOWALIK - a model of a glider made of cardboard and a bar for take-off from a hand
Content
Flying models are undoubtedly the most popular among modellers, regardless of age. This time we will make a small and seemingly simple model, but, like with her living namesake, you will have to try a little to enjoy her beautiful view in all its glory.
The Eurasian nuthatch (Sitta europaea) can be found in old forests, large parks and gardens. Similar in size to a sparrow. The wingspan ranges from 23-27 cm. In addition to the color of the plumage (bluish-gray wings and a brown-orange belly), it also resembles a sparrow in terms of body structure (we won’t be surprised if we find out that it belongs to the same order of sparrows). It has a massive stocky body and an elongated head with a rather long beak, from which a long black stripe runs through the eye. It has a short tail and legs ending in long, very pugnacious claws. His lifestyle is more like a woodpecker, although he does not make holes in trees. Most often it can be seen on the trunks and branches of trees, where, clinging to its claws, it quickly runs up and down, and also upside down! It can also walk on the underside of a branch. No other bird in Europe can do this and only a few species in the world can match it. This is a sedentary bird, it does not migrate in principle, it does not fly away for the winter. It feeds on insects and their larvae, hollowed out from under the bark with a sharp beak. Stocks - for a rainy day, it squeezes into the cracks in the bark of a tree or into a hollow in the ground. In winter, together with tits, it flies to the vicinity of settlements to take advantage of our help. In Poland, this species is under strict protection. You can learn more about this cute bird, for example, here:
A little about the genealogy and properties of the model
It should be noted here that, unlike real birds, our cardboard KOVALIK is very closely related to the KOLIBER, a model glider of a similar size and design, developed in 1997 and tested by hundreds of young modelers. A detailed description of its design was published in the monthly RC Przegląd Modelarski in issue 7/2006 (it can also be found at www.MODELmaniak.pl). Although it was originally designed for recreation, it is also great for training future radio pilots and for domestic or local competitions in this model group (by the way, we won all the medals in the Wrocław flying club championship in the F1N class cardboard model subclass). in 2002 and 2003). Both models are intended for basic training in car workshops. They require a basic knowledge of flight theory and are therefore not recommended for very young designers (under 12 years old), especially if they cannot count on the support of an experienced aircraft modeler. The advantage of both of these designs is the variety of options adapted to the different possibilities of young modellers (variants with or without a cabin, different ways of attaching the horizontal tail). Another advantage is the ability to quickly manufacture for the needs of the model shop, sets of cardboard elements can be successfully printed on A4 format on a home or club printer.
Materials, tools, techniques
The main material for the manufacture of this model is fairly rigid cardboard weighing about 300 g/m.2 this means that ten sheets of A4 should weigh approximately 187g. (Note: Good quality technical blocks have a density up to 180g/mXNUMX.2, cheaper about 150 g/m2. Then a definite solution may be to carefully glue the pages in half - in the end, A5 format is enough. Is it a good idea to use blocks for artwork? have a slightly larger format and weight 270 g/m2 of these, a model was made to illustrate this article. It can also be cardboard with a density of 250g/mXNUMX.2, is sold on A4 sheets and is used primarily as a back cover for bound (photocopier) documents. As for the color of the cardboard, the real bird has a gray-blue back and wings (hence the choice for the exhibition model), although of course the color of the cardboard is absolutely free. In addition to cardboard, some wood in the form of a pine lath 3 × 3 × 30 mm, a piece of balsa 8 × 8 × 70 mm (for a workshop, it is worth making a simple device that will make it easier to cut them with a small circular saw and the remains of balsa or plywood 3 mm thick). dimensions approximately 30 × 45 mm (can also be made from citrus boxes). Additionally, elastic band, adhesive tape and wood glue (quick-drying, for example Magic). Tools: pencil, ruler, scissors, wallpaper knife, sandpaper.
To simplify the model, you can download it for self-printing. After it is printed, you need to transfer the drawings to cardboard. This can be done in several ways: - use carbon paper - after redrawing the left side with a pencil (it is enough only in critical places, i.e. in the corners and at the bends of individual elements) - cut out individual elements and mark them on the target material - use a printer, suitable for printing on cardboard, or a suitable plotter.
Airframe assembly
After preparing all the materials, tools and transferring the drawings of the elements to the target cardboard, we proceed to carefully cutting out the wings, plumage and portholes of the glider cabin (that is, a professional limousine). It is especially important to maintain the correct line of the wings along the axis of symmetry of the model, i.e. where they will then join. After cutting, we iron (smooth) the lines of folds on the wings and tail.
On plywood and balsa we apply the contours of the cabin and underwing block according to the printed template. The first element is best cut with a ball; to cut the second, you only need a wallpaper knife and a little attention and care. A pine lath for a hull beam can be cut, for example, with a sharp knife (for wallpaper), cutting it in a circle, and then carefully breaking it off. After cutting and polishing, glue the cockpit and fuselage beam, leaving them under the rubber band. In the meantime, we'll move on to the next step that many young modellers have the most trouble with connecting wings. First, check the correctness of the cut and try on the elements dry.
The next step is to stick tape on one of the doors halfway across. The ends of the tape should protrude slightly beyond the front (attacking) and rear (rear) parts of the wing. At the bend of the sash profile, make an incision with scissors half the width of the adhesive tape. Then the second wing is partially glued to the expanded wing with adhesive tape (therefore, it bends a little). Only after the back of the second sash is glued is the front of the sash glued in exact alignment with the two elements. When placed on a table, both wingtips should be at the same height (about 3cm). After this operation is completed, the wings must have both a zenith (an appropriate camber along the wings) and a profile (a camber across the wing). Finally, glue the ends of the tape to the front and back of the wings. The most common mistake in constructing this type of wings is flat molding them.
After the wings are properly glued, glue the balsa underwing bar exactly in the center and leave to dry. At this time, the tails are glued to the already glued fuselage, first horizontal, then vertical, according to the selected option shown in the drawing. Attention! Wings cannot be glued to the fuselage! This has already been proven many times and makes glue almost every less successful landing. Meanwhile, the flexible mount only needs to be adjusted before the next takeoff. It is better to fasten the wings with one elastic band (through the beak, above the wings, under the tail, behind the wings and above the beak). The adjustment of the center of gravity is also carried out without problems. However, in order to keep the wing in position after hard landings, two vertical lines are marked on the underwing block and on the fuselage beam, the position of which should be checked before each takeoff. Fast keeps to the end. When the cabin does not require weighting, the last two cardboard elements are simply glued to it. However, when the cabin is made of too light material (lightweight plywood or balsa), the ballast holes should be hidden under glass. Ballast can be lead shot, small metal washers, etc. When we are not assembling the booth, the ballast is a lump of plasticine glued to the nose of the model.
TRAINING TO FLY
Standard wings are set at a distance of ~ <> 8 cm from the bow. We check the symmetry (or supposed asymmetry) of the location of the elements of the model. We balance the model by supporting the wings, usually under the fold of the airfoil. For test flights, it is better to choose calm weather or a gym. Holding the model under the wing, throw it sharply down.
FLIGHT ERRORS:
- the model aircraft raises (track B) the elevator down or throws the model at a smaller angle - the model aircraft spirals (track C) is most often the result of misalignment (i.e. twisting) of the wing or wings due to improper assembly during transportation or collision with obstacles, the model aircraft turns on the wing with a lower angle of attack (i.e. turned more forward) check and correct the wing twist according to the above rule - the model aircraft turns flat (track D) deflect the rudder in the opposite direction - the model aircraft dives (track E) smoothly tilt the elevator up or throw the model further.
COMPETITIONS, GAMES AND AIR ENTERTAINMENT
With KOWALIK you can participate in the annual F1N model competition organized by the Aero Club of Poland (although, as you must admit, it is not completely equivalent to well-made balsa or foam gliders of this class), in your own classroom, school and club competitions (distance competitions). ), flight time or landing accuracy). You can use it to perform basic aerobatics and, above all, learn the flight rules that also govern larger models (including remotely controlled ones). Due to relatively delicate wings, blacksmiths quickly learn the influence of ailerons on the flight path, which is why they are rather unsuitable for complete laymen (for example, at festivals). Using reduced or enlarged KOWALIK templates, you can also create other models and attractive rewards… A technique in which I also offer help and spiritual support. Happy flying!