Installation of an expeditionary roof rack at home
Content
The paths of autotourists lie far from civilization: through forests, mountainous areas, sands. The trunk protects the roof, windshield and hood of the all-terrain vehicle from knots, thick branches. To do this, between the kengurin or the front fenders and the trunk, pull the wood chippers - steel cables with a diameter of 2 cm.
Traveling on off-road vehicles is not complete without a large amount of large cargo. If there is not enough space in the luggage compartment of the car, use the roof of the car. In retail chains, you can easily buy a standard product for transporting bulky items, however, it is not difficult to make an expeditionary roof rack with your own hands. Make an exclusive design at your own discretion, think over the functionality taking into account the experience of previous trips.
Expedition car trunk: purpose, functions, fasteners
For hunters, fishermen, reconnaissance geologists, the upper “superstructure” of a car is needed to transport large-sized equipment (entrenching tools, oars, skis, spare wheel). This is important, but not the only purpose of the power trunk.
The paths of autotourists lie far from civilization: through forests, mountainous areas, sands. The trunk protects the roof, windshield and hood of the all-terrain vehicle from knots, thick branches. To do this, between the kengurin or the front fenders and the trunk, pull the wood chippers - steel cables with a diameter of 2 cm.

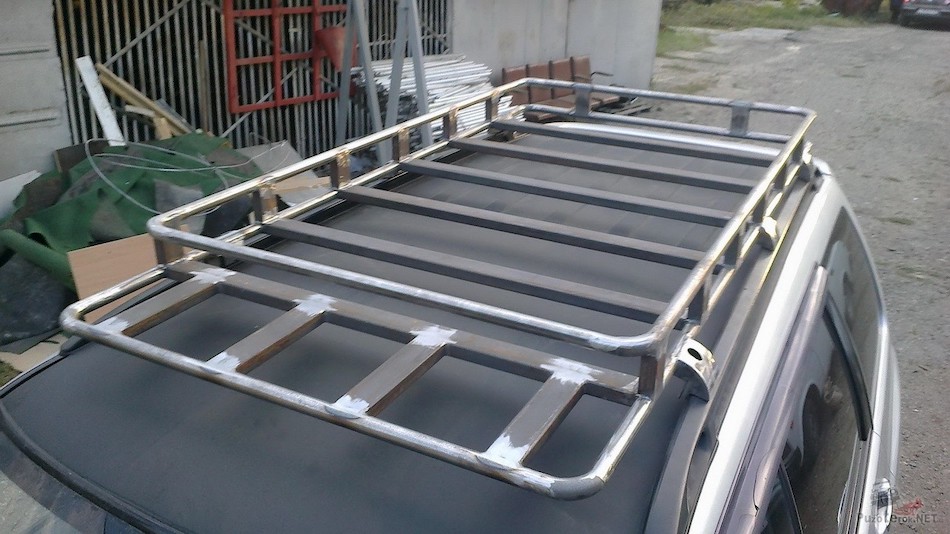
Expedition roof rack
Place additional lighting devices, radio communication antennas on the structure of the cargo compartment. Please note that the car will "grow" by 30-40 cm, and the trunk itself, together with the equipment being transported, will put pressure on the roof weighing 150-200 kg. Therefore, pay special attention to fastening the structure: do not place fasteners over doors, windows and gutters. A reliable place of attachment is the power joints of the body. In this case, the number of connection points with the car must be 6 or more.
If you decide to make an expeditionary roof rack with your own hands, do not allow the dimensions of the structure to exceed the width of the car.
Materials and tools for a car expedition trunk
On Russian off-road, most of all domestic all-terrain vehicles can be found all-wheel drive Chevrolet Niva. To build an expeditionary roof rack with your own hands for this car, you need to determine the actual weight of the product.
Select the material based on the theoretical unladen mass of the structure:
- Aluminum. Its especially strong grades and alloys are distinguished by lightness, durability and excellent performance (flexibility, strength).
- Profile thin-walled pipes. Their main characteristics are: light weight, high tensile strength.
- Black metal. The accessory comes out monumental, heavy, but quickly corrodes.
- Stainless steel. The large weight of the trunk is offset by an attractive appearance.
For self-manufacturing of attribute of travelers, tools are needed:
- pipe bender with hydraulic or electromechanical drive;
- cooking apparatus;
- diamond cutting machine;
- sets of keys and screwdrivers;
- pliers;
- cap heads.
Do-it-yourself manufacturing and installation on the roof of a car
Start work by measuring the roof. Then follow the algorithm:
- Create preparatory documentation - a drawing. Accurate calculations are needed so that the do-it-yourself expeditionary roof rack of the Chevrolet Niva does not vibrate or make whistling sounds. In the diagram, mark the distances between the fasteners.
- Weld a rectangular platform and sides. This is the base, it includes the frame and the bottom.
- Construct the frame from pipes with a diameter of 20x20 mm: weld 2 base beams, connect them with a railing, lay 2-3 stiffening ribs from profile iron.
- Make the bottom mesh or from a solid aluminum sheet. This will not affect the weight of the device.
- Cover the "expeditor" with a primer.
- Paint the frame-lattice structure with black paint.
- Weld the platform.

The process of installing the trunk with your own hands
In the course of work, carry out your plans: for example, make the sides completely or partially removable, divide the bottom into sections of the sizes you need, provide belts for fixing the load. Don't forget about aerodynamics by rounding the corners by arching the front.
Do-it-yourself installation features of the expedition roof rack on the Niva Chevrolet roof
The concept of the Niva Chevrolet car is conducive to active recreation and hiking with great equipment. When the upper cargo compartment is welded, it remains to independently install the forwarding roof rack. It is difficult to do this alone: invite an assistant. Use the purchased adapter kit.
Your actions:
- On the roof of the Chevrolet Niva, regular places for fastenings (nests) are provided. Insert a plastic key into them, turn clockwise until it clicks.
- Remove the cover support - holes for installing fasteners will open.
- Adjust the position of the cam.
- Fix the supports with an L-shaped wrench (pillows should be at a minimum distance from the center of the SUV).
- Insert rubber gaskets into the recesses of the arcs, close the latter with plastic plugs from above.
- Mounting the expedition roof rack on the roof of the car, made at home, complete the fixation of the support covers.
At the end of the work, check how securely the fasteners are tightened.