Malfunctions and repair of the instrument panel VAZ 2106
Content
In equipping any car, one of the important nodes is the instrument panel. It contains instruments, indicator lamps and pointers, through which the control of the main vehicle systems is ensured. Owners of the VAZ 2106 can modify the dashboard with their own hands, find and eliminate possible malfunctions.
Description of the torpedo on the VAZ 2106
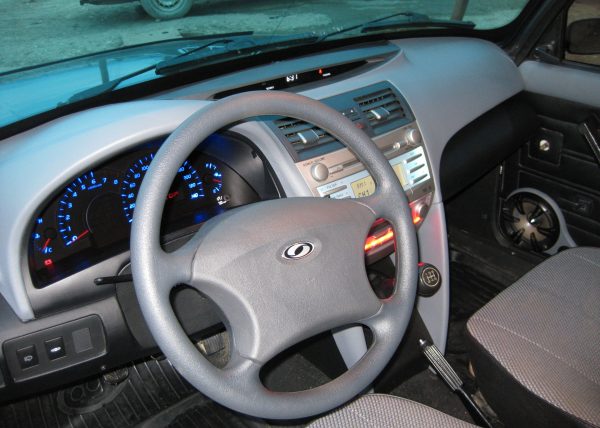
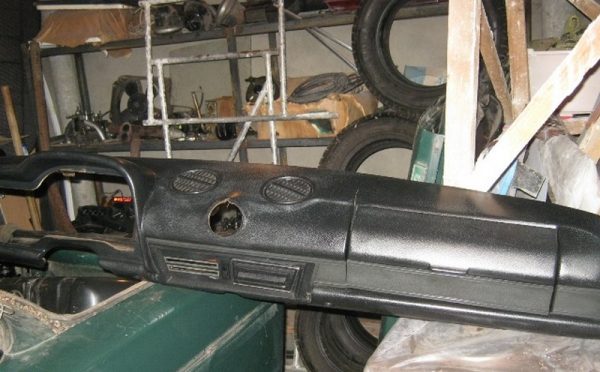
The front panel is installed in the front of the car and is a non-separable structure made in the form of a metal frame treated with polymer foam and ennobled with a finishing material. The panel houses the instrument panel, lighting controls, heater, air ducts, radio and glove compartment.
What torpedo can be put instead of the regular one
The front panel of the "Lada" of the sixth model, in comparison with modern products, does not look very attractive both in appearance and in terms of instrumentation. Therefore, many owners of the "classics" are puzzled by the question of making changes to the torpedo or replacing it. The most preferred options for front panels are products from old foreign cars. On the VAZ 2106, you can install a part from the following cars:
- VAZ 2105–07;
- VAZ 2108–09;
- VAZ 2110;
- BMW 325;
- Ford Sierra;
- Opel Kadett E;
- Opel Vectra A
Regardless of the option chosen, it is important to understand that refinement and adjustment of the selected torpedo is inevitable.
How to remove the panel
The torpedo can be dismantled for repair work, replacement or modifications. From the tools you need to prepare:
- screwdriver flat and Phillips;
- crank;
- extension;
- socket head for 10.
Dismantling is carried out in the following order:
- We take out the instrument.
- Remove the stove body.
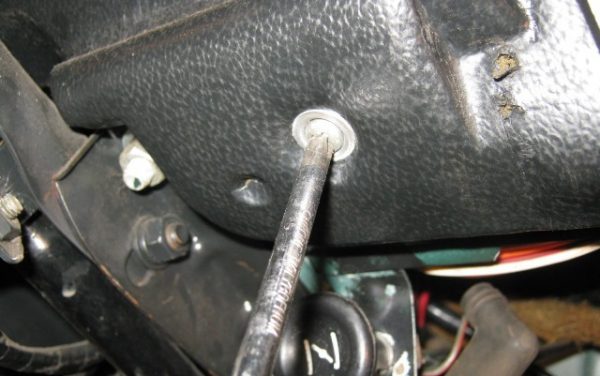
- Loosen the screws at the bottom of the panel.
 From below, the torpedo is attached with several self-tapping screws.
 - In the niche of the instrument panel, unscrew the nuts.From the inside, the torpedo is held by nuts
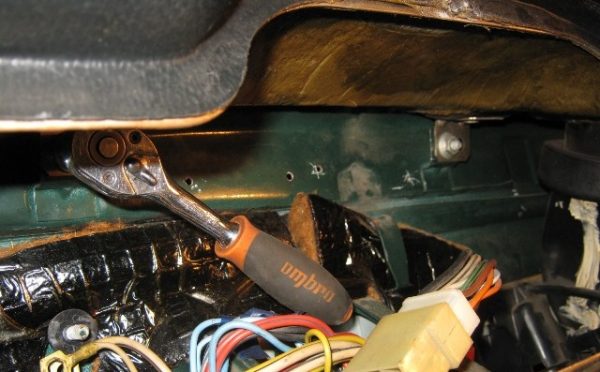
- In the cavity of the glove compartment, we unscrew another mount.Unscrew the two nuts at the installation site of the glove box.
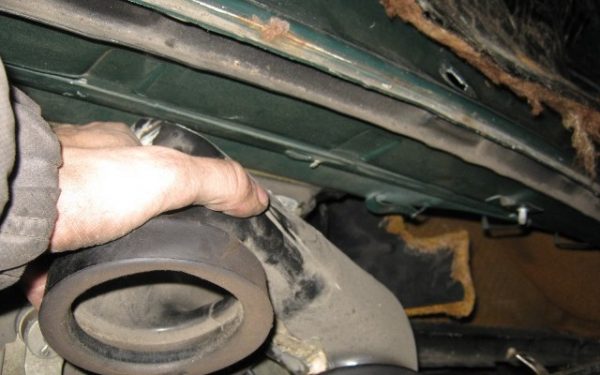
- We take the torpedo a little to the side and remove the central air duct.We take out the central air duct, slightly pushing the torpedo
- Disconnect the heater control cables.We remove the cables from the heater control levers
- Dismantle the dashboard.After unscrewing the fasteners and removing the cables, remove the panel from the car
- Installation is carried out in the reverse order.
Video: dismantling a torpedo on a classic Zhiguli

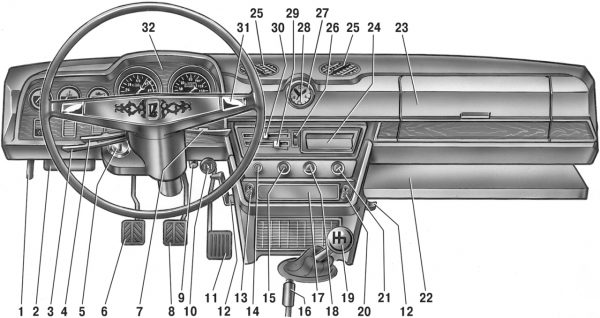
Dashboard VAZ 2106
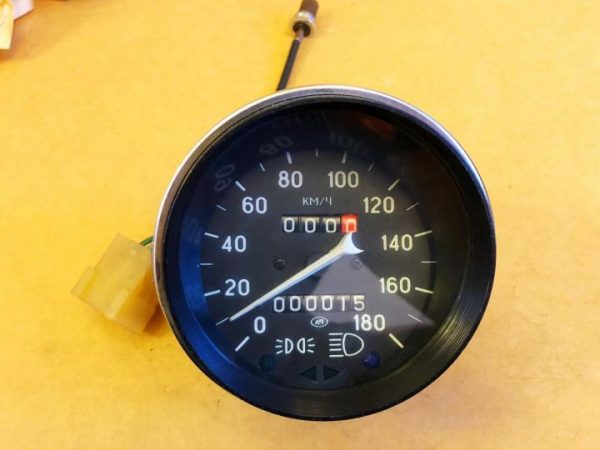
Regular tidy provides control of readings and displays the state of the main parameters of the car.
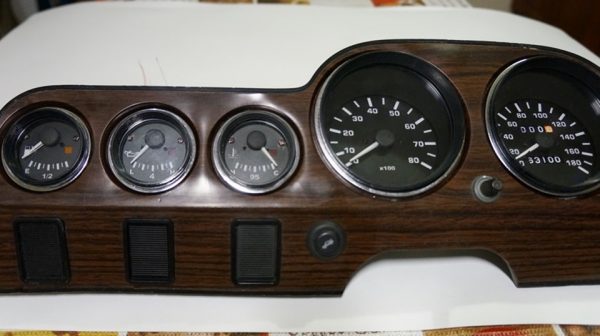
The product consists of the following list of elements:
- 5 pointer devices;
- 2 digital indicators;
- 9 indicator lights.
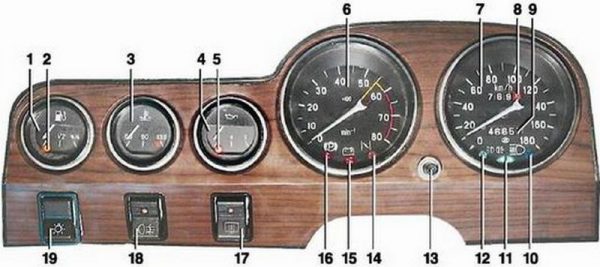
The following devices and indicators are installed in the shield:
- speedometer;
- tachometer;
- battery charging indicator;
- engine temperature sensor;
- mileage counter;
- resettable odometer;
- oil level sensor;
- oil pressure gauge;
- fuel presence sensor.
What dashboard can be installed
If for some reason the standard dashboard does not suit you, you can update it in several ways:
- finalize the shield by improving the backlight, gluing modern instrument scales;
- install tidy from another car;
- make a homemade shield with the installation of the necessary devices.
Depending on the option chosen, both the costs and the list of work that will need to be performed will depend. When choosing a dashboard from other cars, you need to take into account that on the VAZ 2106, many models may simply not be suitable not only in size, but also in connection.
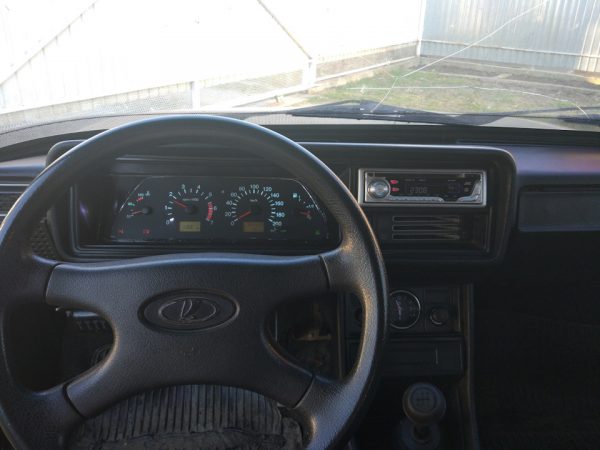
From another VAZ model
Due to the peculiar design of the "six" instrument panel, it is quite difficult to choose the right option for replacement. Some motorists are introducing tidy from the VAZ 2115, for which they change the standard front panel to the "seven" and build a new dashboard into it. Such improvements will require the purchase of additional components (speed sensor, wires, connectors), as well as the correct connection of standard wiring to the new dashboard.
From "Gazelle"
If there are thoughts about introducing a tidy from the Gazelle into the VAZ 2106, then it should be taken into account that the products have different connection schemes, sizes, and in general they are very different from each other. Therefore, you first need to think about the feasibility of such improvements.
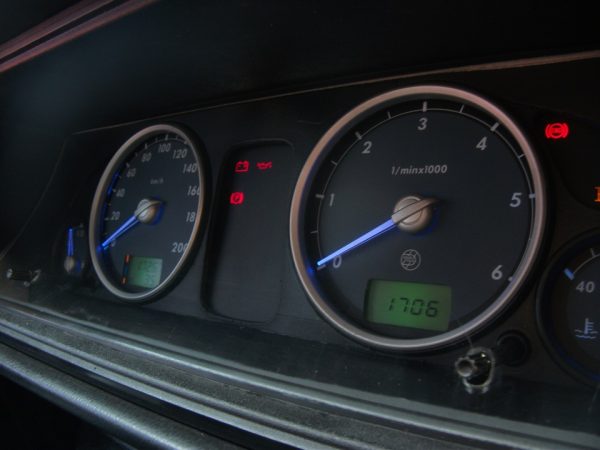
From a foreign car
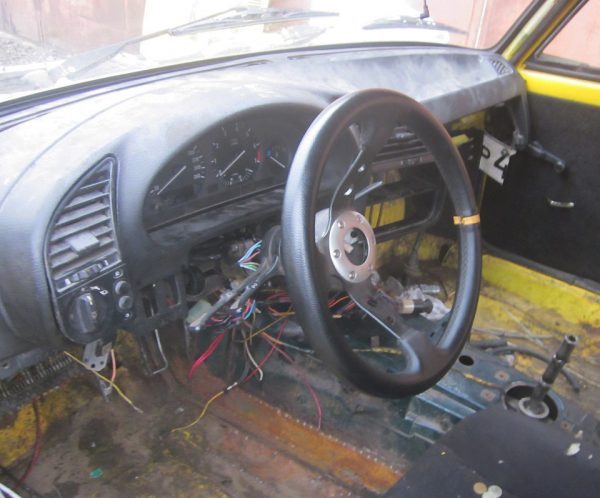
The instrument panel from a foreign car, even from an old one, will make the front panel more beautiful and unusual. However, you need to be prepared for the fact that along with the tidy, it may be necessary to replace the entire front panel. Most often, dashboards from the BMW e30 and other foreign-made cars are installed on the "classic".
Dashboard malfunctions
The instrument panel of the VAZ "six" consists of a small number of devices that may cease to function over time. The causes of breakdowns may be different, but any of them will require dismantling and partial disassembly of the shield. If one of the devices malfunctions or fails at all, driving becomes uncomfortable, because it is impossible to control one or another vehicle system. Therefore, it is necessary to monitor the serviceability of pointers and promptly eliminate the problems that have arisen.
Removing the dashboard
To dismantle the dashboard, you will need a pair of flathead screwdrivers and pliers. The procedure is performed in the following sequence:
- We unscrew the mount and remove the steering shaft cover.
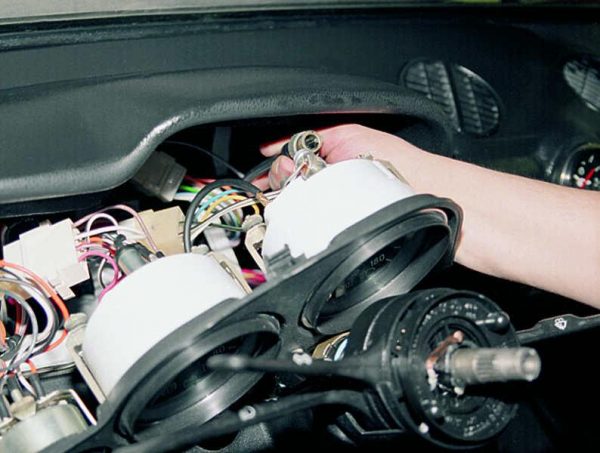
- We pry the shield first on one side, and then on the other.Screwdriver pry tidy on the right and left side
- We pull the tidy towards ourselves and unscrew the fastening of the speedometer cable.Loosen the speedometer cable
- Set the instrument panel aside.
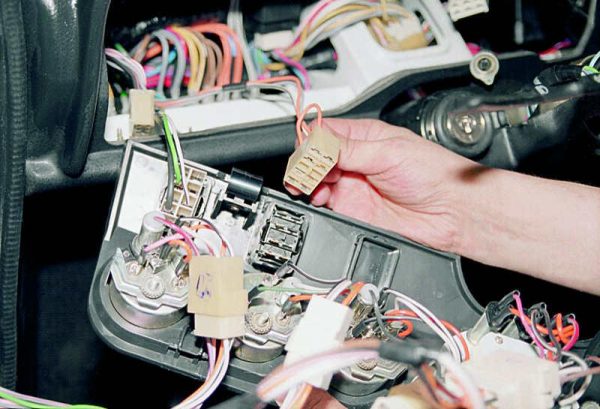
- We mark the pads with a marker and separate them.Removing the wiring harnesses
- We dismantle the instrument panel.
- After the repair, we put everything in its place.
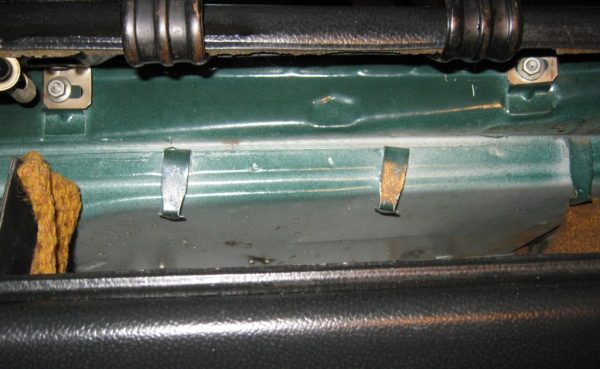
When reassembling, first install the top of the panel, and then press the bottom to snap the brackets into place.
Replacing light bulbs
If it was noticed that one of the indicators on the tidy stopped illuminating when the dimensions were turned on, then the most likely cause is the failure of the light bulb. To replace it, you will need a pair of slotted screwdrivers, and the procedure itself consists of the following steps:
- We repeat steps 1-2 for removing the dashboard.
- We find the device on which the light bulb burned out and with a simple movement of the hand we remove the cartridge from the pointer.We take out the socket with the faulty light bulb from the device.
- We turn the bulb counterclockwise and remove it from the cartridge, after which we install a new part.We change the faulty lamp by turning it counterclockwise
- We mount the tidy in the reverse order.
Checking and replacing the instrument panel lighting switch
Sometimes a situation arises when the instrument panel lighting switch stops functioning. In this case, the panel is simply not illuminated and it becomes problematic to drive a car at night. Breakdowns of the circuit breaker in most cases are caused by damage to the internal mechanism. To remove and inspect the part, you will need a flat screwdriver and a multimeter. The process is carried out as follows:
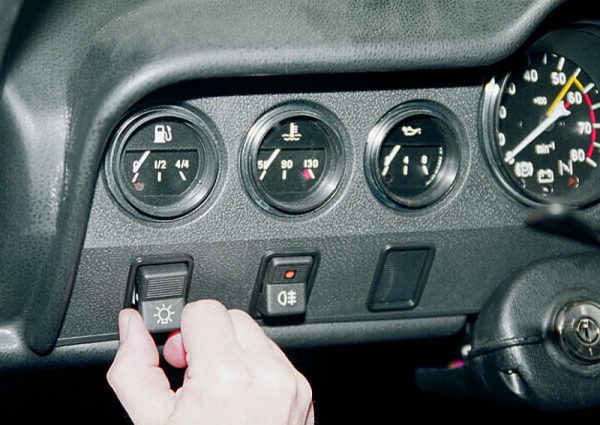
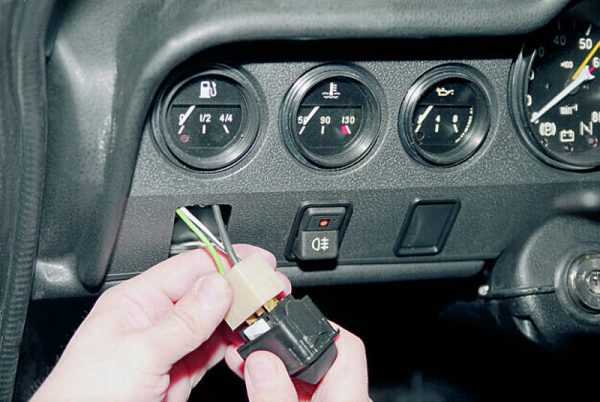
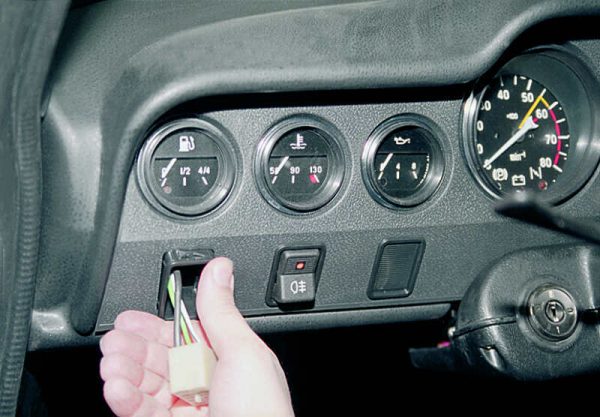
- By pulling the key, we remove the switch from the tidy.Pull the switch out of the dashboard
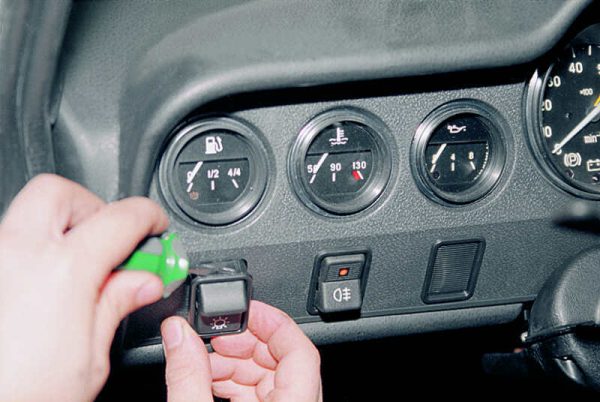
- If the element cannot be removed, pry it with a screwdriver.If the switch does not come out, pry it with a screwdriver
- We remove the block with wires.Remove the wire block from the switch
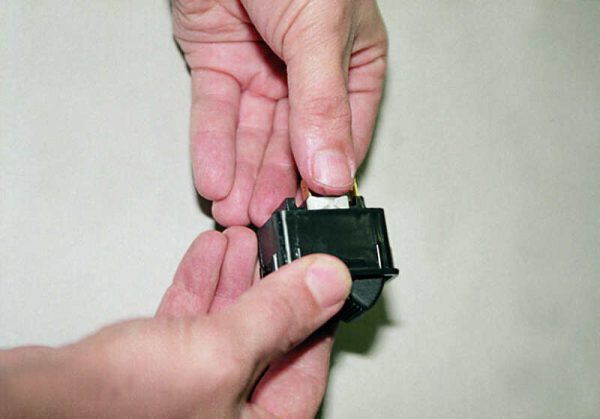
- Squeeze the latches and remove the switch.Removing the switch from the frame
- We mount the frame in the shield, having previously threaded the wires.We pass the wires into the frame and install it in place
- On the multimeter, select the dialing mode and touch the switch contacts with the probes. The working button in one position should have zero resistance, in the other - infinite. Otherwise, change the button to a known good one.
- The assembly is carried out in the reverse order.
Checking and replacing individual devices
Breakage of any of the VAZ 2106 indicators causes inconvenience. Problems are due to both the age of the car and the attitude of the owner himself towards it. Therefore, it is worth considering possible malfunctions of devices and ways to eliminate them.
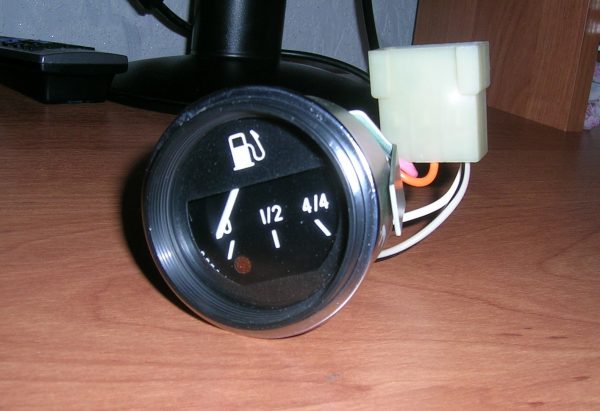
Fuel gauge
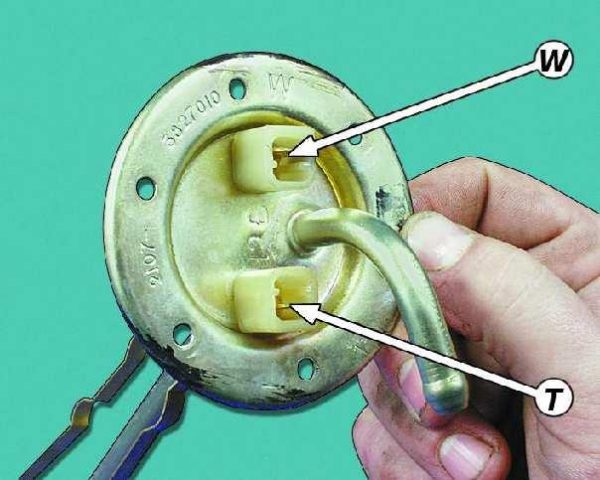
Two elements are responsible for reading the fuel level on the sixth Zhiguli model: a pointer installed in the dashboard and the sensor itself, located in the gas tank. By means of the latter, a light in the indicator is also activated, which indicates a low fuel level. The main problems of the device in question come down to sensor problems, in which the arrow constantly shows a full or empty tank. We check the mechanism as follows:
- With a constantly full tank, disconnect the pink wire from the sensor by turning on the ignition. If the arrow has moved to the beginning of the scale, the sensor is considered serviceable. If this is not the case, then the problem lies either in the pointer, or in the short circuit of the wiring to ground.
- To check the pointer, we dismantle the tidy and disconnect the gray wire with a red stripe, after which we turn on the ignition. When the arrow returns to the leftmost position, the pointer is considered to be working, and the wire is damaged.With a constantly full tank, problems are possible both in the device itself and in the wiring.
- If the arrow shows a constantly empty tank, remove the “T” wire from the sensor and close it to ground. If the arrow deviates, the sensor is considered faulty. If there are no deviations, then remove the tidy and close the gray and red wire to ground. If the arrow deviated, the device is considered serviceable, and the damage lies in the conductor between the sensor and the arrow indicator.Constant readings of an empty tank indicate a malfunction of the sensor or damage to the wire between it and the pointer
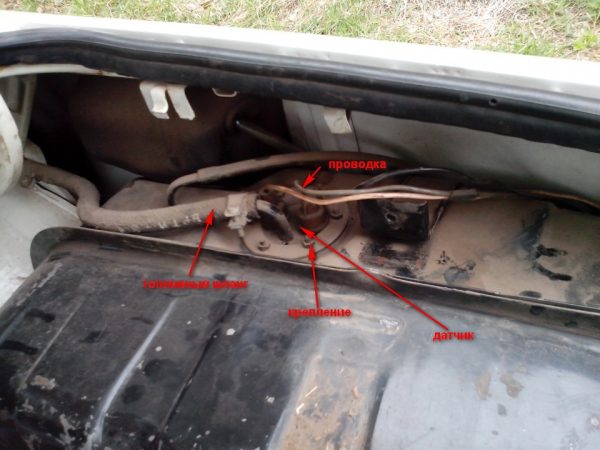
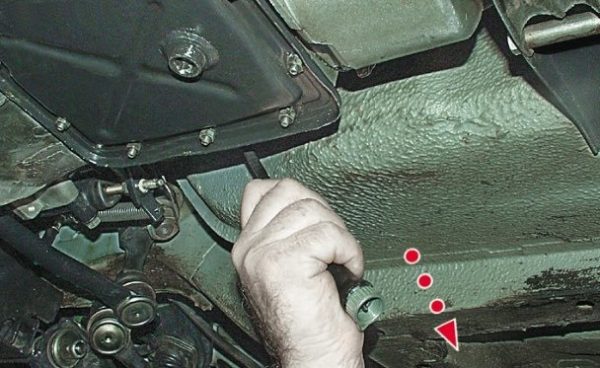
If the fuel sensor fails, you will need a 7 open-end wrench and a Phillips screwdriver to replace it. The essence of the procedure is to remove a pair of terminals and unscrew the fasteners. Replace the defective part with a new one.
Learn more about ignition lock malfunctions: https://bumper.guru/klassicheskie-modeli-vaz/elektrooborudovanie/panel-priborov/zamok-zazhiganiya-vaz-2106.html
Table: fuel sensor check
| The amount of fuel in the tank | Sensor Resistance, Ohm |
| Empty tank | 315 – 345 Feet |
| Half tank | 100 – 135 Feet |
| Full tank | 7 and less |
Video: installing a digital fuel gauge

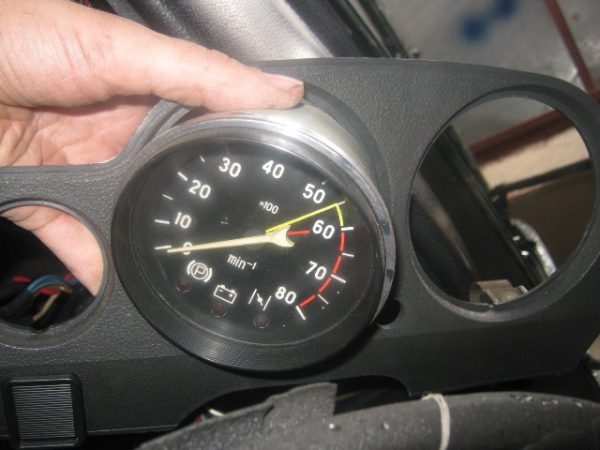
Tachometer
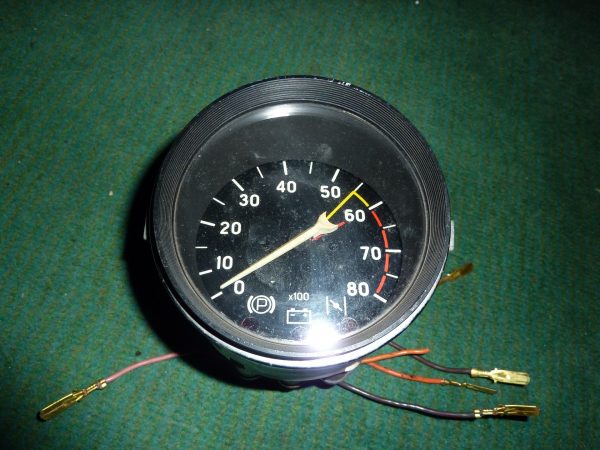
The dashboard tachometer displays engine speed readings. The TX-2106 device is installed on the VAZ 193. The following problems are possible with the mechanism:
- lack of evidence;
- twitching of the arrow in any operating mode of the power unit;
- overestimation or underestimation.
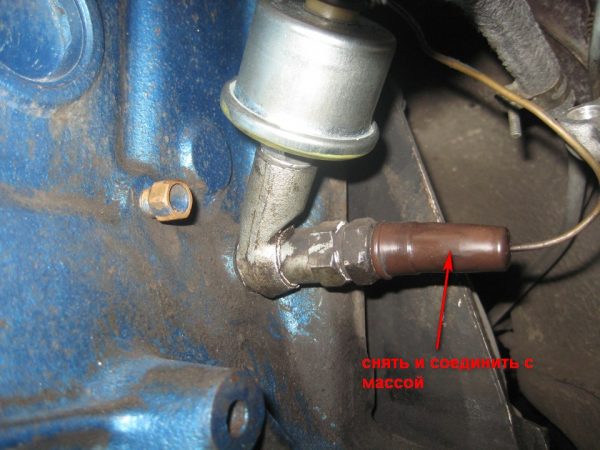
The first fault is caused by wiring problems and poor contact. Therefore, you should check the condition of all connecting elements and connectors, starting with the brown wire with a terminal on the ignition coil: it should not have oxides or other damage. Otherwise, we clean the contact with fine sandpaper and tighten the nut. You should also check the reliability of the connection of the tachometer to the mass and, if necessary, restore it. In addition, with the ignition on, use a multimeter to check whether power is supplied to the device. In the absence of voltage, inspect the integrity of the fuse F9. Also, a digital device checks the reliability of the contacts in the tachometer wiring harness.
If the arrow twitches, then the problem lies in poor wiring contact or in the distributor (wear of the shaft bearing, slider or contacts on the cover). Such a malfunction is eliminated by restoring contact or replacing failed parts. If the tachometer readings are incorrect, you will need to disassemble the distributor, clean the contacts and set the correct gap between them. If this does not help, one of the elements of the tachometer board may have failed. In this case, the device is dismantled, disassembled and the board is repaired. However, disassembly is only appropriate if you understand electrical engineering.
To replace the device, you will need pliers and a screwdriver. The sequence of actions is as follows:
- We pry off the tidy and take it aside.
- Disconnect the appropriate pads from the tachometer.Remove the tachometer connectors
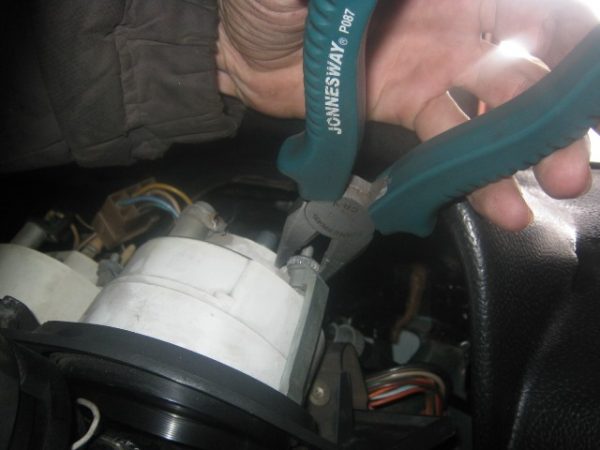
- We unscrew the fastening of the device to the shield and take out the mechanism.Using pliers, unscrew the fastening of the tachometer
- We install a new or repaired tachometer in place and connect the connectors.After repair or replacement, the tachometer is installed in the tidy
Read about the VAZ-2106 electrical system: https://bumper.guru/klassicheskie-modeli-vaz/elektrooborudovanie/elektroshema-vaz-2106.html
temperature sensor
The temperature of the engine coolant is measured using a sensor located in the head of the block and a pointer on the dashboard.

Despite the high reliability of the sensor, malfunctions can sometimes occur with it, which are indicated by non-standard readings, for example, the absence of arrow deviations. To check the sensor, you will need to remove it from the engine, lower it into water and gradually heat it up, and use a multimeter to measure the resistance.
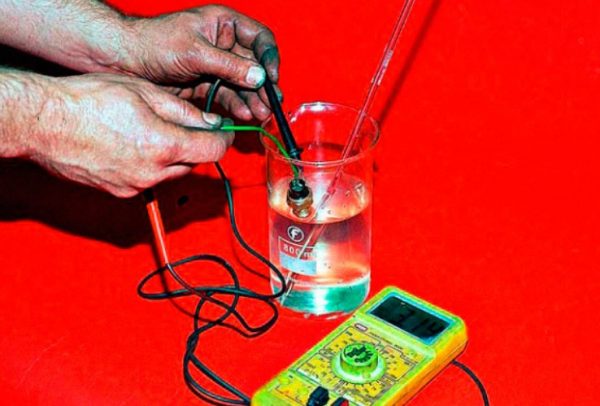
Table: VAZ 2106 sensor resistance values depending on temperature
| Temperature ° C | Resistance, Ohm |
| +5 | 7280 |
| +10 | 5670 |
| +15 | 4450 |
| +20 | 3520 |
| +25 | 2796 |
| +30 | 2238 |
| +40 | 1459 |
| +45 | 1188 |
| +50 | 973 |
| +60 | 667 |
| +70 | 467 |
| +80 | 332 |
| +90 | 241 |
| +100 | 177 |
Change the sensor in this order:
- Disconnect the negative terminal from the battery.
- Drain the antifreeze from the cooling system.
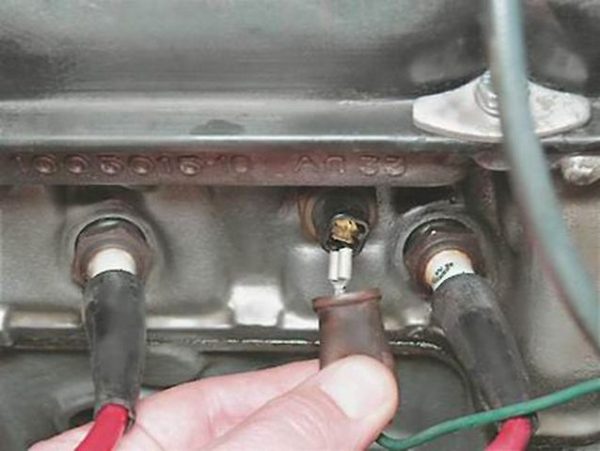
- We remove the protective element from the sensor, and then the wire.Only one terminal is connected to the sensor, remove it
- We unscrew the fastening of the element with an elongated head and remove it from the head of the block.We unscrew the coolant sensor with a deep head
- We mount the new sensor in the reverse order.
Oil pressure sensor
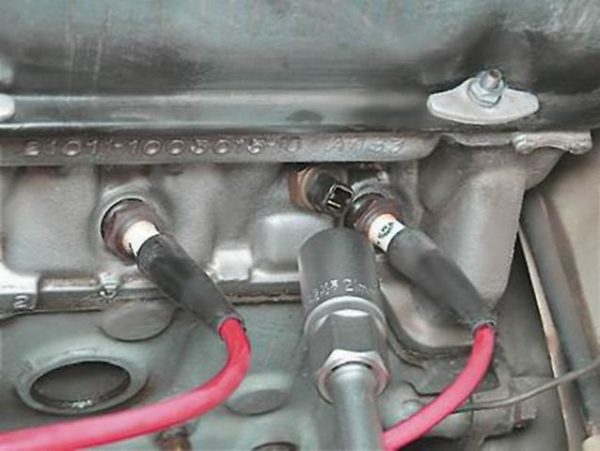
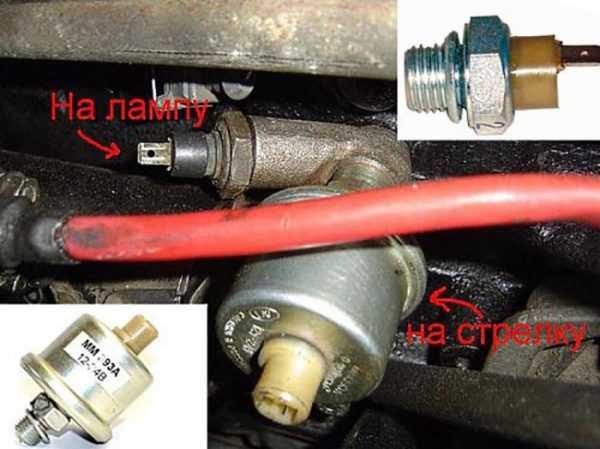
The oil pressure in the "six" lubrication system is determined by two devices: a dial indicator and a light bulb. Signals to both devices are supplied from sensors installed in the engine block.
If the pressure is insufficient while the engine is running, the light comes on.

The pointer or indicator lamp may sometimes function intermittently. Therefore, you need to know how to check them for a malfunction. The procedure is as follows:
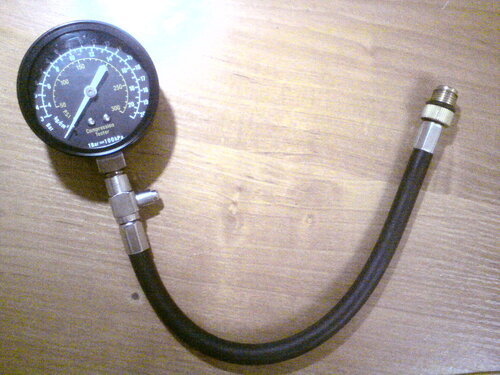
- We disconnect the wires of standard sensors, unscrew them from the engine block and install a mechanical pressure gauge with a scale of up to 10 bar.Mechanical pressure gauge checks the pressure in the lubrication system
- We start the engine (it must be preheated) and evaluate the readings of the pressure gauge. At idle, the pressure should be about 1-2 bar. If the readings are significantly lower or completely absent, then this will indicate a malfunction in the lubrication system and the need for engine repair.
- If the standard pointer device shows normal pressure, but the light is on, then this indicates problems with the pressure sensor on the lamp. If there is no glow, then, perhaps, the light bulb burned out, there was a break in the wiring, or the sensor itself broke.If the light is on, and the pointer shows normal pressure, then the sensor to the light may be out of order.
- To check the sensor for a light bulb, remove the wire from it and close it to ground by turning on the ignition. When the indicator lamp lights up, this will indicate the need to replace the device under test.The light bulb sensor is checked by shorting the wire to ground.
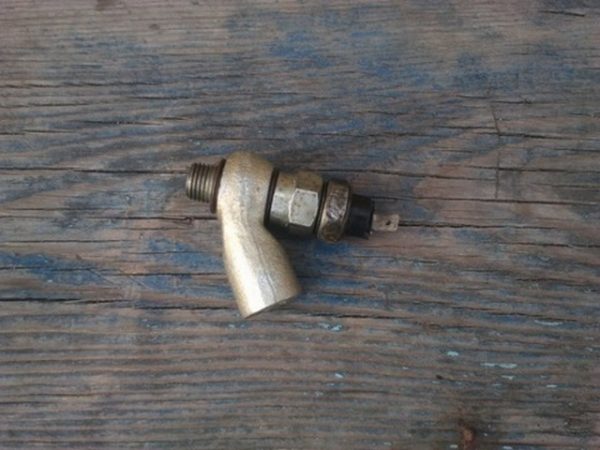
Both oil sensors are non-repairable and should only be replaced.
Speedometer
Details about the device of the VAZ-2106 speedometer: https://bumper.guru/klassicheskie-modeli-vaz/elektrooborudovanie/panel-priborov/spidometr-vaz-2106.html
The speedometer is responsible for displaying the speed on the VAZ 2106. Like any other mechanism, it has its own characteristic faults:
- mechanical wear, which requires only the replacement of the device;
- flexible shaft damage;
- loosening the speedometer cable nuts.
Since the main problems are due to the failure of the cable, we will consider replacing this element. Repair work is carried out using the following set of tools:
- flat screwdriver;
- passages;
- spanners;
- wire or cord up to 2 meters long;
- new drive cable.
The sequence of actions is as follows:
- Remove the terminal from the negative of the battery.
- We dismantle the instrument.
- Unscrew the nut securing the cable to the speedometer.
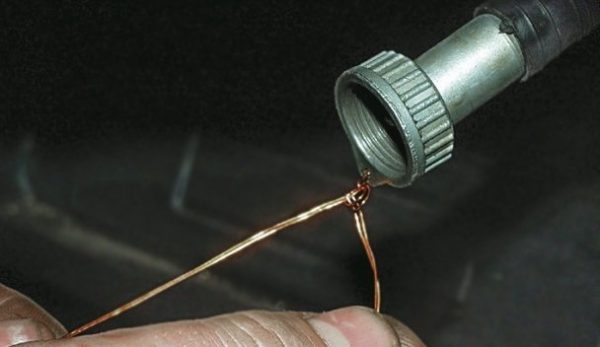
- We tie a cord or wire to the nut.We tie a piece of wire to the eye of the speedometer cable
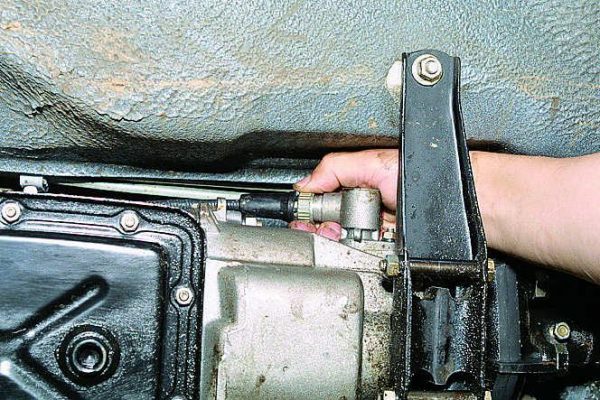
- Loosen the nut securing the cable to the speedometer drive.From below the cable is fixed to the speedometer drive
- We dismantle the cable by pulling it towards us.Being under the car, we pull out a cable
- We tie the wire on the nut of the new flexible shaft and tighten it into the cabin.
- We remove the wire and perform the reassembly.
Sometimes the speedometer may not work due to a drive failure. In this case, you will need to remove the worn part and install a new one, paying attention to the number of gear teeth.
Video: why the speedometer needle twitches

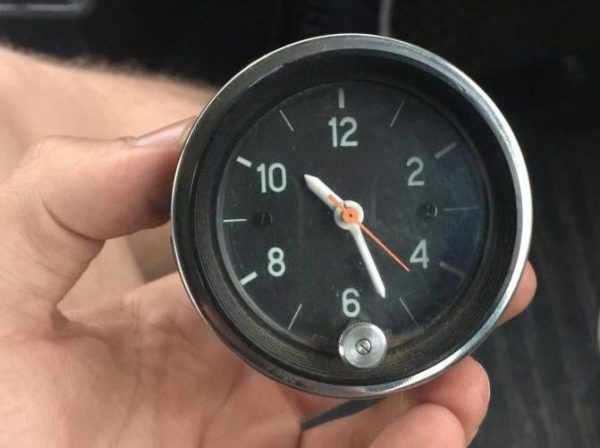
Watches
With the “six” clock, malfunctions also sometimes occur, the main of which are:
- damage to the internal mechanism;
- backlight malfunction;
- electrical wiring problems.
To replace or repair a watch, follow these steps:
- Remove the negative terminal from the power supply.
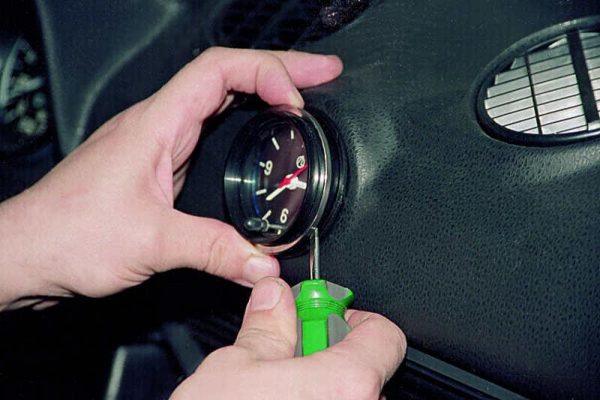
- We pry the device with a screwdriver and remove it from the panel.We pry the clock with a screwdriver and remove it from the panel
- To replace the light bulb, we hook the cartridge and remove it from the clock, after which we change the lamp itself.We take out the cartridge and change the faulty lamp
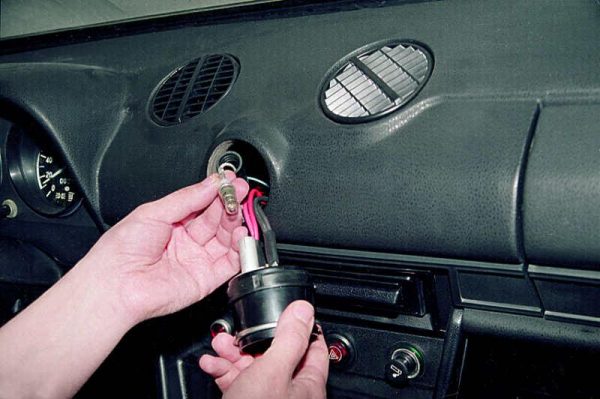
- We disconnect the wires from the device and dismantle it from the car.VAZ 2106 watches sometimes fail and require replacement
- After repair or replacement, we install the clock in the reverse order, aligning the protrusion of the plastic ring with the slot in the dashboard.
If there is a desire to carry out an independent repair of the clock, the mechanism will need to be disassembled, blown out of dust and bend the legs on the pendulum (depending on the nature of the malfunction).
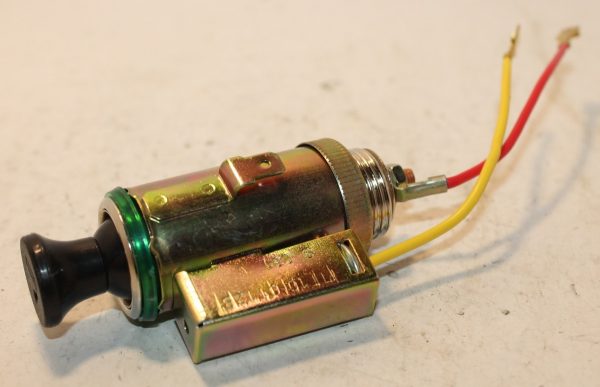
Cigarette lighter
Today, the cigarette lighter is a multifunctional device, through which you can not only light a cigarette, but also connect a compressor for pumping wheels, a charger to a phone, laptop, etc.
Therefore, the failure of this element can cause inconvenience. The main malfunctions of the cigarette lighter are:
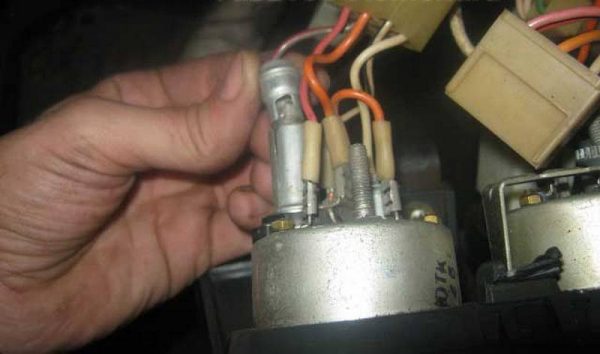
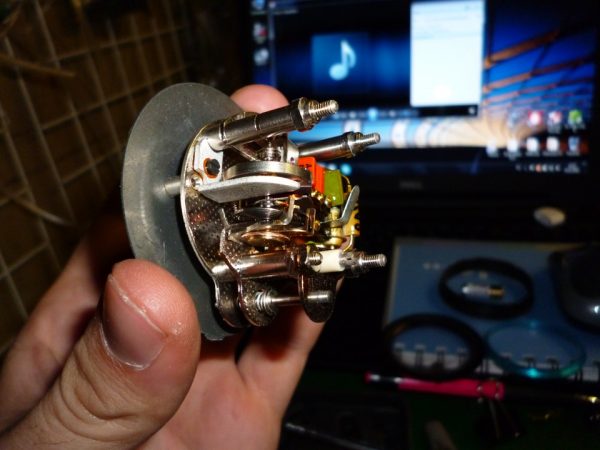
- poor fixation of the spiral in the socket. In this case, to heat the coil, you have to hold it until it warms up, which is inconvenient and unsafe while driving. The cause of the problem is due to the wear of special antennae. The problem is eliminated by bending the latter;
- spiral breakdown. The malfunction is solved by replacing the cigarette lighter head or replacing the device;
- fuse failure. When a fuse blows (F1 to 16 A), power to the cigarette lighter simply will not come. The protective element is installed only with the required denomination;
- wiring problems. To diagnose the wiring, the circuit is called with a multimeter for an open circuit. Having determined the damaged area, it is restored and carefully isolated.
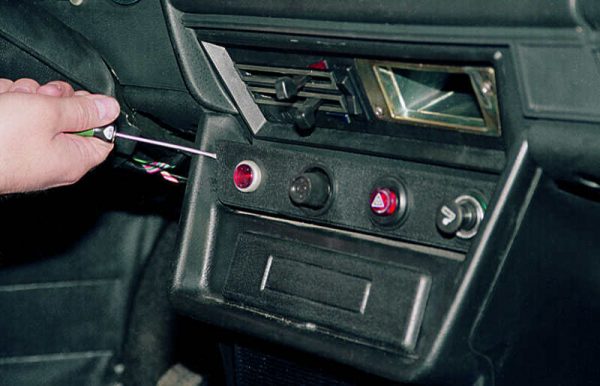
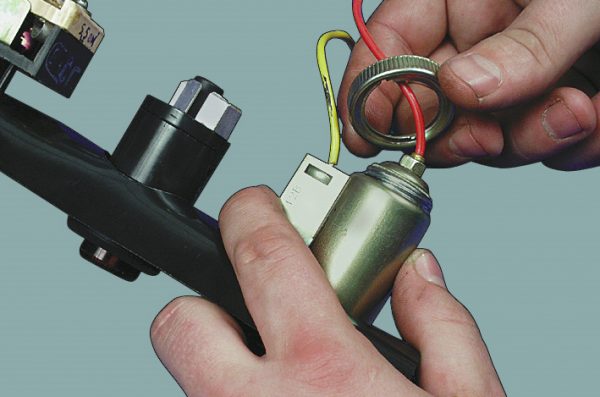
If you need to replace the cigarette lighter, perform the following sequence of actions:
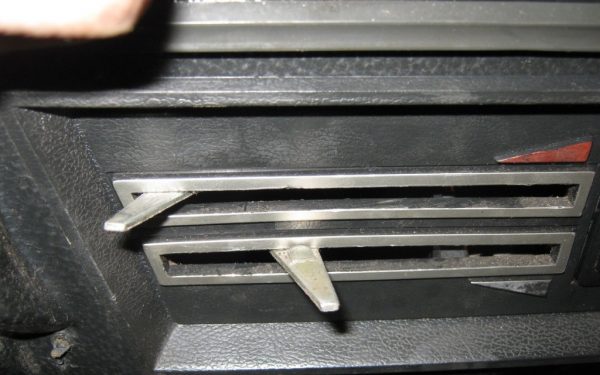
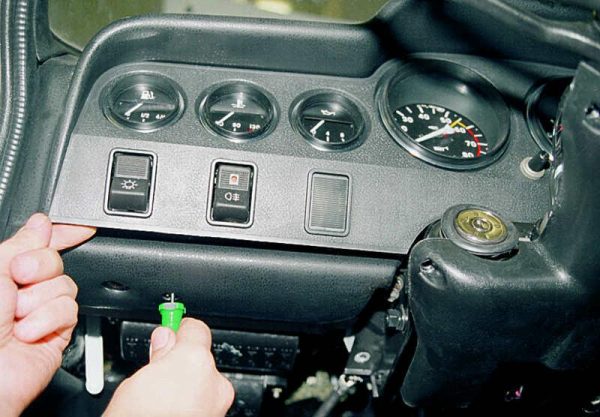
- Pry off the insert with a flat screwdriver on one side and on the other, and then dismantle it.We hook the insert with a screwdriver on both sides and remove it from the panel
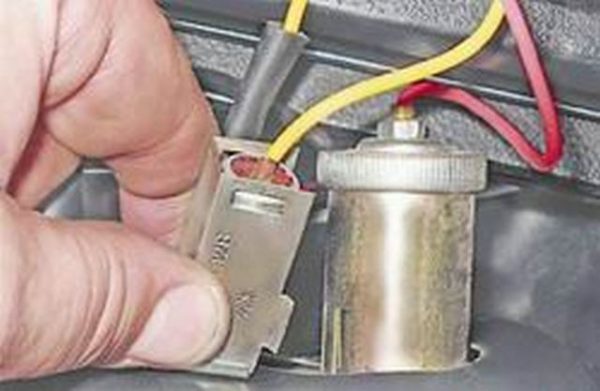
- Disconnect the cigarette lighter wires.Removing the power connectors on the cigarette lighter
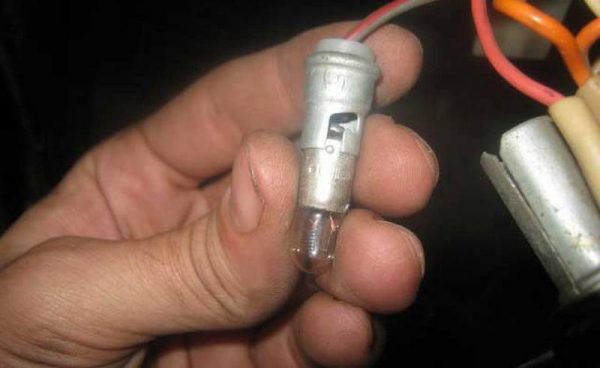
- To replace the backlight, we squeeze the walls of the casing and disconnect it together with the lamp from the body. Then we take out the cartridge, the lamp and change it to a working one.The cigarette lighter light also sometimes burns out and needs to be replaced.
- Loosen the fixing nut.To dismantle the cigarette lighter, unscrew the nut
- We dismantle the cigarette lighter assembly and install a serviceable element in its place, after which we assemble everything in the reverse order.

Steering column switch VAZ 2106
On the classic Zhiguli, the steering column switch is located on the steering column and consists of three levers. On the left side of the column are switches for direction indicators "A" and head optics "B".
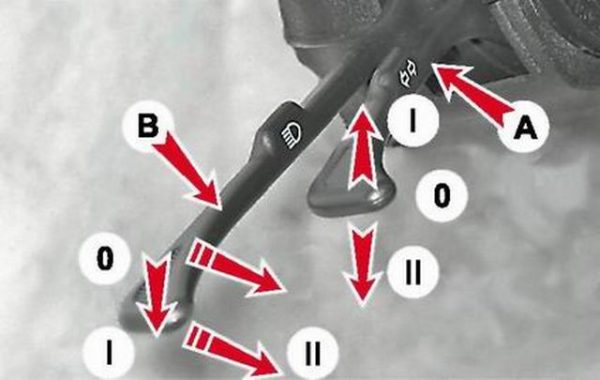
The stalk lever "A" can be in one of the following positions:
- 0 - direction indicators are off;
- I — indicators of the right turn are included;
- II - left turn indicators are on.
Lever "B" is activated by pressing the button for outdoor lighting on the tidy:
- 0 - outdoor lighting and dipped headlights are on;
- I - outdoor lighting and high beam headlights are on;
- II - high beam headlights are on (non-fixed position).
On the right side of the steering column is the windshield wiper and washer switch "C".
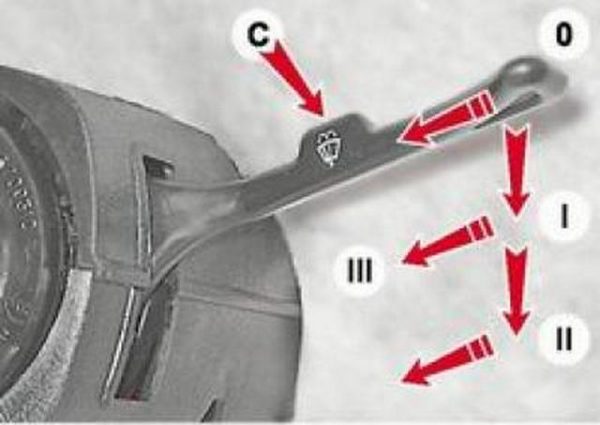
Switch "C" can operate in the following positions:
- 0 - windshield wiper off;
- I - the windshield wiper operates in intermittent mode;
- II - the windshield wiper operates continuously;
- III - the windshield washer is turned on.
How to disassemble
The steering column switch is a non-separable mechanism and must be replaced in case of problems. However, if you wish, you can try to repair it yourself. The essence of the procedure is to dismantle the rivets, carefully disassemble the device, replace damaged springs, and repair contacts. The performance of the repaired unit directly depends on the correct assembly. If you want to save yourself from this procedure, just buy a new device and install it on your car. The cost of such products ranges from 700 rubles.

How to replace
Replacing the steering column switch on the "six" may be necessary in such cases:
- damage to the contacts of one of the levers;
- failure of the contact of the sound signal;
- failure of one of the switches.
Any of these problems require removal of the switch from the steering shaft. From the tools you will need a Phillips and slotted screwdriver, and the procedure itself is carried out as follows:
- Remove the terminal from the negative of the battery.
- We dismantle the steering wheel by unscrewing the fastening nut.
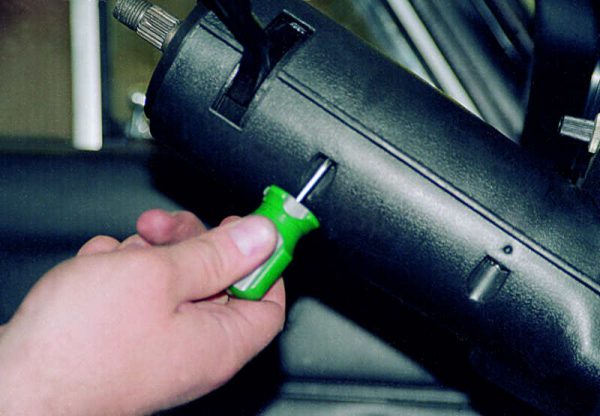
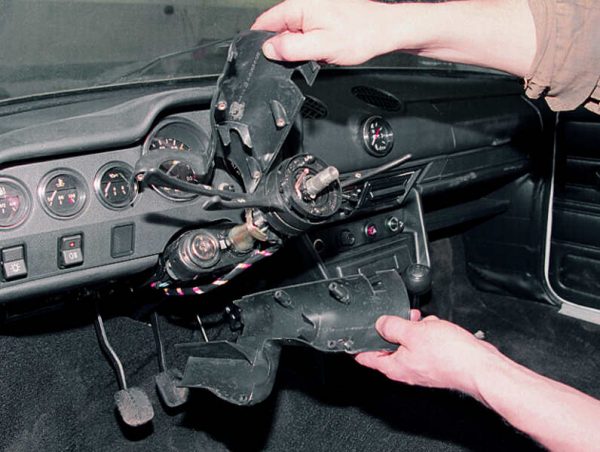
- Using a Phillips screwdriver, unscrew the fasteners of the plastic casing.We unscrew the fastening of the decorative casing of the steering shaft
- Remove the cover from the shaft.Unscrew the mount, remove the decorative trim
- For convenience, we dismantle the instrument panel.
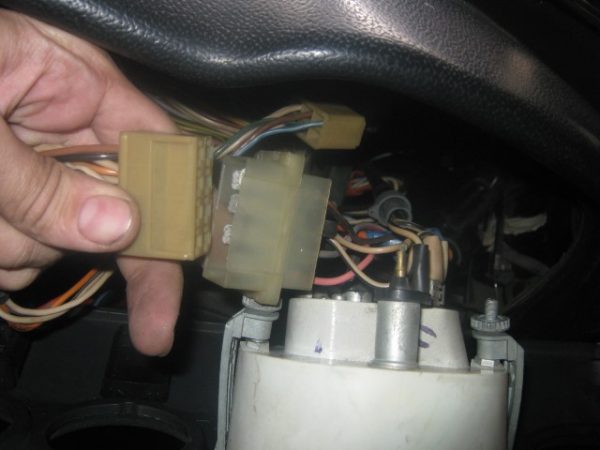
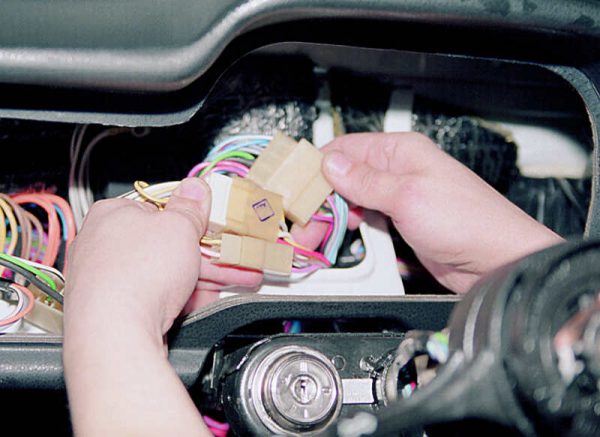
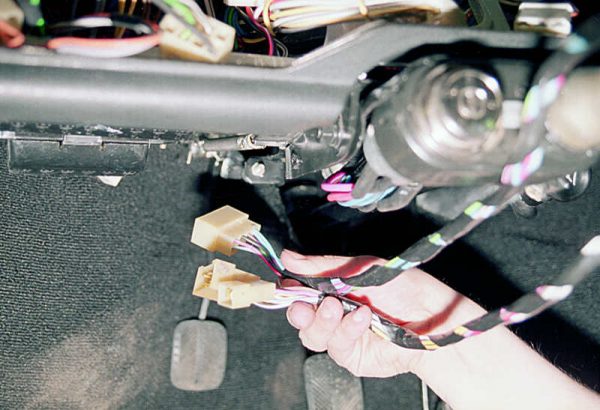
- Under the tidy, we disconnect the pads of the steering column switch, consisting of two, six and eight contacts.We remove the pads with wires from the switch
- We take out the connectors from the bottom of the panel.Under the panel we take out the wires with connectors
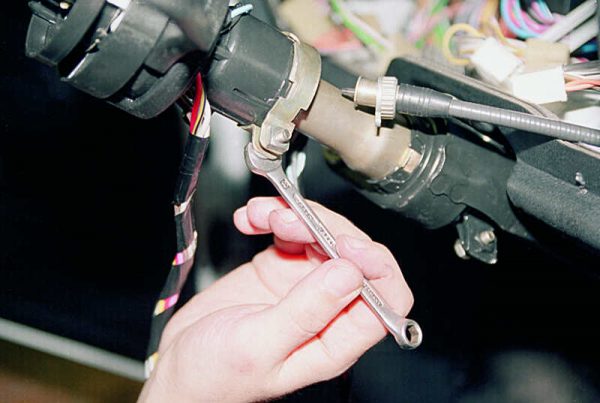
- Loosen the switch clamp.We leave the fasteners of the clamp holding the switches
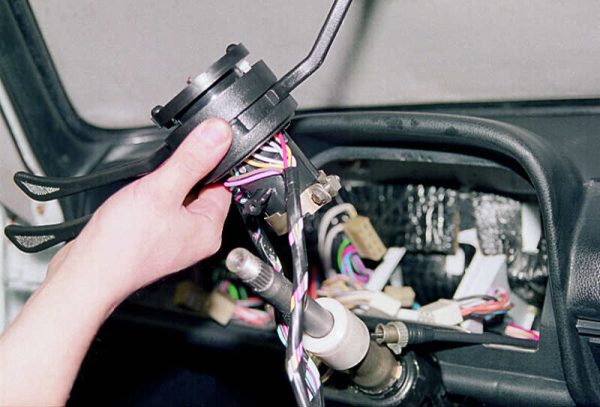
- We remove the mechanism from the steering column along with the wires.After disconnecting the wires and unscrewing the mount, remove the switch from the steering shaft
- We install the new device in the reverse order.
When reinstalling the steering column switch, do not forget to put on the rubber seal on the ignition switch.
Video: replacing the steering column switch on the "classic"

Repair of the instrument panel of the VAZ "six" or its components is carried out with a minimum list of tools according to step-by-step instructions. A couple of screwdrivers, pliers and a digital multimeter are enough to fix basic problems without visiting a car service.

