Clutch service
Content
The clutch connects the engine to the transmission and provides lossless power transmission with precise metering to the rear wheel. This is why the clutch is a wearing part that requires periodic maintenance.

Motorcycle clutch maintenance
What's the point of having 150 hp if you can't use it on the road? Dragster pilots are not the only ones aware of this problem: even on normal roads, at every start and every acceleration, the clutch must be extremely powerful in order to transfer power from the crankshaft to the engine without loss and in the correct proportion. Transmission.
The clutch is based on the physical principle of friction, therefore it is a wearing part. The more you ask for it, the sooner you have to replace it. The clutch is particularly stressed when, for example, pulling away from traffic lights at high engine speeds. Of course, the launch is much more "courageous" when the tachometer needle rises to red and the clutch lever is half open. Unfortunately, only half of the power reaches the transmission, the rest is spent on heating and wear of the clutch disc.
One day the rotors in question will get rid of the ghost, and if you want full power your bike is probably making a lot of noise, but power comes to the rear wheels late. Then all you have to do is spend your hard-won money for your next vacation on parts (chain kits, tires, clutch discs, etc.).
A problem that our grandfathers did not face in their fire trucks. Indeed, the first motorcycles were still running without a clutch. To stop, you had to turn off the engine, and then the start looked like a rodeo show. In today's traffic conditions, of course, this would be too dangerous. This is why it is so important that your clutch works flawlessly.
With a few rare exceptions, oil-filled multi-plate clutches are common on modern motorcycles. Imagining this type of grip is not at all like visualizing a large, round sandwich with several rungs. Replace sausage with friction discs and bread with steel discs. Compress the whole thing with a pressure plate using several springs. When the elements are compressed, you have a closed connection between the engine and the transmission, which opens when you press the clutch lever and when the spring pressure is released from the discs.
The size, number and surface of the discs, of course, exactly match the power of the engine. The result is a smooth start without jerks, the motor torque is transmitted safely. Torsion springs in the clutch housing soften the response to load changes and provide more comfort.
In addition, the clutch protects when the engine stalls. Slipping protects the gears from excessive stress. A good grip, of course, only works when a flawless drive engages. In principle, in the case of hydraulic systems, the same points must be taken into account as for disc brakes: the hydraulic fluid must be changed no more than once every 2 years, there must be no air bubbles in the system, all gaskets must work flawlessly. , the pistons must not be blocked Mechanical recommendation Brake pads. There is no need to adjust the clearance as the hydraulic system adjusts automatically. Conversely, in the case of mechanical cable control, the decisive factor is that the Bowden cable is in perfect condition, Teflon guided or lubricated and the clearance is adjusted. When the clutch is hot, too little play will cause the pads to slip, which will wear out quickly. In addition, overheating damages the steel discs (deforms and turns blue). Conversely, too much backlash makes gear shifting difficult. When stationary, the motorcycle has a tendency to start when the clutch is engaged and it is difficult to idle. Then it becomes clear that the clutch cannot be disengaged. This phenomenon can also occur when steel discs are deformed!
Conversely, clutch jerks and disengages most of the time indicate that the clutch housing and actuator are broken. On most motorcycles, it is not necessary to disassemble the engine to overhaul the clutch and replace the pads. If you're not afraid to get your hands dirty and have a certain talent for mechanics, you can do the job yourself and save a decent amount of money.
Clutch service - let's get started
01 - Prepare the tools
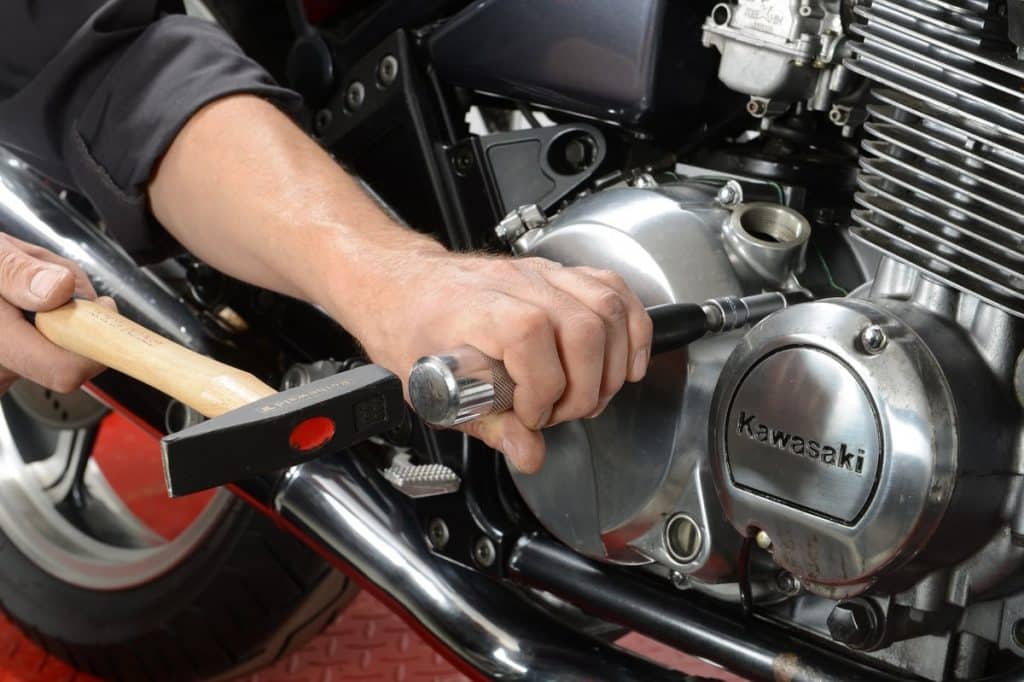 Loosen and remove the cover screws in stages using a suitable tool. Machine-tightened or painted screws may become stuck. In most cases, a light blow to the screw head can help loosen the screw. The impact screwdriver turns Phillips screws optimally.
02 - Remove cover
 To disengage the cover from the adjusting sleeves, use the plastic side of the adjustable hammer and gently tap on all sides of the cover until it comes off.
The note : Pry off with a screwdriver only if there is a corresponding slot or recess in the cover and body! Never try to push a screwdriver between the sealing surfaces so as not to irreparably damage them! If there is no way to remove the cover, then you probably forgot the screw! Usually the seal sticks to both surfaces and breaks. In any case, you need to replace it. Carefully remove any gasket residue with a gasket scraper and brake cleaner or gasket remover without damaging the sealing surface, then use a new gasket. Be careful not to lose the adjusting sleeves!
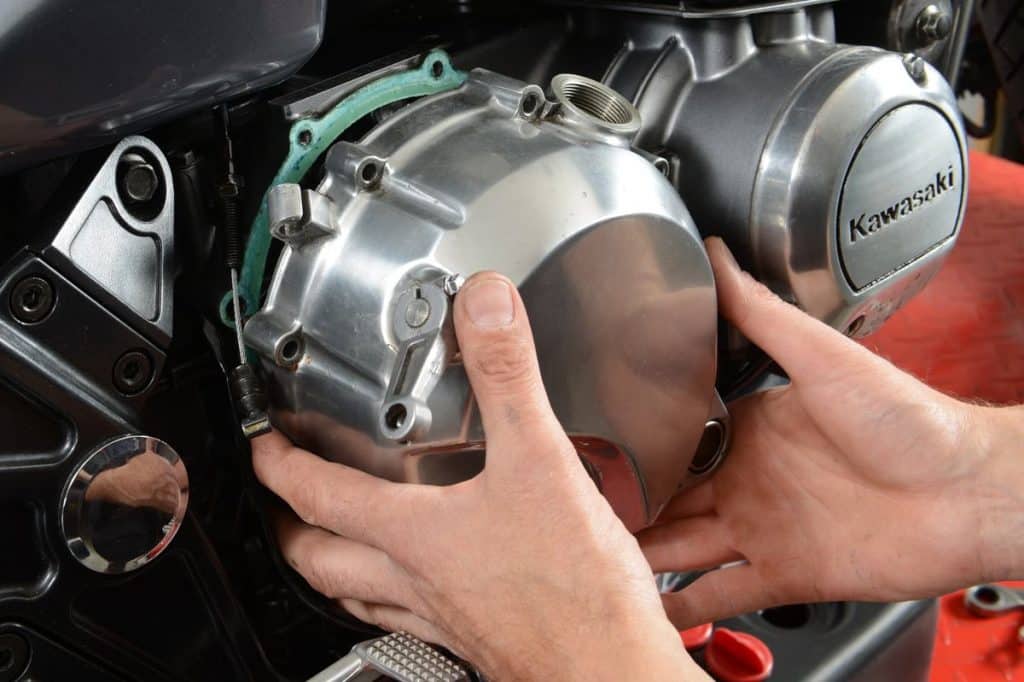
Step 2, Fig. 2: Remove the cover
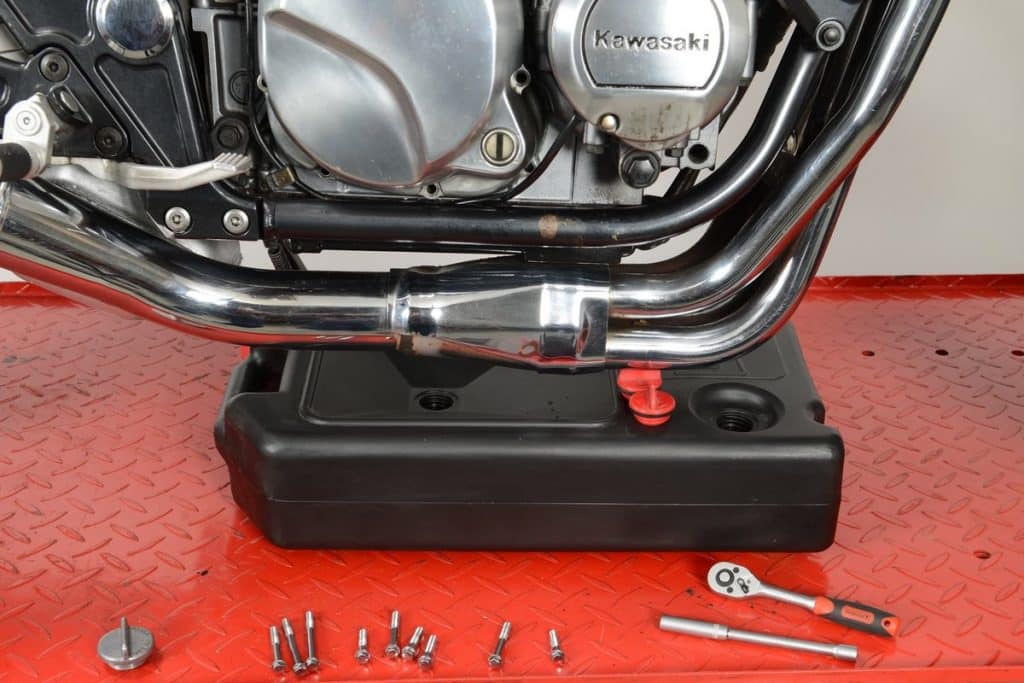
03 - Remove the clutch

Step 3, Fig. 1: Loosen the center nut and screws
The clutch housing is now in front of you. To access the interior, you must first remove the clutch clamp plate. In most cases, you will need to unscrew a certain number of screws, less often the center nut. Always proceed crosswise and in stages (approximately 2 turns each)! If the clutch housing turns with the screws, you can shift into first gear and lock the brake pedal. After the screws are loosened, remove the compression springs and clamping plate. You can now remove the steel discs and friction discs from the clutch. Place all parts on a clean piece of newspaper or rag so you can record the assembly order.
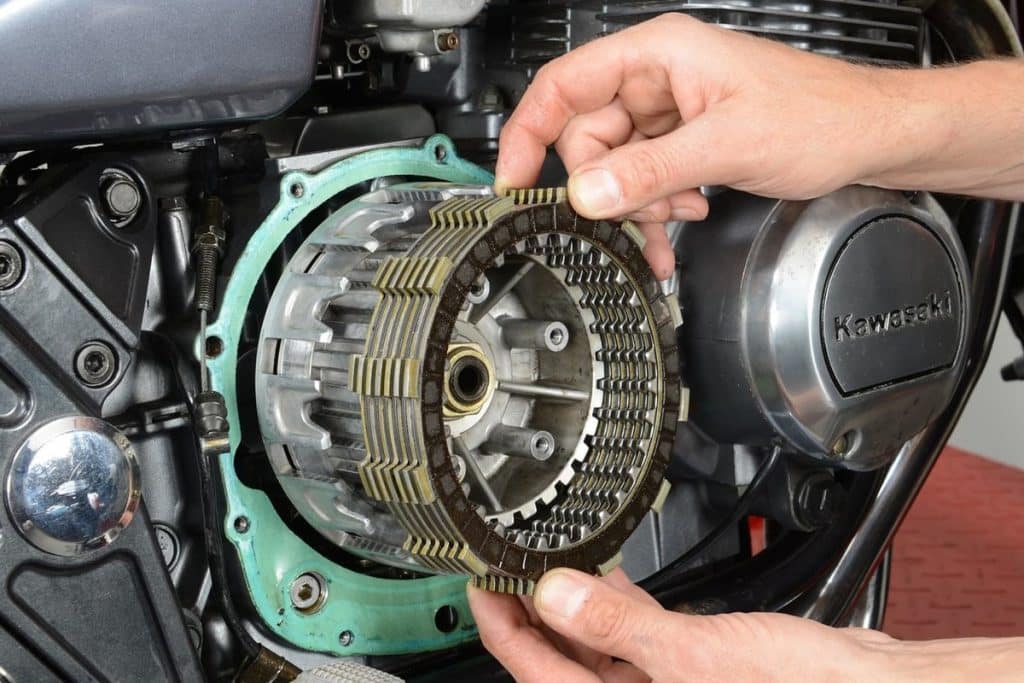
Step 3, Fig. 2: Remove the clutch
04 - Check details

Step 4, Fig. 1: Measuring the clutch spring
Now check the components: over time, the clutch springs fatigue and contract. Therefore, measure the length and compare the value with the wear limit indicated in the repair manual. The clutch springs are relatively inexpensive (around 15 euros). Loose springs will cause the clutch to slip, so if in doubt, we recommend replacing them!
Steel discs, respectively placed between the friction discs, can deform under the influence of heat. In most cases, they turn blue. You can check them using a feeler gauge and a dressing plate. You can also use a glass or mirrored dish instead of a toilet plate. Press the disc lightly against the glass plate, then from different points try to calculate the gap between the two points with a feeler gauge. Slight warpage is allowed (up to about 0,2 mm). For the exact value, refer to your vehicle's manual.
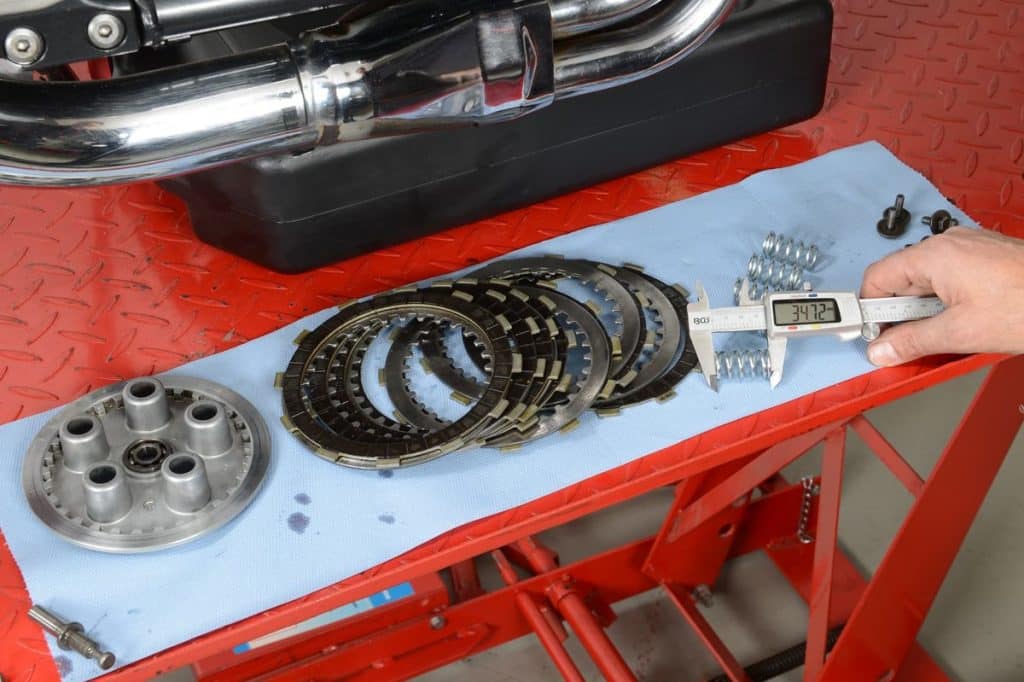
Step 4, Fig. 2: check details
You need to replace discolored and warped discs. The discs can also warp if the clutch housings and internal actuators are badly worn. Small gaps on the sides of the guide plate can be smoothed out with a file. This operation is time consuming but saves a lot of money. To prevent sawdust from entering the engine, it is necessary to disassemble the parts. To remove the clutch housing, loosen the center nut. To do this, hold the simulator with a special tool. Also see your manual for further instructions. Also check the condition of the shock absorber on the clutch housing. A clicking sound while the engine is running indicates wear. The flare may have some play after installation, but in general it should not look soft and worn in the event of strong acceleration or jerking.
05 - Install the clutch
Step 5: Install the clutch
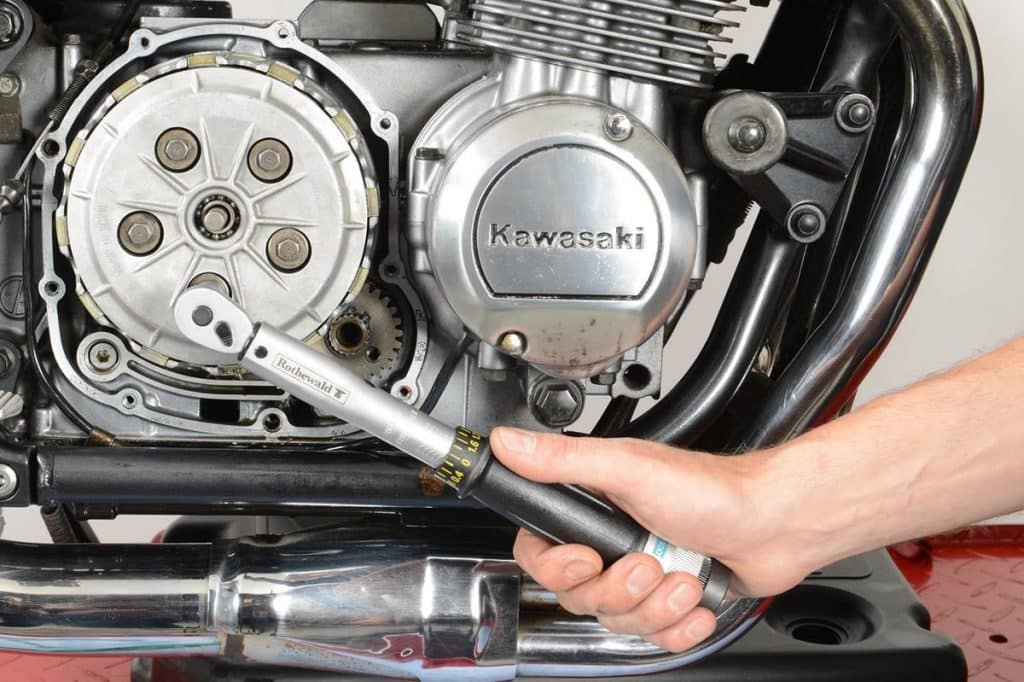
Having decided which parts need to be replaced, proceed with the assembly. Remove residual wear and dirt from used parts with a brake cleaner. Now reassemble the clean and oiled parts in reverse order. To do this, refer to the repair manual again: it is important to take into account any markings on the components that serve to indicate a specific position!
If you haven't disassembled the clutch housing, the operation is relatively simple: start by installing the clutch discs, starting and ending with the friction lining (never the steel disc). Then install the clamp plate, then set the springs in place with the screws (in most cases you need to apply light pressure). Pay attention to the markings that may be present when installing the clamping plate!
Finally tighten the screws crosswise and in stages. If torque is specified in the MR, a torque wrench must be used. Otherwise, tighten without force; thread casting is especially delicate inside the clutch actuator.
06 - Customize the game
When the clutch is actuated by the Bowden cable, the clearance adjustment has a decisive influence on the operating result. The adjustment can be made with the adjusting screw located in the center of the clutch housing, on the opposite side of the engine, or in the case of a clutch cover, in the clutch cover. Observe the relevant manufacturer's instructions.
07 - Put on the cover, tighten the screws step by step
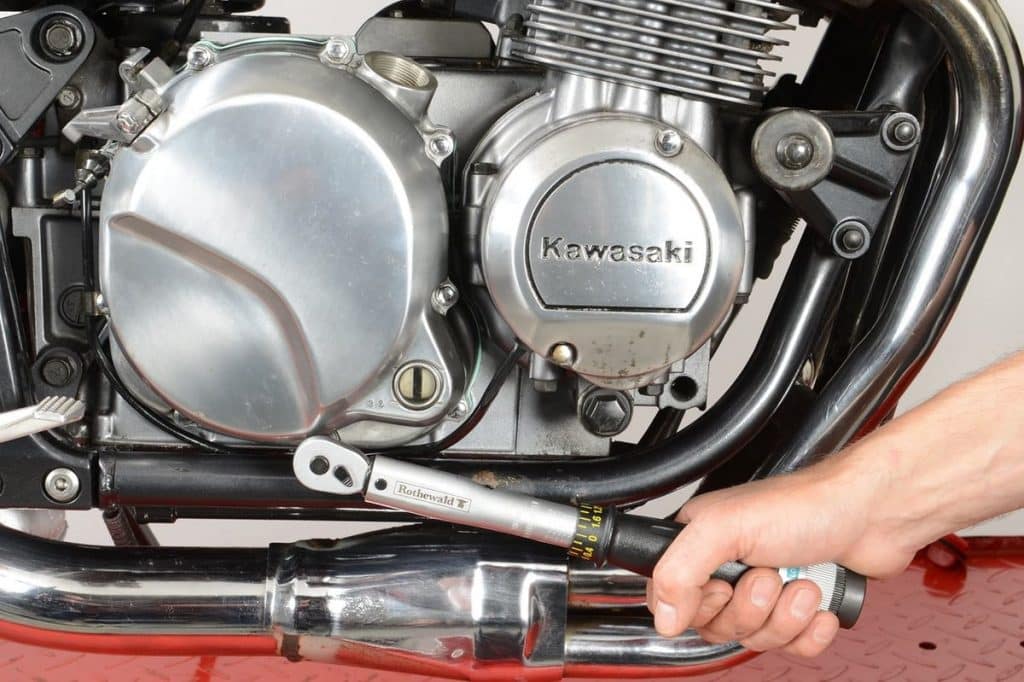
Step 7: Put on the cover, tighten the screws in stages.
After cleaning the sealing surfaces and installing the correct gasket, you can replace the clutch cover. Don't forget the adjusting sleeves! Install the screws first by hand-tightening, then lightly tighten or with a torque wrench according to the manufacturer's instructions.
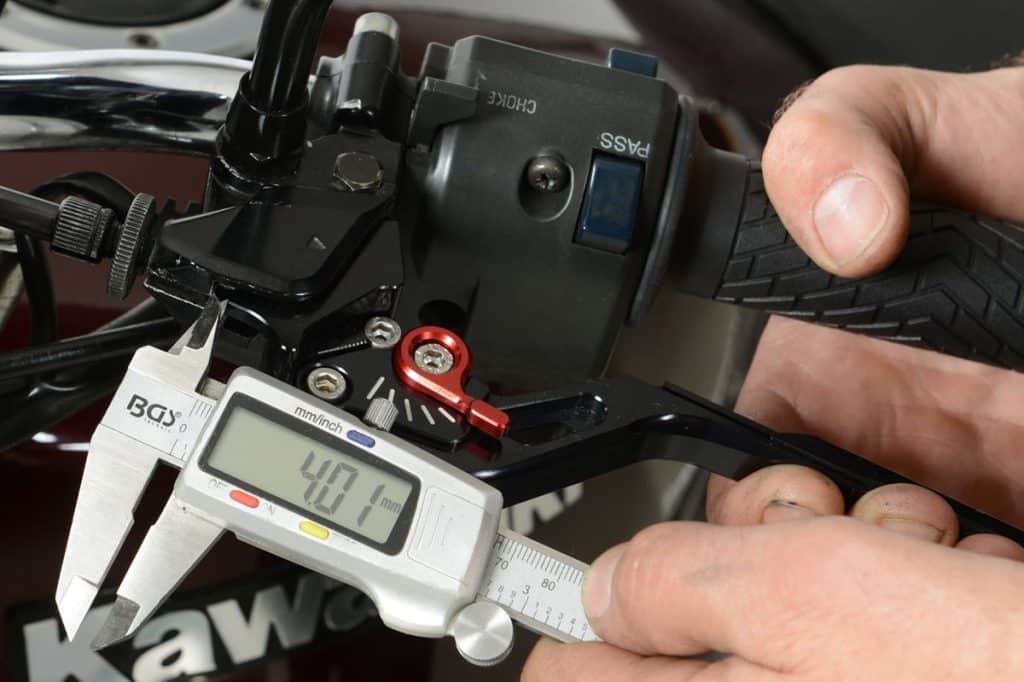
08 - Bowden cable adjustment
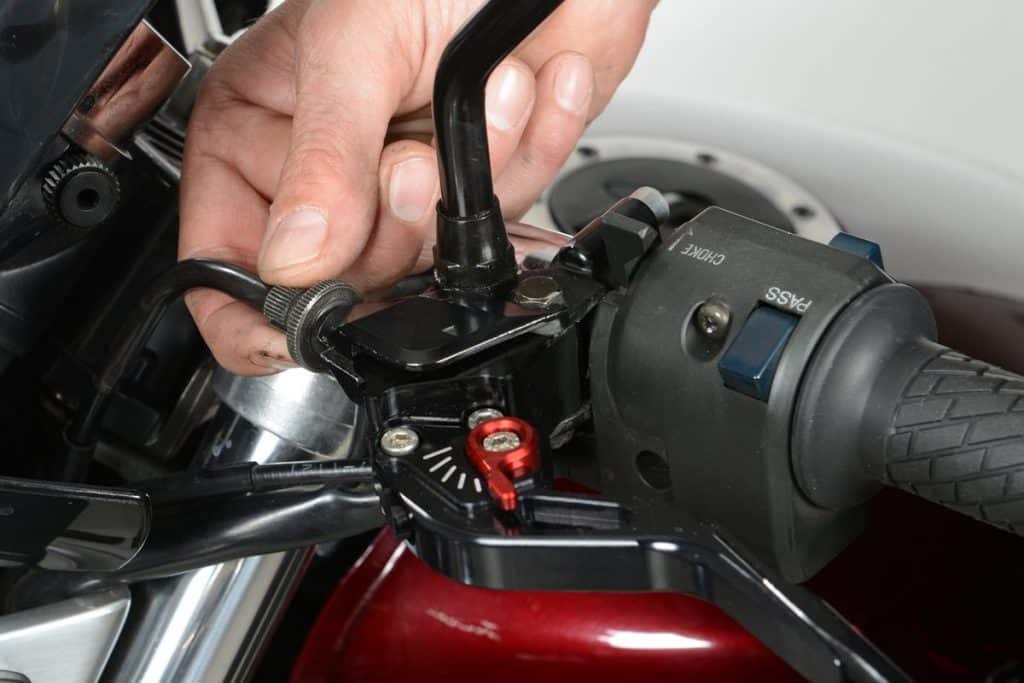
Step 8, Fig. 1: Adjusting the bowden cable
When adjusting with a Bowden cable, make sure the clutch lever has a clearance of approximately 4mm. before loading the arm. It is not necessary to loosen the socket head screw strongly.
Step 8, Fig. 2: Adjust the Bowden cable
09 - Fill with oil
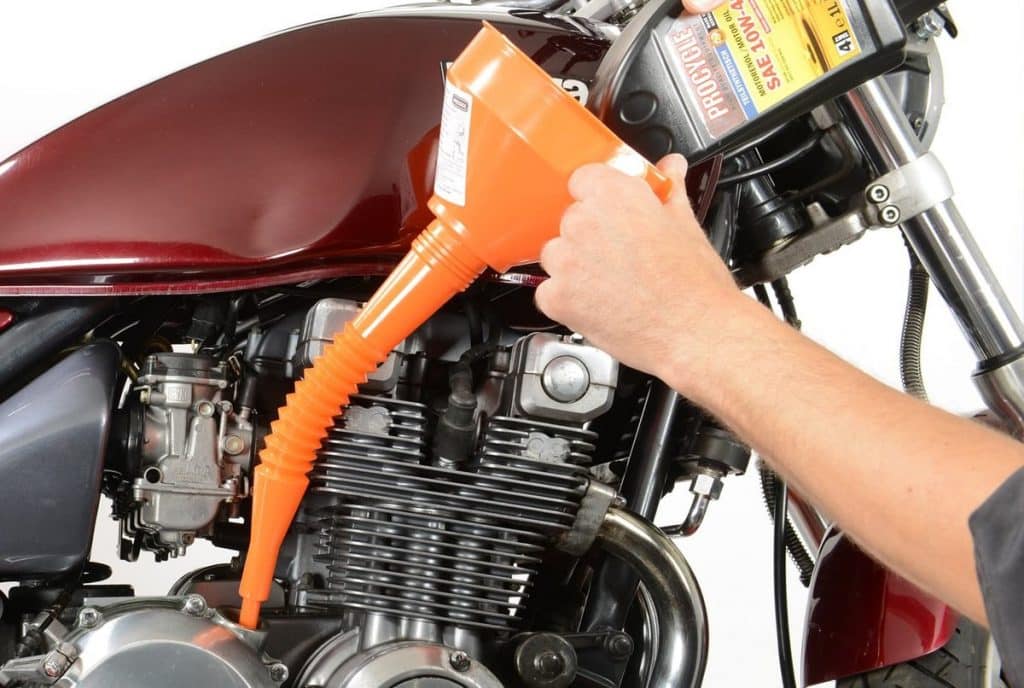
Step 9: fill in the oil
The oil can now be topped up. Make sure the drain plug is in place! Finally, install the footpegs, kickstarter, etc. and remove any debris from the brake and rear wheel. All is well that ends well ; however, before you sit back in the saddle, check your operation again: start the engine at idle speed, keep the brake and clutch levers engaged, and slowly shift into first gear. If you can now accelerate without being overwhelmed by a car or skidding, you've done a good job and can again count on being able to cover miles of pure pleasure in your two-wheeled vehicle.
Bonus tips for true DIY enthusiasts
Don't let irritation get in the way of mechanical work!
Sometimes parts don't fit together the way they should. If you handle it with heavy artillery because you're annoyed and trying to use force, you won't get away with it. The damage you can do will only increase your annoyance! If you feel the pressure is building up, stop! Eat and drink, go outside, let the pressure drop. Wait a bit and try again. Then you will see that everything is done simply ...
To complete the mechanics, space is required:
If you need to disassemble an engine or something similar, look somewhere other than your kitchen or living room. Avoid endless discussions with roommates about the purpose of these rooms from the beginning. Find the right spot with the right workshop furniture and plenty of room for your drawers and other storage boxes. Otherwise, you may not find your screws and other parts.
Always have a digital camera or mobile phone close at hand:
It is impossible to remember everything. Thus, it is much easier to quickly take a few pictures of the location of the gear, the location of the cables, or some parts assembled in a certain way. This way, you can pinpoint the location of the assembly and easily reassemble it even after a few weeks.