Beware of leaks!
 A decrease in the level of brake fluid in the reservoir is normal and is the result of worn brake pads and discs. However, if the red low fluid indicator lights up, there are leaks in the system.
Leakage of brake fluid is very dangerous, as it leads to air locks in the system and complete failure of the brakes. There may be several leaks. It could be a master cylinder, a damaged hose, a rusty metal hose, or a brake caliper leak. And this is the most common piston seal leak in a brake caliper. 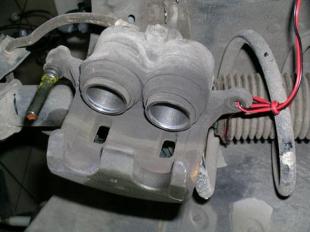
you can yourself
Repair is not difficult, so it may be tempting to do it yourself. It doesn't even need a channel or ramp.
If the leak occurred only in one wheel, it is also worth replacing the seals in the other.
The first step will be to firmly support the car on stands, and if we don’t have such stands, then solid wooden bars can successfully play their role.
Then you can proceed to unscrew the clamp. In order not to ventilate the entire brake system, press and block the brake pedal to the stop. The next step before completely unscrewing the caliper is to check the ease of extension of the piston. If problems arise, you have to press the brake pedal several times and the piston will surely slip out of the cylinder. Now you can unscrew the clamp and proceed with the repair.
Of course, before installing new seals, the entire clamp must be thoroughly flushed and the piston surface checked for pitting. You also need to check that the breather is unscrewed. Now you can start replacing the seals. First, we insert a new piston seal, and then the so-called dust cover that protects the piston from dirt.
The seals must be tight in place or they will be damaged when the piston is inserted. On the other hand, if the dust cap is installed incorrectly, it will fall out of the mount very quickly, completely fail to fulfill its task and the piston will jam after a short time. Before inserting the plunger, there are rubber elements and the plunger itself 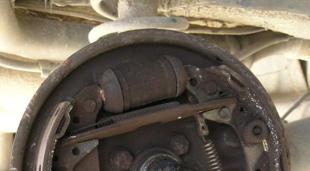 must be lubricated with special grease, which should be in the repair kit.
If not, it must be liberally lubricated with brake fluid. The plunger should not slide with much resistance, and when everything is in order, we should push it with our hands, without much effort.
Checking with a diagnostician
Install the repaired caliper in the yoke, wind the brake hose (necessarily on new seals), and the final step in the repair will be to bleed the system and check the efficiency and uniformity of the brakes. The last step is best done at the diagnostic station.
With drum brakes, you need to do a little differently. In this case, in the event of a leak, the entire cylinder must be replaced. The seals themselves should not be changed, because the entire cylinder is not much more expensive. In addition, in many cases we may have difficulty obtaining the gaskets themselves. And if we have a popular car, then we usually have a large selection of replacements, so the costs should not be large.
Estimated prices for parts of brake system components
Make and model | brake caliper price | Set price corrective chuck | Topper price brake |
Daewoo Lanos 1.4 | 474 (4 max) 383 (Daewoo) | 18 | 45 (ATE) 24 (Delphi) 36 (TRV) |
Honda Civic 1.4 '98 | 210 (TRV) | 25 | 71 (TRV) |
Peugeot 405 1.6 | 570 (4 max) 280 (TRV) | 30 | 25 (4 max) 144 (ATE) 59 (Delphi) |
Skoda Octavia 1.6 | 535 (4 max) 560 (TRV) | 35 | 38 (4 max) 35 (Delphi) |
Toyota Corolla 1.6 '94 | 585 (4 max) | 32 | 80 (TRV) 143 (ATE) |