Why does the VAZ 2107 generator fail and its phased check
Content
The most common car malfunctions, including the VAZ 2107, include problems with electrical equipment. Since the power source in the vehicle is a generator and a storage battery, the start of the engine and the operation of all consumers depend on their uninterrupted operation. Since the battery and the generator work in tandem, the service life and the duration of the operation of the former depend on the latter.
Checking the VAZ 2107 generator
The generator "seven" produces an electric current when the engine is running. If problems arise with it, the search for the causes and elimination of breakdowns must be done immediately. There can be a lot of problems with the generator. Therefore, possible malfunctions need to be dealt with in more detail.
Diode bridge test
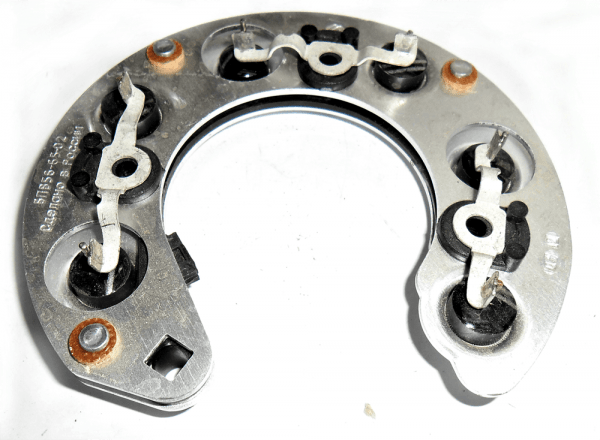
The diode bridge of the generator consists of several rectifier diodes, to which an alternating voltage is supplied, and a constant voltage is output. The performance of the generator itself directly depends on the serviceability of these elements. Sometimes diodes fail and need to be checked and replaced. Diagnostics is carried out using a multimeter or a 12 V car light bulb.
Multimeter
The procedure consists of the following steps:
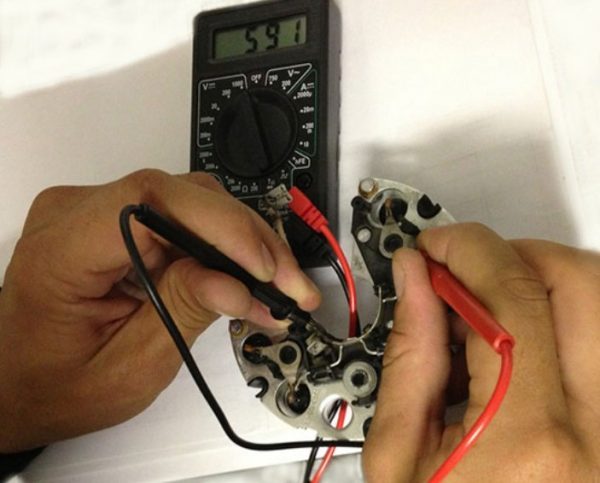
- We check each diode separately, connecting the probes of the device in one position, and then change the polarity. In one direction, the multimeter should show infinite resistance, and in the other - 500-700 ohms.
 When checking diodes with a multimeter in one position, the device should show an infinitely large resistance, and in the other - 500-700 Ohms
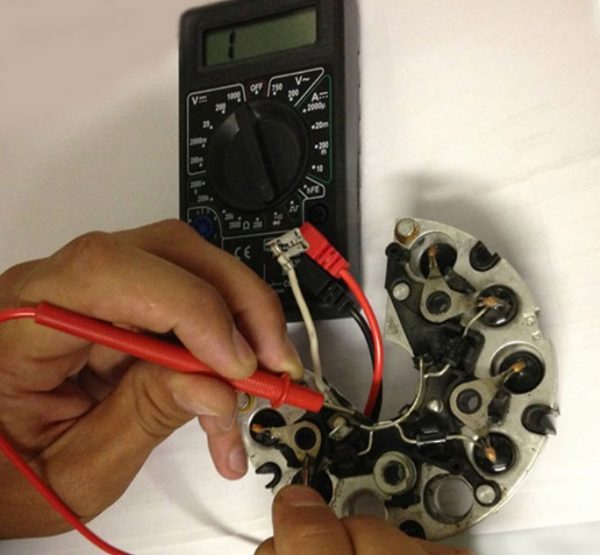
 - If one of the semiconductor elements has minimal or infinite resistance during continuity in both directions, then the rectifier needs to be repaired or replaced.If the diode resistance is infinitely high during the test in both directions, the rectifier is considered faulty
Light bulb
If you don't have a multimeter at hand, you can use a regular 12V light bulb:
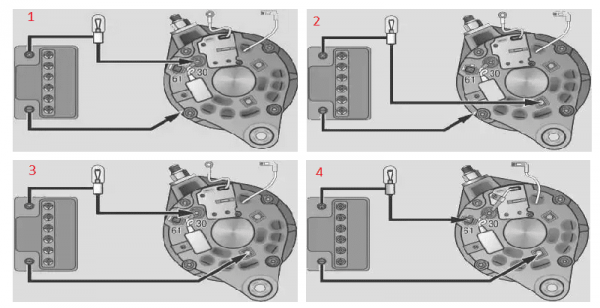
- We connect the negative terminal of the battery to the diode bridge case. We connect the lamp to the gap between the positive contact of the battery and the generator terminal marked "30". If the lamp lights up, the diode bridge is faulty.
- To check the negative rectifier diodes, we connect the minus of the power supply in the same way as in the previous paragraph, and the plus through a light bulb with a diode bridge fastening bolt. A burning or flickering lamp indicates a problem with the diodes.
- To check the positive elements, we connect plus the batteries through the lamp to the terminal "30" of the generator. We connect the negative terminal to the bolt. If the lamp does not light up, the rectifier is considered to be working.
- To diagnose additional diodes, the minus of the battery remains in the same place as in the previous paragraph, and the plus through the lamp is connected to the “61” terminal of the generator. A glowing lamp indicates problems with the diodes.To check the diode bridge with a lamp, different connection schemes are used depending on the elements being diagnosed.
Video: diagnostics of the rectifier unit with a light bulb

Checking the regulator relay
Since different voltage regulators were installed on the VAZ "sevens", it is worthwhile to dwell on checking each of them in more detail.
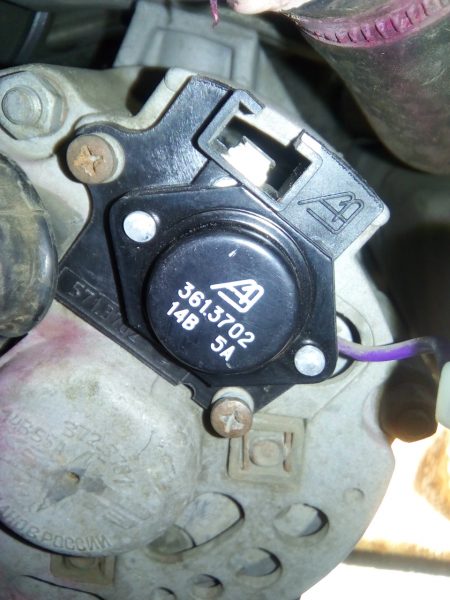
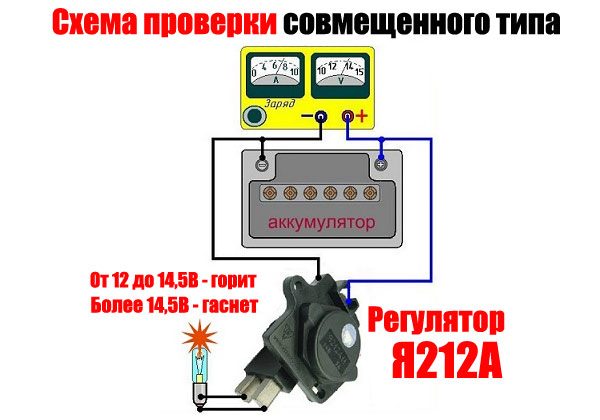
Combined relay
The combined relay is integral with the brushes and is mounted on the generator. You can remove it without dismantling the latter, although it will not be easy. You need to get close to the back of the generator, unscrew the two screws securing the relay and remove it from the special hole.
To check the voltage regulator you will need:
- 12-22 V variable voltage power supply;
- connecting wire;
- 12 V light bulb.
The process itself consists of the following steps:
- We connect the minus of the battery to the ground of the relay, and the plus to its contact "B". We connect a light bulb to the brushes. The power source is not yet included in the circuit. The lamp should light up, while the voltage should be about 12,7 V.
- We connect the power supply to the battery terminals, observing the polarity, and increase the voltage to 14,5 V. The light should go out. When the voltage drops, it should light up again. If not, the relay must be replaced.
- We continue to increase the tension. If it reaches 15-16 V, and the light continues to burn, this will indicate that the relay-regulator does not limit the voltage supplied to the battery. The part is considered non-working, it recharges the battery.The combined relay consists of a voltage regulator and a brush assembly, which are checked using a power supply with a variable output voltage
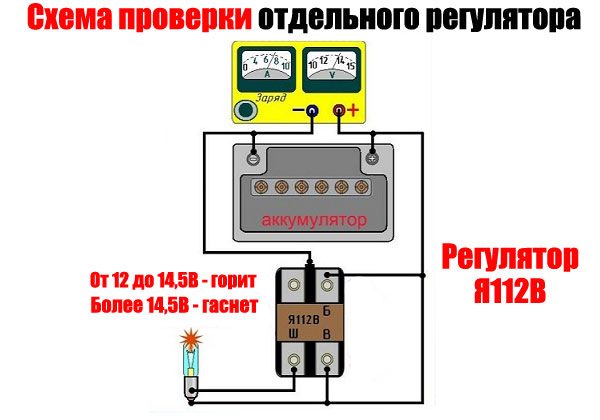
Separate relay
A separate relay is mounted on the car body, and the voltage from the generator first goes to it, and then to the battery. As an example, consider checking the Y112B relay, which was also installed on the classic Zhiguli". Depending on the version, such a regulator can be mounted both on the body and on the generator itself. We dismantle the part and perform the following steps:
- We assemble a circuit similar to the previous one, instead of brushes we connect a light bulb to the contacts “W” and “B” of the relay.
- We perform the check in the same way as in the above method. The relay is also considered faulty if the lamp continues to burn when the voltage rises.If the lamp lights up at a voltage of 12 to 14,5 V and goes out when it rises, the relay is considered to be in good condition.
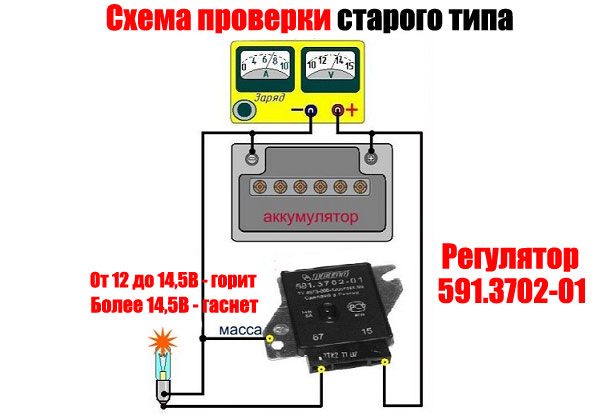
old relay type
Such a regulator was installed on the old "classic". The device was attached to the body, its verification has some differences from the described options. The regulator has two outputs - "67" and "15". The first is connected to the negative terminal of the battery, and the second to the positive. The light bulb is connected between ground and contact "67". The sequence of voltage changes and the reaction of the lamp to it are the same.
Video: checking the generator relay-regulator on the "classic"

Condenser test
The capacitor is used in the voltage regulator circuit as a suppressor of high frequency noise. The part is attached directly to the generator housing. Sometimes it can fail.
Checking the health of this element is carried out with a special device. However, you can get by with a digital multimeter by choosing a measurement limit of 1 MΩ:
- We connect the probes of the device to the terminals of the capacitor. With a working element, the resistance will be small at first, after which it will begin to increase to infinity.
- We change polarity. The instrument readings should be similar. If the capacitance is broken, then the resistance will be small.
If a part fails, it is easy to replace it. To do this, just unscrew the fastener holding the container and fixing the wire.
Video: how to check the capacitor of a car generator

Checking brushes and slip rings
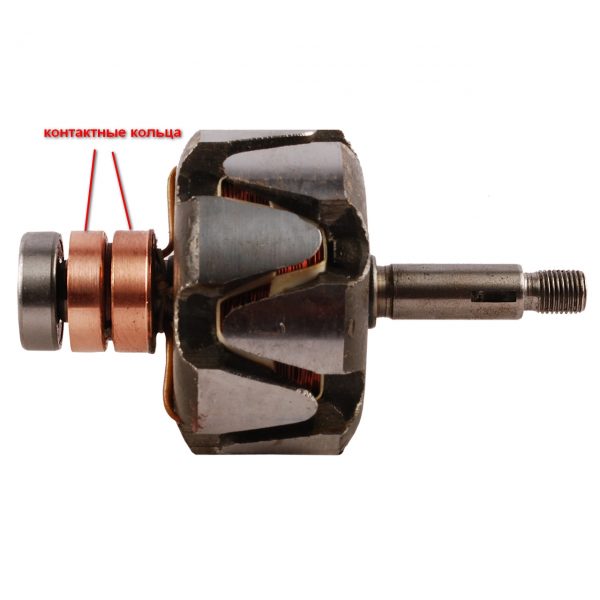
To check the slip rings on the rotor, the generator will need to be partially disassembled by removing the rear. Diagnostics consists in a visual inspection of contacts for flaws and wear. The minimum diameter of the rings must be 12,8 mm. Otherwise, the anchor must be replaced. In addition, it is recommended to clean the contacts with fine-grained sandpaper.
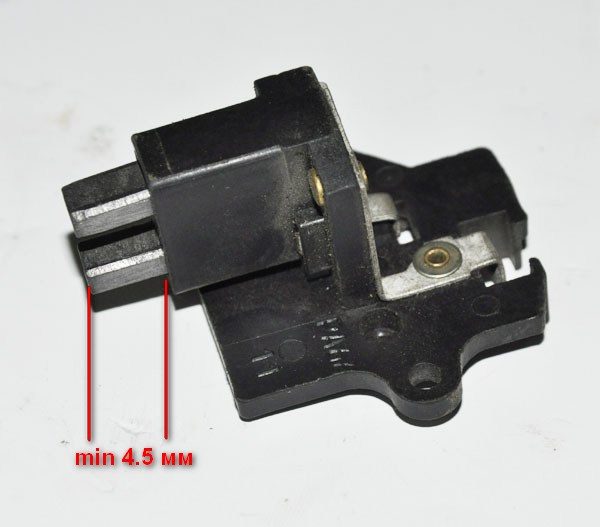
The brushes are also inspected, and in case of severe wear or damage, they are replaced. The height of the brushes must be at least 4,5 mm. In their seats, they should walk freely and without jamming.
Video: checking the generator brush assembly

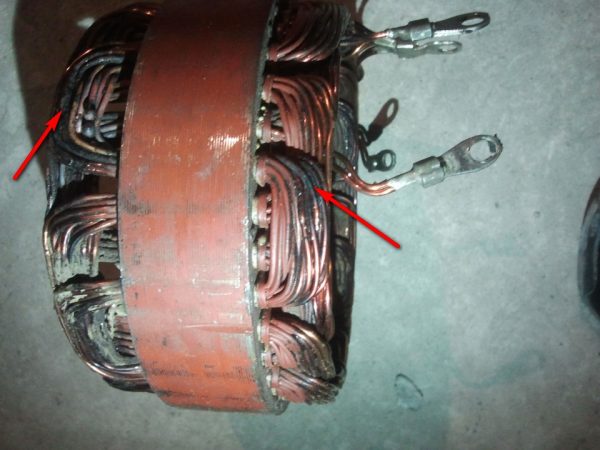
Checking the windings
The "seven" generator has two windings - rotor and stator. The first is anchored and constantly rotates when the engine is running, the second is fixedly fixed on the body of the generator itself. Windings sometimes fail. To identify a malfunction, you need to know the verification method.
Rotor winding
To diagnose the rotor winding, you will need a multimeter, and the process itself consists of the following steps:
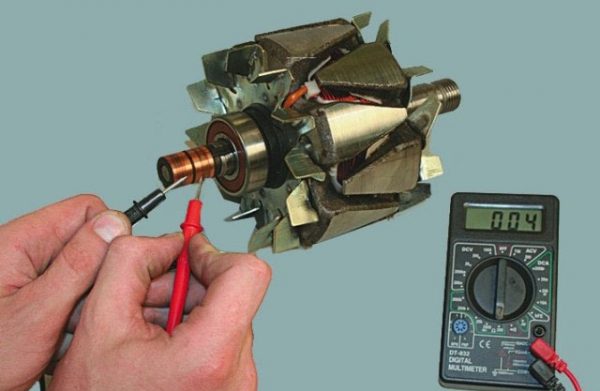
- We measure the resistance between the contact rings. Readings should be between 2,3-5,1 ohms. Higher values will indicate poor contact between winding leads and rings. Low resistance indicates a short circuit between the turns. In both cases, the anchor requires repair or replacement.To check the rotor windings, the multimeter probes are connected to the slip rings at the armature
- We connect the battery to the winding contacts in series with the multimeter at the current measurement limit. A good winding should consume a current of 3–4,5 A. Higher values indicate an interturn short circuit.
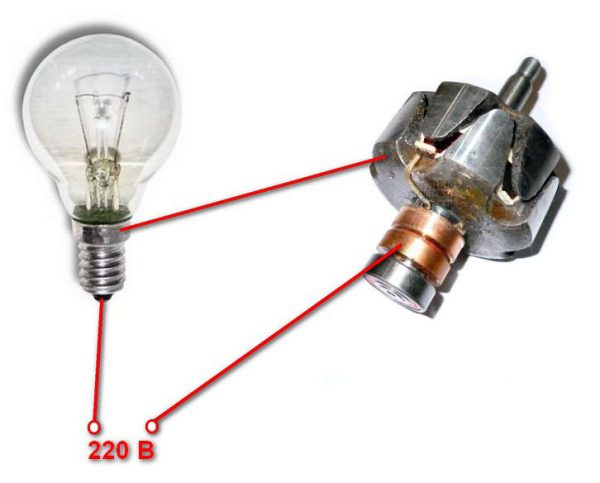
- Check the rotor insulation resistance. To do this, we connect a 40 W lamp to the mains through the winding. If there is no resistance between the winding and the armature body, then the bulb will not light up. If the lamp barely glows, then there is a current leakage to ground.Checking the insulation resistance of the armature winding is carried out by connecting a 220 W bulb to a 40 V network through it
Stator winding
An open or short circuit can occur with the stator winding. Diagnostics is also carried out using a multimeter or a 12 V light bulb:
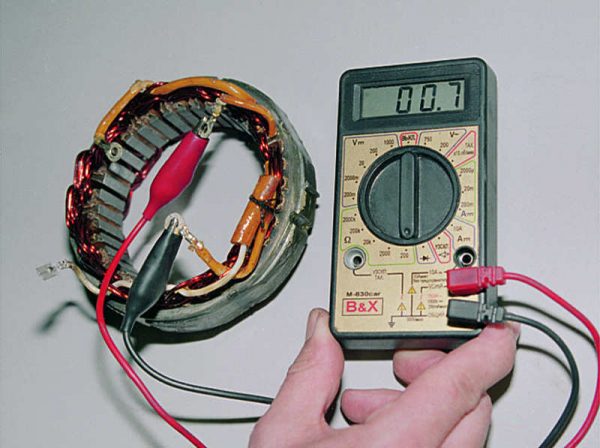
- On the device, select the resistance measurement mode and alternately connect the probes to the terminals of the windings. If there is no break, the resistance should be within 10 ohms. Otherwise, it will be infinitely large.To check the stator winding for an open circuit, it is necessary to connect the probes one by one to the winding terminals
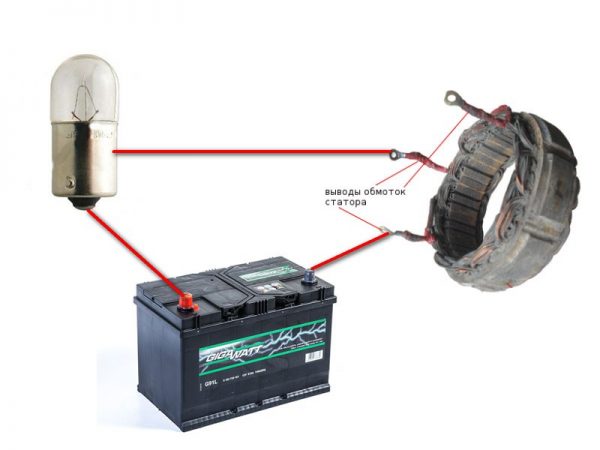
- If a lamp is used, then we connect the battery minus to one of the winding contacts, and connect the plus batteries through the lamp to another stator terminal. When the lamp lights up, the winding is considered serviceable. Otherwise, the part must be repaired or replaced.When diagnosing stator coils using a lamp, its connection is made in series with the battery and windings
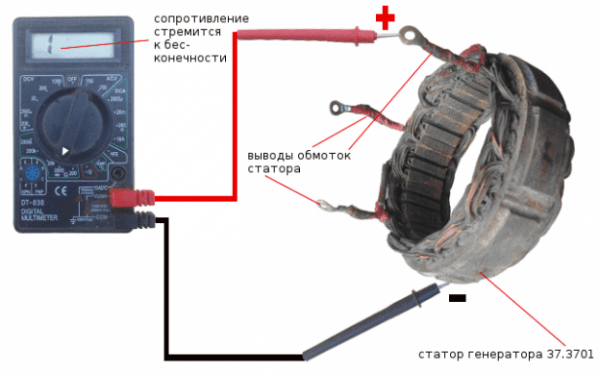
- To check the winding for a short to the case, we connect one of the multimeter probes to the stator case, and the other in turn to the winding terminals. If there is no short circuit, the resistance value will be infinitely large.If, when checking the stator short circuit to the case, the device shows an infinitely large resistance, the winding is considered to be in good condition.
- To diagnose the stator winding for a short circuit, we connect the minus battery to the case, and connect the plus through the lamp to the winding terminals. A glowing lamp will indicate a short circuit.
Belt check
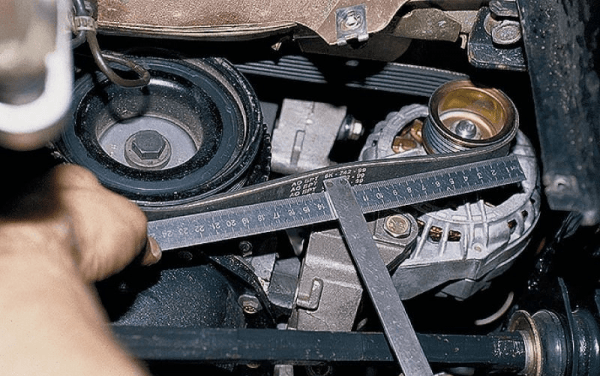
The generator is driven by a belt from the engine crankshaft pulley. Periodically it is necessary to check the tension of the belt, because if it is loosened, problems with charging the battery can occur. It is also worth paying attention to the integrity of the belt material. If there are visible delaminations, tears and other damage, the element needs to be replaced. To check its tension, follow these steps:
- We press one of the branches of the belt, for example, with a screwdriver, while simultaneously measuring the deflection with a ruler.The belt must be tensioned correctly, as over or under tension affects not only the battery charge, but also the wear of the alternator and pump bearings.
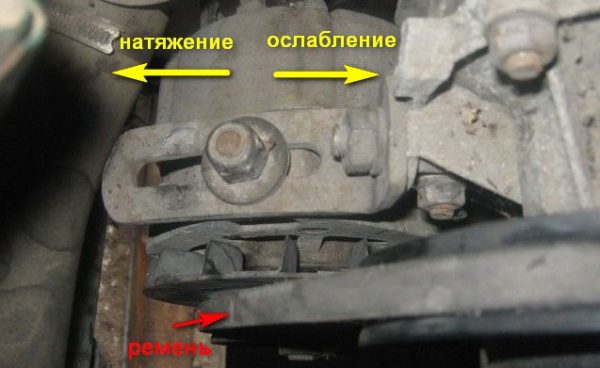
- If the deflection does not fall within the range of 12–17 mm, adjust the belt tension. To do this, unscrew the upper mount of the generator, moving the latter towards or away from the engine block, and then tighten the nut.To adjust the tension of the alternator belt, it is enough to loosen the nut located on top of its body and move the mechanism in the right direction, then tighten it
Checking the bearings
So that a generator malfunction caused by jammed bearings does not take you by surprise, when a characteristic noise appears, you need to check them. For this, the generator will need to be dismantled from the car and disassembled. We perform diagnostics in the following order:
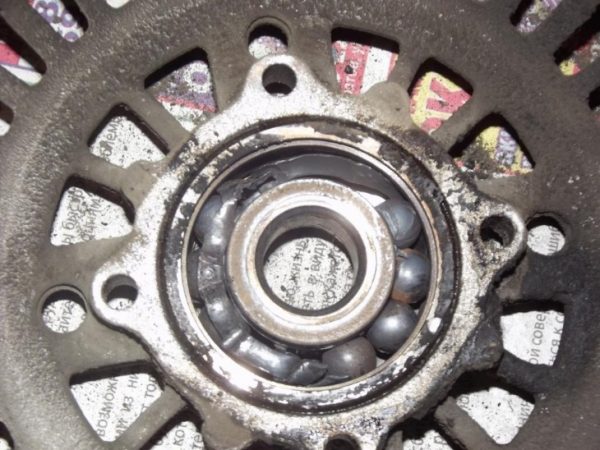
- We visually inspect the bearings, trying to identify damage to the cage, balls, separator, signs of corrosion.The alternator bearing can fail as a result of a crack in the cage, a broken separator, or a large output of balls.
- We check whether the parts rotate easily, whether there is noise and play, how big it is. With strong play or visible signs of wear, the product needs to be replaced.If during the diagnostics a crack was found on the generator cover, this part of the housing must be replaced
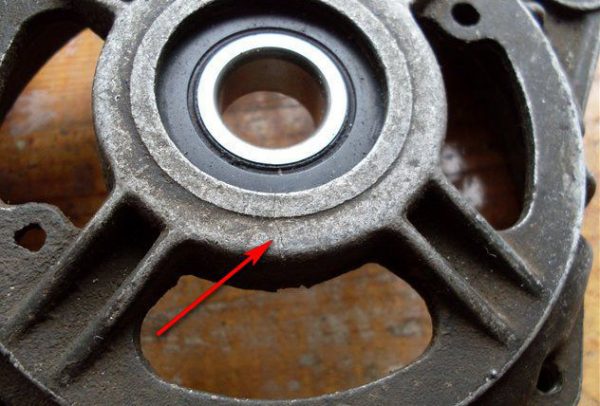
When checking, attention should also be paid to the front cover of the generator. It should not have cracks or other damage. If damage is found, the part is replaced with a new one.
Reasons for the failure of the VAZ 2107 generator
The generator on the "seven" fails infrequently, but breakdowns still happen. Therefore, it is worth knowing more about how malfunctions manifest themselves.
Breakdown or breakage of the winding
The performance of the generator directly depends on the health of the generator coils. With coils, a break and short circuit of the turns, a breakdown on the body can occur. If the rotor winding breaks, there will be no battery charge, which will be indicated by the glowing battery charge light on the dashboard. If the problem lies in the shorting of the coil to the housing, then such a malfunction mainly occurs at the points where the ends of the windings exit to the slip rings. The short circuit of the stator occurs due to a violation of the insulation of the wires. In this situation, the generator will get very hot and will not be able to fully charge the battery. If the stator coils are shorted to the housing, the generator will hum, heat up, and the power will decrease.
Previously, the generator windings were rewound in case of damage, but now almost no one does this. The part is simply replaced with a new one.
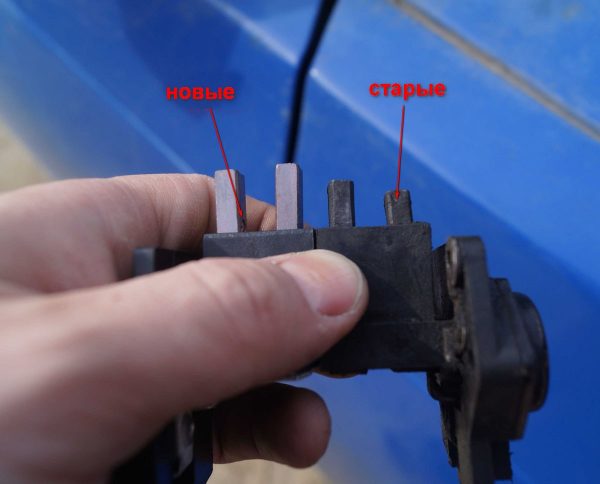
Brush wear
The generator brushes provide voltage to the field winding. Their malfunction leads to an unstable charge or its complete absence. In the event of a brush failure:
- consumers often disconnect for unknown reasons;
- lights are dim and flashing;
- the voltage of the on-board network drops sharply;
- The battery drains quickly.If the brushes are worn out, there are problems with the battery charge.
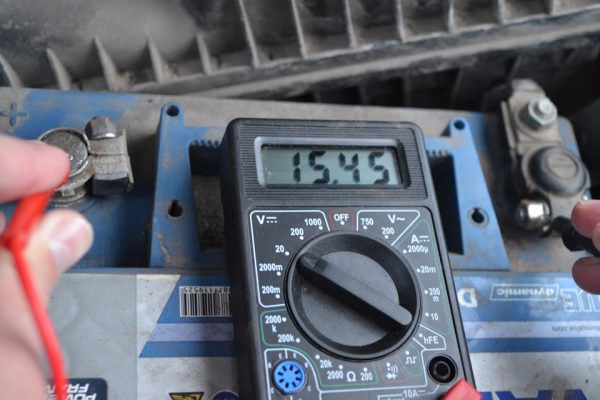
Relay-regulator
If, after starting the engine, the voltage at the battery terminals is lower than 13 V or significantly higher than 14 V, then the malfunction may be caused by a voltage regulator malfunction. Failure of this device can significantly reduce battery life. If after a night of parking the starter does not turn or you notice white smudges on the battery itself, then it's time to diagnose the relay-regulator.
This device may have the following problems:
- unreliable contact with brushes;
- breakdown of elements;
- internal break in the circuit.
The charge may be absent due to wear or freezing of the brushes, which is associated with the shrinkage of the springs during prolonged use.
Diode breakdown
The failure of the diode bridge may be preceded by:
- moisture ingress into the generator;
- dirt and oil;
- "lighting up the car" when the battery is completely discharged and the wires are connected incorrectly.Contamination of the generator with oil can cause failure of the diode bridge.
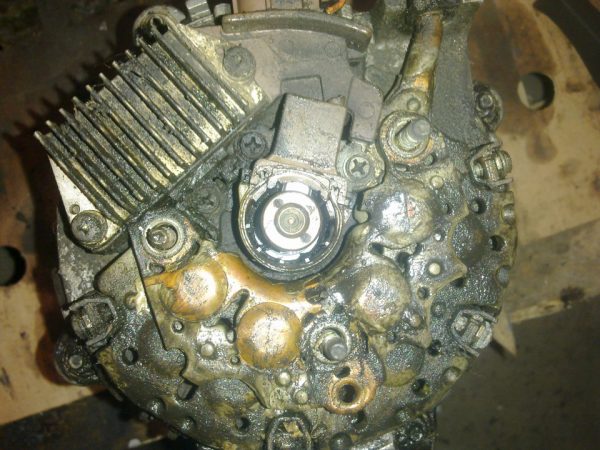
If the integrity of the diodes in the case of “lighting up” depends on the attentiveness of the car owner, then no one is safe from the impact of the first two factors.
Подшипники
The VAZ 2107 generator has 2 ball bearings that ensure the free rotation of the rotor. Sometimes the generator may make sounds that are uncharacteristic of its operation, for example, a hum or extraneous noise. Dismantling the alternator and lubricating the bearings can only temporarily fix the problem. Therefore, it is best to replace the parts. If they have exhausted their resource, then the generator will make a buzzing sound. It is not worth delaying the repair, since there is a high probability of jamming the assembly and stopping the rotor. Bearings can break and hum due to lack of lubrication, heavy wear, or poor workmanship.
Video: how generator bearings make noise

It is quite possible to fix any malfunction of the VAZ "seven" generator with your own hands. To identify a problem, it is not necessary to have special equipment, to have knowledge and skills in working with the electrical equipment of a car, although they will not be superfluous. To test the generator, a digital multimeter or a 12 V light bulb will suffice.

