Painting, anti-corrosion and optical treatment of car bodies
Content
 Car painting has two main functions. From an operational point of view, protective is more important when the paint protects the body surface from adverse external influences (aggressive substances, water, stone blows ...). However, for many motorists, the aesthetic impression of the paint is more important, therefore the color of the vehicle is one of the important criteria when choosing it.
Varnishing as a surface treatment originated in China and reached its peak in East Asia. The horse-drawn carriage was instrumental in expanding the area of the paint shop to vehicles. At that time (18th century), it was considered a public transport, which later went through various stages of development. For a long time, it was the basis of the first cars. Until the twentieth century AD, car body frames were made from a wooden frame, which was covered with synthetic leather. Only the hood and fenders were sheet metal that needed to be painted.
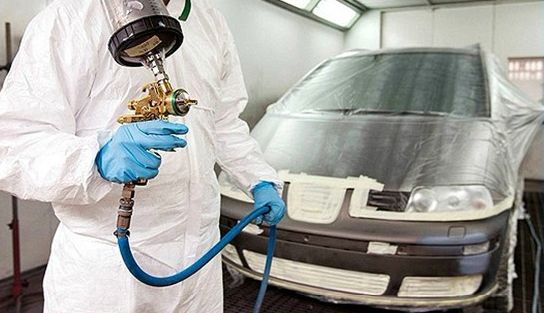
Previously, cars were painted by hand with a brush, which required the time and quality of the painter's work. Manual painting has been performed for a very long time in the production of car bodies on a conveyor belt. Modern varnishing techniques and new materials have helped increase automation, especially in industrial, batch varnishing. The basic modification was carried out in an immersion bath followed by individual spraying operations using hydraulically controlled robots.
Switching to metal hulls has shown another advantage in painting - the processing and drying time has been significantly reduced. The painting technique has also changed. They began to paint it with nitro-lacquer, which increased the number of manufactured parts. Although synthetic resin varnish was invented in the 30s, the use of nitro varnish in factories and repair shops continued until the 40s. However, both forms were gradually relegated to the background by a new technique - firing.
The main task of handicraft painting of cars is repair, to a lesser extent new painting, as well as special painting and marking. Skilled craftsmanship must keep pace with technical progress in the production of automobiles, in particular with changes in body materials (more plastic, aluminum, various shapes, galvanized sheet metal) or changes in paint (new colors, water-based materials) and related developments in in the field of repair and painting methods.
Painting after renovation
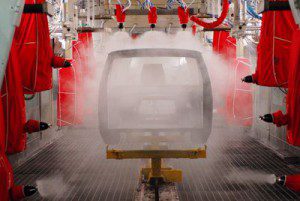
In this article, we will focus more on painting already painted surfaces, i.e. without painting new parts, acc. car bodies. Painting new parts is the know-how of every vehicle manufacturer, and it can be said that the painting process as such is largely identical, except for the initial steps involved in protecting the "raw" sheet metal from corrosion, such as soaking the body in a zinc solution.
Vehicle end users have a better understanding of painting techniques after repairing a damaged or replaced part. When painting your car after repair, remember that the final look depends on a number of factors. Not only from the quality choice of the finishing coat, but also from the whole process, which begins with the correct and thorough preparation of the sheet.
Painting, acc. Preparatory work consists of several stages:
- polishing
- cleaning
- compaction
- performance,
- camouflage,
- varnishing.
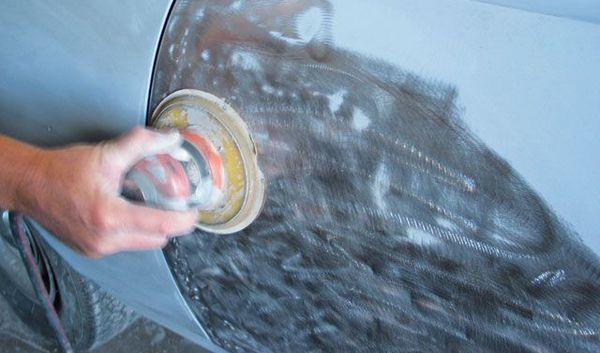
Grinding
Particular attention should be paid to sanding the sheet and individual intermediate layers, although sometimes this seems trivial or even minor operation in which only a flat surface is needed.
Consider the following when sanding:
- The correct choice of sandpaper depends on the area of sanding, whether we are sanding old / new sheet metal, steel sheet, aluminum, plastic.
- When sanding each subsequent layer, the grit size of the sandpaper should be three degrees finer than the previous one.
- To achieve proper sanding, wait until the solvents have completely evaporated and the film has dried, otherwise the material will roll under the paper.
- After sanding, the surface must be completely cleaned, all sanding residues, salts and grease must be removed. Do not touch the surface with bare hands.
cleaning
Before painting, acc. also before reapplying the sealant, or It is important to remove all contaminants such as sanding residues, salt residues from water and sandpaper, excess sealant in case of additional sealing or protection, grease from hands, all residues (including traces) of various silicone products, if any are used.
Therefore, the surface must be completely clean and dry, otherwise numerous defects may occur; craters and paint spreading, later also paint cracking and bubbles. Elimination of these defects is usually impossible and requires complete surface grinding and repainting. Cleaning is done with a cleaner that is applied to the surface in a clean dry, for example. also a paper towel. Cleaning is repeated several times during the preparation of the coating.
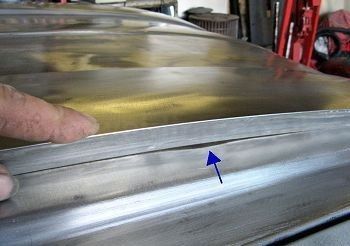
Sealing
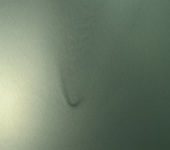
Sealing is the most common method for leveling recessed and defective vehicle parts. The picture below shows the junction of the ruler with the body, which must be filled with sealant. Usually, a place around the overhang is marked with a pencil, where it is necessary to apply the filler sealant.
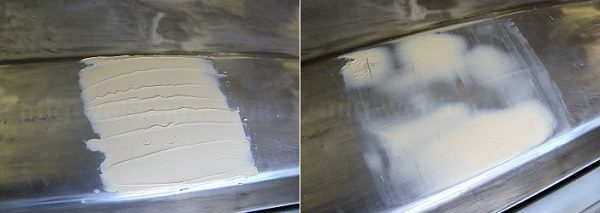
The putty is applied to the surface with a classic spatula in the place that we have previously marked with a pencil. The sealant is applied to bare metal, cleaned by grinding, to provide sufficient hardness and strength, although modern potting sealants must adhere firmly to any substrate. In the following picture, the surface is ready for filler application, respectively. the process of the so-called submission.
Causes and prevention of filling deficiencies
Spots on the top layer
 The reasons:
- too much hardener in the polyethylene sealant,
- insufficiently mixed hardener in polyethylene sealant.
Defect correction:
- sand to plate and re-seal.
Small holes
 The reasons:
- improper sealing (presence of air or too thick individual layers),
- the substrate is not dry enough,
- too thin a layer of primer.
Defect prevention:
- the shovel must be pressed several times in this place to release the air,
- if we seal with a greater thickness, it is necessary to apply several thin layers,
- dry the base materials well.
Defect correction:
- sand to plate and re-seal.
Lapping marks
 The reasons:
- sanding the sealant with an inappropriate (too coarse) sandpaper,
- sanding old paint with inappropriate sandpaper.
Defect prevention:
- use sandpaper of a given grain size (roughness),
- Sand large grooves with fine emery paper.
Defect correction:
- sand to plate and re-seal.
performance
Pouring is an important workflow before applying a top coat. The challenge is to cover and apply a thin layer of very small but visible bumps and scratches, and to cover and isolate the printed areas.
Different types of filler are used for different purposes:
- 2K polyurethane / acrylate based filler,
- thick-film (compact) fillers,
- water based fillers,
- fillers wet on wet,
- toning filler,
- transparent fillers (Fillsealer).
Camouflage
All unpainted parts and surfaces of vehicles must be covered, including decorative strips, which do not decompose or decompose.
Requirements:
- adhesive and cover tapes must be moisture resistant and at the same time heat resistant,
- the paper must be impervious so that ink does not penetrate through it.
Drawing
- Warm up the vehicle to room temperature (18˚C) before painting.
- The color and accompanying components (hardener and thinner) should also be at room temperature.
- The hardness of the grinding water should be as low as possible. Residual grinding water must be carefully wiped off, as salt residues can cause blistering of the painted surface.
- The compressed air must be dry and clean. The water separator must be emptied regularly.
- If we do not have a spray booth and we paint in the garage, we need to be especially careful about air humidity (for example, do not water the floor and then turn on the radiators to the maximum). If the humidity is too high, bubbles form accordingly. clamps acc. matting paint. It's the same with dust. The floors should be clean and dry and the airflow should be as low as possible.
- Paint booths and drying cabinets should be equipped with fresh air supply, dust filters and steam outlets to prevent paint smearing or dust accumulation on the paint.
- All sanded areas must be re-protected against corrosion.
- Each package has instructions for use in the form of pictograms. All data are given for an application temperature of 20 ° C. If the temperature is higher or lower, the operation must be adapted to the actual conditions. This is very important for pot life and drying, which can be shortened at higher temperatures, respectively. at a lower temperature longer than prescribed.
- The relative humidity is also very important, which should not be higher than 80%, as this greatly slows down drying and can also lead to incomplete drying of the paint film. Thus, for PE sealants, there will be gluing or. sandpaper clogging, in 2K coatings then blistering due to reaction with water. When using multi-component coatings and using a complete repair system, only products from one manufacturer should be used and the instructions should be followed, as this is the only way to achieve the desired performance. Otherwise, the surface may wrinkle. This defect is not caused by the inadequate quality of the materials, but by the fact that the materials in the system are incompatible. In some cases, wrinkles do not appear immediately, but only after a certain time.
Causes and prevention of defects when applying primers acc. colors
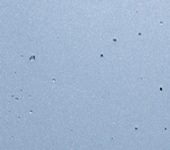
Bubble formation
 The reasons:
- too short ventilation time between layers,
- too thick primer layers,
- water residues after sanding in corners, edges, bends,
- the water is too hard to grind,
- contaminated compressed air,
- condensation due to temperature fluctuations.
Defect prevention:
- ventilation time between coats must be at least 10 minutes at 20 ° C,
- do not allow the water residues after sanding to dry, they must be wiped off,
- compressed air must be dry and clean.
Defect correction:
- sand to plate and reapply.
Bad, acc. insufficient adhesion to the substrate
 The reasons:
- poorly prepared substrate, traces of grease, fingerprints, dust,
- dilution of the material with an unsuitable (non-original) thinner.
Bug fix:
- clean the surface well before painting,
- use of prescribed diluents.
Defect correction:
- sand to plate and reapply.
Dissolving the substrate
 The reasons:
- undried, uncured previous painting,
- the layers of old paint are too thick.
Defect prevention:
- adhere to the prescribed drying time
- adhere to the prescribed coating thickness
Defect correction:
- sand to plate and reapply
Causes and prevention of marriage with two- and three-layer painting
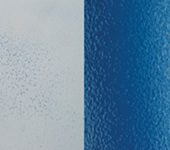
Spotting
 The reasons:
- unsatisfactory application technique (nozzle, pressure),
- too short ventilation time,
- using the wrong thinner,
- the painted surface is not at a suitable temperature (too cold, too warm).
Defect prevention:
- using the prescribed application technique,
- using a prescribed thinner,
- ensuring a suitable room temperature and surface to be painted (18-20 ° C) and a maximum humidity of 40-60%.
Defect correction:
- sand to the base and paint again.
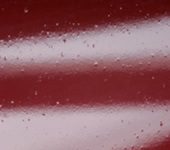
Dripping
 The reasons:
- unsuitable viscosity of HYDRO Base,
- HYDRO Substrate too thick,
- unsuitable spray gun (nozzle), pressure,
- too cold material, too low base or room temperature,
- using the wrong thinner.
Defect prevention:
- compliance with the technical instructions for use,
- using a suitable spray gun,
- the object and material are heated to room temperature + 20 ° C,
- using the prescribed diluent.
Defect correction:
- sand to the base and paint again.
Types of colors
Opaque colors are primary colors that are used alone or mixed with other colors to create new shades or as a base coat for special shades and effects. They are very often used with transparent colors, which give opaque colors a light shade according to needs and ideas, either directly by mixing these colors or by applying transparent layers directly to the opaque color. The recommended nozzle diameter when using opaque paints is 0,3 mm or more. If the paints are more diluted, a 0,2 mm nozzle can be used.
Transparent colors translucent colors with a semi-gloss effect. They can be mixed with other types of paints or applied directly to other types of paints. They are versatile and are used to achieve a large number of effects. Mixing with other types, you can achieve the desired shade. For example. By mixing transparent paints with aluminum paint, metallization of any shade is achieved. To create a glossy color with glitter, transparent colors and Hot Rod colors (mentioned below) are mixed. Transparent colors can also add a slight tint to opaque colors, creating a new hue to your liking. Paints can be mixed either directly together or applied transparent or opaque. The recommended nozzle diameter when using transparent paints is 0,3 mm or more. If the paints are more diluted, a nozzle with a diameter of 0,2 mm can be used.
Fluorescent paints translucent, neon colors with a semi-gloss effect. They are sprayed on a white background paint or on a light background created with opaque or transparent paints. Fluorescent paints are less resistant to UV radiation from sunlight than conventional paints. Therefore, they require varnish with UV protection. The recommended nozzle diameter for fluorescent paints is 0,5 mm or more. Nozzle diameter 0,3 resp. You can use 0,2 mm if the colors are more diluted.
Pearl colors they can be used alone for a pearly shimmer effect or with other colors. By mixing with transparent colors, you can create shimmery colors in your own shade. They are also used as base coats for Candy paints, resulting in a brilliant pearlescent color in various shades. To create a glossy effect, Candy paint is applied in two to four coats directly on the pearlescent paint. The recommended nozzle diameter for pearlescent paints is 0,5 mm or more. Nozzle diameter 0,3 resp. You can use 0,2 mm if the colors are more diluted.
Metallic used alone or in combination with other colors. These colors stand out best against a dark background (black is an opaque color). They can also be used as a base coat for clear or candy paints to create custom metallic shades that are created by simply applying two to four coats of clear/candy paint directly onto the metallic. The recommended nozzle diameter for metallic paints is 0,5 mm or more. Nozzle diameter 0,3 resp. You can use 0,2 mm if the colors are more diluted.
Colors of rainbow they can be used on their own to create a subtle rainbow effect that causes color cast to change when exposed to light, or as a base for other types of colors. They are often used as a base coat for clear or candy colors, with which they can create their own shades of rainbow effect colors (by applying two to four coats of clear/candy color directly onto the rainbow color). The recommended nozzle diameter for rainbow colors is 0,5 mm or more. Nozzle diameter 0,3 resp. You can use 0,2 mm if the colors are more diluted.
Hi-Lite colors they can be used against any colored background to achieve a distinctive color enhancing effect. They are designed to be applied in small amounts in one to three coats. The color-shifting effect is less pronounced in the Hi-Lite colors than in the emerald series. Hi-Lite colors are ideal for creating a subtle highlight effect that is best seen in daylight or direct artificial light. Colors can be mixed directly with transparent colors. As a result, the color will change easily. Over-mixing the colors will lose this effect and the colors will take on a milky pastel effect. Hi-Lite colors stand out very well against dark backgrounds such as opaque black. Recommended nozzle diameter for Hi-Lite paints is 0,5 mm or larger. Nozzle diameter 0,3 resp. You can use 0,2 mm if the colors are more diluted.
Emerald colors These are paints with a special pigment that works on the basis of the angles of break, which leads to a strong change in color shade. Emerald colors change their color dramatically depending on the angle of illumination. These colors stand out best against a dark background (opaque black). This shade is created by applying one to two thin coats of dark base paint followed by two to four coats of emerald paint. Thinning of these paints is not recommended, but if necessary, thinner should only be added in small doses to avoid over-thinning the paint. The recommended nozzle diameter for Emerald Paint is 0,5 mm or larger.
Colors flair are paints with a special pigment that acts on the basis of the break angles, which leads to a strong change in color shade. The color transition of these colors is smooth and clearly visible even in low light, and the effect is even more pronounced on uneven objects with sharp creases. Bright colors stand out best against a dark background (black background color). The desired effect is achieved by applying one to two thin coats of black base paint with two to four coats of Flair paint. Thinning these paints is not recommended, but add thinner only in small amounts if necessary to avoid over-thinning the paint. The recommended nozzle diameter for Emerald Paints is 0,5 mm or larger.
Sparkling colors these are colors with a slight shimmer. Their particle size is smaller than that of Hot Rod paints. These colors are translucent with a semi-glossy appearance. They stand out best against a dark background (black background color). Applying one to two thin coats of black primer and two to four coats of high gloss paint will achieve the desired effect. The recommended nozzle diameter for glittering paints is 0,5 mm or more. Nozzle diameter 0,3 resp. You can use 0,2 mm if the colors are more diluted.
Cosmic colors these are colors with the effect of fine stardust. Their particle size is smaller than Hot Rod paints. These colors are translucent with a semi-gloss appearance. They stand out best against a dark background (black background color). The desired effect is achieved by applying one to two thin coats of black base paint with two to four coats of Cosmic paint. To achieve a glossy color, Cosmic colors are mixed with clear or candy colors. To tint the resulting paint, two to five coats of any transparent paint must be applied to the Cosmic paint base. Space colors can also be mixed with each other to achieve a more vibrant color effect. You can also use their shimmering effect and apply on a substrate of any opaque color. The recommended nozzle diameter for Cosmic paints is 0,5 mm or more. Nozzle diameter 0,3 resp. You can use 0,2 mm if the colors are more diluted.
Hotrod paints they revive the so-called "Retro colors" of 50-60 cars. years, creating a very impressive shimmering effect that glows and sparkles in direct light. These colors stand out best against a dark background (black background color). The desired effect is achieved by applying one to two thin coats of black base paint with two to four coats of Hot Rod paint. To achieve shine, Hot Rod colors should be mixed directly with clear or candy paints. To touch up the resulting paint, apply one to four coats of any clear paint to the Hot Rod base. Hot Rod colors can also be mixed with each other for a more vibrant color effect. The recommended nozzle diameter for Hot Rod paint is 0,5 mm or larger. Nozzle diameter 0,3 resp. You can use 0,2 mm if the colors are more diluted.
Candy colors are high-gloss concentrated paints, which, even after complete drying, look like a freshly sprayed paint (the full glossy effect appears only after the top layer is applied). Although Candy colors are used as a base for a primer, they differ in many ways from the classic base colors. Candy paints without varnish are very susceptible to damage and should not be directly masked (they must be completely dry and painted before masking). When using Candy paints it is necessary to apply the top coat as soon as possible, as it protects the paint from dirt deposits and fingerprints, which this paint is very susceptible to. When spraying large areas, it is recommended to mix Candy paints with a transparent base due to their high concentration. It is necessary that the paint is completely dry, in the open air it can take several hours. The recommended nozzle diameter for Candy paints is 0,5 mm or more. Nozzle diameter 0,3 resp. If the colors are more diluted, 0 mm can be used.
Aluminum color available in three different grades depending on grain size: fine, medium, coarse. It is highly reflective and intended mainly as a base for candy flowers. It can be used alone to create an aluminum or metallic effect, or as a base coat for transparent paints to create any shade with a reflective effect. Another possible application is spraying different types of aluminum paints (fine, medium, coarse) and then applying any Candy paint. The result is a glossy paint with a transition between aluminum grains of different sizes. Aluminum paint covers well and one coat is usually sufficient for the entire painting. The recommended nozzle diameter for aluminum paints is 0,5 mm or more. Nozzle diameter 0,3 resp. You can use 0,2 mm if the colors are more diluted.
Spray painting
The current fast times are forcing vehicle owners to make the most of their motor mates and make the most of it. It also increases the pressure on the rate of repairs, including painting. If this is a minor damage, it is used to reduce the time and reduce the cost of the so-called partial repair for painting - spray. There are specialized companies on the market that have developed systems that allow you to work in this way.
When painting the Base, we are faced with three problems:
- The deviation of the shade of the new base relative to the original coating - it is affected by almost all factors: temperature, viscosity, pressure, layer thickness, etc.
- The appearance of a lighter streak of base on the parts where we spray (powder) and try to create a spray.
- Combining new clear paint with old, undamaged paint.
This problem can usually be avoided by following the instructions for proper surface preparation before painting and using materials that are intended for such painting.
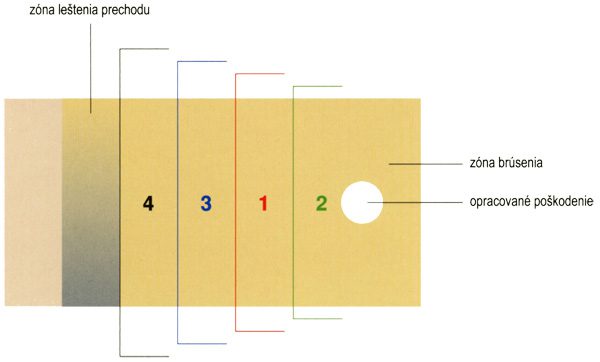
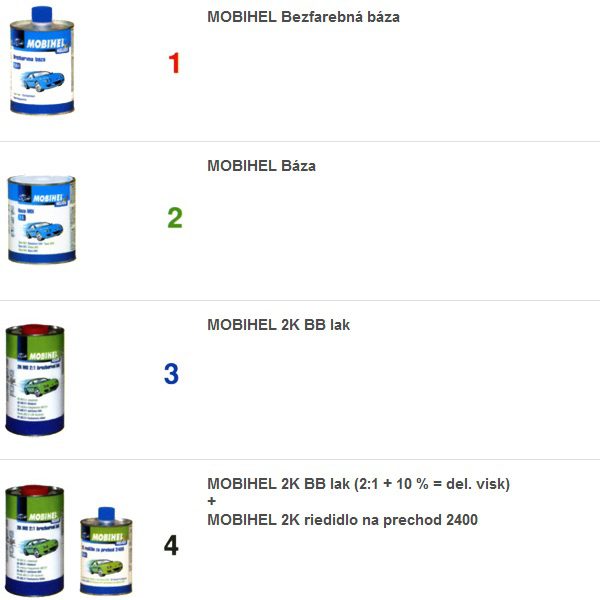
Spray paint scheme
Body repair
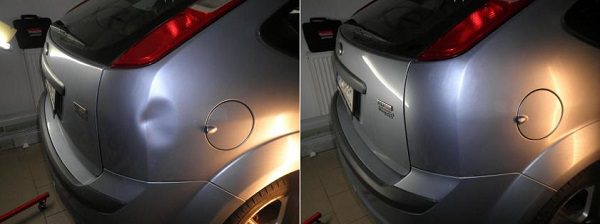
Body repair by PDR method (without painting dents)
Using the PDR method, it is possible to cold align sheet metal body parts with minor damage caused by, for example, a shock while parking, another car door, vandalism, hail, etc. The PDR method was not only developed to quickly and professionally repair these damages at a low cost, but above all to preserve the original paint and paint without the need for sanding, sanding and repainting of the damaged area.
The origins of the PDR method date back to the 80s, when a Ferrari technician damaged the door of one of the manufactured models and did not have the funds needed for subsequent repairs. Therefore, he tried to restore the door by squeezing the sheet with an iron lever. He then used this technique several more times and thus improved it to the point that he realized the possibility of a more spontaneous, respectively. more widespread use of this method and decided to go to the United States and use this technology to earn money, while at the same time having patented it. Only in the next twenty years did this method spread to the European continent, where, as in America, it had great success and became even more widely used.
Advantages:
- Keeping the original paint, free of putty, aerosols and the like, is very important, especially for newer and newer vehicles. The reason is obvious: in many cases it is possible to keep the original paint from the factory before spraying, which is of great importance for new, not yet sold cars.
- A significant reduction in the repair time, compared to conventional painting, this repair method is performed several times faster.
- Reduced Repair Costs – Less time spent on repairs and fewer materials used reduce repair costs.
- After the repair, there will be no traces left - after the completion of such repairs, the surface of the part will be like new.
- No sealant is used, so the area to be repaired is as resistant as other parts of the part to various loads, without the risk of cracking the sealant.
- Possibility to make repairs directly at the customer's place. Since the repair requires mostly the skilled hands of a mechanic and a few tools, the damaged area can be repaired almost anywhere and at any time.
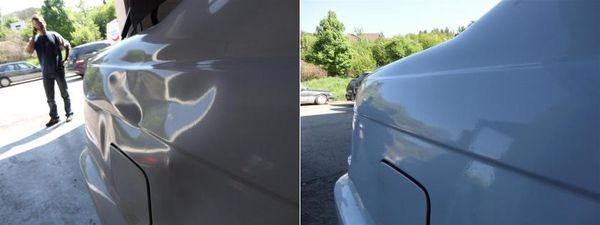
Repair procedure
The repair procedure is based on the gradual squeezing out of frayed sheet metal from the inside of the body without damaging the paintwork. The technician monitors the surface of the car body in the light of the fixing lamp. Surface irregularities distort the reflection of light, so the technician can determine the exact location and degree of overflow. The printing itself takes place gradually, requires skill and the use of special tools and devices of various shapes.