broken oxygen sensor
Content
broken oxygen sensor leads to increased fuel consumption, a decrease in the dynamic characteristics of the car, unstable operation of the engine at idle, an increase in exhaust toxicity. Usually, the reasons for the breakdown of the oxygen concentration sensor are its mechanical damage, breakage of the electrical (signal) circuit, contamination of the sensitive part of the sensor with fuel combustion products. In some cases, for example, when an error p0130 or p0141 occurs on the dashboard, the Check Engine warning light is activated. It is possible to use the machine with a faulty oxygen sensor, but this will lead to the above problems.
Purpose of the oxygen sensor
An oxygen sensor is installed in the exhaust manifold (the specific location and quantity may differ for different cars), and monitors the presence of oxygen in the exhaust gases. In the automotive industry, the Greek letter "lambda" refers to the ratio of excess oxygen in the air-fuel mixture. It is for this reason that the oxygen sensor is often referred to as a "lambda probe".
The information provided by the sensor on the amount of oxygen in the composition of the exhaust gases by the ICE electronic control unit (ECU) is used to adjust the fuel injection. If there is a lot of oxygen in the exhaust gases, then the air-fuel mixture supplied to the cylinders is poor (the voltage on the sensor is 0,1 ... Volta). Accordingly, the amount of fuel supplied is adjusted if necessary. Which affects not only the dynamic characteristics of the internal combustion engine, but also the operation of the catalytic converter of exhaust gases.
In most cases, the range of effective operation of the catalyst is 14,6 ... 14,8 parts of air per part of fuel. This corresponds to a lambda value of one. so, the oxygen sensor is a kind of controller located in the exhaust manifold.
Some vehicles are designed to use two oxygen concentration sensors. One is located before the catalyst, and the second is after. The task of the first is to correct the composition of the air-fuel mixture, and the second is to check the efficiency of the catalyst. The sensors themselves are usually identical in design.
Does the lambda probe affect the launch - what will happen?
If you turn off the lambda probe, then there will be an increase in fuel consumption, an increase in the toxicity of gases, and sometimes unstable operation of the internal combustion engine at idle. However, this effect occurs only after warming up, since the oxygen sensor starts to work at temperatures up to + 300 ° C. To do this, its design involves the use of special heating, which is turned on when the internal combustion engine is started. Accordingly, it is at the moment of starting the engine that the lambda probe does not work, and in no way affects the start itself.
The “check” light in the event of a breakdown of the lambda probe lights up when specific errors have been generated in the ECU memory associated with damage to the sensor wiring or the sensor itself, however, the code is fixed only under certain conditions of the internal combustion engine.
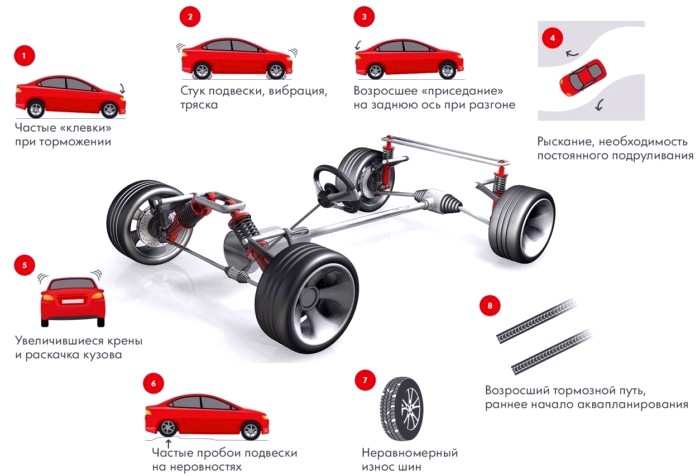
Signs of a broken oxygen sensor
The failure of the lambda probe is usually accompanied by the following external symptoms:
- Decreased traction and reduced vehicle dynamic performance.
- Unstable idle. At the same time, the value of revolutions can jump and fall below the optimum. In the most critical case, the car will not idle at all and without the driver gasping it will simply stall.
- Increase in fuel consumption. Usually the overrun is insignificant, but it can be determined by program measurement.
- Increased emissions. At the same time, exhaust gases become opaque, but have a grayish or bluish tint and a sharper, fuel-like smell.
It is worth mentioning that the signs listed above may indicate other breakdowns of the internal combustion engine or other vehicle systems. Therefore, in order to determine the failure of the oxygen sensor, several checks are needed using, first of all, a diagnostic scanner and a multimeter to check the lambda signals (control and heating circuit).
usually, problems with the oxygen sensor wiring are clearly detected by the electronic control unit. At the same time, errors are generated in its memory, for example, p0136, p0130, p0135, p0141 and others. Be that as it may, it is necessary to check the sensor circuit (check the presence of voltage and the integrity of individual wires), and also look at the work schedule (using an oscilloscope or a diagnostic program).
Reasons for the breakdown of the oxygen sensor
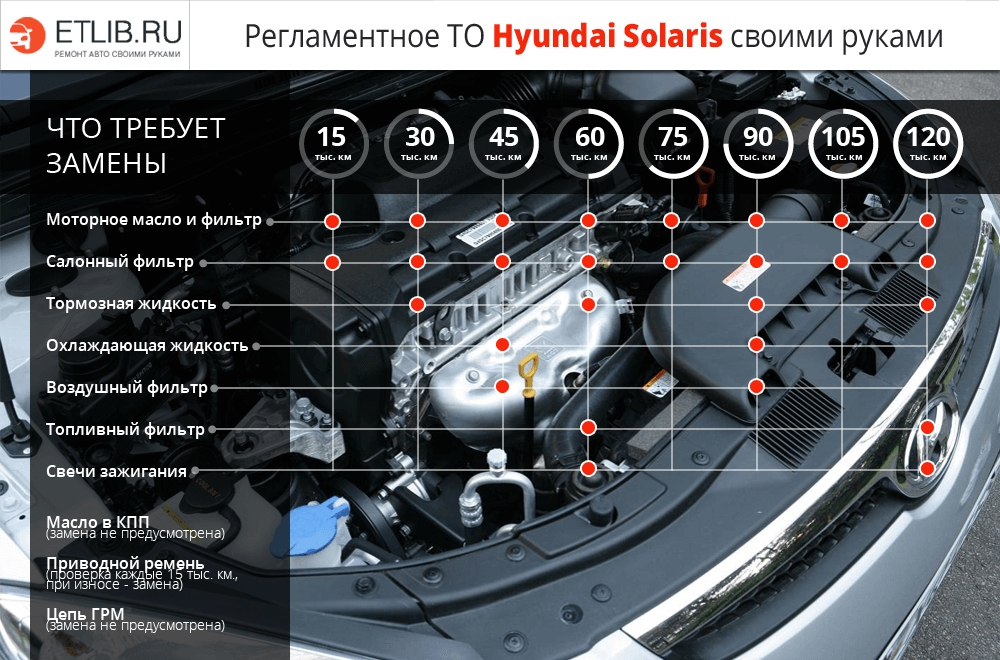
In most cases, oxygen lambda works for about 100 thousand km without failures, however, there are reasons that significantly reduce its resource and lead to breakdowns.
- broken oxygen sensor circuit. Express yourself differently. This may be a complete break in the supply and / or signal wires. Possible damage to the heating circuit. In this case, the lambda probe will not work until the exhaust gases warm it up to operating temperature. Possible damage to the insulation on the wires. In this case, there is a short circuit.
- Sensor short circuit. In this case, it completely fails and, accordingly, does not give any signals. Most lambda probes cannot be repaired and must be replaced with new ones.
- Contamination of the sensor with products of combustion of fuel. During operation, the oxygen sensor, for natural reasons, gradually becomes dirty and over time may stop transmitting correct information. For this reason, automakers recommend periodically changing the sensor to a new one, while giving preference to the original, since the universal lambda does not always display information correctly.
- Thermal overload. This usually happens due to problems with the ignition, namely, interruptions in it. Under such conditions, the sensor operates at temperatures that are critical for it, which reduces its overall life and gradually disables it.
- Mechanical damage to the sensor. They can occur during inaccurate repair work, when driving off-road, impacts in an accident.
- Use when installing the sensor sealants that cure at high temperature.
- Multiple unsuccessful attempts to start the internal combustion engine. At the same time, unburned fuel accumulates in the internal combustion engine, and namely, in the exhaust manifold.
- Contact with the sensitive (ceramic) tip of the sensor of various process fluids or small foreign objects.
- Leakage in the exhaust system. For example, the gasket between the manifold and the catalyst may burn out.
Please note that the state of the oxygen sensor largely depends on the state of other elements of the internal combustion engine. So, the following reasons significantly reduce the life of the lambda probe: the unsatisfactory condition of the oil scraper rings, the ingress of antifreeze into the oil (cylinders), and the enriched air-fuel mixture. And if, with a working oxygen sensor, the amount of carbon dioxide is about 0,1 ... 0,3%, then when the lambda probe fails, the corresponding value increases to 3 ... 7%.
How to identify a broken oxygen sensor
There are a number of methods for checking the status of the lambda sensor and its supply / signal circuits.
What should be done first when diagnosing?
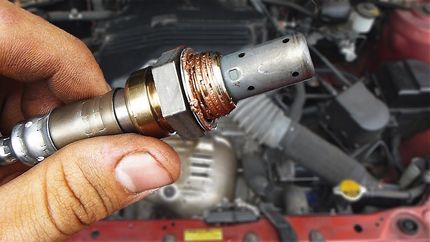
- it is necessary to estimate the amount of soot on the probe tube. If there is too much of it, the sensor will not work correctly.
- Determine the color of deposits. If there are white or gray deposits on the sensitive element of the sensor, this means that fuel or oil additives are used. They adversely affect the operation of the lambda probe. If there are shiny deposits on the probe tube, this indicates that there is a lot of lead in the fuel used, and it is better to refuse to use such gasoline, respectively, change the brand of gas station.
- You can try to clean the soot, but this is not always possible.
- Check the integrity of the wiring with a multimeter. Depending on the model of a particular sensor, it can have from two to five wires. One of them will be signal, and the rest will be supply, including for powering the heating elements. To perform the test procedure, you will need a digital multimeter capable of measuring DC voltage and resistance.
- It is worth checking the resistance of the sensor heater. In different models of the lambda probe, it will be in the range from 2 to 14 ohms. The value of the supply voltage should be about 10,5 ... 12 Volts. During the verification process, it is also necessary to check the integrity of all wires suitable for the sensor, as well as the value of their insulation resistance (both in pairs among themselves, and each to ground).
How to check lambda probe video
Please note that normal operation of the oxygen sensor is only possible at its normal operating temperature of +300°С…+400°С. This is due to the fact that only under such conditions does the zirconium electrolyte deposited on the sensitive element of the sensor become a conductor of electric current. also at this temperature, the difference between atmospheric oxygen and oxygen in the exhaust pipe will cause an electric current to appear on the sensor electrodes, which will be transmitted to the electronic control unit of the engine.
Since checking the oxygen sensor in many cases involves removing / installing, it is worth considering the following nuances:
- Lambda devices are very fragile, therefore, when checking, they should not be subjected to mechanical stress and / or shock.
- The sensor thread must be treated with special thermal paste. In this case, you need to make sure that the paste does not get on its sensitive element, as this will lead to its incorrect operation.
- When tightening, you must observe the value of the torque, and use a torque wrench for this purpose.
Accurate check of the lambda probe
The most accurate way to determine the breakdown of the oxygen concentration sensor will allow the oscilloscope. Moreover, it is not necessary to use a professional device, you can take an oscillogram using a simulator program on a laptop or other gadget.
Schedule for the correct operation of the oxygen sensor
The first figure in this section is a graph of the correct operation of the oxygen sensor. In this case, a signal similar to a flat sinusoid is applied to the signal wire. The sinusoid in this case means that the parameter controlled by the sensor (the amount of oxygen in the exhaust gases) is within the maximum permissible limits, and it is simply constantly and periodically checked.
Operating graph of a heavily contaminated oxygen sensor
Oxygen sensor lean burn schedule
Oxygen Sensor Operation Chart on a Rich Fuel Mixture
Oxygen sensor lean burn schedule
the following are graphs corresponding to a heavily contaminated sensor, ICE vehicle use of a lean mixture, a rich mixture, and a lean mixture. Smooth lines on the graphs mean that the controlled parameter has gone beyond the permissible limits in one direction or another.
How to fix a broken oxygen sensor
If later the check showed that the reason is in the wiring, then the problem will be solved by replacing the wiring harness or the connection chip, but if there is no signal from the sensor itself, it often indicates the need to replace the oxygen concentration sensor with a new one, but before buying a new lambda, you can use one of the following ways.
Method one
It involves cleaning the heating element from carbon deposits (it is used when there is a breakdown of the oxygen sensor heater). To implement this method, it is necessary to provide access to the sensitive ceramic part of the device, which is hidden behind a protective cap. You can remove the specified cap using a thin file, with which you need to make cuts in the area of \u5b\u100bthe sensor base. If it is not possible to dismantle the cap completely, then it is allowed to produce small windows about XNUMX mm in size. For further work, you need about XNUMX ml of phosphoric acid or a rust converter.
The recovery procedure is performed according to the following algorithm:
- Pour 100 ml of phosphoric acid into a glass container.
- Dip the ceramic element of the sensor into the acid. It is impossible to completely lower the sensor into acid! After that, wait about 20 minutes for the acid to dissolve the soot.
- Remove the sensor and rinse it under running tap water, then let it dry.
Sometimes it takes up to eight hours to clean the sensor using this method, because if the soot was not cleaned the first time, then it is worth repeating the procedure two or more times, and you can use a brush to perform surface machining. Instead of a brush, you can use a toothbrush.
The second method
Assumes burning out carbon deposits on the sensor. To clean the oxygen sensor by the second method, in addition to the same phosphoric acid, you will also need a gas burner (as an option, use a home gas stove). The cleaning algorithm is as follows:
- Dip the sensitive ceramic element of the oxygen sensor in acid, wetting it abundantly.
- Take the sensor with pliers from the side opposite from the element and bring it to the burning burner.
- The acid on the sensing element will boil, and a greenish salt will form on its surface. However, at the same time, soot will be removed from it.
Repeat the described procedure several times until the sensitive element is clean and shiny.