PTF fuse on Priore
Content
- What are the relays in the Lada Priora mounting block responsible for?
- What are the fuses in the Lada Priora mounting block responsible for?
- Video: Lada Priora (VAZ-2170). Electrical diagnostics.
- How to replace relays and fuses on a Lada Priora
- How to remove and replace the relay and fuse mounting block on the Lada Priore
- Answers to common questions related to replacing relays and fuses on the Lada Priora
- Fuses and relays in Lada Priore, wiring diagrams
- Fuse box in the cabin VAZ-2170, -2171, -2172
- Additional block
- Block in the engine compartment
Most of the car's electrical circuits are protected by fuses installed in the mounting block. The mounting block is located in the instrument panel on the lower left side and is closed with a cover. Before replacing a blown fuse, find out the cause of the blown fuse and fix it. When troubleshooting, it is recommended to check the circuits that are protected by this fuse. The following describes where the fuses are located and how to replace them. This page describes the fuse blocks for the above and above 2
Mounting block for relays and fuses VAZ 2170 - Lada Priora.
Where is it located: in the cabin, on the instrument panel on the left side from below under the cover.
Open three locks
Location of relays and fuses
Location of relays and fuses in the mounting block: 1.2- clamps; K1 - relay for turning on the electric fan of the radiator of the engine cooling system; K2 - relay for turning on the heating of the rear window frets earlier; KZ - starter enable relay; K4 - additional relay (ignition relay); K5 - place for a backup relay; K6 - relay for turning on the washer and wipers; K7 - relay high beam headlights; K8 - relay for turning on the sound signal; K9 - alarm relay; K10, K11, K12 - places for a backup relay; F1-F32 - pre-fuses
Explanation of previous fuses F1-F32
The chain is protected (decrypted)
Radiator fan for engine cooling system
Even such a trifle as changing the fuses in a car plunges drivers into a certain stupor. This is especially true for owners of Lada Priora cars. In today's article, I will tell you in detail how to change the fuses on the Priore and give a detailed description of what each of the fuses is responsible for.
Most of the car's electrical circuits are protected by fuses installed in the mounting block. The mounting block is located in the instrument panel on the lower left side and is closed with a cover.

The marking of fuses and relays is located on the inside of the cover.
What are the relays in the Lada Priora mounting block responsible for?
And now I’ll tell you what is responsible for what in the mounting block. We look at the figure above K1 - K12 is a relay. Fuses F1 - F32.
- 1,2 — tweezers.
- K1 - relay for turning on the electric fan of the radiator of the engine cooling system.
- K2 - relay for turning on the heated rear window.
- K3 - starter enable relay.
- K4 - additional relay (ignition relay).
- K5 - a place for a backup relay.
- K6 - relay for turning on the washer and wipers.
- K7 - high beam relay.
- K8 - Relay for turning on the sound signal.
- K9 - Alarm relay.
- K10 - K12 Space for spare relay.
What are the fuses in the Lada Priora mounting block responsible for?
And now let's go through the fuses:
- Fuse F1 is responsible for the radiator fan of the engine cooling system
- Fuse F2 is responsible for heating the rear window
- Fuse F3 is responsible for the high beam (starboard side)
- F4 fuse is responsible for high beam (left side)
- Fuse F5 is responsible for the sound signal
- Fuse F6 is responsible for low beam (left side)
- Fuse F7 is responsible for low beam (starboard side)
- F8 fuse is responsible for the alarm
- Fuse F9 is responsible for the heater fan
- Fuse F10 is responsible for the instrument cluster, interior lighting, brake light
- Fuse F11 is responsible for the wipers, heated rear window (control)
- Fuse F12 is responsible for the output devices "15
- Fuse F13 is responsible for the cigarette lighter
- Fuse F14 is responsible for the side light (left side)
- Fuse F15 is responsible for the parking light (starboard side)
- Fuse F16 is responsible for output "15" ABS
- Fuse F17 is responsible for the left fog light
- Fuse F18 is responsible for the right fog lamp
- Fuse F19 is responsible for seat heating
- F20 fuse is responsible for the immobilizer control unit
- Fuse F21 is responsible for the rear fog lamp
- Fuse F22 - F30 - spare fuse location
- F31 fuse is responsible for the power unit control unit
- F32 Fuse - Spare Fuse Location
Video: Lada Priora (VAZ-2170). Electrical diagnostics.
How to replace relays and fuses on a Lada Priora
So, now let's turn to the question of how to replace relays and blown fuses in a Lada Priora car
- And the first thing we have to do is disconnect the “─” terminal from the battery.
- Rotate the three latches on the fuse and relay box cover 90.

- After overcoming the resistance of the latches, remove the cover.
- Install a fuse of the same rating as the one removed in the socket.
- Small relays on the mounting block can also be removed using fuse clips. The remaining relays will need to be removed manually, since the design of the relay clamps located on the mounting block provides for ribs on the side surfaces of the relay, and there are no such relays on this mounting block.
- Install the relay of the same type as the one removed. Fuses of different ratings are painted in different colors. In addition, the fuse is marked with the numerical value of the current for which it is designed (rated).


How to remove and replace the relay and fuse mounting block on the Lada Priore
But there are often times when simply replacing the relay and fuse is not enough. In this case, the entire mounting block must be replaced. For this:
- Disconnect the negative battery terminal
- Removing the Mounting Block Cover
- We unscrew the screw that secures the mounting block to the instrument panel
- We remove the mounting block from the instrument panel by unhooking it from the mounting hooks.
- Remove all relays and fuses from the mounting block
- We press the clamps on the wiring terminals
- We remove the terminals with wires from the mounting block and remove the mounting block from the car


Answers to common questions related to replacing relays and fuses on the Lada Priora
So, now I would like to answer common questions related to replacing fuses with Lada Priora:
What fuse goes to the Lada Priora cigarette lighter?
In the Lada Priora car, the F13 fuse is responsible for the functionality and operation of the cigarette lighter. I marked it on the screenshot.
What fuse goes to the wipers in the Lada Priora car?
In the mounting block, fuse F11 is responsible for the operation of the wipers (wipers), in addition, in the event of a malfunction, I recommend checking relay K6, it is responsible for the operation of the washer and wipers (wipers)
What fuse on the Priora goes to the low beam?
If you need to replace the low beam fuse, open the mounting block and pay attention to the fuse F6 and F7, they are responsible for the low beam operation on the left and right side, respectively.
What fuse is responsible for the stove on the Lada Priora
F9 fuse is responsible for the operation of the stove in the Lada Priora car, turning on the heater or stove fan
What fuse goes / is responsible for the windows on the Lada Priora
F31 fuse is responsible for the functionality of power windows and electrical accessories, it is located in the unit control unit
Fuses and relays in Lada Priore, wiring diagrams
Lada Priora is another car in the line of new VAZ cars, which is gaining popularity among segments of the population. The external resemblance to the 10th model attracts the attention of young people, the relatively low price is also a reason for buying for most motorists. Along with the growth in popularity, the owners of this model are gaining experience in repair and maintenance, which is becoming more and more every year.
If your Priora has electrical problems, do not rush to get upset, first check the fuses and relays on the Lada Priore. It is about them that will be discussed in this article.
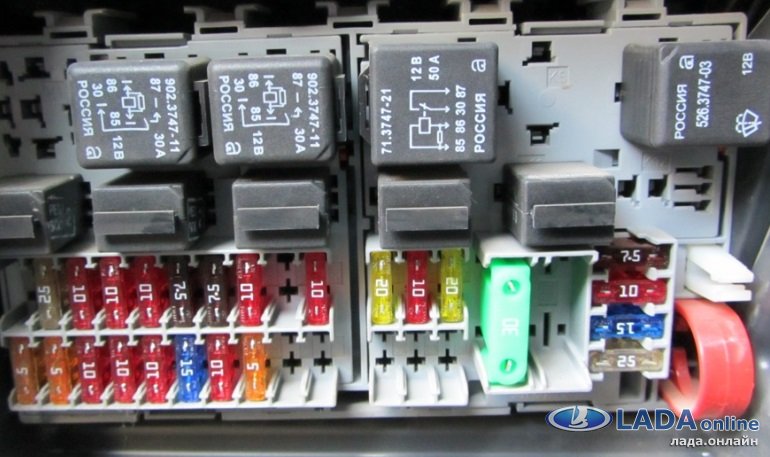
Fuse box in the cabin VAZ-2170, -2171, -2172
The Priore fuse box is located at the bottom of the dashboard, to the left of the steering wheel. To get to it, you need to open the cover, which is held on by three latches. Rotate each latch knob 90 degrees and pull the cover down to open.
Fuses in the passenger compartment mounting block
F1 (25 A) - radiator cooling fan.
If your fan is not working, test the motor by running 12 volts directly from the battery. If the engine is running, then it is most likely a wiring or connector issue. Check the serviceability of relay K1.
The fan in Prior usually turns on at a temperature of 105-110 degrees. Do not allow the motor to overheat, follow the arrow on the temperature sensor.
If the fan runs constantly and does not turn off, check the coolant temperature sensor located on the thermostat. If you remove the operation sensor connector, the fan should turn on. Check the wiring to this temperature sensor, as well as the contacts of relay K1, move this relay, clean the contacts. If so, replace it with a new relay.
F2 (25 A) - heated rear window.
Check together with fuse F11 and relay K2. If the rear window does not fog up, the resistor wires may have broken. Inspect the entire thread, and if you find a break, seal it with glue or special varnish, which can be purchased at car dealerships at a price of 200-300 rubles.
Check the connections on the terminals to the heating elements on the edges of the windows, as well as the switch on the dashboard and the wiring from it to the rear window.
F3 (10 A) - high beam, right headlight.
F4 (10 A) - high beam, left headlight.
If the headlights do not turn on to high beam, check the K7 relay and the headlight bulbs. The steering column switch, wiring or connectors may also be faulty.
F5 (10 A) - sound signal.
If the signal does not work when you press the button on the steering wheel, check relay K8. The signal itself is located under the radiator grill, you can get to it by removing the plastic casing from above. Check it by connecting 12V voltage. If it does not work, try turning the adjusting screw or replace it with a new one.
F6 (7,5 A) - dipped beam, left headlight.
F7 (7,5 A) - dipped beam, right headlight.
When replacing bulbs, be careful, there are separate bulbs for high beam and low beam, so they can easily be confused. It is better not to put lamps in powerful headlights, reflectors can melt, but there will be no desired effect.
Most low beam problems that are not fixed by conventional means can be related to the lighting control module (CCM). The low beam relay is only on cars equipped with a light sensor, it is located instead of the K1 relay, on most cars this relay is not on the mounting block, the low beam circuit passes through the MCC block. It happens that the tracks burn out on the block, in case of problems it is better to replace it with a new one.
If the “windshield wipers” turn on spontaneously when the dipped beam does not work properly, then the point is most likely in the wiper control unit located in the center of the torpedo, the upper unit, next to the radio, is better to get the glove box from the passenger compartment, or manually through the console lining, which was removed at the feet.
F8 (10 A) - alarm.
If the alarm does not work, also check relay K9.
F9 (25 A) - stove fan.
If your stove does not work in any mode, the problem may be in the stove speed controller or in the motor. Check the stove motor by applying 12 V directly to it. If it does not work, disassemble it, open the cover and check the condition of the brushes. If the stove does not work only in the first mode, but works in the second, then most likely it is necessary to replace the heater resistor, which is located under the hood on the fan snail.
The price of these resistors is about 200 rubles. Also check that the filter and all air ducts are clean and that the air is properly supplied to the oven. If your stove fan squeaks or spins hard, try lubricating it. If the stove turns on and off, check the connectors and contacts on them, they may have melted or rusted, in this case, replace the connector.
If the car has air conditioning, then the thermal fuse may blow, it is located next to the additional resistor, the fan fuse in the configuration with air conditioning is located under the hood in the power fuse box.
F10 (7,5 A) - dashboard, interior lighting, brake lights.
If the arrows on your device and the sensors on the panel have stopped working, most likely the problem is in the connector that fits it. Check if it has fallen and inspect its contacts. It can also be wear on the tracks on the shield. In this case, you need to disassemble the panel and inspect it. Disassembly is easy by unscrewing the screws at the top under the casing, at the bottom in the fuse cover and on the side.
If your brake lights are not working including the cab light, it is most likely the switch at the base of the brake pedal, check it and replace it. If some brake lights work and others don't, it's likely they've burned out. The headlight must be removed to replace the bulb. To prevent the lamps from burning out, replace them with better ones.
F11 (20 A) - heated rear window, wipers.
If the heating does not work, see information on F2.
If the front wipers do not work, check the tightness of the axle nuts, check the operation of the gear motor by disassembling it and applying 12 V to it. If the motor is faulty, replace it with a new one. Removing the engine is problematic by design, so it is best to contact a car service.
The price of a new engine is about 1800 rubles (if the car is not under warranty). Also check the steering column switch, it may have failed or its contacts have oxidized.
F12 (10 A) - output of 15 devices.
F13 (15 A) - cigarette lighter.
If your cigarette lighter does not work, check its contacts and wiring. Usually problems with the cigarette lighter arise due to a short circuit after using non-standard or low-quality connectors. The center console must be removed to replace the cigarette lighter.
F14 (5 A) - lamps of left dimensions.
F15 (5 A) - lamps of suitable dimensions.
If your dimensions stop working and the dashboard backlight does not light up, then most likely it is the light control module (MUS), check all the connectors and contacts on them, if the module is out of order, replace it with a new one. If the dashboard backlight works, but the dimensions do not, most likely the problem is in the wiring or contact. Don't forget to check the bulbs.
F16 (10 A) - contact 15 ABS.
F17 (10 A) - left fog lamp.
F18 (10 A) - right fog lamp.
If the PTF stopped working, the lamps may have burned out, check for voltage at their connectors. If there is no voltage, then in addition to the fuses, either wiring, or connectors, or relays. Also check the power button in the cabin.
"Fog" lights can be replaced by unscrewing the bumper or one side of it, or unscrewing the fender liner and turning the wheels towards the headlight to be replaced, or you need to unscrew the protection from below.
It is impossible to install xenon on PTF, because there is no tilt angle corrector, and there is a high probability of blinding oncoming drivers.
F19 (15 A) - heated seats.
If the front seat heater stops working, check the connector under the seat, the wiring, and the power button.
F20 (5 A) - immobilizer.
The immobilizer blocks the ignition circuits and the operation of the fuel pump. If the immobilizer does not see or loses the key, and also does not work correctly, try replacing the key battery. The power plant control unit could fail, which is located in the center of the torpedo, in the radio area, the second unit from the top with a black box. If you have lost the key and want to use a new one, you need to register it in the immobilizer firmware.
If you turn off the immobilizer, a lamp with a key symbol will light up on the panel, which means that it is looking for a key.
F21 (7,5 A) - rear fog lamp.
F22-30 - backup fuses.
F31 (30 A) - power unit control unit.
Relay in cabin mounting block
K1 - radiator cooling fan relay.
See information about F1.
K2 - relay for turning on the heated rear window.
See information about F2.
K3 - starter enable relay.
If the starter does not turn when the key is turned, first check the voltage of the battery and the contacts of its terminals, if necessary, clean them of oxidation and tighten them tightly. Charge the dead battery or replace it with a new one. There may also be no common ground contact in the engine compartment or a contact in the electromagnetic relay, check the tightness of the nuts and hold the wire terminals well.
You can check the starter by closing its contacts directly with a screwdriver in the neutral position of the gearbox or by applying a positive from the battery to one of the retractor contacts. If it spins, then the problem is in the wiring or in the ignition switch. If not, the starter or retractor is most likely defective.
Another reason may be the lack of contacts in the ignition switch. Also check the contact group, cables and connectors.
K4 - additional relay (ignition relay).
K5 - backup relay.
K6 - front wiper and washer relay.
See information about F11.
If the washing machine does not work, in the cold season, check the pipes of the washing machine system for frozen liquid, as well as blockages, and also inspect the nozzles. Check the pump and its contacts by applying a voltage of 12 V to it, the pump is connected to the washer fluid reservoir. If the pump is defective, replace it with a new one.
K7 - high beam relay.
See information about F3, F4.
K8 - horn relay.
See information about F5.
K9 - alarm relay.
Check together with fuse F8.
K10, K11, K12 - reserve relays.
Additional block
Additional relays are mounted on a bar and located under the instrument panel, not far from the front passenger's feet. To get to them, you need to remove the right tunnel lining. Along with additional relays is an electronic engine control unit (ECU).
If your connector interferes with access to the relay, disable it by first removing the "negative" battery terminal.
F1 (15 A) - main relay circuit, start blocking. Circuit breakers
F2 (7,5 A) - power supply circuit of the electronic control unit (ECU).
F3 (15 A) - electric fuel pump.
If the fuel pump has stopped pumping (this can be determined by the lack of sound of its operation when the ignition is turned on), check together with the K2 relay. There may also be problems with the immobilizer, it blocks the operation of the pump, see information on F20. If the wiring, this fuse and relay are ok, the fuel pump is most likely bad. To remove it, you need to disconnect the battery, remove the rear seat cushion, unscrew the cap, ring and fuel hoses, then carefully remove the entire fuel pump.
K1 is the main relay.
K2 - electric fuel pump relay.
See above at F3.
Block in the engine compartment
The power fuse block is located in the engine compartment under the hood, near the left pillar support. To get to it, you need to pry off the lid on the latch.
2 (30 A) - circuit on board the car. 1 (30 A) - engine control circuit.
In case of problems with the electronic control unit, short circuits and other malfunctions, this fuse may blow.
3 (40 A) - circuit on board the car.
4 (60 A) - generator circuit.
5 (50 A) - electric power steering circuit.
6 (60 A) - generator circuit.
When any problem arises, it is important not to panic, to reason soberly and logically. The most important thing is to diagnose and determine the cause of the breakdown. If you don’t have enough experience or nerves, it’s easier to sign up for the nearest car service if they have a competent electrician.