Breakdown of the ignition coil
Content
Under the term breakdown of the ignition coil or a candle tip is understood as a breakdown in the weakest point of the body or wire insulation due to a decrease in resistance that occurs in short periods of time. This is mechanical damage that leads to the appearance of cracks or melting. On the surface of the housing, the breakdown site looks like black, burnt dots, longitudinal tracks or white cracks. Such places of flashing sparks are especially dangerous in wet weather. This failure leads not only to a violation of the ignition of the mixture, but also to the complete failure of the ignition module.
Often, such places are not difficult to notice visually, but sometimes it is necessary to check the ignition coil, and not with a multimeter or oscilloscope, but with a simple two-wire device. When a damaged area is identified, the part is usually completely changed, although sometimes it is possible to delay the replacement with electrical tape, sealant, or epoxy glue.
What is a breakdown of the ignition coil and its causes
Let us briefly dwell on what a coil breakdown is, what it affects and how it looks visually. First of all, it should be recalled that the coil itself is a transformer having two windings (primary and secondary) isolated from each other. The definition of a breakdown is understood as a physical phenomenon when, due to damage to the primary and / or secondary windings of the coil, part of the electrical energy does not fall on the candle, but on the body. This leads to the fact that the spark plug does not work at full power, respectively, the internal combustion engine begins to "troit", its dynamics are lost.
Ignition coil device
There can be many reasons for the breakdown of the ignition coil. - damage to the insulation of one or both windings, damage to the body of the tip, damage to its rubber seal (due to which water gets inside, through which electricity “sews”), the presence of dirt on the body (similarly with water, current passes through it), damage (oxidation) of the electrode in the tip. However, most often the problem lies in the "wired" insulator, and therefore, to eliminate the problem, this place must be localized and insulated.
An interesting reason for the failure of the tips of the ignition coil is the fact that when replacing the spark plug, in some cases, car owners, through negligence or inexperience, can break their waterproofing. This can lead to moisture getting under them and causing problems with the operation of the internal combustion engine. The opposite case is that when a car enthusiast tightens the top nuts of the candle cups too tightly, there is a risk that oil from the internal combustion engine will begin to penetrate into the body of the latter. And this oil is harmful to the rubber from which the tips of the coils are made.
Also, the reason that the spark breakdown goes outside the cylinder is incorrectly set gaps on the spark plugs. This is especially true if the gap is increased. Naturally, the spark in this case adversely affects both the candle body and the rubber tip of the ignition coil.
Symptoms of a broken ignition coil
Signs of a broken ignition coil consist in the fact that the internal combustion engine periodically “troit” (triple is actual in rainy weather, and when starting the engine, “on cold”), there are “failures” when accelerating the car, when visually inspecting the coil, there are “paths” of electrical breakdown, burning of contacts, traces thermal overheating, the presence of a large amount of dirt and debris in the coil body and other, smaller, breakdowns. The most common cause of coil failure is a break in its primary or secondary windings. In some cases, simply damage to their insulation. At the initial stage, the coil will work more or less normally, but over time the problems will worsen, and the symptoms described above will manifest themselves to a greater extent.
There are several typical signs of breakdown of the ignition coil. It’s worth mentioning right away that the breakdowns listed below can be caused by other reasons, so diagnostics should still be carried out comprehensively, including by checking the condition of the ignition coils. So, breakdown symptoms can be divided into two types - behavioral and visual. Behavioral includes:
- The internal combustion engine starts to "troit". And over time, the situation is getting worse, that is, “trimming” is expressed more and more clearly, the power and dynamics of the internal combustion engine are lost.
- When trying to accelerate quickly, a “failure” occurs, and when idling, the engine speed does not increase sharply in the same way. there is also a loss of power under load (when carrying heavy loads, driving uphill, and so on).
- "Tripling" of the internal combustion engine often appears in rainy (wet) weather and when starting the internal combustion engine "cold" (especially typical for low ambient temperatures).
- In some cases (on older cars) the smell of unburnt gasoline may be present in the cabin. On newer cars, a similar situation can occur when, instead of more or less clean exhaust gases, the smell of unburned gasoline is added to them.
When dismantling the ignition coil when it breaks, you can observe visual signs that it is completely or partially out of order. Yes, they include:
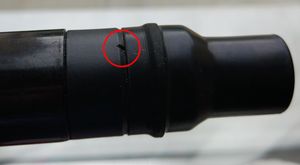
- The presence of "breakdown tracks" on the coil body. That is, the characteristic dark stripes along which electricity “flashes”. In some, especially "neglected" cases, scales occur on the tracks.
- Change (cloudiness, blackening) of the color of the dielectric on the housing of the ignition coil.
- Darkening of electrical contacts and connectors due to burning.
- Traces of overheating on the coil body. Usually they are expressed in some "streaks" or a change in the geometry of the case in some places. In "severe" cases, they may have a burnt smell.
- High contamination on the coil body. Especially near electrical contacts. The fact is that electrical breakdown can occur precisely on the surface of dust or dirt. Therefore, it is desirable to avoid such a state.
the basic sign of a coil failure is the absence of ignition of the fuel mixture. However, this situation does not always appear, since in certain cases part of the electrical energy still goes to the candle, and not just to the body. In this case, you need to conduct additional diagnostics.
Well, on modern cars, in the event of a breakdown of the ignition coil, the ICE electronic control unit (ECU) will inform the driver about this by activating the Check Engine lamp on the dashboard (and the misfire diagnostic code). However, it can also light up due to other malfunctions, so this requires additional diagnostics using software and hardware.
The signs of breakdown described above are relevant if individual ignition coils are installed in the internal combustion engine. If the design provides for the installation of one coil common to all cylinders, then the internal combustion engine will stall completely (this, in fact, is one of the reasons why several individual modules are installed on modern machines).
How to test a coil for breakdown
You can check the breakdown of the ignition coil in one of 5 ways, but usually, an ordinary car enthusiast has the opportunity to use only three of them. The first is a visual inspection, because often the breakdown site is noticeable to the eye; the second check with a multimeter, and the third, and the most reliable quick method, if nothing is visually noticeable, is to use the simplest tester of the ignition system (it is easy to do it yourself).
Diagnostics of the ignition system
Recommendations for diagnosing the ignition system (spark plugs, wires, coils, module). Instructions on how to check the ignition units of a car with your own hands Read more
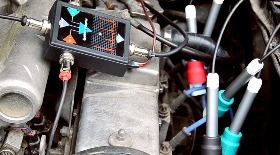
To check the operation of the ignition system, first of all, you should use the program for reading errors from the computer. Usually in such cases, it shows errors from groups P0300 and P0363, indicating misfires in one of the cylinders. However, please note that in this case, errors can be caused not only by faulty coils or spark plug tips. Therefore, in order to make sure that the failure is with one of them, it is worth rearranging the problem node to another cylinder, erasing errors from the ECU memory and diagnosing again.
If the problem is in the coil (we are talking about an individual coil), then the error situation will repeat, but with another cylinder indicated. True, when it is a breakdown of the coil, and such that there are gaps, then you can already understand by the tripping of the internal combustion engine, see the broken insulator track with your eye, or even hear a characteristic crackle with your ear. Sometimes at night, in addition to cod, you can also see a spark appearing.
Visual inspection
The next way to determine the breakdown of the ignition coil is to dismantle it and visually inspect it. As practice shows, on the coil body it is usually not difficult to find the very “path” of breakdown along which the spark “sews”. Or you should pay attention to chips, potholes, violation of geometry in the coil body, which were not there before.
Measurement of parameters
There are two mandatory methods for checking the condition of the ignition coil - checking for a spark and checking the insulation resistance of both windings (low and high voltage). To measure the parameters, you will need a working spark plug and a multimeter with the ability to measure insulation resistance. But it is most reliable to use a spark generation tester, only with a little modification, in order to be able to drive the conductor along the coil body and look for that weak point of the insulation that breaks through.
Homemade spark tester
The most interesting and reliable method of how to check the breakdown of the ignition coil is to use a special homemade probe. It helps when the defect is not visually visible, checking the resistance of the windings did not reveal a problem, and there is no way to use an oscilloscope. To make a spark tester you will need:
- medical disposable 20 cc syringe;
- two pieces of flexible copper wire (PV3 or similar) with a cross-sectional area of 1,5 ... 2,5 mm², each about half a meter long;
- small crocodile mount;
- a known-good spark plug (you can take a used one);
- a piece of heat shrink with a diameter slightly larger than the total diameter of the existing copper wire;
- a small piece of flexible wire;
- electric soldering iron;
- manual or electric hacksaw (grinder);
- thermal gun with silicone pre-loaded into it;
- screwdriver or electric drill with a drill with a diameter of 3 ... 4 mm.
- mounting knife.
The sequence of the manufacturing process consists of the following steps:
Ready tester
- Using a mounting knife, you need to remove its “nose” from the syringe, where the needle is put on.
- With a hand saw or grinder, you need to cut the thread on the candle in such a way as to remove the part of the body on which this thread is applied. As a result, only the electrode will remain at the bottom of the candle.
- In the upper part of the syringe body, a hole of such a diameter must be made so that a spark plug processed in advance can be inserted there.
- Solder with a thermal gun around the ring the junction of the candle and the body of the plastic syringe. do it carefully, in order to produce good hydraulic and electrical insulation.
- The syringe plunger in its front and rear parts must be drilled with a screwdriver.
- In the drilled hole in the lower part, you need to pass the previously prepared two pieces of flexible copper wire. To the opposite end of one of them, you need to solder the prepared crocodile mount using a soldering iron. The opposite end of the second wire should be lightly stripped (about 1 cm or less).
- Insert the prepared metal wire into a similar hole in the upper part.
- Approximately in the middle of the piston, copper wires and wire are connected to each other into a single contact (solder).
- The junction of the wire with the wire must be soldered with a thermal gun for mechanical strength and reliability of contact.
- Insert the piston back into the body of the syringe so that the wire at the top of the piston is at some distance from the spark plug electrode (the distance will be adjusted later).
How to determine the breakdown of an ignition coil with a spark tester
After a home-made tester was made to search for a penetration site, it is the procedure that must be performed according to the following algorithm:
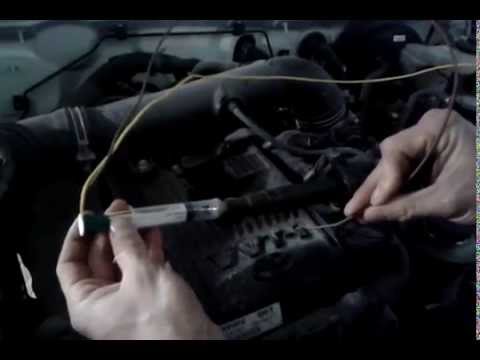
Finding a breakdown with a homemade tester
- Connect the ignition coil to be tested to the spark plug in the tester.
- On the corresponding nozzle (where the coil was disconnected), disconnect the connector so that the fuel does not flood the spark plug well during the test.
- Connect the wire with the alligator clip to the negative terminal of the battery or simply to ground.
- In the syringe, set a gap of about 1 ... 2 mm.
- Start DVS. After that, a spark will appear in the syringe body between the spark and the wire.
- The stripped end of the second wire (connected in parallel) must be moved along the coil body. If there is a penetration on it, then a spark will appear between the body and the end of the wire, which can be clearly seen. This makes it possible not only to verify its presence, but also to determine the place of its occurrence for further elimination of the breakdown.
- Repeat for all coils in turn, while remembering to disconnect and connect the corresponding fuel injectors.
The verification method is simple and versatile. With its help, you can not only find the place where the spark “sews” along the body, but also determine the general working condition of the ignition coil.
This is done by adjusting the gap between the spark plug electrode and the wire on the syringe plunger. At the initial stage, a minimum gap is set with a value of about 1 ... 2 mm and gradually increases. The value of the gap at which the spark disappears depends on the volume of the internal combustion engine, the type and condition of the ignition system, and other factors. On average, for an internal combustion engine with a volume of about 2 liters or less, the distance at which the spark should disappear is about 12 mm, but this is conditional. In general, when checking all individual ignition coils, you can simply compare their work with each other and identify a faulty element, if any.
How to eliminate a breakdown
As for the question of how to fix the breakdown that has arisen, then there are two options - fast (“field”) and slow (“garage”). In the latter case, everything is simple - it is advisable to completely change the coil, especially if the breakdown is significant. As for quick repairs, either electrical tape or glue is used for this.
Insulating a damaged coil
The most interesting question for car owners in this context is how to eliminate the breakdown of the injector ignition coil? In the simplest case, that is, if there is a small breakdown of a spark on the case (and this is the most common type of breakdown), after localizing this place, you need to use insulating materials (insulating tape, heat shrink, sealant, epoxy glue or similar means, in some cases, even nail polish is used, but the varnish should only be colorless, without any paints and additives), to insulate the place (path) of the breakdown. It is impossible to give universal advice, it all depends on the specific situation.
When performing repairs, it is imperative to clean and degrease the place of electrical breakdown before applying a protective insulating layer to it. This will increase the resistance value of the resulting insulation. If, when the insulation is damaged and breakdown occurs, liquid appears in the coil (usually from a damaged seal), then it is worthwhile to additionally use dielectric grease.
Well, in the most difficult case, you can, of course, install a new coil. It can be original or not original - depends on the price. Many car owners are saved by the so-called "dismantling", that is, places where you can buy spare parts from disassembled cars. There they are cheaper and it is quite possible to find high-quality components.
Finally, a few words about preventive measures that will allow you to get rid of troubles and operate the coil for a very long time and without problems. The simplest measure in this context is to use heat shrink of a suitable (large) diameter, which must be applied to the surface of the ignition coil tip. The procedure is simple, the main thing is to choose a heat shrink of a suitable size and diameter, and also have a hair dryer (preferably a building one) or some kind of gas burner on hand. However, before applying the heat shrink, be sure to clean and degrease the working surface of the tip. This procedure can also be used not as a preventive, but quite a repair measure.
also, for prevention, it is desirable to maintain the coil body, and other elements of the internal combustion engine, in a clean state so that there are no “flashing” sparks through dirt and dust. And when replacing spark plugs, always use dielectric grease for spark plugs.