
Reducer VAZ 2103: device, principle of operation, troubleshooting
Content
VAZ 2103, like the whole "VAZ classic", is a rear-wheel drive car: such a technical solution was considered the most appropriate at the time of release of this model. In this regard, the role of the rear axle and one of its key components - a gearbox with a main gear installed in it - increased.
Functions and principle of operation
The rear axle reducer (REM) is part of the vehicle's transmission. This unit changes direction and increases the value of the torque, which is transmitted from the propeller shaft to the axle shafts of the driving wheels.... The engine rotates at high speed (from 500 to 5 thousand revolutions per minute), and the task of all transmission elements is to transform the direction and angular speed of the rotational movement of the motor and ensure efficient operation of the driving wheels.
Gearbox specifications
The VAZ 2103 gearbox is suitable for any "classic" VAZ model, but the engine operation after installing a "non-native" gearbox may change. This is due to the design features of such a gearbox.
Ratio
Each type of REM installed on the VAZ 2101–2107 has its own gear ratio. The lower the value of this indicator, the more “speedy” the gearbox is. For example, the gear ratio of the "penny" REM is 4,3, a gearbox with a gear ratio of 4,44 is installed on the "two", i.e. the VAZ 2102 is a slower car compared to the VAZ 2101. The VAZ 2103 gearbox has a gear ratio of 4,1, 2106, i.e., the speed performance of this model is higher than that of the “penny” and “two”. The fastest of the REM "classics" is the unit for the VAZ 3,9: its gear ratio is XNUMX.
Video: an easy way to determine the gear ratio of any gearbox

Number of teeth
The gear ratio of the REM is related to the number of teeth on the gears of the main pair. On the "three-wheel" REM, the drive shaft has 10 teeth, the driven one - 41. The gear ratio is calculated by dividing the second indicator by the first, that is, 41/10 = 4,1.
The number of teeth can be determined from the marking on the gearbox. For example, in the inscription "VAZ 2103 1041 4537":
- VAZ 2103 - type of gearbox;
- 10 and 41 - the number of teeth of the driving and driven shafts, respectively;
- 4537 is the number of the final drive gear set.
The consequences of installing an abnormal gearbox
You should be aware that the installation of a "faster" REM does not mean an automatic increase in the vehicle speed. For example, if on a VAZ 2103 instead of a "native" gearbox with a gear ratio of 4,1, use a VAZ 2106 unit with a gear ratio of 3,9, then the car will become 5% "faster" and by the same 5% "weaker". It means that:
- effective torque will decrease by 5%;
- to accelerate to a certain speed, a lower number of engine revolutions will be required, that is, to accelerate, for example, to 120 km / h, 3900 rpm will be enough instead of 4400. The problem is that now the engine may not have enough power to spin up to 3900 rpm.
Thus, if you installed an abnormal REM with a different gear ratio on the VAZ 2103, then in order to maintain the dynamic performance of the car, a proportional change in engine power will be required.
Any gearbox can be installed: if it is normal, it will not buzz with any gearbox. However, you need to take into account the gear ratio of the gearbox: if you put it with a lower number, the car will be faster, but it will go slower. And vice versa - if you put it with a large number, it will accelerate longer, but go faster. And also the readings of the speedometer change. Do not forget about the traffic cops: it is better to set the same as it should be, and the engine is better.
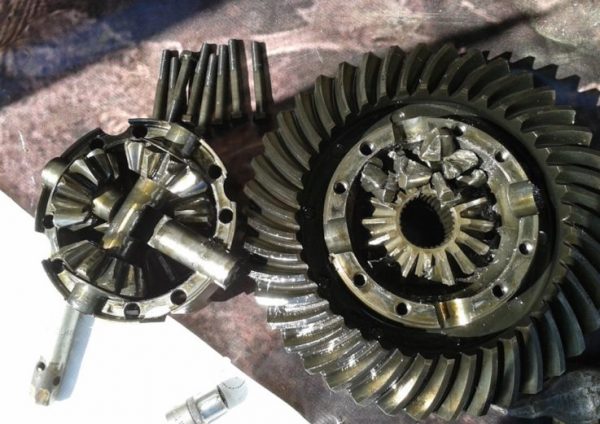
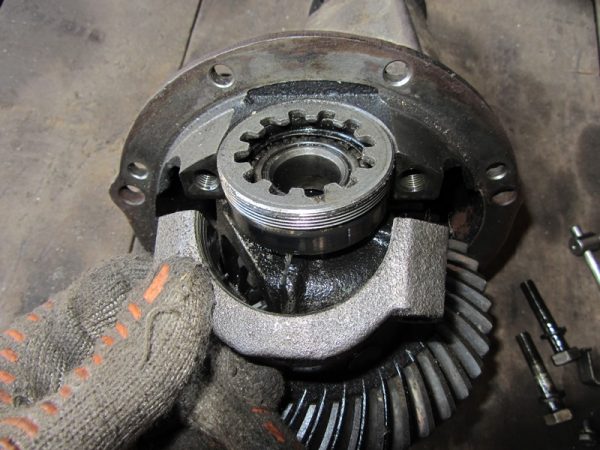
Gearbox device
The design of the REM is typical for the "classic" VAZ. The main components of the gearbox are the planetary pair and the center differential.
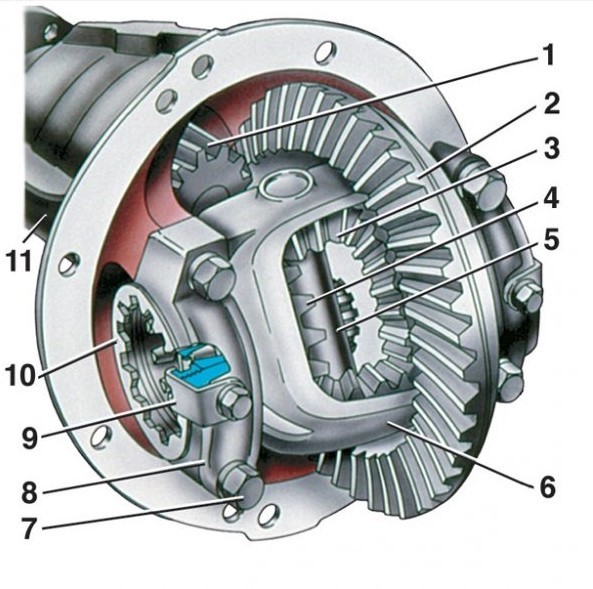
The VAZ 2103 gearbox consists of:
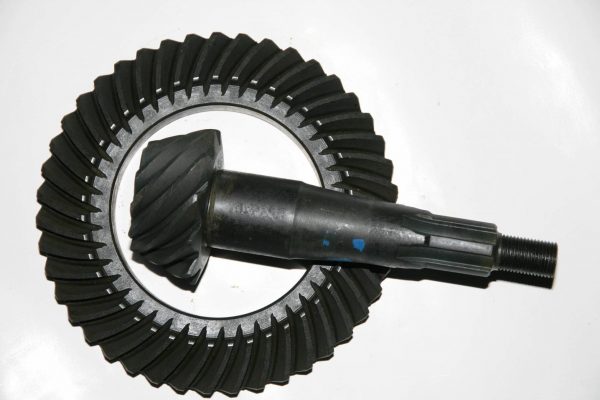
- Bevel drive gear.
- Planetary driven gear.
- Satellites.
- Half-axle gears.
- Satellite axes.
- Differential boxes.
- Mounting bolts of the box bearing caps.
- Differential box bearing caps.
- Bearing adjusting nut.
- Reducer housing.
Planetary pair
The drive and driven gears, called the planetary pair, form the main transmission of the REM. The axes of these gears are displaced relative to each other and intersect without crossing. Thanks to the use of specially shaped teeth, an optimal mesh is obtained. Gear design allows multiple teeth to engage simultaneously... At the same time, more torque is transmitted to the axle shaft, the load on each tooth is reduced and the durability of the mechanism increases.
Подшипники
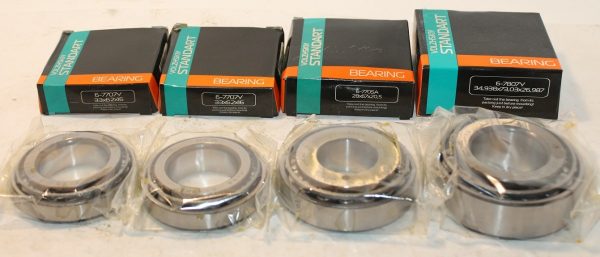
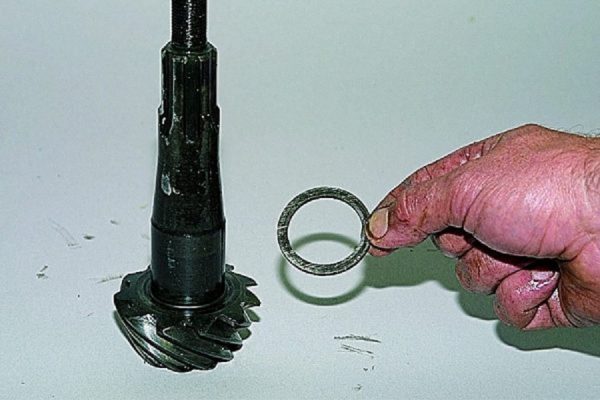
The pinion gear is held by two roller bearings of the 6-7705U and 6-7807U types. For precise adjustment of the mutual position of the gears of the main pair, an adjusting washer is placed between the inner bearing and the end of the gear. The thickness of such a ring can vary from 2,55 to 3,35 mm with the possibility of fixing every 0,05 mm. Thanks to the 17 permissible washer sizes, it is possible to quite accurately adjust the position of the gears and ensure their correct engagement.
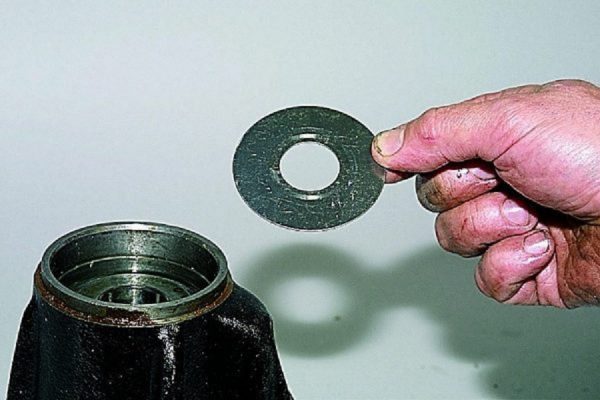
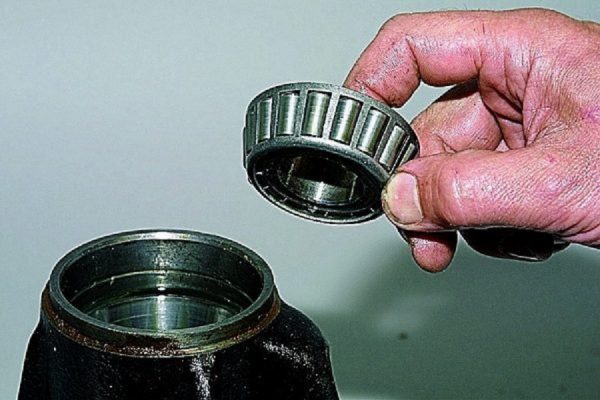
Rotation of the driven gear is provided by two bearings of the 6-7707U type. To prevent axial displacement of the gears, preload is created in the bearings with tension nuts and spacer plates.
Flange and differential
The flange fixed on the shank of the gearbox provides the connection of the main gear with the propeller shaft. The center bevel differential consists of two satellites, two gears, a box and a satellite axis... The differential allows the rear wheels to rotate at different angular speeds.
Signs of a gearbox malfunction
Many REM malfunctions can be diagnosed by the changed sound of a running machine and the appearance of extraneous noise. If a knocking, crunching and other noises are heard from the side of the gearbox during movement, this indicates a malfunction or failure of any part of the unit. If an abnormal noise appears in the rear axle, you should pay attention to the oil level in the gearbox and check how correctly the REM is adjusted (especially if it is after repair or newly installed).
Crunch when moving
Hearing a crunch from the gearbox when the car is moving, you should immediately take measures to prevent even greater malfunctions. The appearance of a rattle and crunch suggests that, most likely, you will have to change bearings or gears. If the bearings have not yet failed, but are already very worn out and do not rotate well, a rumble will be heard from the side of the RZM, which is not present during the operation of a working unit. Most often, the causes of crackling and hum from the side of the gearbox while the car is moving are:
- unacceptable wear or complete destruction of gears or bearings of the main drive;
- unadjusted gear engagement;
- broken hole for the pinion axle in the differential box;
- low oil level in the gearbox.
Wheel jammed
The reason that one of the rear wheels of the car is jammed may also be a malfunction of the REM. If the driver ignored the appearance of extraneous noises, which were caused by the failure of the differential bearings, this may result in deformation of the axle shafts and wheel wedging.
Gearbox adjustment
If the REM malfunctions appear during engine operation, most often it is necessary to dismantle the gearbox and disassemble it. After that, it will be possible to determine what is needed to troubleshoot: adjustment, replacement of individual parts of the REM, or the installation of a new gearbox.
Dismantling the gearbox
To dismantle the REM, you will need:
- hex key 12;
- set of open-end wrenches;
- jack;
- supports for the rear axle;
- shoes for wheels;
- container for draining the oil.
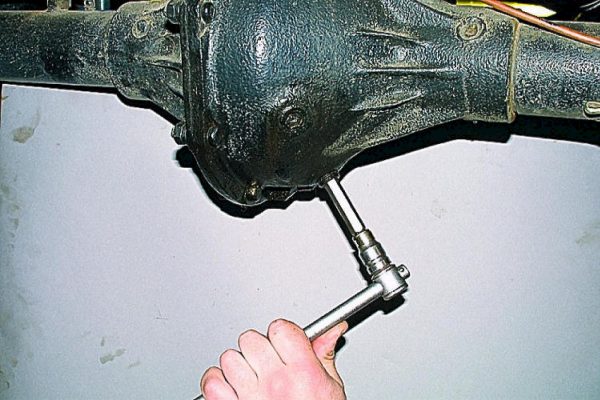
To dismantle the REM, you must:
- Position the machine over the inspection pit and place shoes under the front wheels.
- Unscrew the drain plug and drain the oil into a container prepared in advance.
 Before dismantling the gearbox, unscrew the drain plug and drain the oil into a container prepared in advance
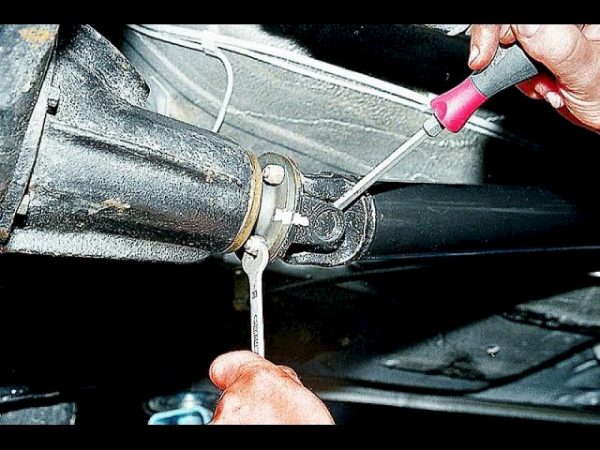
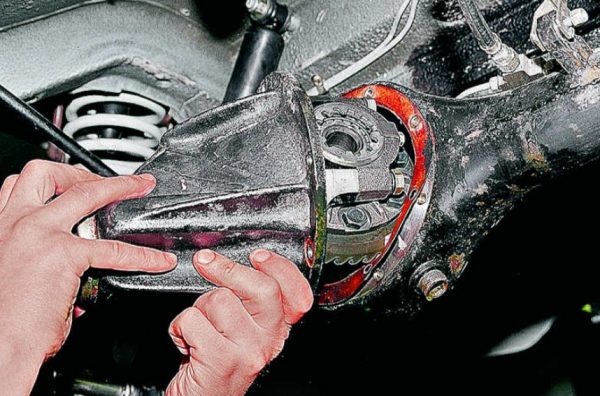
 - Disconnect the cardan shaft from the flange, move the shaft to the side and tie it with wire to the jet thrust.The cardan shaft must be disconnected from the flange, taken aside and tied with wire to the jet thrust
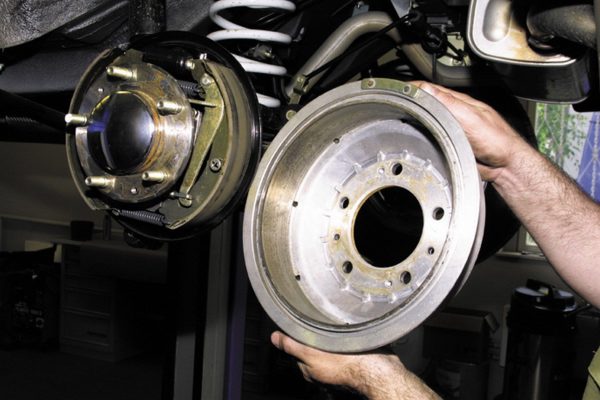
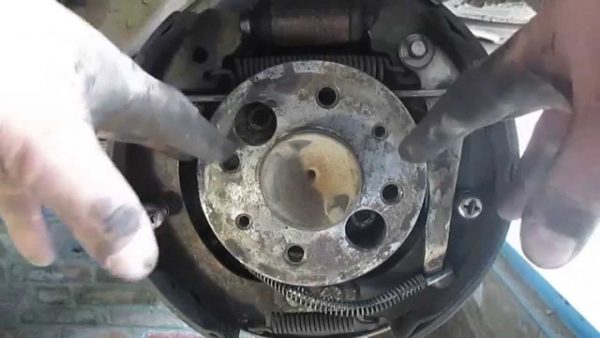
- Raise the rear axle with a jack and place supports under it. Remove wheels and brake drums.Next, you need to remove the wheels and brake drums.
- Remove axle shafts from axle housing.After that, the axle shafts are removed from the rear beam
- Detach the gearbox from the beam using an open-end wrench and remove the RZM from the machine.After the fasteners are unscrewed, the gearbox can be removed from the seat
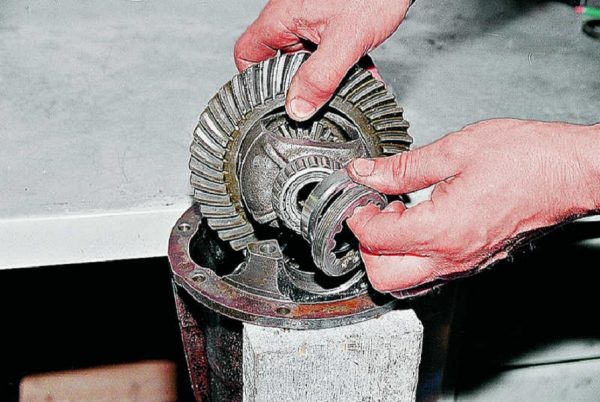
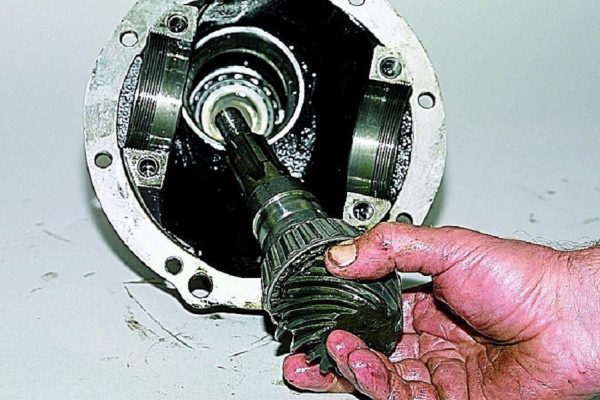
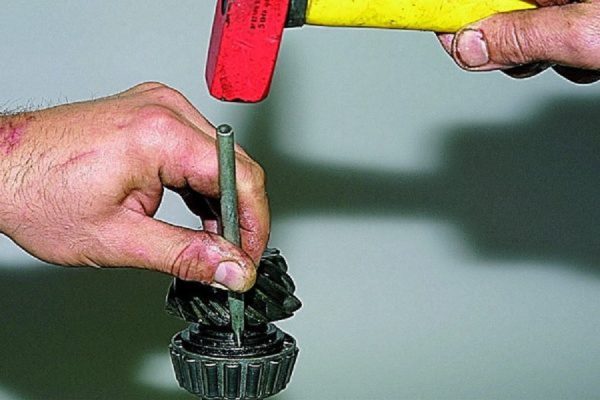
Disassembly of the gearbox
To disassemble the REM, you will additionally need a hammer, a punch and a bearing puller. To disassemble the gearbox, you will need:
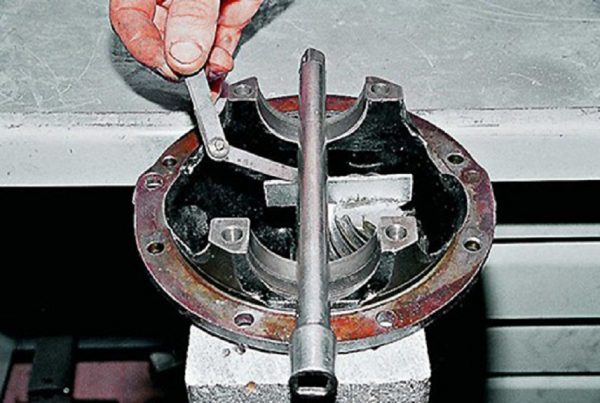
- Loosen and remove the bearing retainers.Disassembly of the gearbox begins with unscrewing and removing the bearing lock plates
- Mark the location of the bearing caps.Before removing the bearing cover, mark its location.
- Loosen and remove bearing caps.Next, you need to unscrew and remove the bearing caps.
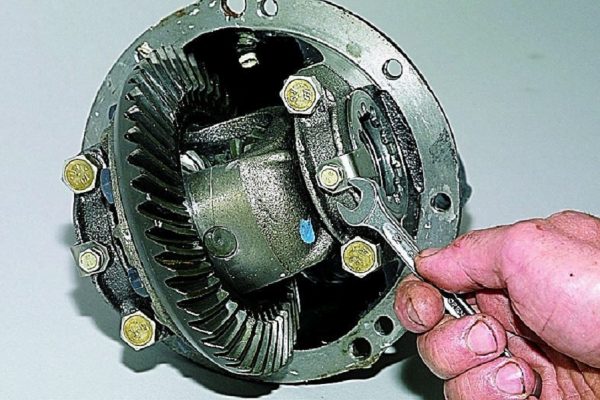
- Remove the adjusting nut and bearing outer race from the housing.The next step is to remove the adjusting nut and the outer race of the bearing.
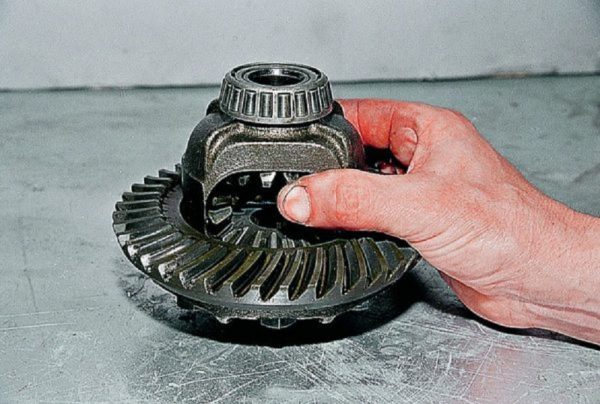
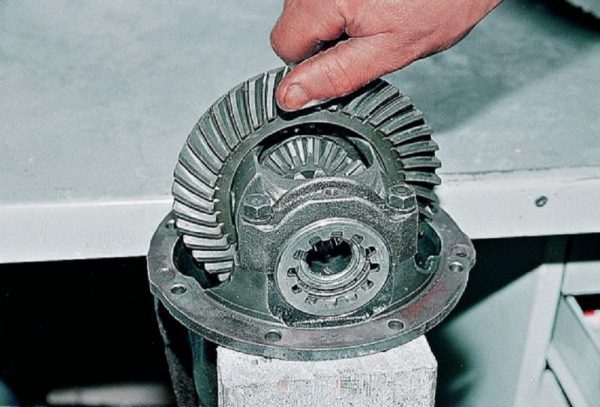
- Remove differential box.The differential is removed along with the planetary and other parts of the box
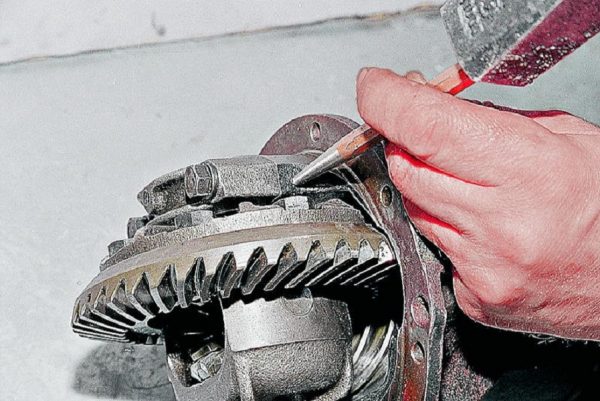
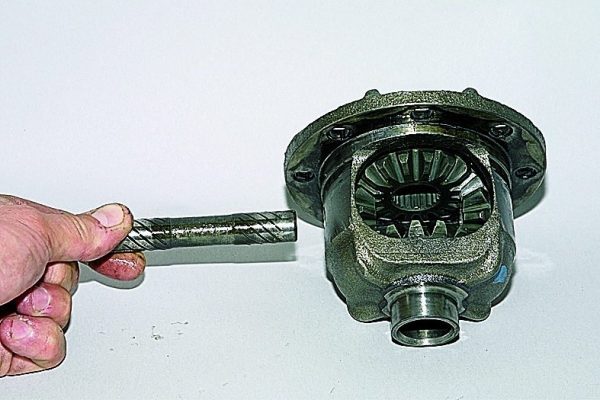
- Remove the drive shaft from the crankcase.The drive conical shaft is removed from the crankcase
- Remove the spacer from the drive shaft.The spacer sleeve must be removed from the drive shaft of the gearbox
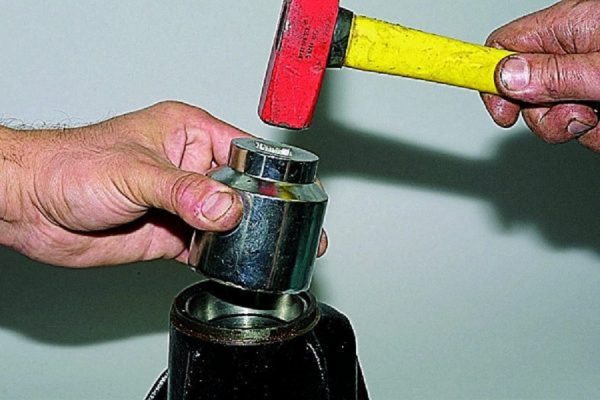
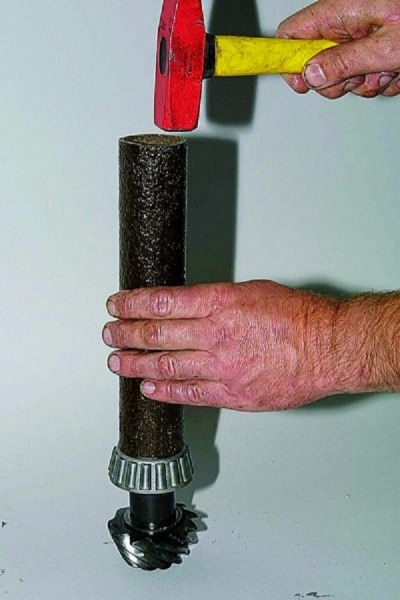
- Knock out the rear bearing.The rear bearing is knocked off with a drift
- Remove adjusting ring.Next, you need to remove the adjusting ring
- Remove oil seal and oil deflector.The next step is to remove the oil seal and oil deflector.
- Take out the front bearing.The front bearing is removed from the crankcase
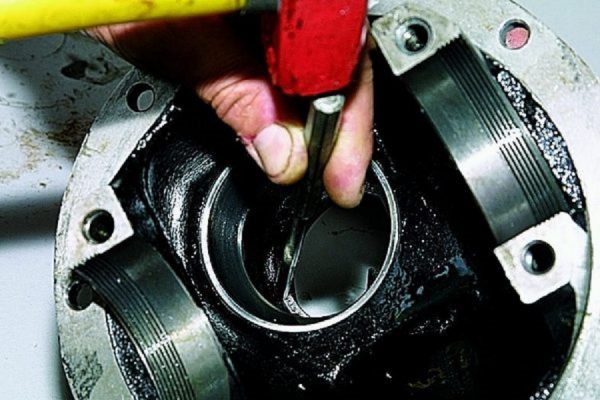
- Knock out and remove the outer races of the bearings from the crankcase.The outer race of the bearing is knocked out with a drift


Dismantling the differential
To disassemble the differential, you will additionally need:
- plastic hammer;
- wooden bars;
- vise.
To disassemble the differential, you need:
- Using a puller, remove the bearings from the box.The bearings of the differential box are removed using a puller.
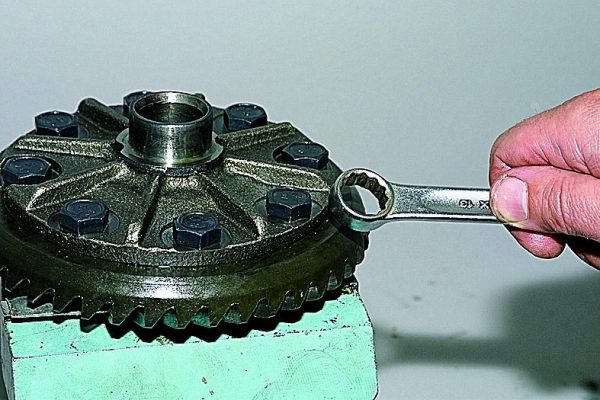
- Clamp the differential in a vice, placing wooden blocks. Unscrew the fastening of the box to the gear.To disconnect the driven gear, you need to fix the box in a vise
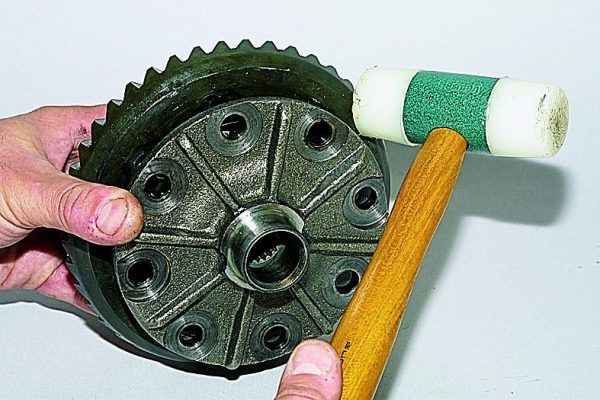
- Unclip the differential with a plastic hammer.The differential is released with a plastic hammer.
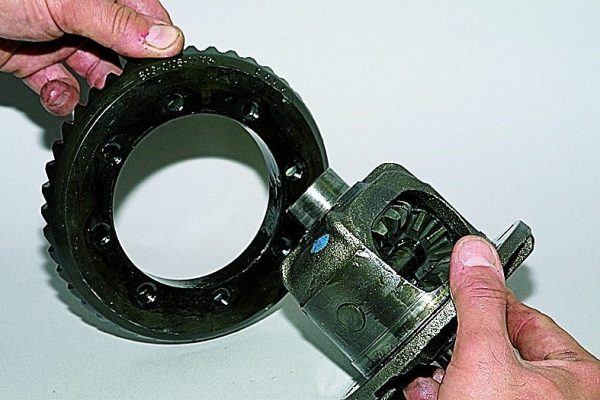
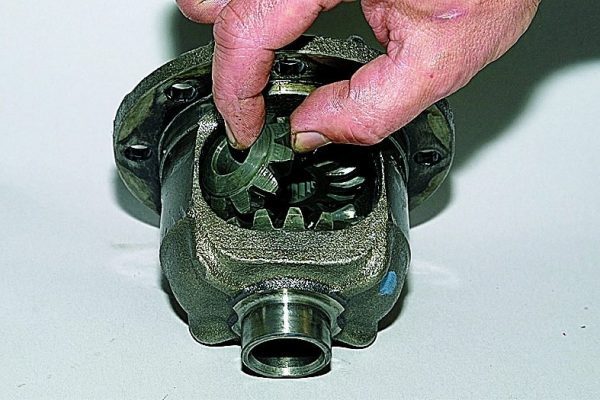
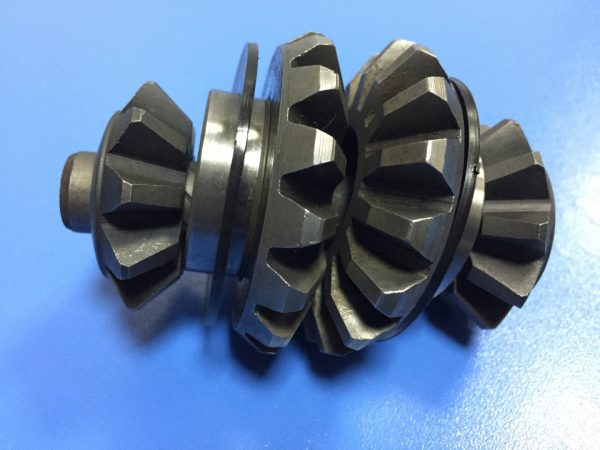
- Remove driven gear.The next step is to remove the planetary gear
- Remove pinion axle.Then you need to remove the axis of the satellites
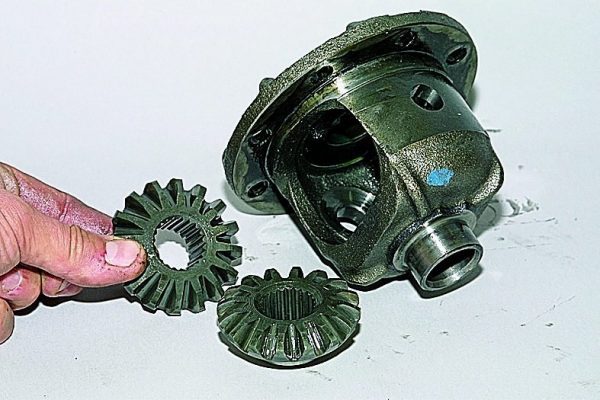
- Get the satellites out of the box.Satellites must be removed from the differential box
- Remove side gears.After the satellites, the side gears are removed
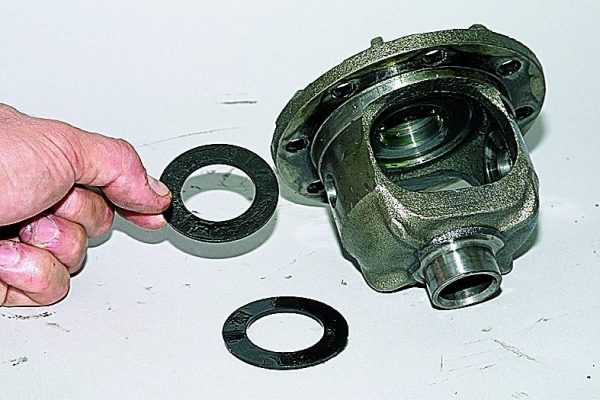
- Remove support washers.Disassembly of the differential ends with the removal of the support washers
Gearbox adjustment
After complete disassembly of the REM, it is necessary to wash all the parts in diesel fuel and assess their condition using a visual inspection. When performing troubleshooting, it should be taken into account that:
- if the gears are worn to such an extent that their adjustment is impossible, or at least one tooth is missing, this part must be replaced;
- it is necessary to pay attention to the condition of the holes of the satellites and the parts adjacent to them on the axle. Grinding with fine sandpaper is allowed only in the case of the most minor defects. Most often, damage to the satellites requires their replacement;
- any cracks and breaks on the gearbox housing and differential box are unacceptable. The presence of such damage provides for the replacement of these parts.
The assembly of REM, as a rule, provides for its associated adjustment. To assemble and adjust the REM, you will additionally need:
- set of probes;
- dynamometer;
- calipers;
- mandrel;
- metal plates.
The sequence of steps is as follows:
- We collect the differential, securing the bearings and the planetary.
- We place pre-lubricated side gears in the box.It is necessary to install the side gears so that the pinion axle can be inserted
- Washers adjust the axial clearance of the gears. This indicator should be within 0,1 mm.
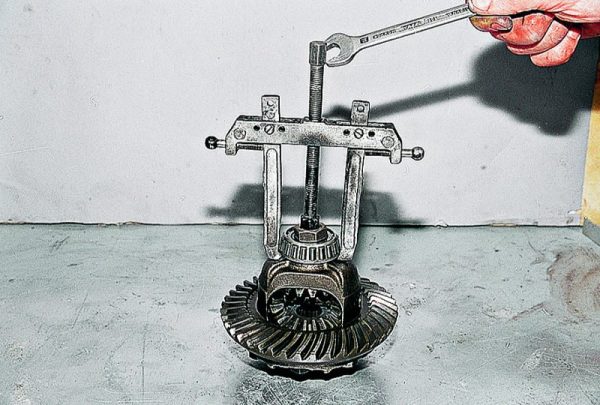
- We install the outer races of the bearings of the tapered shaft.Installation of the outer race of the bearing is carried out using a hammer and a bit
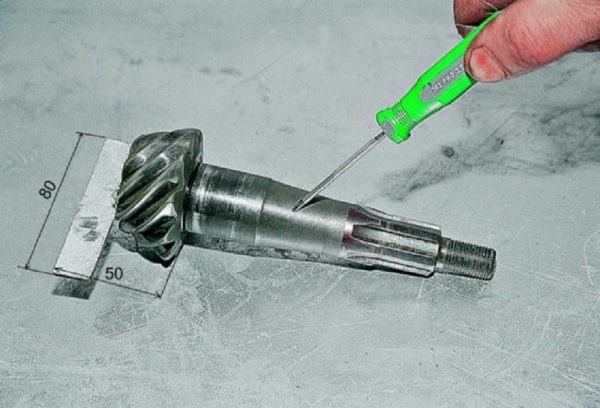
- Determine the size of the adjusting washer. To this end, we take the old gear and attach a plate 80 mm long to it by welding. We make the width of the plate such that it is 50 mm from its edge to the end of the gear.To determine the thickness of the shim, you can use a plate welded to the gear
- We assemble a home-made structure, securing the flange and bearings. We clamp the flange nut with a torque of 7,9–9,8 N * m. We place the REM on the workbench so that the mounting surface is horizontal. At the bearing installation sites we put any flat object, for example, a piece of a metal rod.A metal round rod is placed on the bearing bed and the gap between the rod and the plate is determined with a feeler gauge
- We reveal the gap between the rod and the welded plate with the help of probes.
- If we subtract the so-called deviation from the nominal size from the resulting gap (this figure can be seen on the drive gear), we get the required washer thickness. For example, if the gap is 2,9 mm and the deviation is -15, then the thickness of the washer will be 2,9-(-0,15)=3,05 mm.
- We assemble a new gear and mount the "tip" in the gearbox housing.The adjusting ring is set in place with a mandrel
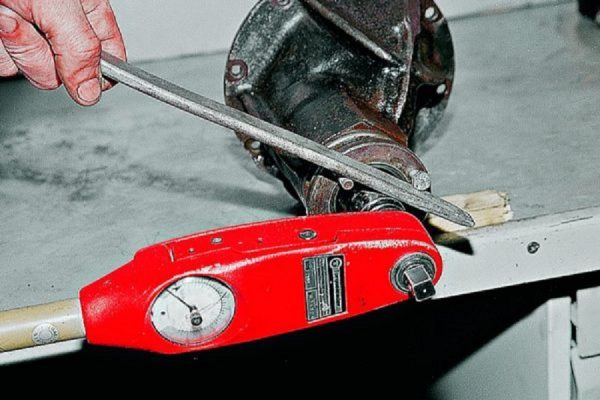
- We clamp the flange fastening nut with a force of 12 kgf * m.The flange nut is tightened with a force of 12 kgf * m
- We measure the moment of rotation of the “tip” with a dynamometer. This indicator should average 19 kgf * m.The torque of the drive gear should be on average 19 kgf * m
- We place the differential in the housing, and clamp the fasteners of the bearing caps. If after tightening there are backlashes of the side gears, you need to select shims of a different thickness.
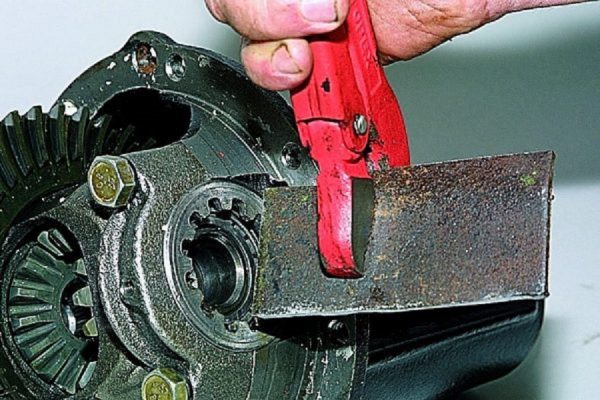
- To tighten the bearing nuts, we use a metal blank 49,5 mm wide.To tighten the differential bearing nuts, you can use a 49,5 mm wide plate made of metal 3 mm thick
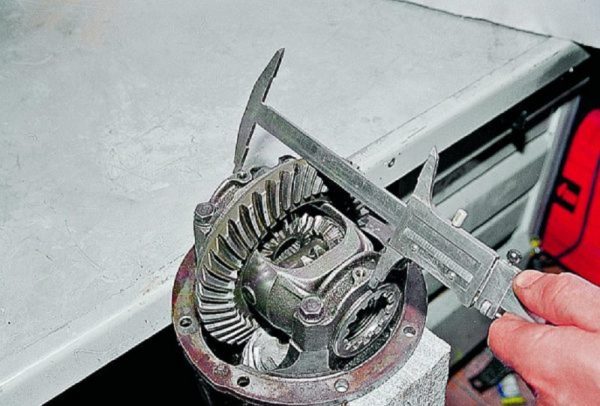
- We measure the distance between the bearing caps with a caliper.Measurement of the distance between the bearing caps is carried out with a vernier caliper
- We tighten the adjustment nuts alternately from the side of the planetary and from the other side. We achieve a gap of 0,08–0,13 mm between the main gears. In this case, it will be possible to feel the minimum free play when turning the planetary gear. As the adjustment progresses, the distance between the bearing caps increases slightly.
- We form the bearing preload by tightening the adjusting nuts in turn until the distance between the covers increases by 0,2 mm.
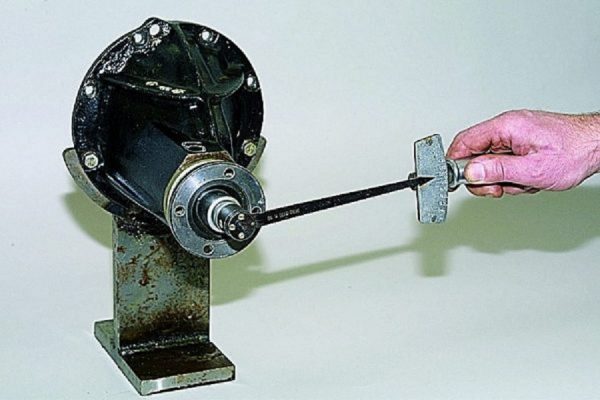
- We control the resulting gap by slowly rotating the driven gear. If the gap is lost, correct it with adjusting nuts.The clearance between the gears of the main pair is checked by turning the driven gear
- We install RZM in the body of the rear beam.
Video: how to adjust the rear axle gearbox VAZ 2103

Gearbox repair
During the repair of the gearbox, it may be necessary to disassemble the rear axle and replace its individual components.
How to split the bridge
Some motorists prefer to split the bridge in half instead of its traditional dismantling and disassembly for repair or adjustment of REM. This method is available, for example, to owners of UAZ cars: the design of the UAZ rear axle allows you to split it in half without removing it. This will require:
- Drain the oil.
- Jack up the bridge.
- Place stands under each half.
- Remove the mounting bolts.
- Carefully spread the halves apart.
I went the simple way: I unscrewed the lower ear of the left shock absorber, the brake pipe from the tee to the right wheel, the left stepladders, drained the oil from the axle gearbox, the jack under the apple, the jack under the left side of the bumper, the push of the left wheel to the side and the GPU with a differential in hands. For everything about everything - 30-40 minutes. When assembling, I screwed two studs into the right half of the bridge, like guides, and connected the bridge along them.
Replacement of satellites
Satellites - additional gears - form a symmetrical equal-arm lever and transmit the same forces to the wheels of the car. These parts are in constant engagement with the side gears and form the load on the axle shafts depending on the position of the machine. If the vehicle is driving on a straight road, the satellites remain stationary. As soon as the car begins to turn or moves out onto a bad road (i.e., each wheel begins to move along its own path), the satellites come into operation and redistribute the torque between the axle shafts.
Given the role assigned to satellites in the operation of REMs, most experts recommend replacing these parts with new ones when the slightest signs of wear or destruction appear.
Bridge assembly
After completion of work related to the repair, adjustment or replacement of RZM, the rear axle is assembled. The assembly procedure is the reverse of disassembly:
- the contact surfaces of the REM and the rear axle housing are cleaned from dirt;
- a new gasket is installed between the gearbox and the beam;
- RZM returns to its place and is securely fixed with fixing bolts;
- installed in place of the axle shaft, brake drums and wheels.
RZM factory gaskets are cardboard, but many drivers successfully use paronite. The advantages of such gaskets are high heat resistance and the ability to withstand high pressure without changing quality.
Drivers most often trust experienced specialists at the service station to repair and adjust the RZM of a VAZ 2103 car. This type of work can be done independently, if there are appropriate conditions, as well as the necessary tools and materials. At the same time, it is better to do this for the first time under the supervision of an experienced craftsman, if there is no skill in performing independent disassembly, adjustment and assembly of REM. It is highly not recommended to delay the repair if there are extraneous noises from the gearbox side.

