Adjustment of valves on engines of cars VAZ 2108, 2109, 21099
Content
- Adjustment of thermal clearances of car engine valves
- - Set the pulley to a position where the alignment marks match (top dead center)
- - Install the adjustment tool on the head of the block
- - We turn the pusher with a slot towards us (towards the radiator)
- - We introduce the "fang" of the device between the cam and the pusher
- - Push down the lever of the device and push the pusher down
- - We install a retainer between the edge of the pusher and the camshaft, which holds the pusher in the pressed position
- - With tweezers, through the slot in the pusher, remove the adjusting washer
- - We calculate the thickness of the new washer using the formula:
- - Install a new washer in the pusher, marking down
- - Press the pusher down and remove the latch
- Notes and additions
- More articles on cars VAZ 2108, 2109, 21099
The cause of a number of engine malfunctions of VAZ 2108, 2109, 21099, along with a faulty or unadjusted carburetor, may be an increase or decrease in thermal clearances in the valve mechanism.
These failures include:
— unstable operation of the engine at idle;
- the impossibility of adjusting the idle speed;
- loss of power and throttle response (deterioration of vehicle dynamics);
- "failures" when pressing the gas pedal;
— "shots" in the carburetor.
To identify the real culprit of engine problems, let's listen to how this very engine idles. A sure sign of increased thermal gaps will be a ringing rattle under the valve cover, which is clearly audible. With a limited space, rattling will not be heard, but constant overheating of the engine, frequent clicks in the muffler, a noticeable decrease in power and throttle response are possible.
Either way, the valves need to be adjusted. This normalizes the operation of both the gas distribution mechanism in particular and the engine as a whole. It is possible that the problems that existed earlier in your work, after such an adjustment, will disappear by themselves.
Required Tools
- Valve regulator with lock
Or two screwdrivers if there is no accessory. One should be long and powerful in order to push the pusher down with the washer, the second slotted with a wide blade (at least 10 mm) to fix the pusher in the pressed position.
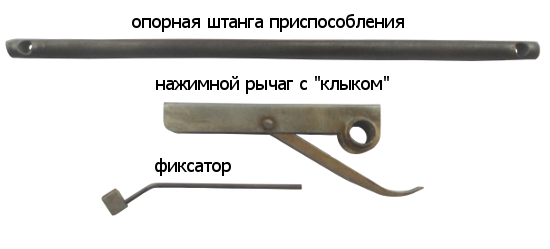 Car Engine Valve Regulator
— Set of flat probes
- Tweezers
- Star key for 17
— Set of leggings
Optionally, washers of the required size can be purchased separately after measuring the thermal gaps.
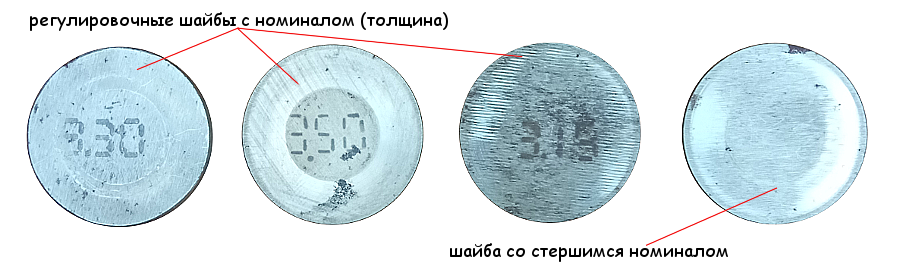 Washers of different sizes for adjusting engine valves
Preparatory work
Valve adjustment is done on a cold engine, so if your engine is hot, let it cool for at least 1 hour.
- Remove the air filter housing.
- Remove the accelerator lever support.
- Remove the engine valve cover.
- Remove the timing cover.
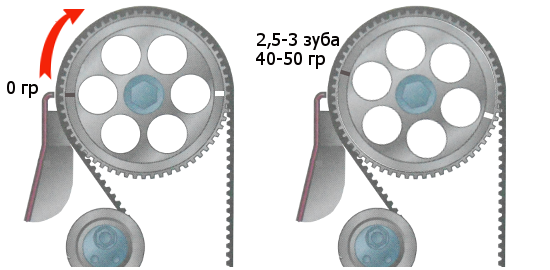
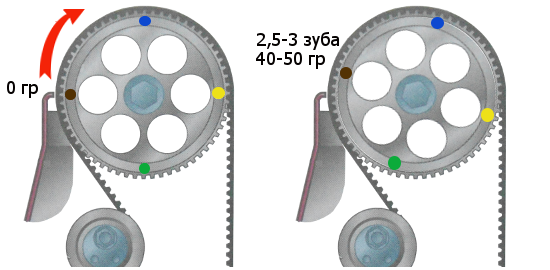
- We make three more marks on the camshaft pulley. To do this, we count the number of teeth he has and divide it into four parts.
 Additional marks on the camshaft pulley
- Aligned the alignment mark on the camshaft pulley with the protrusion on the rear timing cover. The pistons of the first and fourth cylinders reach the top dead center (TDC).
- At the hatch in the clutch housing, we make sure that the long mark (risk) on the flywheel is opposite the center of the triangular cutout of the ignition timing scale.
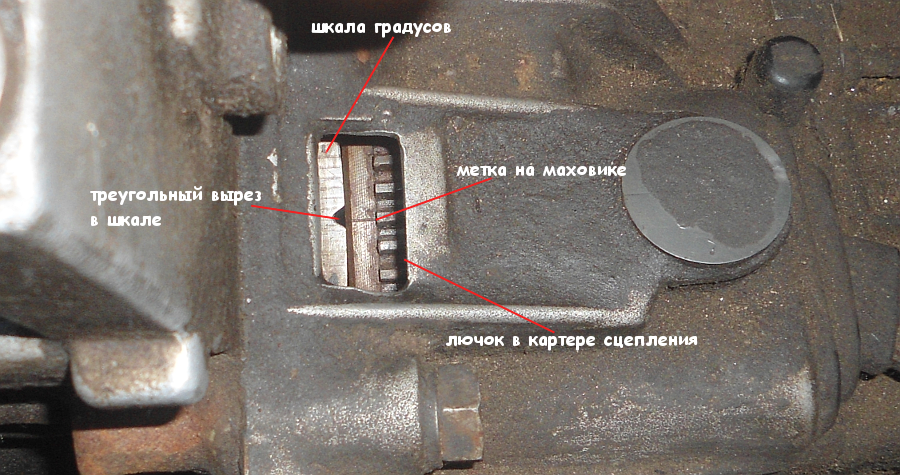 Nameplate for engine flywheel 2108, 21081, 21083
Before adjusting the valves in the engines of VAZ 2108, 2109, 21099 cars, it is necessary to check the thermal clearances in order to find out the general technical condition of the valve mechanism of this engine.
 Measurement of thermal space with a probe
Adjustment of thermal clearances of car engine valves
Consider, as an example, the adjustment of the third valve.
- Set the pulley to a position where the alignment marks match (top dead center)
We turn it 3-4 teeth (40-500) clockwise.
- Install the adjustment tool on the head of the block
If not, take two screwdrivers. We will use a long and powerful one as a lever, and a smaller slotted one to fix the pusher.
- We turn the pusher with a slot towards us (towards the radiator)
- We introduce the "fang" of the device between the cam and the pusher
- Push down the lever of the device and push the pusher down
Instead of an accessory, you can use a long screwdriver. Supporting it on the cam, we also drown the pusher.
- We install a retainer between the edge of the pusher and the camshaft, which holds the pusher in the pressed position
If there is no blockage, insert a flat blade screwdriver. It is necessary that the latch is exactly on the edge of the pusher and does not interfere with the removal of the shim.
- With tweezers, through the slot in the pusher, remove the adjusting washer
Its surface can be marked by its thickness. If the mark is erased, it will be necessary to measure its thickness with a micrometer, and if not, then select a new one empirically.
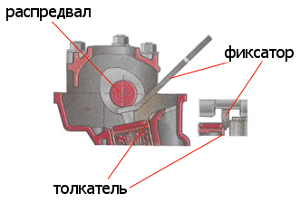
 Valve adjustment
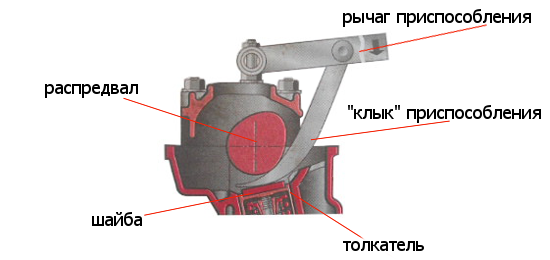 Device and pusher, diagram
- We calculate the thickness of the new washer using the formula:
— for inlet valves Z=Y+X-0,2 mm;
— for exhaust valves Z=Y+X-0,35 mm;
Z is the calculated thickness of the new washer;
Y is the thickness of the removed washer;
X is the gap determined by the probe.
We select a new washer with a mark close to the calculated one (± 0,05 mm).
- Install a new washer in the pusher, marking down
- Press the pusher down and remove the latch
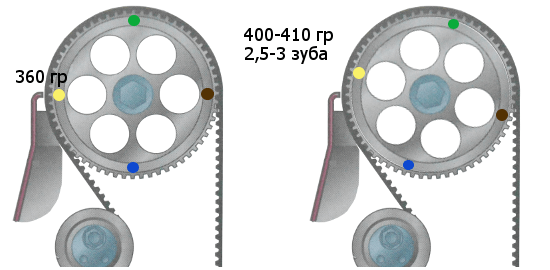
The remaining valves are adjusted by turning the crankshaft to the angles indicated in the notes below.
We remove the adjusting tool, replace the valve cover and other disassembled parts.
Notes and additions
 Adjusted clearances on the first intake and third exhaust valves
We adjust the gaps on the fifth (exhaust) and second (inlet) valves
 We adjust the clearances on the eighth (exhaust) and sixth (inlet) valves
 We adjust the gaps on the fourth and seventh exhaust valves (inlet
Twokarburators VK - More information on the topic in our VKontakte group, on Facebook Twokarburators FS and Odnoklassniki - Twokarburators OK
More articles on cars VAZ 2108, 2109, 21099
- Adjustment of the clutch drive on VAZ 2108, 2109, 21099 cars
- "Bleeding" the brakes on VAZ 2108, 2109, 21099 cars
— Replacing the timing belt on VAZ 2108, 2109, 21099 cars
- Troit engine, motives
- Measurement of compression in the cylinders of a carburetor engine
How to break a car engine valve?
Shot in the muffler - perhaps the fuel mixture is too rich, does not burn completely, is thrown into the exhaust tract, where it can burn with pops and shots. The same effect will be if the fuel mixture in the cylinders ignites too early, when the piston moves up, the exhaust valves do not have time to close completely. The distributor must be rotated 1 mm clockwise (when viewed from the side of the cover). Or one (two) candles do not work, and then “break through”.
And how a clogged exhaust system manifests itself, there can be drops and just drop in, adding a little gasoline, something like that appears and then normalizes. I tried to turn it on several times, then fired at the muffler and it began to work normally. And the level in the float chamber was added and the old valve was changed again, to no avail. At night in the morning everything is fine again. And the back does not turn on.
The rod can only be checked through the filler, but I can’t unscrew it, only through the transmission cable can I measure and fill it. How to determine through a cable transmission with a cable, I measured it, it seems to be higher than the oil seals, but I don’t know exactly the desired level, how much does the level differ? And I can’t find oil to add min semi-synthetics They say minerals from the 75s semi-synthetics from the 80s? And the recoil of a strong lever interferes when turning the back, the cardan on the wings is also like new on the collective farm (the plastic is inserted from the mineral water cover, it still stands, it just knocked out, it turned out less), but everything is fine on the lever. I still haven't figured out how to fix the reaction on the box. This is if you shoot for one thing and change the oil, extra costs if you take it to a gas station. I almost drove the train away (it ended), I put a cardboard box so that it could be better seen, not far from the master to roll the wheels and rent a hole and check the dynamics on one and after decarbonizing for a couple of tens of kilometers. So far, the case has not come to a standstill.
If the breather is restored, the oil may stop flowing. There is a rod at the top of the box. Check the oil level in it.
The muffler decarburized the smoke under the car's shalom.
Further, breakdowns were revealed, oil flowed from the box from the stuffing box on the left half of the axle shaft and from under the cable, or rather the cable transmission to the speedometer, without dripping the breather. Perhaps the breather is clogged, should the seal be replaced? I can't get the filler cap off to check the level. 5 speed I'm afraid that again the bearing is in the fifth, so as not to melt. The limit was 20 km/h 1 km, and then there was a transmission smell.
Somehow the piston was cleaned from above in some places. 10 ml seems not enough. And once again I added 7 ml to the first one, and left 3 ml to the rest for the night. For about three hours, the smell was near the calciner and after that it was not heard. Only from above reacted to the rings that did not reach? It would be better if the sprayer took 20 cylinders and five times. Indoors too, but what about solid particles with soot?
True, the gaps are somewhat larger. It's better than sticking valves. Decarbonizing sometimes does not work immediately, but after a couple of tens of kilometers. Or it does not work if the piston rings are not only clogged with soot, but have also lost their elasticity due to overheating (soot).
And how, after measuring, are valves 1 and 3, 2 and 5, etc. pressed? deviates 4 times from the nominal value upward: 1) out 0,35 2) in 0,3* 3) in 0,15 4) in 0,5* 5) in 0,3 6) in 0,3* 7 ) in 0,25 out 0,45 * marked with an asterisk. Is there a connection with the first cylinder, or was a roscox measure needed?
I tried to decoke for some reason, the candles got even more dirty, low speed, maybe it was necessary to press the gas to the floor? I did not think that he would smoke, the neighbors forbade him (you need to comment on the carbonization so that he is not in the yard), he worked for at least 15 minutes according to the instructions of 20t.
Yes, the first and fourth should be at the top.
Before reaching 90 degrees, a mark on the flywheel is visible on the camshaft pulley. There is a mark on the alternator pulley at the bottom. There are no marks on the pulley on the engine, but approximately 180 degrees of rotation will not match.
On the camshaft, if you put the 1st piston at the highest point through the spark plug hole?
The markings on the steering wheel are ok. It may not be noticeable. You need to turn the flywheel, inspect a little and clean it with a rag if there is dirt.
Labels don't match? I didn't even find the mark on the steering wheel. Through the candlestick to look for the top?
And 42 teeth. Does the flyer have 111 in the literature? After 10.5.
And before, the carburetor stank of burnt oil, crankcase gases were released into the atmosphere.
I once installed rings on a penny engine, after the coolant was used up, the crankshaft bent. A person with professional rights (VS) burned down.
It smelled like an overheated engine.
No, there are no signs of overheating. Is it just low antifreeze?
On the first cylinder, after the overhaul of the carburetor, did the candle after soot metallize faster than the others?
Slightly white crankcase gases when throttled, not visible at idle. Cleaned the oil separator did not connect the breather pipes less smoke than from the valves. Only the muffler, I'm not sure if it looks white when regasified?
Overheating can lead to the block head where these valves are installed. As a result, the cylinder head gasket will burn and fall; piston rings lose elasticity. Check for a white emulsion on the dipstick after parking (antifreeze in oil) and whether the coolant bubbles in the expansion tank when the engine warms up (gases in antifreeze). Strong and constant smoke from the muffler is also possible (antifreeze in the combustion chambers or rings on the pistons). If there are no such signs, then this is normal, when they appear, you will need to remove the head from the block, grind, change the gasket, change the piston rings. Here is a link to the articles: "Cylinder head gasket broken" and ".
Probes are flat, narrow. On VAZ 2101-2107 the probe is wide, on 2108-2109 it is narrow. The wear of the stuffing box leads to the fact that smoke comes out of the muffler during regasification. Decarbonizing can be done both with a purchased product and with a home-made one, after which you need to check the compression again.
And even if this valve cover overheats, the cylinder head. I forgot to add water, had to drive 100 meters and idle a bit. The branch broke at the collar of the winter radiator cap, cut it off. Antifreeze was not filled. What is the threat?
There are no teeth on the camshaft pulley 111 teeth 112 cavities 28 cavities. And what should be the set of flat screws? On the first 8, compression was measured at the service station, on the remaining 10, we recommend adjusting the gaps.
There is a question, and if it is not decoked with kerosene acetone. and buy (he was 2-3 years old) before checking (possibly adjusting) the gaps, or after? How are seals checked?
Not fixed??? Such schools must be immediately destroyed.
Let's fix this.
Error in the primary circuit 1 outlet valve 3 inlet