Carburetor Repair
Content
- Carburetor as a cause of failure
- Overhaul of the carburetor - let's get started
- 01 - Release carburettors
- 02 - Remove carburettors
- 03 - Check the rubber gaskets on the intake pipe
- 04 - Clean the carburettor from the outside
- 05 - Unscrew the constant level tank
- 06 - Pull out the shaft, then remove the float
- 07 - Remove carburettor cap and valve
- 08 - Unscrew the jets
- 09 - Dry holes with compressed air
- 10 - Don't Forget These Holes
- 11 - Replacing gaskets
- 12 - Hook the needle onto the float
- 13 - Lubricate all rotating parts
- 14 - Synchronization of carburetors
Carburetor as a cause of failure
When the carburetors are no longer working properly, it's time to overhaul. If the ignition system is in perfect condition, but the engine is running erratically, and its power and cranking behavior are unsatisfactory, you should look for the error on the carburetor side. Likewise, carburettors that continually overfill or fail to operate despite correct fuel delivery are a clear sign of malfunctioning float needle valves or that the inside of the carburetors is dirty. These errors often occur when gasoline was not drained from constant level tanks during the winter holidays.
A thorough internal cleaning, a few rubber seals, and a new needle float valve can work wonders. Subsequent synchronization is not absolutely necessary until you disconnect the carburetors, but above all safety! However, the timing of the carburetors only makes sense when the valves are adjusted and when the compression, spark plugs, ignition cable, etc., and the ignition point adjustment are flawless.
If you want to tweak your bike a bit, you can use a carburetor overhaul as an excuse to install a Dynojet kit, allowing you to overcome hole issues while accelerating on some production models. A dedicated press confirms that this system improves walking comfort and accelerates evenly. If you need to adapt the carburetor because the exhaust system is open, you have changed the air filter or made similar adjustments, the Dynojet kit will help you. Specially designed for the dyno for various motorcycle models, these kits contain all the elements you need to enrich your mixture. Various tuning levels are offered, assembled for production engines or perforated engines with pointed camshafts, etc. Quite often, with this kit, you will feel an improvement in power and driving comfort, even if you have a production car with an original air filter. However, it can sometimes take a while to fully adapt to your vehicle as each kit contains a set of different sizes of injectors.
Overhaul of the carburetor - let's get started
01 - Release carburettors
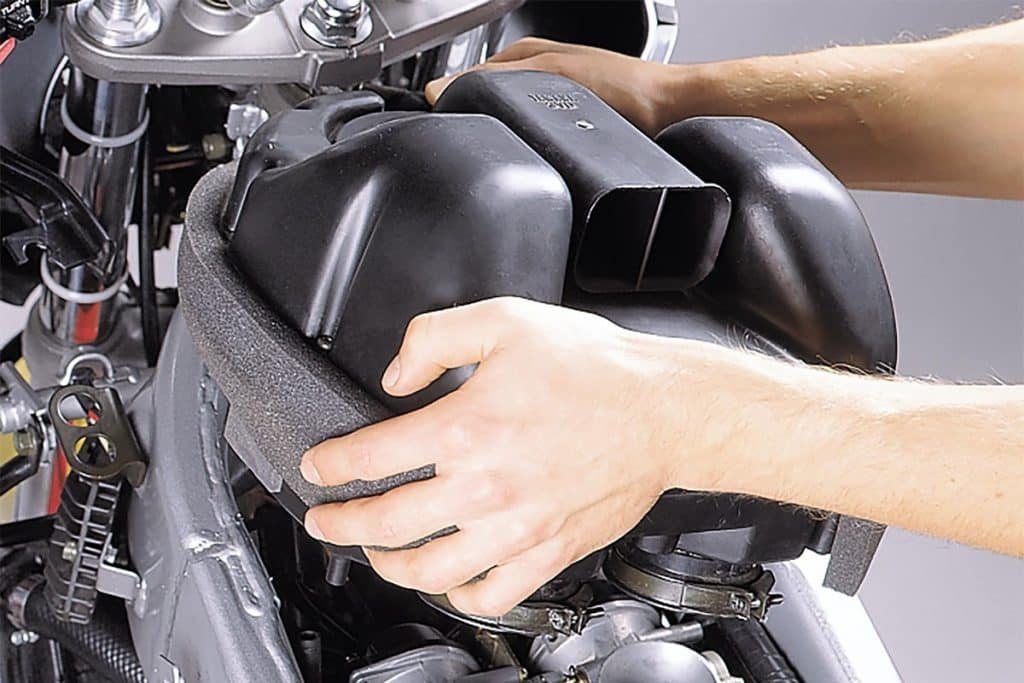
Disconnect the carburetor battery first, depending on the type of motorcycle. The seat, tank, and side cover almost always have to be removed to gain access to the air filter housing, which must be removed or at least pushed back. Once the large box is removed, the actual disassembly of the carburetor will be quick. Be sure to remember the location and connection position of the vacuum tubes so that they can be returned to their original position later. In case of doubt, it is advisable to label pipes and associated connections to eliminate the risk of confusion. Take a picture with your smartphone if necessary. Then remove the throttle cables and the throttle cable. We recommend draining still installed carburettors using drain screws (engine cooled) to prevent uncontrolled leakage of gasoline from the carburettors during removal. When doing this, make sure the room is sufficiently ventilated and never touch an open flame (explosion hazard!).
02 - Remove carburettors
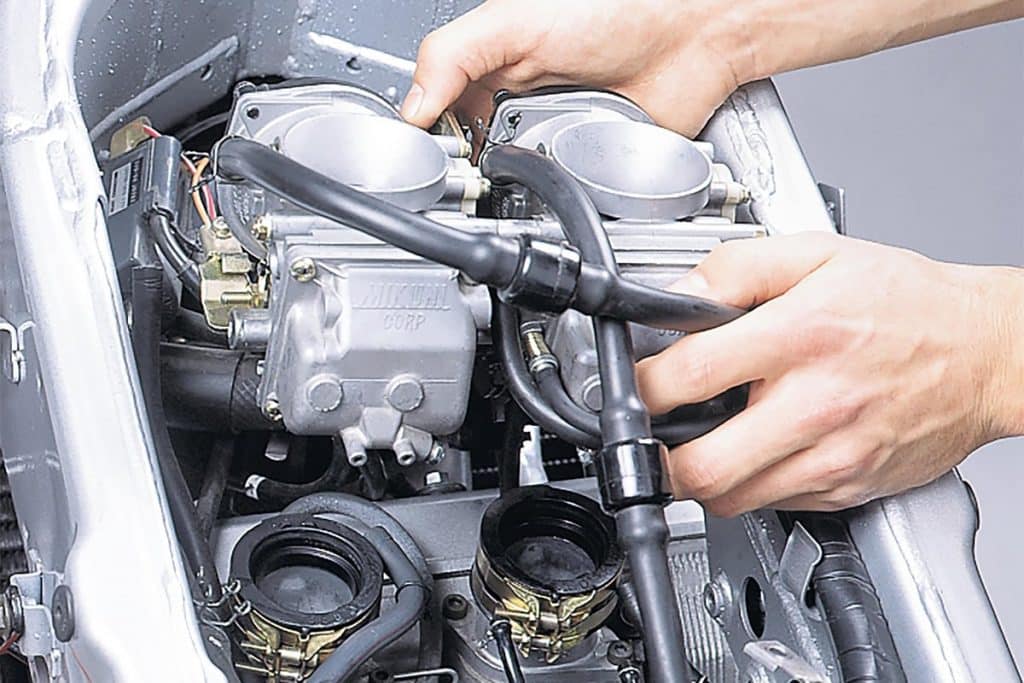
With the carburettors attached to the intake pipe only, loosen the clamps and remove the carburetor battery.
03 - Check the rubber gaskets on the intake pipe
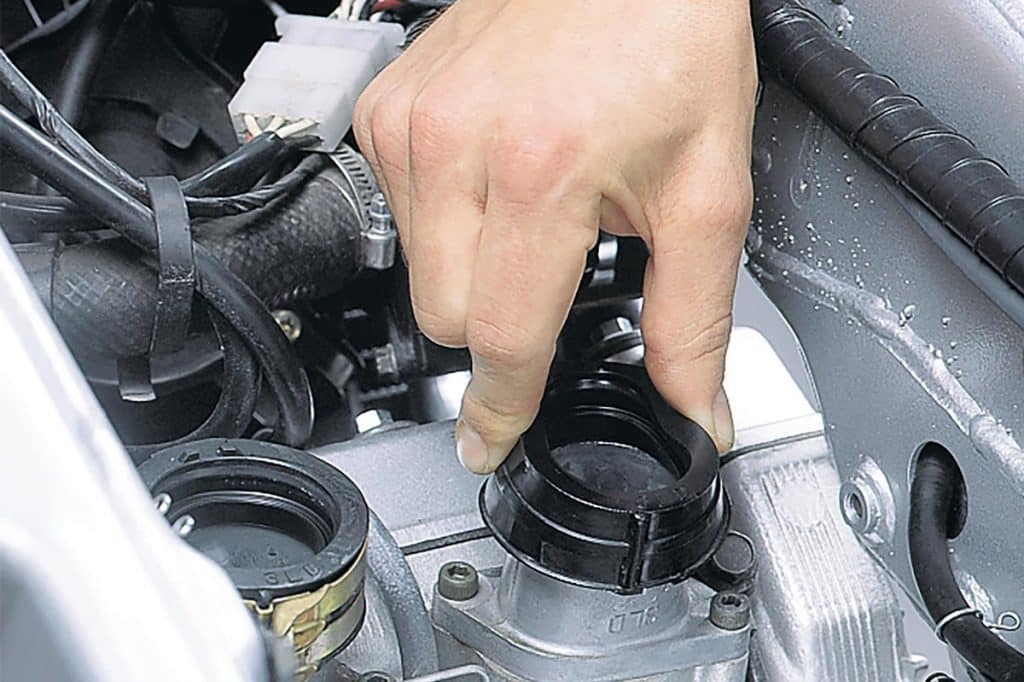
Immediately inspect the rubber seals on the inlet pipe. If they are porous, cracked or hard, replace them. Indeed, they are the main culprits for carburetor malfunctions caused by unwanted air ingress. Suction tube rubber gaskets, which are significantly less expensive than standard ones, are available from contractors and component suppliers.
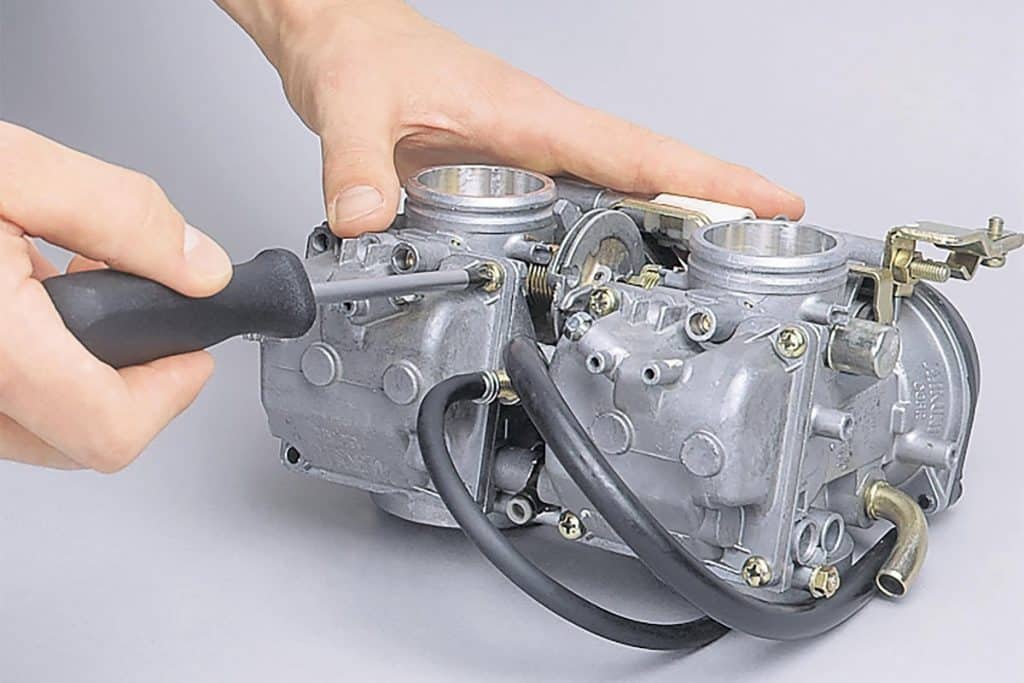
04 - Clean the carburettor from the outside
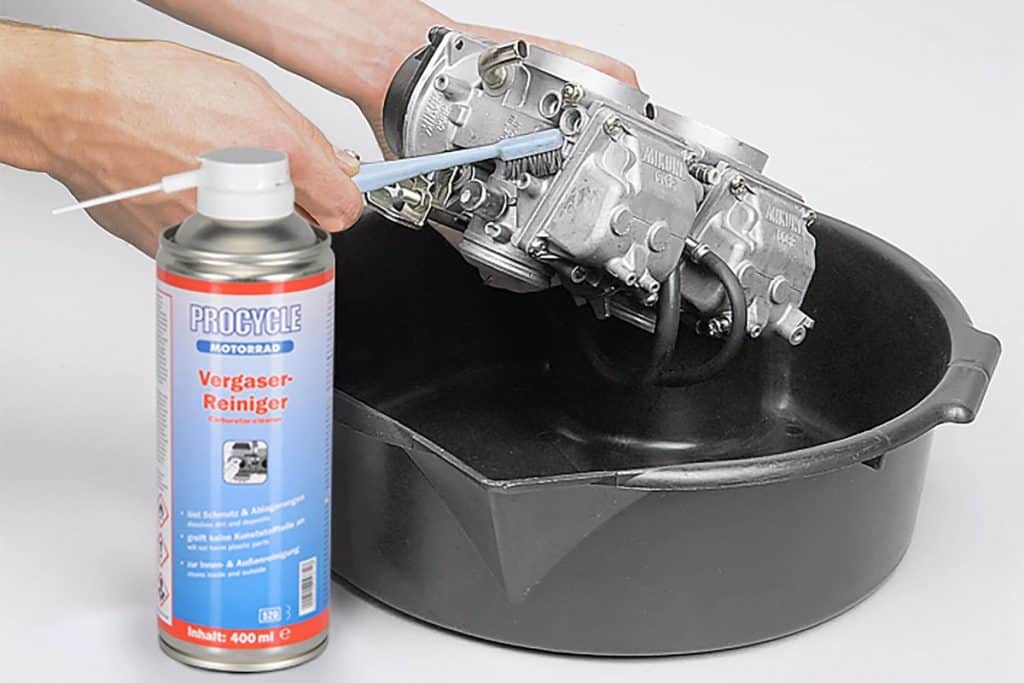
Before handling the car interior, first clean the outer surfaces of the carburetors to prevent dirt from entering. Use PROCYCLE Carburetor Cleaner Spray to easily remove dirt. A brush can be especially helpful.
05 - Unscrew the constant level tank
After cleaning the external surfaces of the carburetors, you can proceed to dismantle the constant level vessels. Don't do this job on the garage floor. Lay out a large clean rag to fold the disassembled parts. To avoid damaging them, only loosen the small Japanese soft iron Phillips screws that are often used with a perfectly matched screwdriver (Japanese industrial standard; using flexible screws is a good idea since the carburettor bodies are far away. Be rigid...).
Pretreatment with a penetrating oil may help. We recommend that you repair your carburettors one at a time to avoid confusion. Keep it spotless, as even the finest grains can block the nozzle.
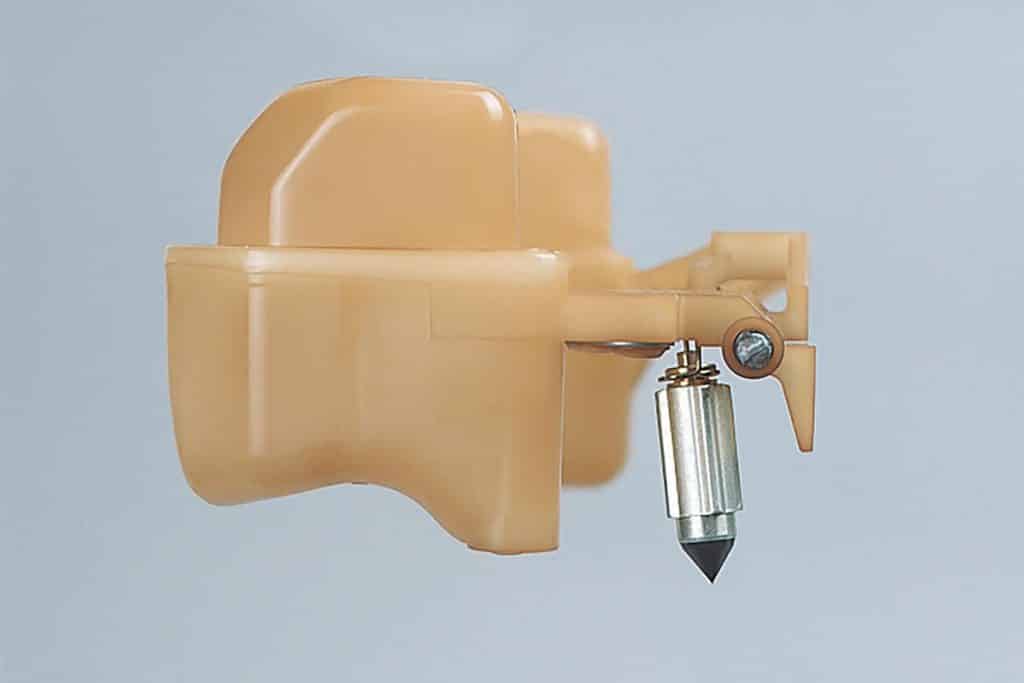
06 - Pull out the shaft, then remove the float
After removing the tank cap, you still need to remove the float to replace the float needle valve. Run your fingernail over the float needle valve. When worn, you will clearly feel the circular pressure area at the tip of the float needle. This type of wear prevents the needle from providing a perfect seal. Move the float shaft to the side to loosen the connection between the carburetor body and the float. Pay attention to the mounting position of the float and the attachment of the float needle valve to the float. If you do mix the components, orient yourself using the carburetor still installed (or take a picture beforehand).
07 - Remove carburettor cap and valve
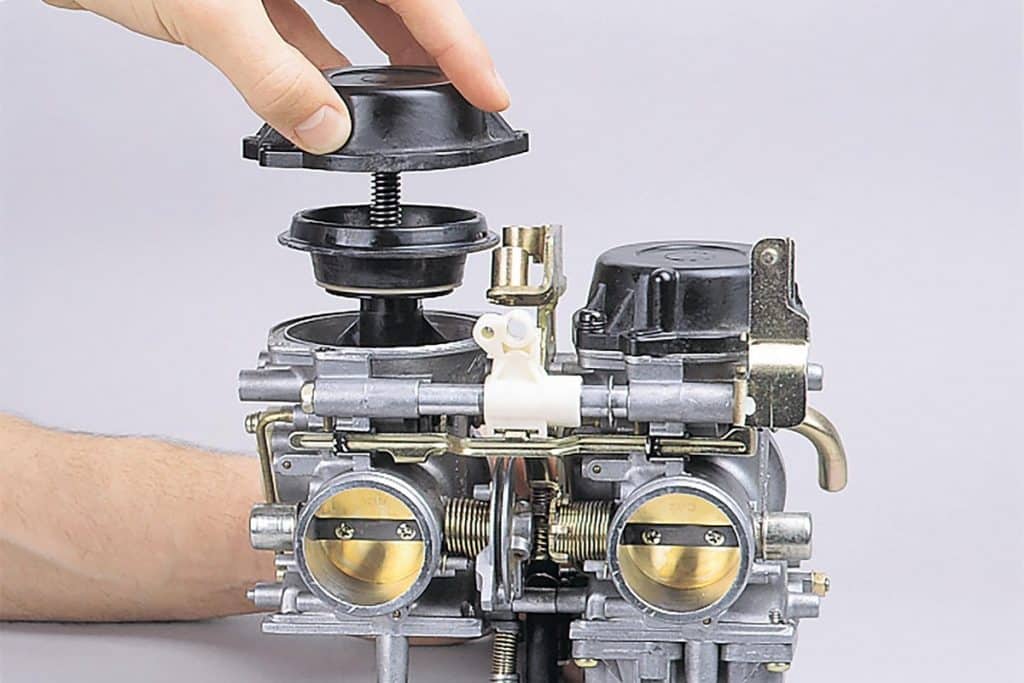
Top carburetor: Inspect the valve or vacuum piston for deep scratches and cracks in the diaphragm. Loosen the cover screws and remove the spring. You can now carefully remove the plunger as well as the diaphragm. In most cases, the membrane has a slit or protruding lip. This determines the mounting position and only fits in one place on the carburetor body.
To check the membrane, expose it to light and stretch it slightly in all areas. If you find a hole, replace it. In most cases, it is damaged at the edges (at the junction with the piston or at the outer edge of the diaphragm). Another possible defect is excessive expansion of the membrane due to evaporation. In this case, the membrane is very soft and too large to be reassembled. In this case, the only solution is to replace it. If the diaphragms are not available separately, you must purchase them together with the valves/piston.
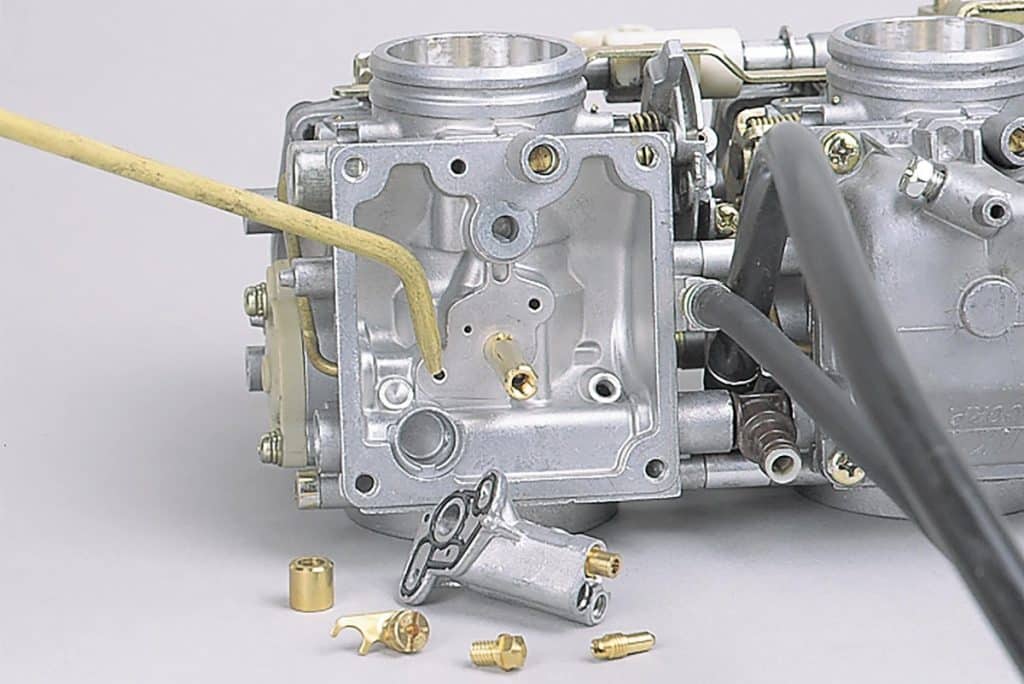
08 - Unscrew the jets
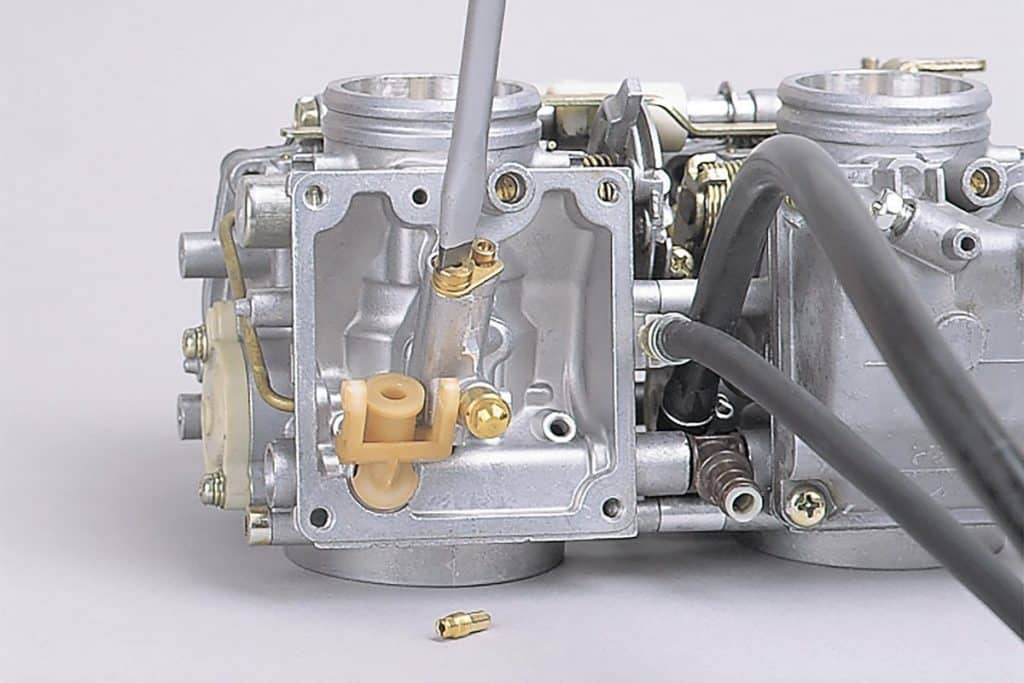
Bottom part : To properly clean the carburetors, remove all screw-in jets. But be careful: the nozzles are made of brass and should only be unscrewed with a suitable tool.
Do not use wire to clean the nozzles; in fact, the flexible material of the nozzles expands rapidly. Spray them well and then dry with compressed air. Then place the nozzles in a light to check for dirt. Before removing the idle mixture adjustment screw, it is imperative to take into account the following point: start by loosening the screw so that it does not tighten the thread (do not tighten it in the opposite direction, so as not to damage), while counting the number of revolutions (note this for further adjustment). Do not remove the adjusting screw until this point. Replace the adjusting screw rubber seal after cleaning. To reassemble, turn the screw until it snaps into place (!), Then tighten it using the same number of turns as before.
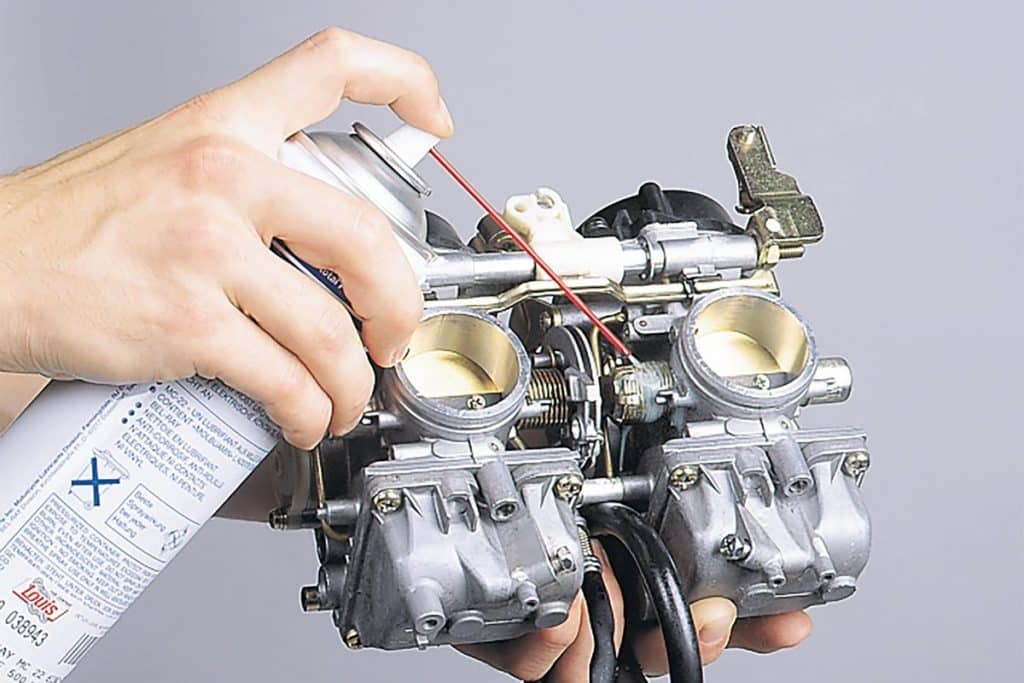
09 - Dry holes with compressed air
Now we are talking about removing deposits with a cleaning spray. Spray liberally into each carburetor hole. Leave to act for a while and then dry all holes with compressed air as much as possible. If you don't have a compressor, head to a gas station or seek help, where you can certainly use compressed air in exchange for a small financial reward. Be careful not to lose small parts when using compressed air!
10 - Don't Forget These Holes
We often forget about the extra holes at the air inlet and carburetor outlet when they make a big difference.
11 - Replacing gaskets
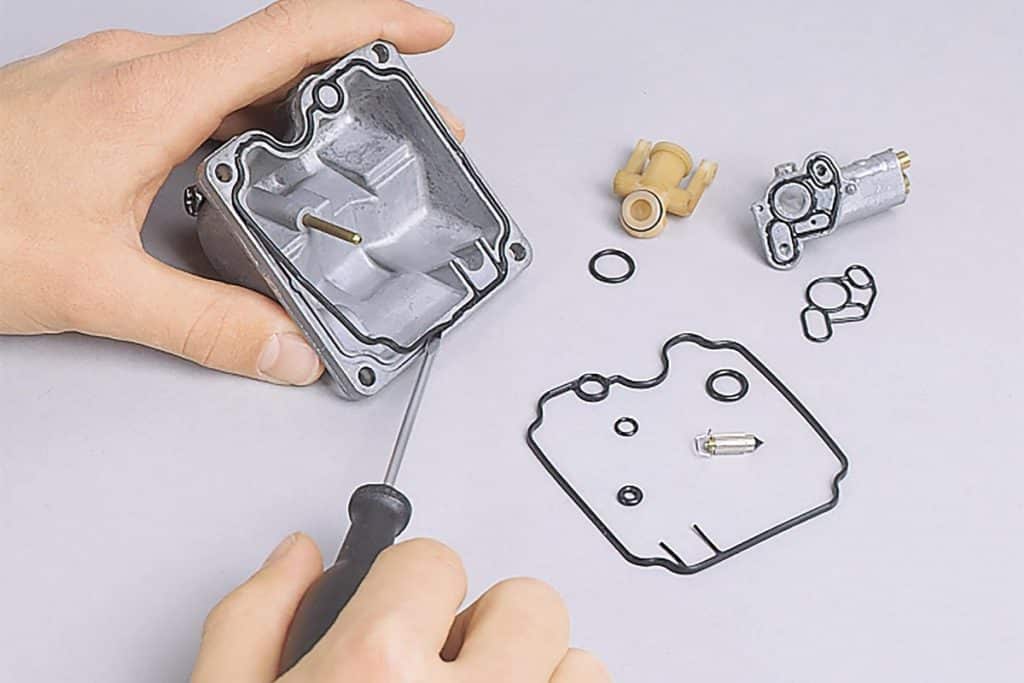
Remove o-rings and gaskets to be replaced using a small screwdriver. During assembly, make sure that the O-rings fit correctly into the grooves provided for this.
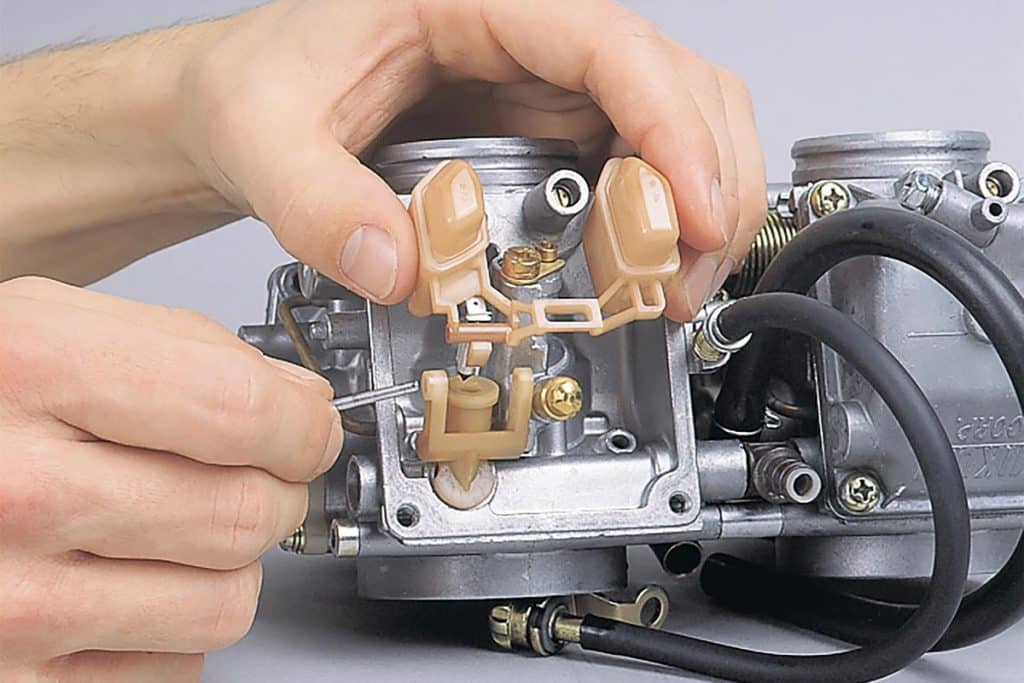
12 - Hook the needle onto the float
After screwing in all the jets and replacing the O-rings, slide the new needle onto the float. If removed, carefully insert the valve or piston with diaphragm and injection needle into the carburetor body, making sure the diaphragm is seated correctly.
13 - Lubricate all rotating parts
Before installing the carburetors in the intake pipes, lubricate all parts of the swivel joint with Teflon spray, as the grease was removed during cleaning, place in the rubber gaskets for the intake pipe and make sure that no components (cables, etc.) are blocked. After the hose clamps are tightened correctly (securely but not too tight), reconnect the choke cable, throttle cable, fuel hose, and any other cables that may be accessible. Make sure the Bowden cables are routed correctly, then adjust the throttle cable and possibly the throttle cable for play (see vehicle manual).
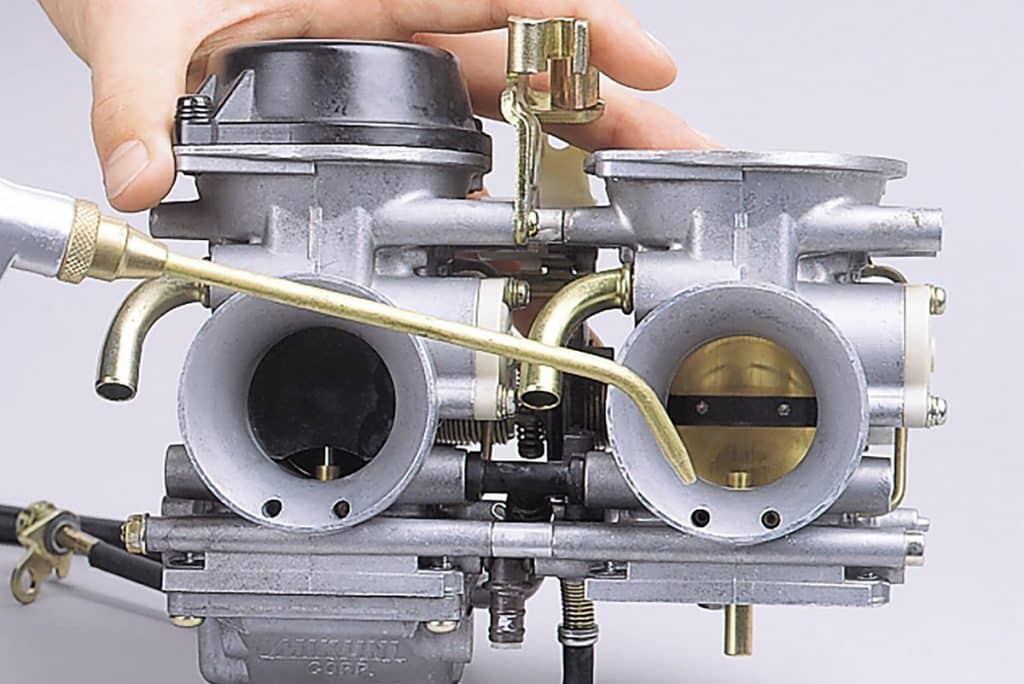
14 - Synchronization of carburetors
Re-emphasize that during routine cleaning (unless the carburettors have been separated from each other), synchronization is not absolutely necessary, but is recommended. A repair manual is needed to find the correct fittings and set screws. This includes supplying all relevant carburettors and cylinders with the air / fuel mixture required for proper engine operation.
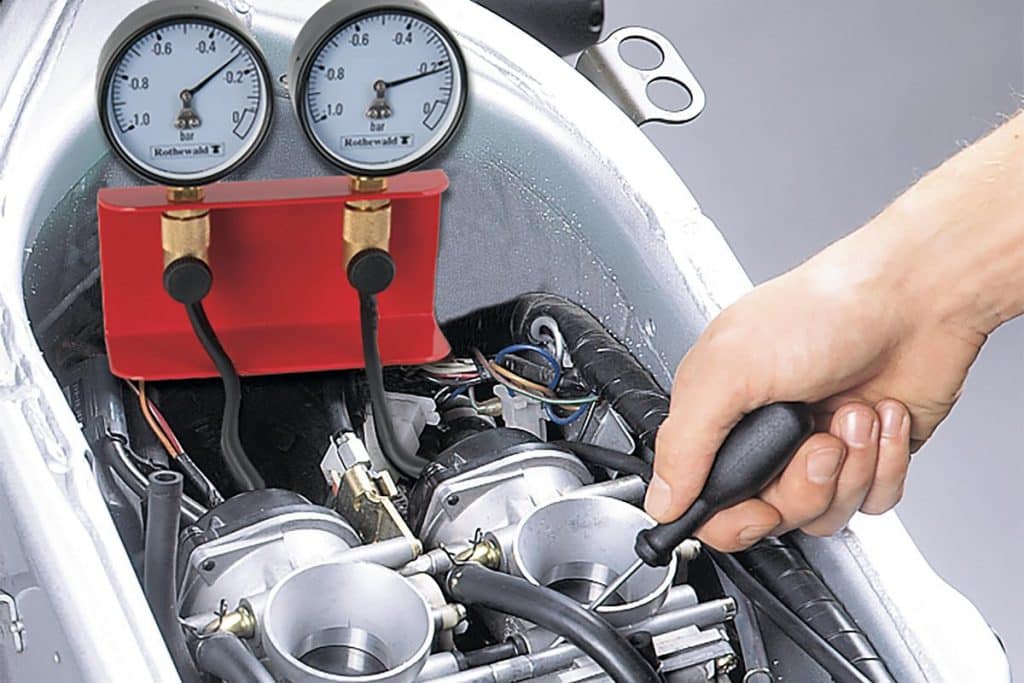
For this job you will need a vacuum gauge to measure the suction vacuum of individual cylinders. Depending on the model, this device consists of two or four vacuum gauges, depending on the number of carburetors on the motorcycle. The various adapters supplied allow you to connect the vacuum gauge hoses to the engine. At best, the connectivity is already available on the rubber gaskets for the inlet pipe. All you need to do is remove the rubber plugs and connect the hoses.
In most cases, the reservoir must be removed to gain access to the timing screws. This is why an external fuel supply is almost always necessary. The engine must be warm and running for adjustment. Be sure to install the correct screws. Briefly squeeze the throttle grip and check after each turn of the adjusting screws. Refer to the MR for the tolerances for each displayed value. To do this, refer to the mechanics advice Carburetor Timing.
Finally, we would like to point out that after installing the Dynojet carburetor kit, it is imperative to check the appearance of the spark plugs. This is because the wrong mixture can damage the engine and reduce road safety. Take a test drive on the highway or a long drive at full throttle, then check the appearance of the spark plugs. If necessary, you need to make additional settings. If you don't have much experience and want to play it safe, entrust these settings to a specialized garage equipped with a dynamometer.