Power steering pump repair
Content
I'll tell you how I repaired the power steering pump. But first, a little background.
The steering wheel on a cold car in summer and winter works without any complaints. But as soon as the car warms up, especially in summer, the steering wheel on the twentieth becomes very tight, as if there is no GUR. In winter, this problem does not manifest itself so much, but it is still present. If you step on the gas, the steering wheel immediately turns with ease (although not quite perfect, but still easier). At the same time, the pump does not knock, does not ring, does not flow, etc. ... (do not take the snotty rail into account) the oil is fresh and perfect (all the more, thanks to the state of the rail it is updated regularly!), the cardan is lubricated and does not stick!
In general, there is a clear sign of the lack of performance of the power steering pump with hot oil at idle. I didn’t suffer for a long time, in the end I decided to deal with this problem, spent a lot of time, rummaged through the Internet, understood the principle of the pump, found a similar description and decided to sort out my “old” pump.
Dismantling the power steering pump
And so, first of all, we remove the pump, we need to drain all the liquid from it (how to remove it and drain the liquid, I think anyone will figure it out), also, on the back cover of the power steering, you need to unscrew the four bolts with a 14 head.
Bolts of fastening of a back cover of the GUR pump
After we begin to carefully remove the cover, try not to damage the gasket (it has an internal rubber seal), in the power steering case we leave the outer part of the “working elliptical cylinder” (hereinafter simply the cylinder). No need to be scared when the cover moves away from the body, it may seem that it moves away due to the action of the spring, when reassembling it will seem to you that it does not fall into place, just continue to carefully and alternately tighten the bolts diagonally, then everything will fall into place .
The working part of the rear cover of the power steering pump
Inspection and determination of defects
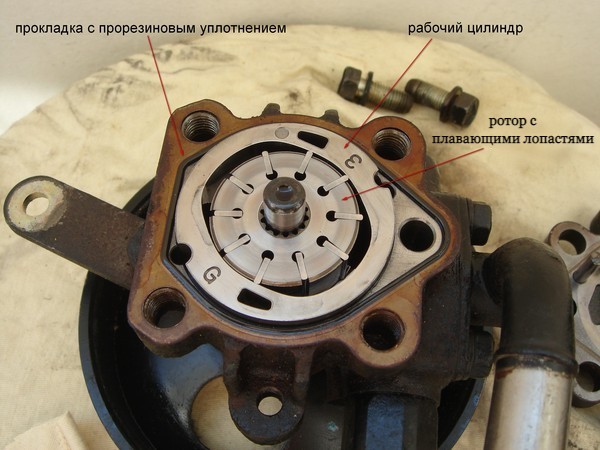
Carefully inspect the contents and remember (you can take a photo) what stood where and how (more attention should be paid to the position of the cylinder). You can twist the power steering pulley and carefully check with tweezers how the blades move in the grooves of the rotor.
Contents of the power steering pump
All parts should be pulled out without effort, since they do not have any fixations, but the central axis is fixed rigidly, it cannot be removed.
Axle and blades of the power steering pump
We inspect the rotor from the reverse side, the parts (power steering body and cover wall) that touch them, for scoring or grooves, everything is perfect for me.
Inspection of the state of the rotor from the reverse side
Now we extract the entire internal economy on a “clean” rag and begin to study it ...
The insides of the power steering pump
We carefully examine the rotor, all the grooves in it have very sharp edges on all sides. One of the end sides of each groove has a pronounced inward sharpening, which, when moving the blade inside the groove with a constant slope towards this side, will greatly complicate its movement (this may be the first component of the poor performance of the power steering).
Inspection of the state of the rotor from the end
The side parts of the rotor slots are also “sharpened”, you can feel it if you slide your finger in different directions along the end (outer circumference), as well as along the side parts of the rotor in different directions. Other than that, it's perfect, no flaws or notches.
Inspection of the condition of the side faces of the rotor of the power steering pump
Next, we proceed to study the inside of the cylinder. On the two diagonal sides (working parts) there are deep irregularities (in the form of transverse dents, as if from the blows of the blades with considerable force). In general, the surface is wavy.
Defects in the working part of the power steering pump cylinder
Elimination of defects in the power steering pump
Breakdowns are found, now we begin to eliminate them.
We will need a rag, white spirit, P1000 / P1500 / P2000 grit sandpaper, a triangular needle file, a 12mm drill bit (or more) and an electric drill. With the rotor, everything is much simpler, you need the P1500 skin and we begin to clean all the edges of the rotor grooves with it (we clean the outer and side ones on both sides) in all possible ways. We work without fanaticism, the main task is to remove only sharp burrs.
Cleaning burrs with fine sandpaper - the first way
Cleaning sharp edges with sandpaper - the second way
Cleaning the edges of the grooves of the pump rotor - the third way
At the same time, you can immediately slightly polish both sides of the rotor on a flat surface, it is advisable to use P2000 sandpaper.
Power steering pump rotor polishing
then you need to check the result of our work, we check it visually and by touch, everything is perfectly smooth and does not cling.
Checking the state of the corners of the grooves after polishing
Checking the condition of the end part after polishing
For one thing, you can grind the blades on both sides (they are grinded in a circular motion), while they must be gently pressed against the skin with your finger.
Polishing the rotor blades of the power steering pump
The most difficult thing will have to do with the surface of the cylinder, I personally have nothing simpler, I have not figured out how to make a spherical grinder from a skin, a drill and a thick drill (F12). To begin with, we take a P1000 skin and such a drill as it is possible to cram into a drill.
Materials for polishing the power steering pump cylinder
then you need to tightly wind the skin against the rotation of the drill, in two or three turns, there should be no gaps.
Tool for polishing the power steering pump cylinder
Holding the tightly twisted structure, you need to insert it into the drill (clamp the skin too).
Design for polishing the power steering pump cylinder
Then, in the most convenient ways for you, we carefully begin to grind the cylinder, you need to grind it evenly, press the cylinder tightly and move it relative to the axis of rotation (at maximum speed). As we eat the skin, we change it, eventually we reach the smallest skin P2000.
Restoring the inner surface of the cylinder in the first way, put and fix the part on the surface
Restoring the inner surface of the cylinder in the second way, fixing the drill, scroll through the part
The desired result is obtained,
Checking the surface of the power steering pump cylinder after polishing
now you need to carefully wipe everything with a cloth with white spirit. The rotor itself with blades can be rinsed in it.
Flushing power steering pump parts after polishing
After we start the assembly, everything is put in the reverse order.
Mounting the rotor on the shaft
Inserting the blades into the rotor
Installing the cylinder
Before installing the cover, we raise the power steering to a horizontal position and carefully turn the pump pulley, look, make sure that everything rotates perfectly, and the blades move in the grooves as expected. Then carefully close the lid and tighten the four bolts (they are twisted diagonally). All is ready!