We independently install air conditioning on the Lada Priora
Content
- The device of the air conditioner "Priory"
- The principle of operation of the air conditioner
- On the choice of air conditioning for "Priora"
- How to install air conditioning on Priora
- Connecting the air conditioner to the onboard network
- About charging the air conditioner
- If the air conditioner does not turn on
- On the installation of the climate control system on Priora
Air conditioning can make life much easier for the driver in hot or cold weather. The problem is that when buying a new car, not all motorists have enough money for this option. Therefore, many car owners prefer to install air conditioners later, on their own. Consider how the owners of Priora do it.
The device of the air conditioner "Priory"
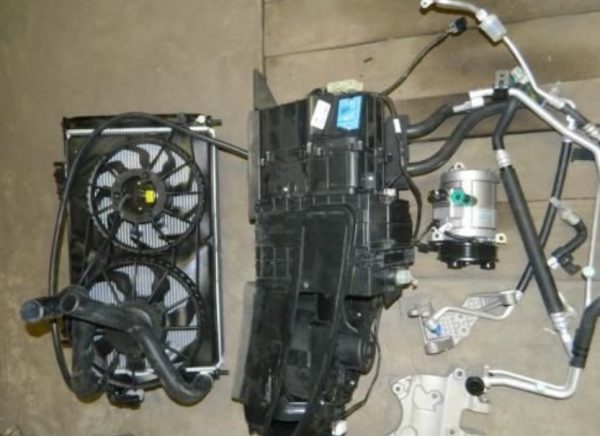
The car air conditioner "Lada Priora" consists of several parts:
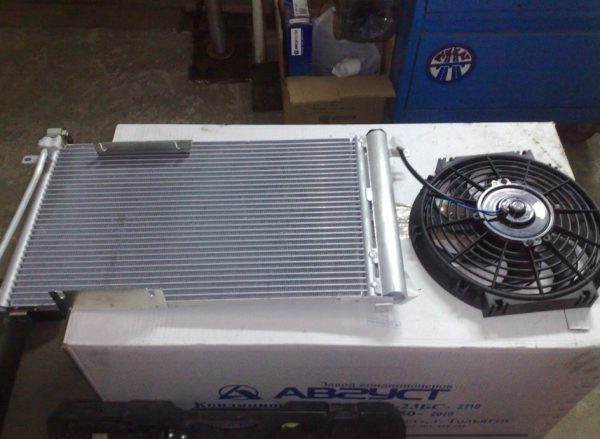
- blown radiator (condenser);
- heat exchanger;
- compressor;
- desiccant;
- heat pipes;
- expansion valve;
- pressure meter;
- temperature sensor;
- main controller;
- air ducts.
The above parts form a single system. The key to the successful operation of this system is its tightness, and its main element is the radiator.
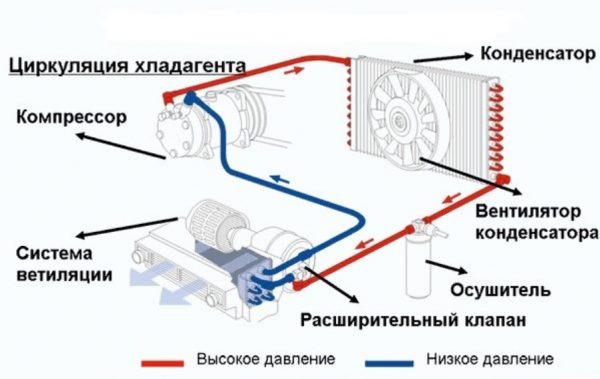
The principle of operation of the air conditioner
In a sealed air conditioning system, the refrigerant Freon is continuously circulating, which is mixed with a special grease that is resistant to freezing. The compressor is responsible for the movement of freon through the system, which builds up pressure in the heat pipes. After turning on the air conditioner, freon is in the heat exchanger located under the dashboard of the car. The internal structure of this device resembles a honeycomb. Once there, the refrigerant begins to take heat from the red-hot interior. At the same time, he himself quickly heats up, and from a liquid turns into steam. Since the compressor continuously pressurizes the system, the steam goes into the blown radiator, where it cools down, again becoming a liquid, which again ends up in the heat exchanger.
Is it possible to install an air conditioner on Priora?
The Priore initially provides for the constructive possibility of installing an air conditioner. A car owner who decides to put this device on his car will not have to do any modifications. All the necessary holes and buttons on the dashboard are already there, a place for laying heat pipes and electrical wiring is also provided. Thus, the installation of an air conditioner on the Lada Priora is completely legal, and the authorities will not have any questions for the driver.
On the choice of air conditioning for "Priora"
Today, air conditioners of both domestic and foreign production are presented on the market. All of them have both advantages and disadvantages. Let's list them.
"August"
Domestic air conditioners "August" are invariably in high demand among the owners of "Priora". First of all, because of the democratic price.
But August also has disadvantages:
- the evaporator body is made of plastic, so it is very easy to damage it;
- compressor reliability is questionable. For some reason, this device almost always fails before all other elements of the air conditioner.
Halla and Panasonic
Halla air conditioners are produced in South Korea. AvtoVAZ began to install them on the Priory in 2010. And by 2012, Japanese air conditioners from Panasonic began to appear on cars.
Both devices are considered quite reliable, the differences between them are minimal:
- compressor design. Panasonic devices are equipped with vane compressors, the volume of which is 110 cm³. And in the Halla air conditioner there is a piston-type compressor, and its volume is larger - 160 cm³;
- in Halla air conditioners, cabin filters are held on by plastic latches, in Panasonic - on self-tapping screws;
- heat pipes on Halla air conditioners are made of aluminum, while Panasonic has about half metal pipes, everything else is flexible hoses.
The conclusion from all of the above can be drawn as follows: the choice of a compressor for Priora today is determined solely by the thickness of the car owner's wallet. The best (and most expensive) option would be to install a Halla air conditioner. It was these air conditioners that were installed on almost all export Priors. Their price is from 30 thousand rubles. The second number is Panasonic, which will cost the motorist 25 thousand rubles. And if money is scarce, you can buy "August". The price is from 20 thousand rubles.
How to install air conditioning on Priora
Before starting work, let's decide on the tools. Here's what we need:
- air conditioner with all accessories and fasteners (in this case it will be Halla air conditioner);
- set of open-end wrenches;
- screwdrivers (flat and Phillips).
Sequence of work
Installation of the air conditioner always begins with a de-energization of the car. The negative terminal must be removed from the battery.
- The front bumper is removed from the car.
- The air filter is removed along with all tubes attached to it.
- The nuts holding the throttle assembly are unscrewed with an open-end wrench, after which the device is removed.
 The knot rests on two studs, the nuts are unscrewed from them with a 12 wrench
 - The timing belt is protected by a special cover that is held on by 5 bolts. The bolts are unscrewed, the cover is removed.
- The lid has space for a hole for the bracket. A hole is punched in the lid using a suitable tube and a hammer.
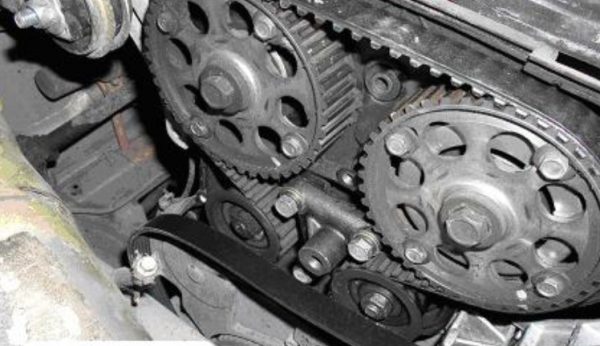
- A bracket for the roller is installed on the timing.The bracket for the additional roller is visible below, between the timing main gears
- The nut is unscrewed from the right engine mount, then the anther is removed.
- All antifreeze from the radiator is drained into a pre-prepared container.
- The generator is unscrewed (moreover, it is unscrewed along with the bracket on which it is attached - without this, you cannot get access to the belt).
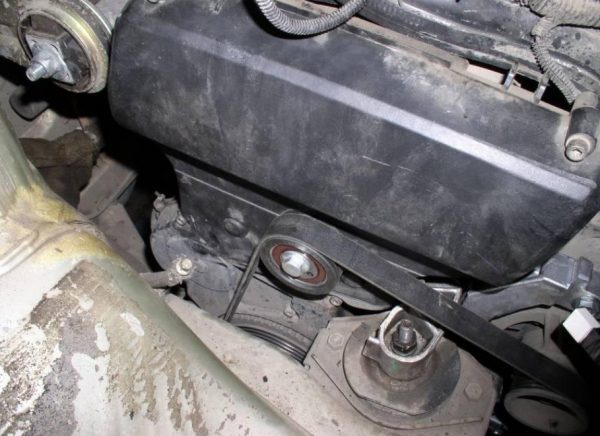
- The compressor belt is threaded under the generator bracket. The bracket with a belt is installed in a regular place.To thread the belt under the bracket, the generator will have to be removed
- Now the compressor bracket is mounted (it is mounted on 3 bolts, a place for them is provided next to the generator).
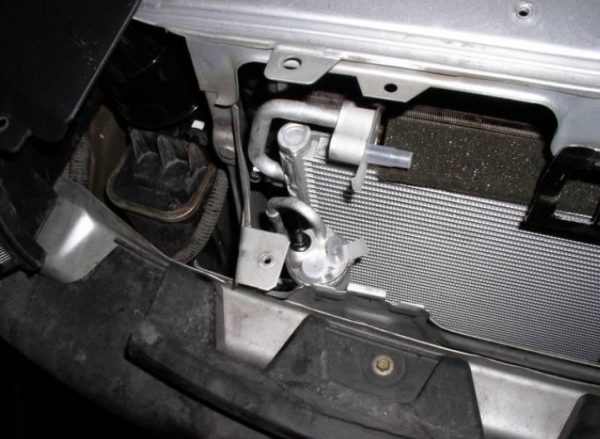
- The cooling radiator is removed from the engine along with the fan.
- An air conditioner radiator is installed in the vacated space.To install this radiator, you will have to remove the main engine radiator
- The engine cooling radiator returns to its place.
- The air conditioning compressor is screwed to the mounting bracket.
- A cover with a hole for the roller is installed on the timing, then the roller itself is screwed.
- The drive belt is pulled over the compressor roller and crankshaft pulley.Now the air conditioning compressor can rotate with the engine crankshaft
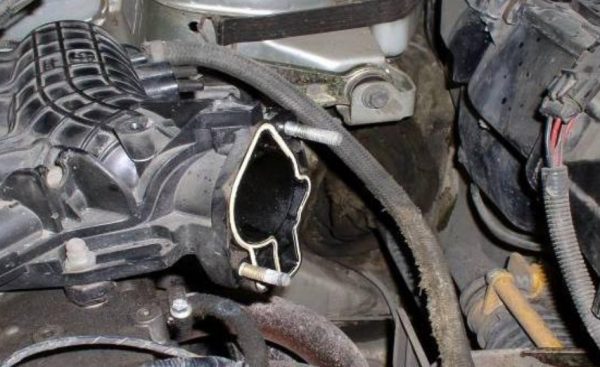
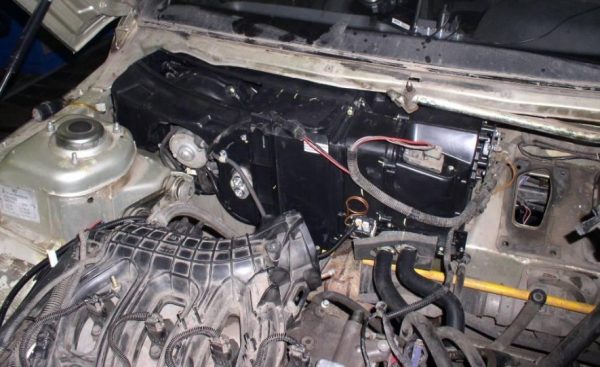
- The heater is removed with all pipes.
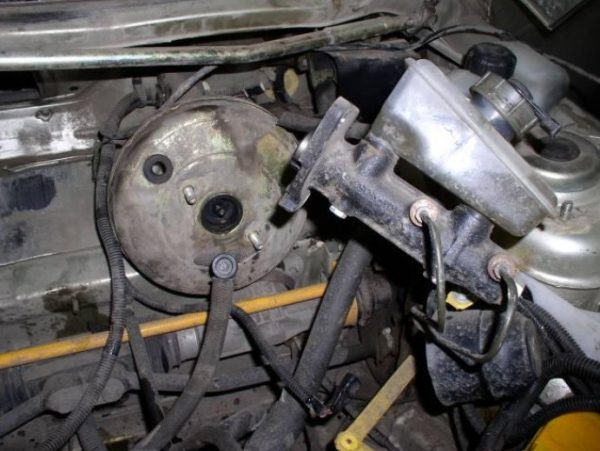
- The master cylinder is removed from the vacuum brake booster.First, the cylinder is removed, then the VUT itself, located under it, is removed
- The brake booster is removed along with the pedal.
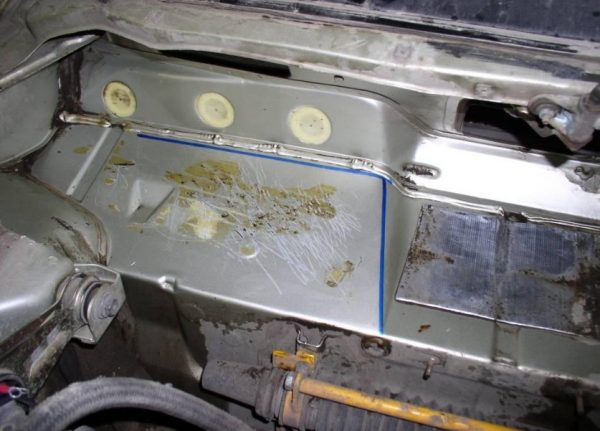
- An incision is made on the site where the standard heater used to be (the location of the incision is shown by a blue line).Before installing a new recirculation unit, the site must be cut along the blue line
- Now you need to cut another window to install the air conditioning recirculation system.A place for an additional window for the block is already provided, you just need to cut a square recess along the contour
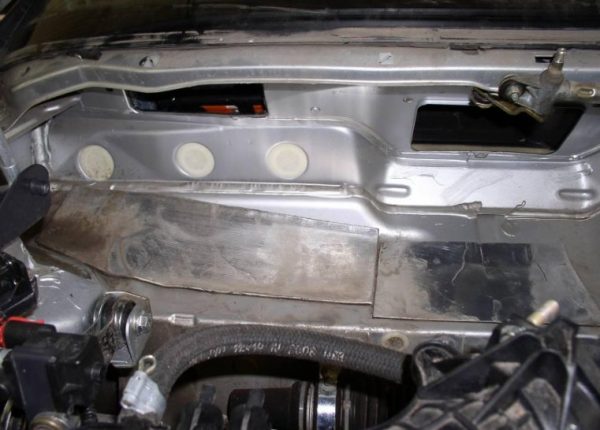
- The recirculation unit of the air conditioner is installed in place of the standard Priora heater.The new recirculation unit takes up twice as much space as the standard heater
- All previously mounted elements of the air conditioning system are connected by tubes in accordance with the instructions.

Connecting the air conditioner to the onboard network
After installing all the elements and tubes of the air conditioner, it must be connected to the car's electrical network. Here's how it's done.
- A pressure sensor, which is included in the air conditioner kit, is mounted on the high pressure pipe.
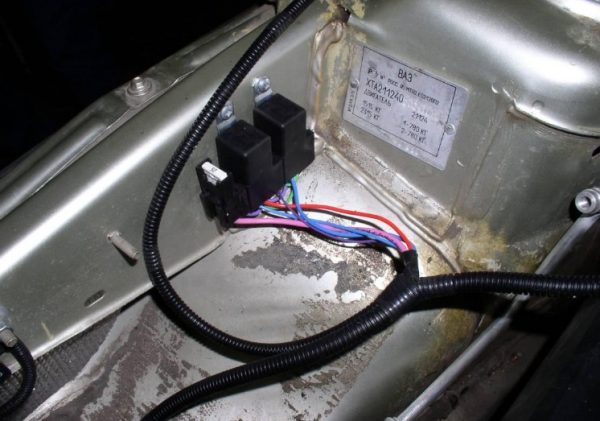
- A relay box is mounted in any free space in the engine compartment. Its wiring is connected to the air conditioner in accordance with the diagram attached to the device.In this case, the relay box is installed on the wall of the engine compartment, not far from the expansion tank.
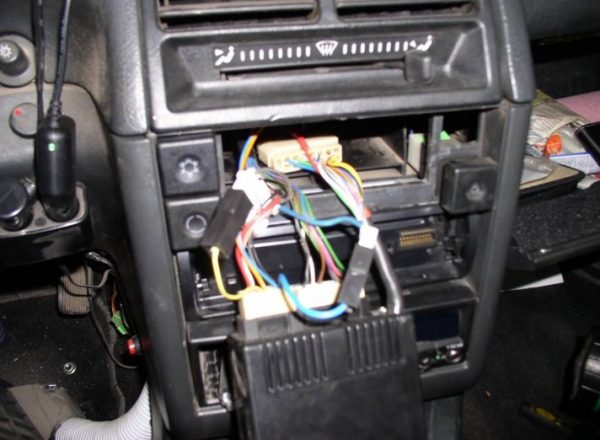
- A common wiring harness is pulled into the passenger compartment, where the contacts are connected to the electronic control unit of the car, to the heater control unit and to the air conditioning buttons.Wiring connected to the air conditioner electronic control unit
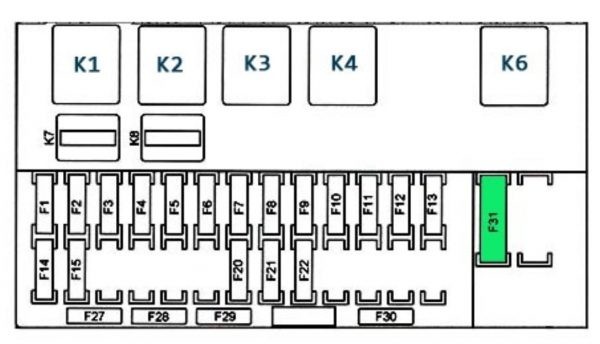
- Pay special attention to the air conditioner fuse. It is located in the mounting block under the steering column. On the diagram, it is designated as F9. In the "Prior" without air conditioning, this fuse is responsible for the state of the standard heater. After connecting the air conditioner, it will also be responsible for the recirculation unit.F9 fuse, responsible for the operation of the air conditioner, is located in the middle of the mounting block
About charging the air conditioner
It is necessary to pump 500 g of refrigerant into the Priory air conditioner. Until 1995, R12 brand freon was pumped into air conditioners, but it was recognized as toxic due to its high fluorine content. Therefore, R134A freon is now in use. Preparation for refueling looks like this:
- a special cleaning foam from a can is pumped into the radiator of the air conditioner;
- the radiator is closed. The engine of the car starts and runs at idle. The air conditioner turns on at the same time. It must work for at least 15 minutes so that the foam passes through the entire recirculation system;
- vacuuming is performed. A pump is connected to the air conditioner, which draws air from the system along with foam and moisture.
Filling
To refuel the air conditioner, the driver needs to purchase a metrological station and a can of freon.
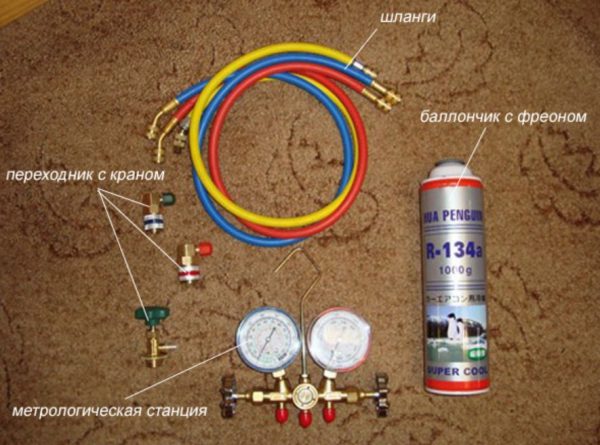
The station is a system of hoses, adapters and pressure gauges connected to the air conditioner.
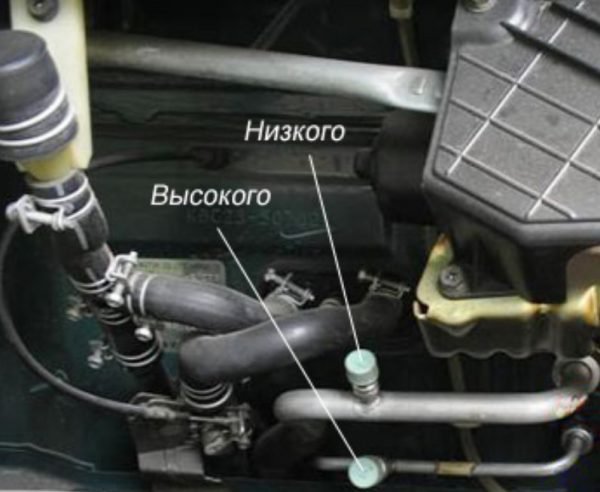
- The station hose is connected to the low pressure fitting on the air conditioner pipeline (it is usually painted blue or has the English designation “low”).Tubing fittings are usually marked "high" and "low"
- The engine starts and runs at idle, and the number of revolutions per minute must be at least 1400 (for this, the gas pedal will have to be fixed with something, or ask someone for help).
- When the engine is running, the maximum recirculation of the air conditioner is turned on, then the low pressure valve smoothly opens at the station.
- The freon cylinder is turned upside down, after which the tap opens on it.
- The refrigerant begins to flow from the cylinder into the system. The driver at the same time controls the pressure on the pressure gauge - it should not exceed 280 kPa.
- When the air in the cabin warms up to a temperature of 10–15°C, refueling stops.
Video: how to fill the air conditioner

If the air conditioner does not turn on
Sometimes the air conditioner categorically refuses to turn on after installation. Here's why it might happen:
- wiring problems. It is necessary to carefully inspect the wires for damaged insulation and short circuits. You should also check the latches on all terminal blocks. Some of them, being new, do not always fit tightly into place, which leads to the opening of the circuit;
- wiring error. This is another common option. Each model of the air conditioner has its own circuit diagram of the assembly. It is difficult to make a mistake when assembling it, since all important wires have insulation of different colors. However, the error cannot be ruled out. The solution is obvious: check the instructions again and find the error;
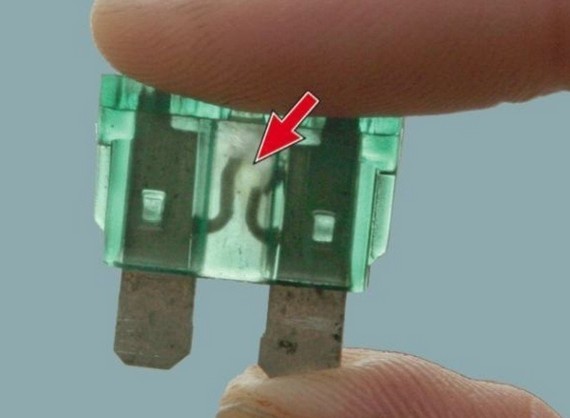
- fuse burned out. The same F9 that was mentioned above usually burns. This can happen due to a short in the wiring, or due to an incorrectly assembled circuit. If the air conditioner does not turn on, you need to remove the fuse and inspect it. If it fails, the thread in it will be broken, and its body will be slightly melted. This fuse needs to be replaced. Then you should carefully check the wiring. And only after that you can try to start the air conditioner again.A blown fuse always has a broken thread.
On the installation of the climate control system on Priora
Automotive climate control systems typically consist of several climate zones. Each zone in the cabin is responsible for its own electronic control unit. The average cost of such a block starts from 12 thousand rubles. The minimum number of blocks to form a climate control system is 2. That is, the owner of Priora will have to pay at least 24 thousand for the blocks, which then will need to be connected. To do this, you will need a qualified auto electrician with special equipment. The average car owner in his garage will simply not be able to make such a connection. The services of an auto electrician for connecting climate control cost from 7 thousand rubles and more. The vast majority of Priora owners, having soberly assessed the above points, understand that the game is clearly not worth the candle. And they limit themselves to only air conditioners in their cars, leaving climate control to a few enthusiastic motorists.
So, installing an air conditioner on the Priora is a job that a car enthusiast can do on his own. Difficulties can arise only at the stage of connecting the device to the on-board network. But here the diagram that is attached to each air conditioner model will come to the rescue.

