Welding and repair of plastics in cars
Content
- Plastic repair methods
- Plastic repair options
- Repair of plastics by welding
- Repair with Uni-Weld and Fiberflex tape
- Repairing broken staples
- Plastic repair with instant glue
- Repair of plastics with two-component epoxy resin
- Putty application
- Surface treatment with a primer before applying the topcoat
- Flexible paint application
 In most modern cars, metal parts are being replaced by plastic ones. The reason is the lower weight of the car, lower fuel consumption, corrosion and, of course, lower price. When repairing plastic car parts, it is necessary to take into account the economic side of repairing one or another element and the performance of plastic after repair.
Plastic repair methods
The order of work is the identification of plastic, cleaning, the repair process itself, sealing, base paint, painting.
Plastic identification
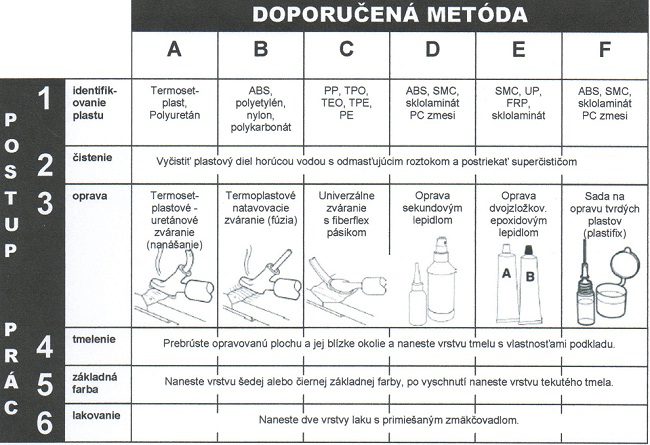
The easiest way to identify a plastic is to turn it over and look inside for the manufacturer's symbol. Then look for this symbol in the attached table (Reference Chart for Plastic Repair) and, in the case of several suggested repair methods, choose the one that best suits you. If it is not possible to identify the plastic by symbol, it is very difficult to determine the repair method, this requires very experienced specialists in the field who can select the appropriate repair method for the part.
Plastics Repair Reference Table
Surface cleaning before repair
To achieve high repair strength and a long service life of the part being repaired, it is important to thoroughly clean the surface from various contaminants, especially at the place of planned repair.
Step no. 1: Wash both sides of the part with detergent and water and dry with paper or air blast.
Step no. 2: Spray the repaired area with a super cleaner (degreaser) and wipe with a dry cloth. Always fold the towel with the new part. Always wipe in one direction. This procedure avoids the ingress of dirt into the part being cleaned.
Plastic repair options
Overhang repair
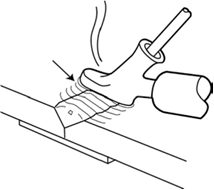
If the surface is covered, we use a heat gun to repair damaged surfaces. When heating plastic, it is important to completely warm it up. Good heat means holding the heat gun on one side until the opposite side is so hot that its surface cannot be held in your hand. After the plastic heats up well, press the damaged part with a piece of wood in the correct position and cool and clean the place (you can cool it with a stream of air or a damp cloth).
Thermosetting plastics - polyurethanes (PUR, RIM) - are plastics with memory, thanks to which they automatically return to their original position after heating with a heat gun or in a paint container.
Repair of thermosetting plastics from uranium plastics.
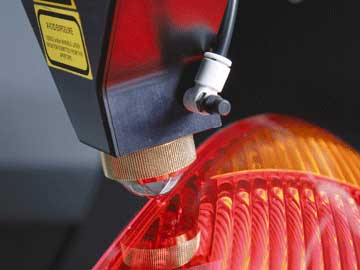
Automotive urethane or PUR is a heat resistant material. In its production, a reaction is used similar to that used when mixing a sealant with a hardener - that is, 2 liquid components together and one solid component is formed without the possibility of returning to its original state. For this reason, plastic cannot be melted. It is impossible to melt plastic by a welder. The most reliable way to tell if a bumper is polyurethane is to apply a hot welder tip to the back of the bumper. If it's urethane, the plastic will start to melt, bubble, and smoke (the welder needs to be very hot to do this). After the etched surface has cooled, the plastic remains tacky to the touch. This is a sign that the temperature has damaged the structure of the molecules in the plastic. Thermoset urethanes can be easily repaired with an airless welder, but the repair will be more with hot glue than with welding (fusing the rod and backing).
Preparation of V-grooves in the damaged area
We straighten and glue the damaged parts with aluminum tape. For large areas, secure with compression clamps. You can also join the parts with instant glue (eg type 2200). In the back of the part to be repaired, we mill a V-groove on a tapered milling machine. We cannot use a warm tip instead of a milling machine for this process as the material is infusible. Sand the V-groove with sandpaper (z = 80) or even coarser. By sanding the surface, we get more grooves in the milled area. Also in the V-groove area, remove the varnish and soften the edges of the V-groove so that the transition between the surface and the V-groove is smooth.
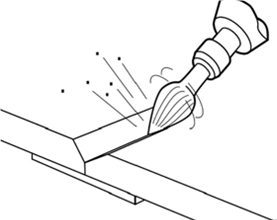
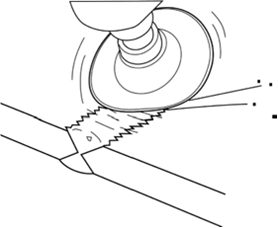
Casting a rod into a V-groove
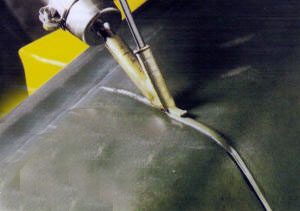
The temperature on the welding machine must be set using the regulator corresponding to the transparent rod (R1). Using a polyurethane rod 5003R1, we have achieved the fact that at the exit from the welding shoe, the rod should come out in a liquid state, translucent without bubbles. Hold the welding shoe over the surface to be welded and press the spaced rod into the V-groove with it. We do not overheat the main material, but pour a welding rod onto its surface. Do not confuse the stem with the bumper. Let's not forget that urethane does not melt. Do not add more sticks than 50 mm at a time. We take the stick out of the shoe and before the molten stick in the groove cools down, smooth its surface with a hot shoe.
Preparation of V-grooves on the opposite side
After the weld on the back side has cooled down, repeat making the V-groove, sanding and welding on the opposite side.
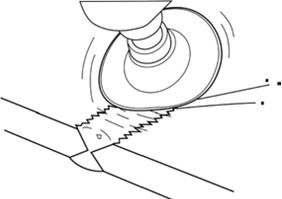
Grinding the weld to a smooth surface
Using coarse paper, sand the weld to a smooth surface. The urethane joint cannot be perfectly sanded, so a coat of sealant will need to be applied to the surface to be repaired. Slightly remove more material from the weld by sanding so that the sealant covers the entire surface evenly.
Repair of plastics by welding
With the exception of urethane, all bumpers and most automotive plastics are made from thermoplastics. This means that they can be melted when heated. Thermoplastic parts are made by melting plastic beads and injecting liquid material into molds where they cool and solidify. This means that thermoplastics are fusible. Most of the bumpers produced are made of TPO material. TPO has quickly become a popular material for the production of interior and engine compartment parts. TPO can be welded using fusion technology or a special Fibreflex fiber rod that makes the weld more durable. The third most popular bumper material is Xenoy, which is best welded.
Preparation of V-grooves in the damaged area
We straighten and glue the damaged parts with aluminum tape. For large areas, secure them with compression clamps. We can also join the parts with a second type 2200 glue. At the rear of the repaired part, we mill a V-groove on a tapered milling machine. For this process, we can use a warm tip instead of a milling machine, since the material is fusible. Remove the paint around the planned renovation by hand sanding and remove the chamfer between the surface and the V-groove.
Mixing the core with the base material
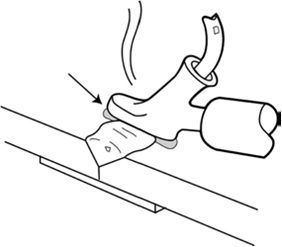
We set the temperature on the welding machine to match the selected welding rod, which we determined during the identification process. In most cases, the weld rod with pads should come out clean and unpainted. The only exception would be nylon, which turns translucent to pale brown. Place the welding shoe on the base and slowly insert the rod into the V-groove. We slowly push the rod in front of us so that we can see behind us a V-shaped groove filled with this material. Maximum of 50 mm welding rod in one process. We take the stick out of the shoe and, before the stick cools down, carefully push and mix the materials together. A good tool is the edge of the shoe, with which we fuse the grooves into the base material and then blend them. Smooth the surface gently with a hot tip. Leave the tip hot throughout the mixing process.
V-groove preparation and opposite side welding
After the back side has cooled completely, we repeat the process of preparing the V-shaped grooves, grinding and welding the front side.
Grinding welds
Using coarse paper, sand the weld to a smooth surface. Slightly remove more material from the weld by sanding so that the sealant covers the entire surface evenly.
Repair with Uni-Weld and Fiberflex tape
The Universal Welding Rod is a unique repair material that can be applied to any plastic. It's not a real welding rod, it's more of a form of hot glue. When we repair this stick, we will use the heat of the welder, rather for its adhesive properties. A rod like Fiberflex strip has a very strong structure. It is reinforced with carbon and fiberglass for extra strength. Fiberflex is the best solution for TPO (also TEO, PP/EPDM) repairs i.e. the most commonly used materials for bumpers. Fiberflex can be used to repair all types of plastics. It can stick to urethanes as well as xenos. If we are not sure what plastic we are welding, we simply use Fiberflex. Another benefit of Fiberflex is its fusibility. The fine structure of the weld minimizes the use of sealant.
Preparation of V-grooves in the damaged area
We straighten and glue the damaged parts with aluminum tape, fix them with compression clamps on large areas. You can also connect the parts with a second type 2200 glue. The width of the V-shaped notch should be 25-30 mm. It is very important to sand the surface instead of the V-groove with sandpaper (grit size approx. 60) in order to obtain additional area in the micro-grooves. If we use a rotary vibration sander for grinding, we will reduce the speed to a minimum to prevent melting of the material to which thermoplastics are sensitive. Using sandpaper (z = 80), remove varnish from the entire surface to be repaired and cut an edge between the V-groove and the surface. This allows us to better spread and press the Fiberflex tape at the repair site.
Melting Fiberflex tape
Set the welding machine to the highest possible temperature and replace the welding shoe with a melting pad (without guide tube). It is best to wipe one side of the Fiberflex strip with a hot surface to partially melt it and apply immediately to the substrate. Separate the glued part with the edge of the hot plate from the rest of the coil. Then melt the strip in the V-groove. We are not trying to mix the base material with Fiberflex. This method is similar to the hot glue method.
Preparation of V-grooves and welding of the facade
After the Fiberflex on the back has cooled down (we can also speed up the process with cold water), repeat the grooving, grinding and welding process. You can also apply a slightly higher layer of Fiberflex as it grinds well.
Grinding
Once the Fiberflex weld has cooled down, start by sanding (z = 80) and slow speed. Finish the sanding process with sandpaper (z = 320). All irregularities must be filled with sealant.
Repairing broken staples
Many TEO bumpers have brackets that need to be flexible to make installation easier. This structure can be repaired very well with a stainless steel grid and fiberflex. First, roughen the surface with a rotary sander. From stainless steel mesh, we will cut out a part that is ideal for connecting the console and the base on both sides. With a hot tip, press these pieces into the plastic. After melting and cooling, sand the surface with paper to remove shiny surfaces. Etch the Fiberflex stick on the treated surface. With this repair, the mesh guarantees strength and flexibility, and the fiber rod is only a cosmetic coating.

Plastic repair with instant glue
Since secondary adhesives form hard bonds, they are preferred for repairing plastics such as ABS, PC, SMC, hard plastics. They are also suitable for spot joining parts by fixing them before welding.
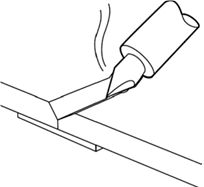
Fast repair of cracks
The priority of joining parts is to lightly spray the parts to be joined with an activator. We install and connect the parts. Use 6481 aluminum tape. For large parts, use clamps to ensure the parts are held in place during bonding. Place a small amount of instant glue to fill the crack. Optimum results are achieved with the minimum amount of adhesive applied to the joint. The glue is thin enough to penetrate the crack. Spray an additional dose of activator to complete the process and medium sized holes.
Filling grooves and holes
We close the hole at the bottom with aluminum tape. Prepare a V-notch around the entire perimeter of the hole and sand it and the surrounding areas by blowing out the dust. Spray the area to be repaired lightly with activator. Fill the hole with putty and apply a few drops of glue. We level and press the glue into the sealant with a sharp tool. After 5-10 seconds, apply a light layer of activator. The surface can be immediately sanded and drilled.
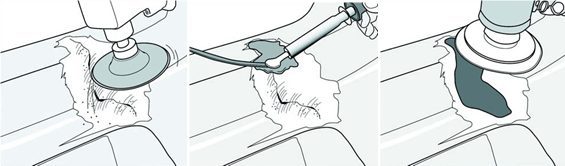
Repair of plastics with two-component epoxy resin
Sand the back of the repaired area with sandpaper (z = 50 or thicker). Deep grooves after grinding are an excellent basis for a strong connection. Then lightly sand the surface with paper (z = 80), which also contributes to better bonding. If TEO, TPO or PP material is used, we must use 1060FP type backing adhesive. Spread the product with a brush on the sanded surface and let dry. We impose fiberglass along the entire length of the damaged part. If a section of SMC is folded over a crack with another remaining section also made of SMC, ensure that this overlap section exceeds the damage area in each direction by at least 0,5mm. We will select a suitable two-component adhesive that most closely resembles the part to be glued:
- Filler 2000 Flex (gray) flexible
- 2010 Medium flexible semi-flexible filler (red)
- 2020 SMC Hardset Filler (Gray) Rigid
- 2021 Hard filler (yellow) hard
Mix enough epoxy. Apply a layer to coat the tape with fibers and allow it to dry for at least 15 minutes. On the SMC, we create a layer of glue for the reinforcement piece, which we then press into the prepared bed. In this case, let the glue dry for at least 20 minutes. Sand the face of the damaged part with paper (z = 50) and sand the V-groove in the crack. The longer and deeper this groove, the stronger the connection. Chamfer the edges of the V groove, sand the surface with paper (z = 80). Mix and apply a layer of epoxy adhesive and shape it so that it extends beyond the surrounding surface. Let dry for at least 20 minutes. Only then will we start grinding. Using SMC, we insert pieces of versatile fiberglass fabric into the V-groove and between the individual layers of adhesive. Using a rotating roller, we carefully press the fabric into the glue and push out unwanted air bubbles. We process the dried surface with sandpaper (z = 80, then z = 180).
Putty application
Sand the surface to be sanded with coarse paper. Prepare a small V-groove at the damage site. All glossy parts must be removed before applying the sealant, otherwise good adhesion will not occur. If the material is polyolefin (PP, PE, TEO or TPO oil-based plastic), we apply a backing adhesive that is well ventilated. We select a suitable epoxy sealant that matches the flexibility of the base material. If flexible, use 2000 Flex Filler 2 or 2010 Semi-flexible Adhesive. If difficult, use 2020 SMC Rigid Kit or 2021 Rigid Filler. Mix the prescribed amount of epoxy sealant. We will create a slightly higher sealant layer than the surrounding surface. We do not start sanding earlier than after 20 minutes, for sanding we use paper with a grain size (z = 80, then 180).
Surface treatment with a primer before applying the topcoat
If the material is a semi-olefin (TEO, TPO, or PP), apply a backing adhesive to all painted parts according to the procedure indicated on the product label. Apply a basic spray of gray or black color to the surface to be repaired in thin layers. After drying, sand the surface with sandpaper (z = 320-400).
Flexible paint application
After sanding the base, blow off the dust, apply a product that smooths out all scratches on the surface to be repaired. Mix the product with undiluted paint. Then we mix the paint with a thinner, apply to the entire surface of the panel according to the manufacturer's instructions, avoid spot spraying. To achieve the standard look of the plastic part, we use flexible black bumper spray.
When repairing car plastics, we must take into account, first of all, the technical side of the possibility of repair and the assessment of the repair performed from an economic point of view. Sometimes it is faster, more convenient and cheaper to buy a used plastic part in good condition.