Motorcycle brake pads: replace them, here's how!
" Hi all !
Thanks for all these articles, a treasure trove of information. Just two comments after reading the article on replacing motorcycle brake pads.
Lubricating threads is not a good idea. This reduces friction and increases the risk of overtightening. There is a risk in the hand, but with a torque wrench it is obvious: tugging is guaranteed. For this, "anti-seize" pastes (anti-blocking) are provided (selected in accordance with the contacting metals), which are not expensive and retain tightening torques.
On the other hand, in the case of floating calipers, lubricating the slide is a good idea! A "solid" lubricant is preferred here, such as a molybdenum disulphide (MoS2) lubricant. When the binder is gone, the molybdenum particles remain "stuck" to the metal, so there is less grease left on the pads. In addition, these lubricants are more resistant to bad weather and prevent excessive "washing" with water and heat.
That's it, I'm not a mechanic, I just have a 4 year old Honda V30 that spends more time in the air than on the road. This does not detract from the quality of this article.
Good day to all!
Stefan"
Of course, brakes are an important component of the safety of our motorcycle. For this reason, they should always be pampered. Rest assured, there is nothing complicated in their maintenance. But before getting into the heart of the matter, it's best to understand how the brakes on a motorcycle work.
1 - Description
How do the brakes on a motorcycle work?
Let's move on to the virtually extinct drum system and attack directly with the disc brake, which has become the standard on all modern motorcycles. Take, for example, a front brake consisting of:
– the master cylinder, its lever and its reservoir filled with brake fluid,
– hose(s),
- one or two stirrups
- platelets,
- disk(s).
The function of the braking system is to slow down the motorcycle. In physics, we could call this a reduction in the kinetic energy of the vehicle (roughly speaking, this is the energy of the vehicle due to its speed), the means used in our case is the conversion of kinetic energy into heat, and all this is simply by rubbing the pads on the discs attached to motorcycle wheels. It rubs, heats up, energy dissipates, so... it slows down.
So let's detail the motorcycle brake chain from below.
Brake discs for motorcycles

These are discs that dissipate most of the energy. There are one or two of them (on the front wheel), they are attached to the wheel hub. There are three types of motorcycles:
- fixed disk: whole piece cake,
- semi-floating disc: a part attached to the hub, usually made of aluminum, is connected using lugs (part circled in the photo) with a disc track made of steel, cast iron or carbon (it is on this part that the pads will rub),
- floating disc: the same principle as for semi-floating discs, but with a much more flexible connection, the discs can move slightly sideways (usually used in competitions).
Semi-floating or floating motorcycle brake discs limit heat transfer between the fret and the track. Loose, it can expand at will under the influence of heat without deforming the hoop, thus avoiding disc veiling problems.
Motorcycle Brake Pads

Two to eight brake pads (in the case of some special calipers, etc.) Clamped in the motorcycle calipers and consist of:
- rigid copper plate,
– lining made of friction material (cermet, organic or carbon). It is this pad that presses against the discs that causes heat and therefore deceleration. 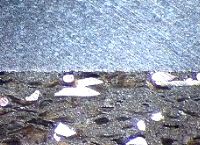
As shown in this section of a motorcycle brake shoe taken under a microscope (right), the sintered material includes a number of components including copper, bronze, iron, ceramics, graphite, each with a different role to play (noise reduction, quality friction, etc.) ). After the components have been mixed, everything is compressed and then fired to ensure the connection and soldering of the brake pad to its support.
Brake pads for motorcycles come in several qualities: road, sports, track.
NEVER install tracks on a motorcycle if you are only driving on the road. They are only effective when they are (very) hot, which is never the case under normal conditions. The consequence: they will perform worse than the original pads, which will lead to an increase in the braking distance!
Motorcycle Brake Calipers

Thus, the brake calipers, which are fixed or floating on the motorcycle fork, support the pads. The calipers are equipped with pistons (one to eight!) And are connected by hoses to the master cylinder. The pistons are responsible for pressing the pads against the disc. We'll quickly go over the different types of calipers, from single-piston to eight opposing pistons, two side-by-side pistons, and more, which will be the subject of the next article.
The advantage of a floating brake caliper on a motorcycle is that it self-aligns with the disc track, ensuring that the brake pads are in contact with the disc over the largest possible surface.
Motorcycle Brake Hoses
Made of reinforced plastic (sometimes Teflon reinforced with a metal braid or Kevlar, the famous "aviation hose"), brake hoses provide a hydraulic connection between the master cylinder and the calipers (actually like pipes). Each hose is tightly connected to the caliper on one side, and to the master cylinder on the other.
Motorcycle brake master cylinder
 The brake master cylinder is responsible for transmitting the force applied by the driver (who said pilot?) To the lever, to the pads through the brake fluid. Basically, it consists of a lever that presses on a piston, which creates pressure in the brake fluid.
Brake fluid for motorcycles
It is an incompressible fluid that is resistant to heat and is responsible for transferring the force exerted by the master cylinder piston to the pistons of the motorcycle brake caliper (s). In short, it is he who pushes the pistons.
Brake fluid is very hydrophilic (absorbs water) and therefore, unfortunately, has a tendency to age, quickly losing its effectiveness. The water contained in the liquid sediments gives off steam and the liquid is no longer incompressible. As a result, the clutch becomes soft, and in the worst case, you will no longer be able to brake the motorcycle!
For this reason, it is recommended that you bleed the motorcycle brake system annually (but we will see that later ...). Also note that this liquid loves to spoil painted surfaces ...
How motorcycle brakes work

1 / the motorcycle rider presses the brake lever (D), which pushes the master cylinder piston (B),
2 / the piston of the master cylinder generates pressure in the brake fluid (C) (approx. 20 bar),
3 / the brake fluid pushes the piston (s) of the caliper (s) (G),
4 / caliper pistons press pads (H),
5 / the pads clamp the discs (I) which heat up and dissipate the kinetic energy of the motorcycle ...
2 - Maintenance of motorcycle brake pads
How to act?
After this somewhat boring theoretical part, let's get to the heart of the matter: replacing the brake pads on your motorcycle ...
Motorcycle brake pads have an annoying tendency to wear out, lose thickness and need to be changed from time to time, if possible, even before the brakes are no longer available ... Replacement is necessary not only for safety reasons, but also to maintain the condition of the discs. If all of the lining is gone, it will be a metal support that will rub against the disc, which wears out at high speed (metal versus metal friction: not good ...)
When to change brake pads on a motorcycle? Most have a small groove in the center that serves as a wear indicator. When the bottom of the groove is approaching or reached, it is necessary to replace all the pads of one loop. and not just a dead waffle. Don't panic, just in case there is always a tiny millimeter of material under the groove. This saves a bit of time, but as with the good stuff, it's best not to overdo it ...
Let's go step by step
First of all, we can arm ourselves on the one hand with a technical overview of the motorcycle, brake calipers may differ slightly from one motorcycle model to another, and on the other hand, a good tool. Prohibit keys bought in the market square, such as a € 1 set of keys, as well as 12-sided keys or flat keys. Better to have a 6-point pipe wrench that works well than a set of thirty rotten wrenches ... Bring yourself a tube of grease, rags, spray brake cleaner, brush and syringe. Let's go to.
1 / Open the brake fluid reservoir after:
- turn the handlebars of the motorcycle so that the surface of the liquid is horizontal,
- wrap a rag around the container, on any painted part below (remember, brake fluid will eat away at your bike's paint, and so will paint remover...).
It remains only to drain a little liquid with an old syringe.
The screws on the cans built into the motorcycle brake master cylinder are often of poor quality cruciform shape. Use a screwdriver of the correct size and if the screw does not come out the first time, insert the screwdriver and tap it lightly to loosen the threads. Then push firmly on the screwdriver while turning it to loosen it.
There should always be some liquid at the bottom of the jar!
2 / Remove the brake caliper.
In the case of a double disc, we take care of one caliper at a time while the other stays in place. It is usually fixed with two screws at the bottom of the motorcycle fork, either a BTR or a hex. You simply remove the screws and then carefully move the brake caliper to disengage it from the disc and rim.
3 / Take out the brake pads

The pads slide over one or two pins that go through the caliper. The axle is either screwed on (like on Honda motorcycles) or is held in place by two small pins that run through it.
Before removing the axles, observe the installation direction of the protective plate located on the top of the caliper (the axles go through this metal plate).
Remove the pins (or unscrew the axle), remove the axle (s) while holding the brake pads and protective plate ...
Hop, magic, it comes out by itself!
Some brake pads are equipped with sound absorbing plates (attached to the rear). Collect them to install on new ones.
Do not throw old brake pads off your motorcycle, they will be used up.
4 / Clean the brake caliper pistons.

As you can see, the brake pistons are pushed back due to the wear of the pads, and their surface is probably quite dirty. These pistons will need to be pushed in, but clean them first. Indeed, dust accumulated on their surface can damage the gaskets that ensure tightness. Remember that they are pushed out directly by the brake fluid and it must be waterproof for that, right?
Therefore, spray the brake cleaner directly onto the caliper and brush it clean. The surface of the pistons must be in perfect condition before pushing them back. He must shine!
5 / Move aside the caliper pistons.

Replace the old pads between the pistons (no need to replace the pins ...) and, using a large screwdriver between them, push the pistons back into the lower part of their housing with a lever. You have to use strong leverage, but you also don't have to go in like a deaf!
After the pistons are pushed back, watch the liquid jar ... The liquid level has risen, so we cleaned up a bit first.
6 / Insert new pads

It's a little more complicated there: you have to hold the two brake pads and the protective plate in place with one hand, and set the axle with the other ...
In the case of a screw axle, lubricate the threads (and ONLY the threads) with a lubricant that will facilitate the next disassembly (and not tighten like crazy, it doesn't make sense). Replace pins if using this system.
7 / Before replacing the brake caliper ...
Clean the caliper and pads again with brake cleaner as well as the disc.
Discs and pads should never be greasy !!!
Lubricate the screws that hold the caliper to the fork, put them in place and tighten them, but not like crazy: a properly tightened screw is a good screw, and most importantly, it will not break, and it will be easier to take it apart next time. .
8 / That's it, almost done!
It remains only to repeat the operation on the second support, if any.
9 / Recent transactions
Before closing the container with liquid, bring the level to the level and do not forget:
Use your bike's brake lever to put the pads back in place so you can brake as soon as you get back on the bike!
3 - Summing up
Our advice for replacing brake pads on your motorcycle
Complexity:
Easy (1/5)
Duration: No more than 1 hour
Do
– Use good quality tools,
– Provide brake cleaner and new fluid,
– Thoroughly clean the pistons and take the opportunity to clean the calipers,
– Before reinstalling, lubricate the threads of the fixing screws,
– At the end, activate the brake lever to put everything back in place,
- Check tightness and performance again before riding!
Not to do
– Fit brake pads with a greasy surface without cleaning them first,
– Do not clean the pistons before pushing them back,
- Install pads upside down, piston linings ... Stupid, but sometimes it happens, the results: discs and pads are twisted, and again, at best ...
– Forget to replace the locking pins of the shoe axles,
“Tighten the screws like… uh… sick?”
It could have happened ...
- On Honda motorcycles, the axle covers are screwed on ... and often stick. Better not to insist if they don't fit:
If you do not have very good quality hex keys (BTR type), forget and go to the dealer before doing anything stupid (the BTR head becomes rounded, the axle can no longer be removed, the dealer will be happy if you have something stupid , sell you a new caliper ...).
If disassembly was successful, remember to lubricate before reassembling (and yes, that was the lubricant for that!).
These axes are blocked by a small screw cap, with a flat support, we lubricate it too and do not serve as ... uh ... as a thug? Thanks for them.
– Brake pistons do not fit:
Clean them well and try again,
Do not try to lubricate them.
If it didn’t work out, we put the old pads back, go to the garage or wait for the “Calipers” section ...
Good advice
- Motorcycle brake pads, like any new wear item, break. A good hundred kilometers with a quiet entrance, soft braking, enough to run a set of pads.
– In the event of an unsuccessful break-in, the pads become icy (their surface then becomes shiny) and the motorcycle brakes poorly. Just take them apart and sand them down with sandpaper on a flat surface.
– For use on motorcycle tracks, some chamfer the leading edge (therefore the leading edge) of the pad to improve pad performance.
- As we saw earlier, the fixing screws of the integrated jar lids are of the cross type. If possible, replace them with analogues, with a head with an internal hex and stainless steel, which is much easier to dismantle ...
Thanks to Stefan for his excellent work, writing and photographs (including unpublished brake pad sections under a microscope!)