Tutorial: Install USB to Motorcycle
Content
Explanations and practical tips for adding a charging port to a two-wheeled vehicle
A Practical Tutorial on Installing Your Own USB Connector on the Steering Wheel
When you ride a motorcycle, just like in everyday life, you are more and more surrounded by electronic devices. It must be said that our smartphones, now closer to a pocket computer than a mobile phone, are used for many tasks, be it informing us about navigation by replacing GPS, providing emergency alerts in the event of an accident, or perpetuating two-wheeled trips through photographs and videos.
The only problem is that our phone batteries are not infinite and that they even have an unfortunate tendency to quickly melt immediately after using GPS sensors. And the situation hasn't improved over the years, regardless of the brand.
Motorcycle manufacturers are right and are increasingly integrating USB ports on appliances, pocket trays or saddle so you can charge mobile devices. If this practice becomes widespread, it is not systematic, and especially motorcycles and scooters, which are starting to hit a few years old, are certainly not equipped with it.
Instead of hauling a backup battery (powerbank) from time to time to recharge electronic devices from your jacket pocket, the motorcycle has kits to install a USB port or more conventional cigarette lighter socket on a motorcycle without too much difficulty and on a very small budget, so you wonder question why USB connector We explain how to do this.
Select outlet, voltage and current
USB or cigarette lighter? The choice of outlet obviously depends on the nature of the devices you need to connect. But today, almost all devices go through USB. The big difference between the two, in addition to their shape, is the voltage, the cigarette lighter is at 12V while USB is only 5V, but again, your devices are critical.
When choosing, you should pay special attention to the current medium, which can be either 1A or 2,1A, this value determines the load speed. For smartphones, 1A will be a little fair for the latest models, and for those with large screens, the system will basically keep the cell phone charged, not charge it. The same goes for GPS, so you can opt for 2.1A if you want to recharge at the same time. There are also slightly more expensive fastboot systems.
Another question to ask is how many catches you want to have. Indeed, there are one- or two-port modules, sometimes with two different amperes, and in particular 1A and 2A of the other.
As for the price, the complete sets are negotiated on average from 15 to 30 euros, or even about ten euros during the promotional periods. Finally, it might even be cheaper than a backup battery.
Equipment
For this tutorial, we chose a Louis kit, which includes a simple 1A USB connector, to equip our good old Suzuki Bandit 600 S. The kit consists of an IP54 certified USB connector with a cover, 1m 20 cable, fuse and surflex, all in 14,90 , XNUMX euros.
To proceed with assembling the device, you first need to bring cutting pliers and a screwdriver adapted to the screws that hold the battery terminals and any covers present on your machine.
Assembly
First, access to the battery must be cleared by removing the seat. Therefore, it is about finding the place where you want to install the USB connector. The most logical thing is that it should be placed on the steering wheel or on the front of the frame so that the port stays close to the support that houses the smartphone / GPS.
Before attaching it in place, make sure the cable is long enough to go along the frame to the battery. It would be a shame to realize at the last moment that ten centimeters are missing to connect the cable to the battery.
It is also important to ensure that the cable does not interfere with the steering movements, risking it being pulled out of the first maneuver, and that it does not run along high heat sources to avoid melting.
After completing these checks, the case can be corrected with two surflexes. Then it remains to pass the thread along the bike, hiding it as best as possible for the aesthetic side. The most picky looks of their car can also be found on the internet serflex, matching the color of their frame to further limit the visibility of the whole. And always for aesthetic reasons, you can turn the surflex after installation so that you no longer see the small square rise.
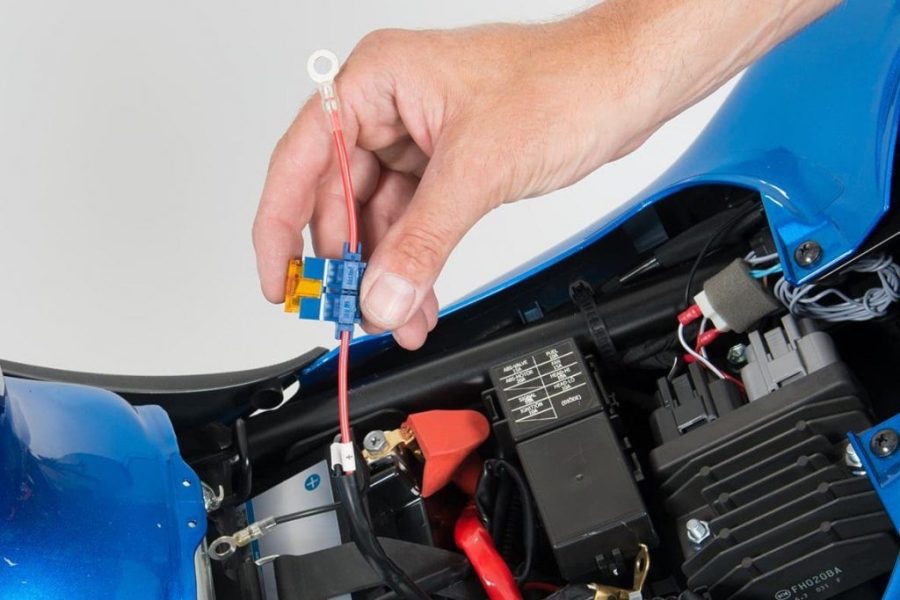
Now is the time to install the fuse. If it can already be integrated into the wiring, in our case it is necessary to add it to the positive terminal wire (red). The advantage is that here you can define the exact place where you want to place it in order to facilitate its integration under the saddle. So cut the cable, both sides, and secure the fuse.
The wires can now be connected directly to the battery. As always, in such cases we are working here on the engine off and disconnect the negative terminal (black) first. This operation can be used to check the condition of the handpieces and to drain them if necessary. To reconnect pods, start with the reddest (+) and then with the smallest black (-).
Finally, you check that everything works fine.
And once you've verified that everything is working well, all you have to do is put the covers and saddle back in place and start the bike to be able to use its brand new USB connector.
Be careful, however, in our box, since the system is directly connected to the battery, it is constantly powered, so remember to turn off your smartphone or GPS when you put the bike back in the garage, it would be a shame if the juice ran out for the next run. This also applies to street parking, but it is unlikely that your GPS or phone will stay on the bike for a long time and you don't have to worry about finding your bike's battery drain.
To overcome this problem, the cable can be installed most behind the contactor, as is the case with turn signals or horns, and also with lighting plates. This, on the other hand, requires intervention on the electrical wiring harness and in addition to the electrical risk when you do not know its beam perfectly, insurance may no longer play a role in the event of a problem due to you tampering with the wiring harness modification.