The device and repair of the main brake cylinder on a VAZ 2107 car
Content
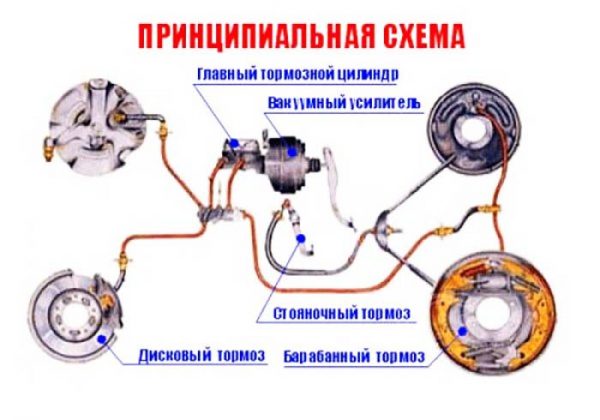
To slow down and completely stop the VAZ 2107, traditional liquid brakes are used, disc brakes in front, and drum brakes on the rear wheels. The main element responsible for the reliable operation of the system and timely response to pressing the pedal is the main brake cylinder (abbreviated as GTZ). The total resource of the unit is 100–150 thousand km, but individual parts wear out after 20–50 thousand km of run. The owner of the "seven" can independently diagnose a malfunction and make repairs.
Mood and purpose GTC
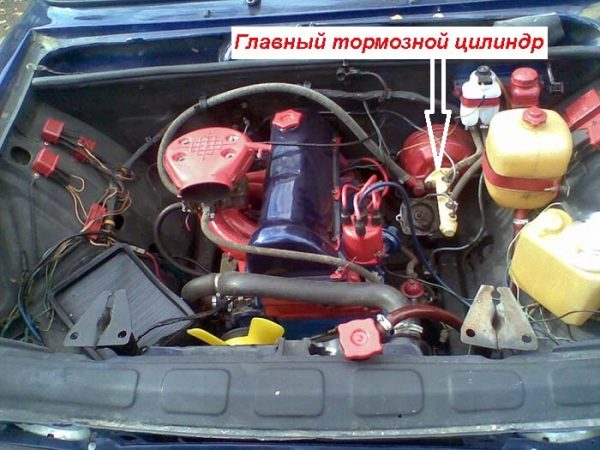
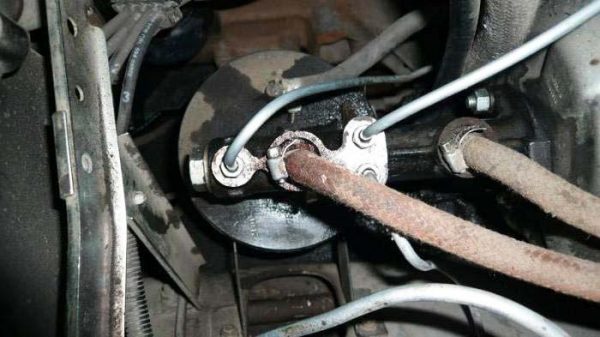
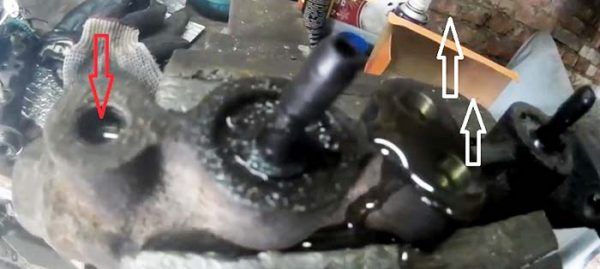
The master cylinder is an elongated cylinder with sockets for connecting brake circuit pipes. The element is located in the rear of the engine compartment, opposite the driver's seat. GTZ is easy to detect by a two-section expansion tank installed above the unit and connected to it with 2 hoses.
The cylinder is fastened with two M8 nuts to the flange of the vacuum brake booster. These nodes work in pairs - the rod coming from the pedal presses on the GTZ pistons, and the vacuum membrane enhances this pressure, making it easier for the driver to work. The cylinder itself performs the following functions:
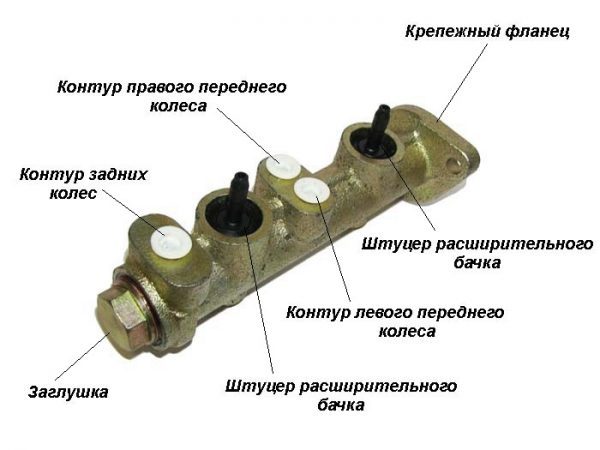
- distributes liquid over 3 working circuits - two serve the front wheels separately, the third one - a pair of rear ones;
- by means of a liquid, it transfers the force of the brake pedal to the working cylinders (RC), compressing or pushing the pads on the wheel hubs;
- directs excess fluid to the expansion tank;
- throws the stem and pedal back to their original position after the driver has stopped pressing it.
The main task of the GTZ is to transfer pressure to the pistons of the working cylinders without the slightest delay, while maintaining the force and speed of pressing the pedal. After all, the car slows down in different ways - in an emergency, the driver presses the pedal “to the floor”, and when avoiding obstacles and bumps, he slows down slightly.
Device and principle of operation of the unit
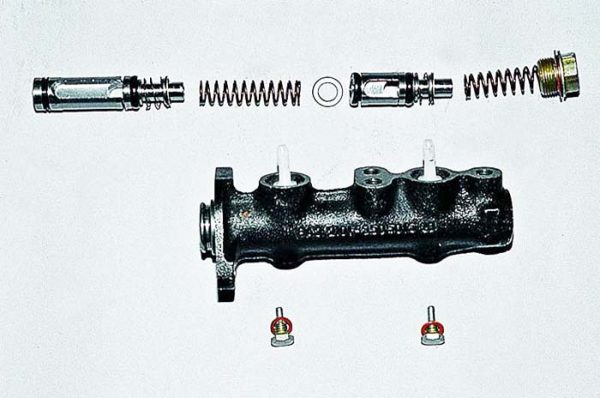
At first glance, the design of the master cylinder seems complicated, because it consists of many small parts. A diagram and a list of these elements will help you understand the device (the positions in the picture and in the list are the same):
- Cast metal housing for 2 working chambers.
- Washer - bypass fitting retainer.
- Drain fitting connected by a hose to the expansion tank.
- Fitting gasket.
- Stop screw washer.
- Screw - piston movement limiter.
- Return spring.
- Base cup.
- Compensation spring.
- Ring sealing the gap between the piston and the body - 4 pcs.
- Spacer ring.
- The piston serving the contour of the rear wheels;
- Intermediate washer.
- Piston working on 2 contours of the front wheels.
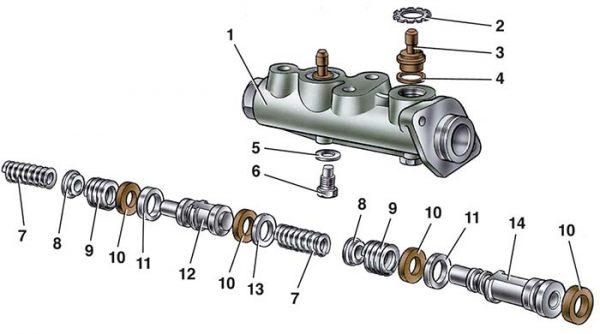
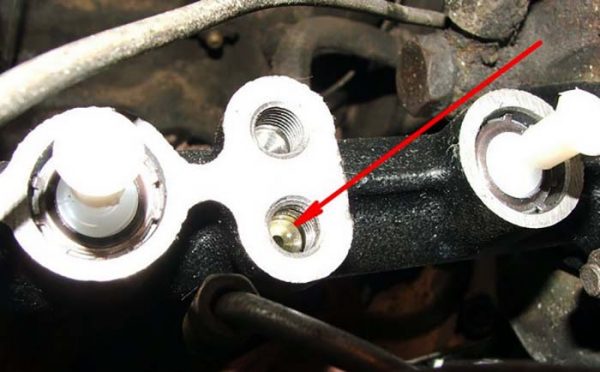
Since there are 2 chambers in the GTZ body, each has a separate bypass fitting (pos. 3) and a restrictive screw (pos. 6).
At one end, the cylinder body is closed with a metal plug, at the second end there is a connecting flange. At the top of each chamber, channels are provided for connecting the system pipes (screwed on the thread) and for discharging liquid into the expansion tank through fittings and branch pipes. Seals (pos. 10) are installed in the piston grooves.
The algorithm of the GTS operation looks like this:
- Initially, return springs hold the pistons against the front walls of the chambers. Moreover, the spacer rings rest against the restrictive screws, the liquid from the tank fills the chambers through open channels.
- The driver presses the brake pedal and selects a free play (3-6 mm), the pusher moves the first piston, the cuff closes the expansion tank channel.
- The working stroke begins - the front piston squeezes the liquid into the tubes and makes the second piston move. The pressure of the liquid in all tubes increases equally, the brake pads of the front and rear wheels are activated at the same time.
When the motorist releases the pedal, the springs push the pistons back to their original position. If the pressure in the system rises above normal, part of the liquid will go through the channels into the tank.
Video: illustration of the operation of the main hydraulic cylinder

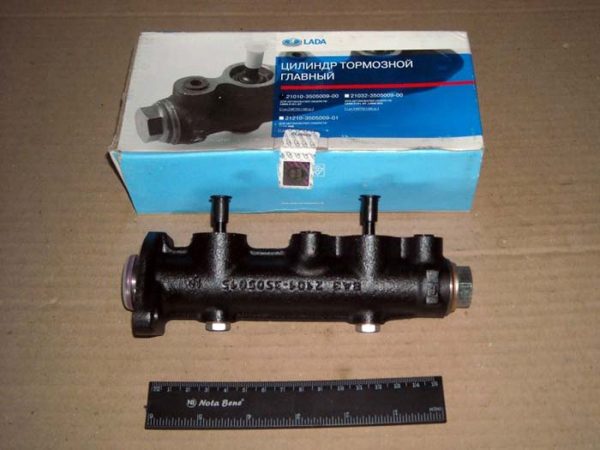
Which cylinder to put in case of replacement
To avoid problems during operation, it is better to find the original GTZ of Togliatti production, catalog number 21013505008. But since the VAZ 2107 family of cars has not been produced for a long time, it becomes difficult to find the specified spare part, especially in remote regions. An alternative is products from other manufacturers that have proven themselves well in the Russian market:
- ATE;
- BelMag;
- "Basalt";
- LPR;
- Fenox.
Judging by the reviews of the owners of the "sevens" on thematic forums, marriage most often comes across among the products of the Fenox brand. Advice regarding the purchase of original spare parts: do not purchase those in the markets and unverified stores, many fakes are sold at such points.
Malfunctions and methods for diagnosing a hydraulic cylinder
Checking the brake system as a whole and the GTZ in particular is performed when characteristic signs appear:
- on the instrument panel, the red lamp of an insufficient level of brake fluid lit up;
- the free play of the pedal has greatly increased or it frankly fails;
- to slow down the car, you have to press the pedal hard;
- uneven braking - the car pulls to the side when pressed sharply;
- the vehicle slows down with difficulty, the pedal rests on the floor.
The easiest way to diagnose hydraulic cylinder problems is to carefully inspect it for leaks. Usually, the liquid is visible on the body of the vacuum booster or the side member under the GTZ. If the expansion tank is intact, the master cylinder must be removed and repaired.
How to quickly and accurately identify a GTZ malfunction without checking the rest of the system elements:
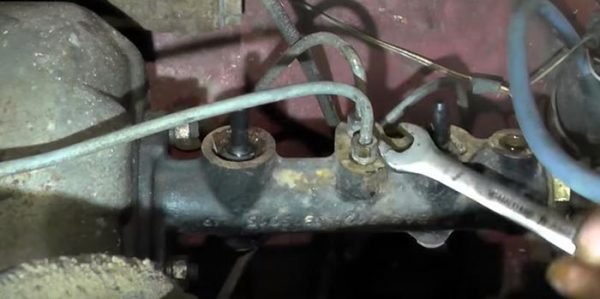
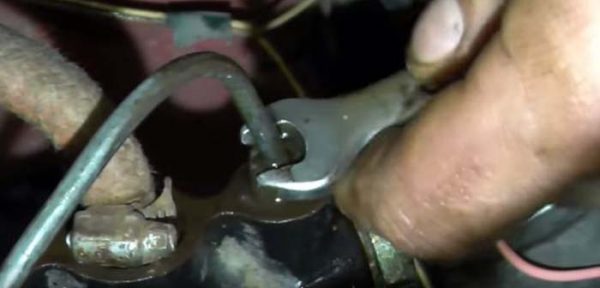
- Using a 10 mm wrench, turn out the brake pipes of all circuits one by one, screwing the plugs in their place - M8 x 1 bolts.
- The removed ends of the tubes are also muffled with caps or wooden wedges.
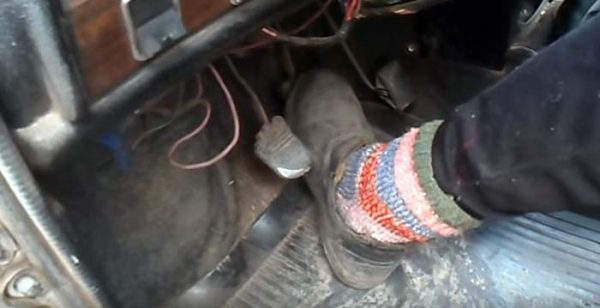
- Sit behind the wheel and apply the brake several times. If the hydraulic cylinder is in good condition, after 2-3 strokes the chambers will be filled with liquid from the tank and the pedal will stop being pressed.
On the problematic GTZ, the o-rings (cuffs) will begin to bypass the liquid back into the tank, the pedal failures will not stop. To make sure that the breakage is complete, unscrew the 2 flange nuts of the cylinder and move it away from the vacuum booster - liquid will flow from the hole.
It happens that the cuffs of the second chamber become limp, the rings of the first section remain operational. Then, during the diagnostic process, the pedal will fail more slowly. Remember, a serviceable GTZ will not allow you to squeeze the pedal more than 3 times and will not allow it to fail, since there is nowhere for the liquid to leave the chambers.
Repair and replacement instructions
Malfunctions of the main hydraulic cylinder are eliminated in two ways:
- Dismantling, cleaning the unit and installing new seals from the repair kit.
- GTC replacement.
As a rule, Zhiguli owners choose the second path. The reasons are the poor quality of new cuffs and the development of the inner walls of the cylinder, which is why the malfunction repeats 2-3 weeks after replacing the rings. The probability of failure of the GTZ with parts from the repair kit is approximately 50%, in other cases the repair is completed successfully.
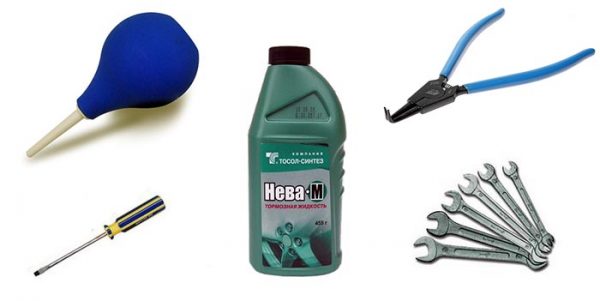
Tools and fixtures
To remove the main hydraulic cylinder in your own garage, you will need the usual set of tools:
- open-end and box wrenches 10-13 and 22 mm in size;
- a small screwdriver with a flat end;
- pliers for retaining rings;
- syringe or medical pear;
- very shabby.
It is recommended to prepare the plugs for the brake pipes in advance - after disconnecting, liquid will inevitably flow from them. Rags should be placed below the GTZ, since a small part of the contents will spill anyway.
As a simple plug, use a neat wooden wedge with a diameter of 6 mm with a pointed end.
The repair of the brake system is always followed by bleeding, for which it is necessary to prepare the appropriate devices:
- ring wrench suitable for fittings of working cylinders (7 or 8 mm);
- a supply of liquid of a suitable brand;
- wheel removal tools - jack, wheel wrench;
- a bottle and a transparent plastic tube that is put on the fittings of the RC.
If you plan to replace the seals, the repair kit should be selected according to the brand of the GTZ itself. For example, Fenox cuffs will not fit an ATE master cylinder because they differ in shape. In order not to be mistaken, take parts from one manufacturer. To repair the original unit, purchase a set of rubber products from the Balakovo plant.
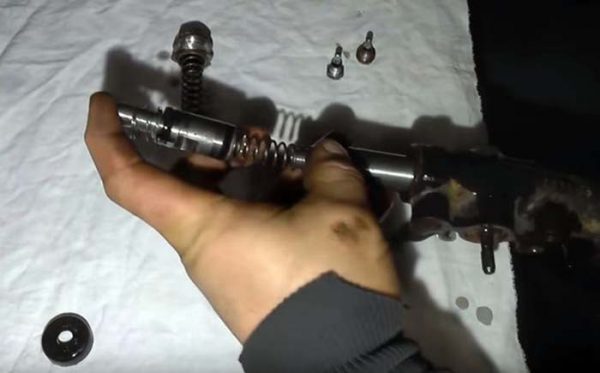
Dismantling and installation of GTZ
Removing the hydraulic cylinder is carried out in the following sequence:
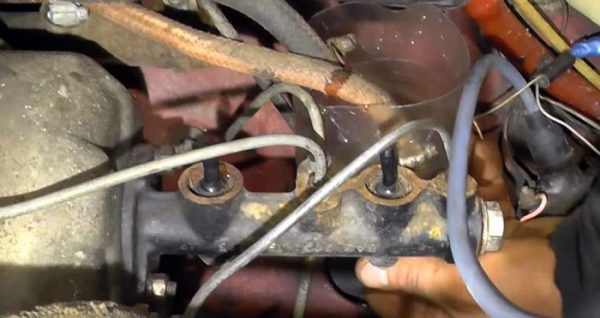
- Use a syringe or a bulb to empty the expansion tank as much as possible. After loosening the clamps, disconnect the pipes from the GTZ fittings, direct them into a cut plastic bottle.
 The remaining liquid from the tank is drained through the nozzles into a small container
 - Using a 10 mm wrench, turn off the couplings on the tubes of the brake circuits one by one, remove them from the holes and plug them with prepared plugs.After unscrewing the tubes, they are carefully laid aside and plugged with plugs.
- Use a 13mm spanner to unscrew the 2 nuts on the master cylinder mounting flange.
- Remove the element from the studs while holding it in a horizontal position.Before removing the hydraulic cylinder from the studs, do not forget to remove the washers, otherwise they will fall under the machine
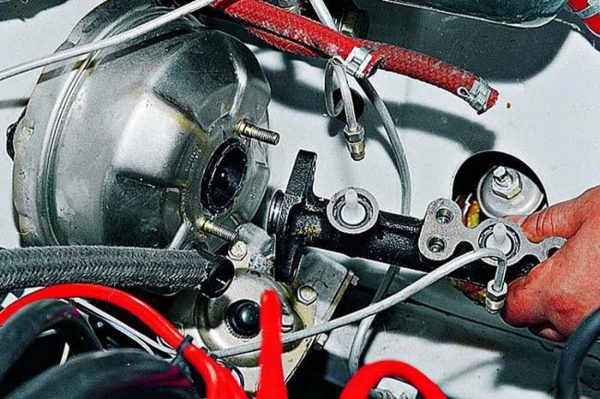
Do not be afraid to confuse the metal tubes in places, the rear circuit line is noticeably separated from the two front ones.
If the hydraulic cylinder is being replaced, set the old part aside and put a new one on the studs. Perform assembly in reverse order, tighten the tube couplings carefully so as not to strip the threads. When you reach the filling of the GTZ, proceed in this order:
- Pour fresh liquid into the tank to the maximum level, do not put on the cap.
- Loosen the line couplings one at a time, allowing the fluid to force out the air. Keep an eye on the level in the container.After 4-5 presses, the pedal should be held until the performer bleeds air through the connections of the GTZ tubes
- Have an assistant sit in the driver's seat and ask them to pump the brake several times and stop the pedal while depressed. Loosen the rear nut half a turn, bleed the air and tighten again.
- Repeat the operation on all lines until clean liquid flows from the connections. Finally tighten the couplings and wipe all wet marks well.After pumping pressure with a pedal, you need to slightly release the coupling of each tube, then the liquid will begin to displace air
If air did not enter the system earlier, and the plugs did not allow fluid to flow out of the tubes, bleeding the master cylinder is enough. Otherwise, expel air bubbles from each circuit as described below.
How to change cuffs
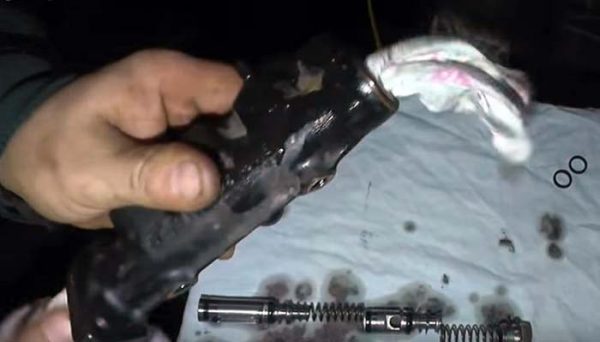
Before dismantling, drain the remnants of the working substance from the hydraulic cylinder and wipe the body with a rag. The internals of the unit are removed as follows:
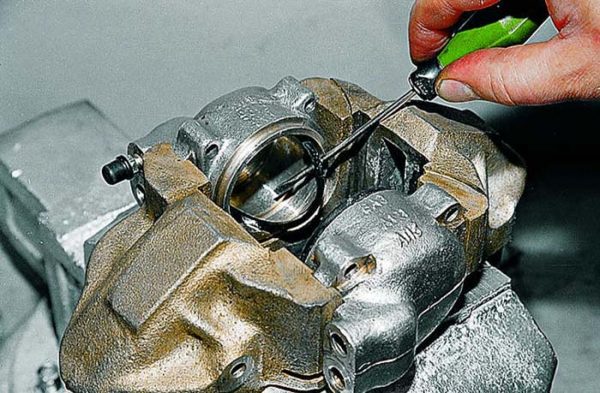
- Using a screwdriver, remove the rubber boot installed inside the GTZ from the flange side.
- Fix the cylinder in a vise, loosen the end cap and 12 restrictive bolts with 22 and 2 mm wrenches.The plug and limit screws are heavily tightened from the factory, so it is better to use a socket with a wrench
- Remove the end cap without losing the copper washer. Remove the unit from the vise and finally unscrew the bolts.
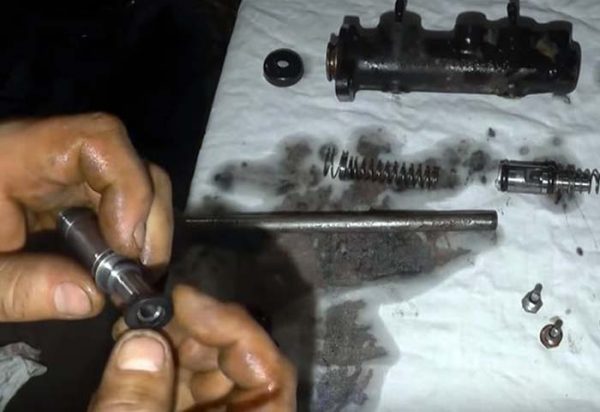
- Lay the hydraulic cylinder on the table, insert a round rod from the flange side and gradually push out all the parts. Lay them out in order of priority.The insides of the hydraulic cylinder are pushed out with a steel rod or a screwdriver.
- Wipe the case from the inside and make sure that there are no shells and visible wear on the walls. If one is found, it is pointless to change the cuffs - you will have to buy a new GTZ.To see the defects of the hydraulic cylinder, you need to wipe the inner walls with a rag
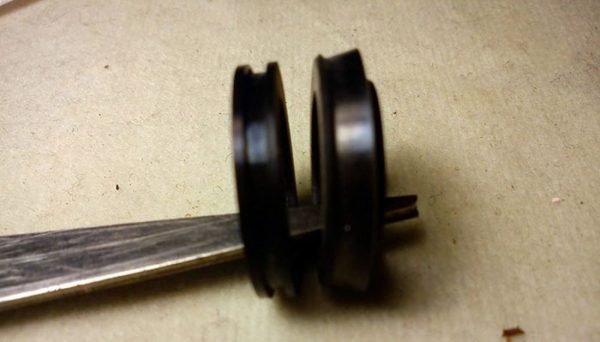
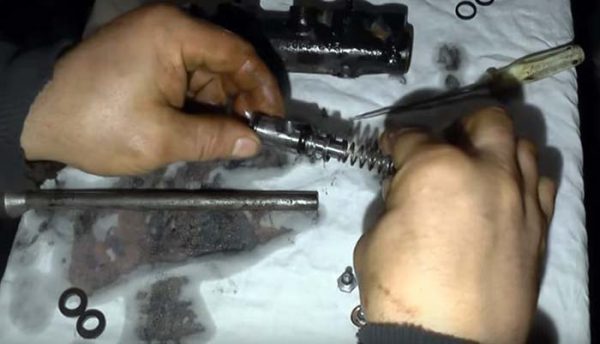
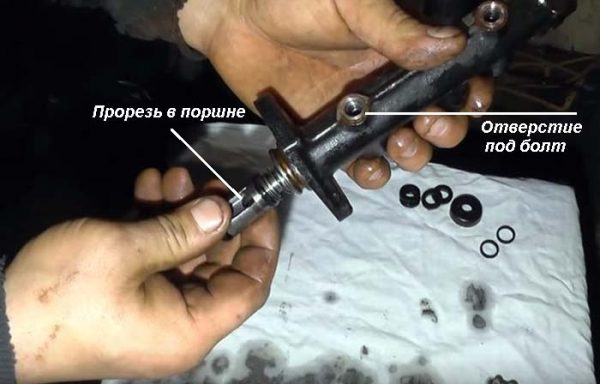
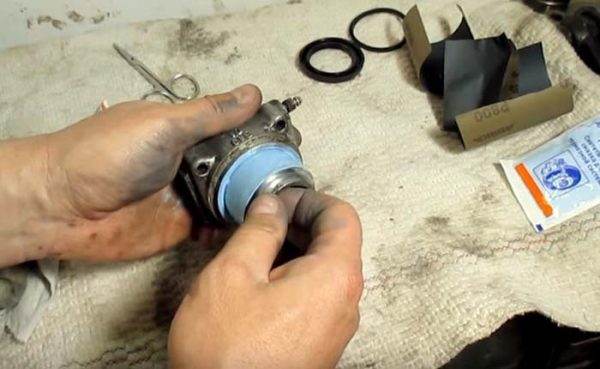
- Remove the rubber bands from the pistons with a screwdriver and install new ones from the repair kit. Using pliers, pull out the retaining rings of the fittings and change the 2 seals.New seals are easily pulled onto the pistons by hand
- Insert all parts one by one back into the housing from the flange side. Push the elements with a round rod.When assembling, be careful, follow the order of installation of parts.
- Screw in the end cap and limiting bolts. By pressing the rod on the first piston, check how the springs throw the rod back. Install a new boot.

Attention! The pistons must be correctly oriented during assembly - the long groove on the part must be opposite the side hole where the restrictive bolt is screwed.
Install the assembled cylinder on the machine, fill it with the working substance and pump it according to the instructions above.
Video: how to disassemble and change the GTZ cuffs

Restoration of working cylinders
The expediency of replacing the cuffs of the RC can only be checked during disassembly. If critical wear and other defects are found, it is pointless to install new seals. In practice, most drivers change the rear cylinders completely, and only the cuffs in the front calipers. The reason is obvious - the mechanisms of the brakes of the front wheels are much more expensive than the rear RCs.
Typical signs of a malfunction of the working cylinder are uneven braking, a decrease in the level in the expansion tank and wet spots on the inside of the hub.
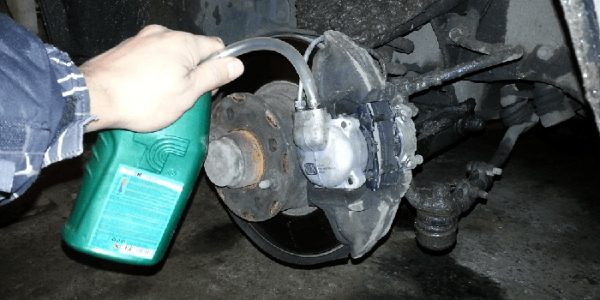
To repair the RC, the above tools, new o-rings and synthetic brake lubricants will be required. The procedure for replacing the cuffs of the front calipers:
- Raise the desired side of the machine with a jack and remove the wheel. Unlock and pull out the pins, remove the pads.
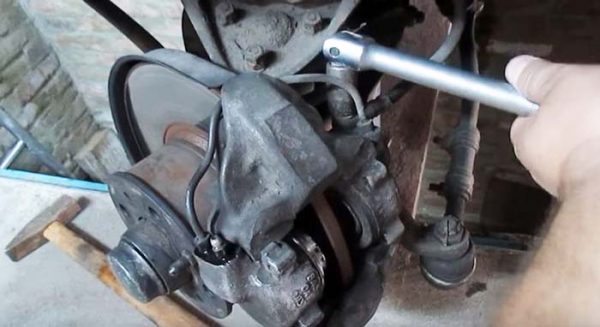
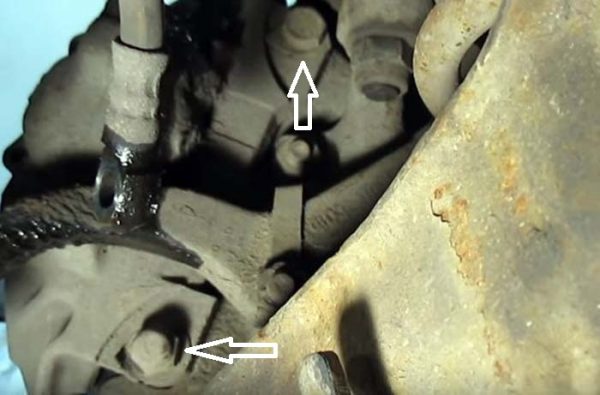
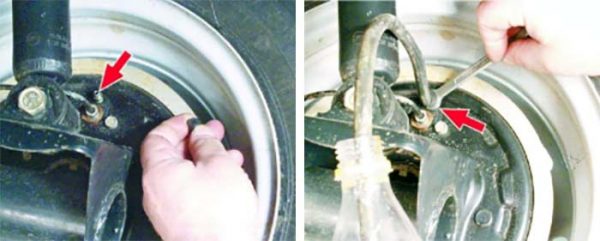
- For convenience, turn the steering wheel all the way to the right or left, unscrew the bolt pressing the brake circuit hose to the caliper with a 14 mm head. Plug the hole in the nozzle so that the liquid does not leak out.The brake hose mount is in the form of a bolt located on top of the caliper
- Loosen and unscrew the two caliper mounting bolts (head 17 mm), after bending the edges of the fixing washer. Remove the brake mechanism.The caliper mounting nuts are located on the inside of the front hub.
- Knock out the lock pins and separate the cylinders from the caliper body. Remove the rubber boots, remove the pistons and sealing rings inserted into the grooves inside the RC.Rubber rings are removed from the grooves with an awl or screwdriver
- Thoroughly clean the working surfaces, grind minor scuffs with sandpaper No. 1000.
- Put new rings into the grooves, treat the pistons with grease and insert them inside the cylinders. Put on the anthers from the repair kit and assemble the mechanism in reverse order.Before installation, it is better to lubricate the piston with a special compound, in extreme cases, with brake fluid.
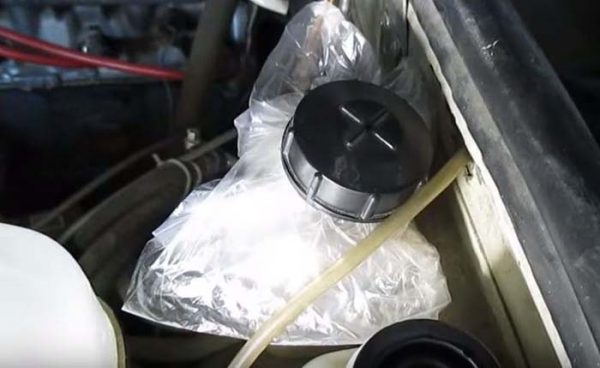
It is not necessary to separate the cylinders from the body, this is done more for convenience. In order to lose a minimum of fluid during disassembly, use the “old-fashioned” trick: instead of the standard plug of the expansion tank, screw on the cap from the clutch reservoir, sealed with a plastic bag.
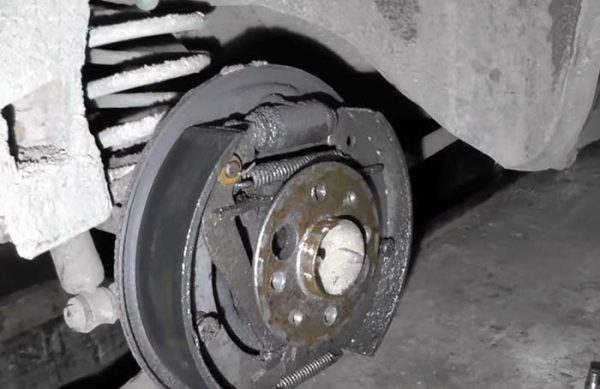
To change the rear RC seals, you will have to thoroughly disassemble the brake mechanism:
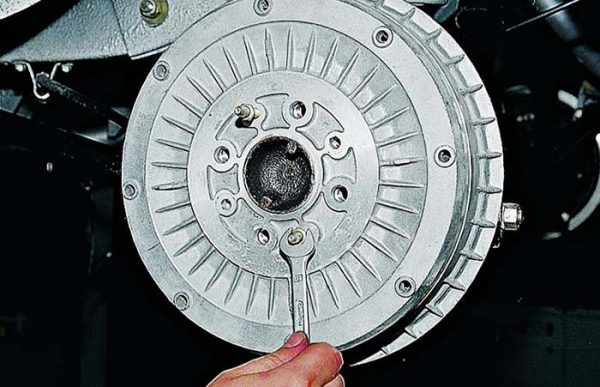
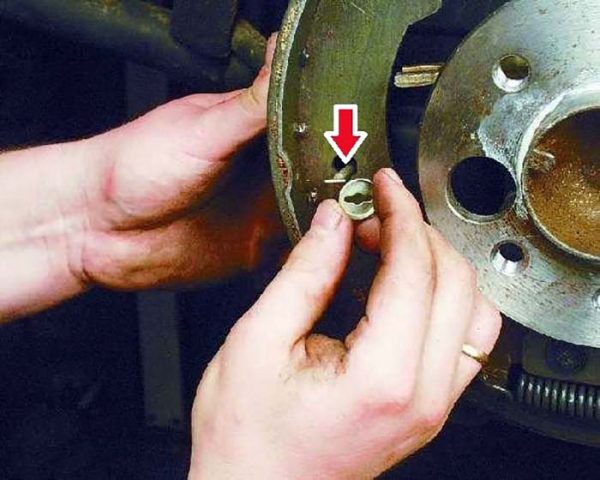
- Remove the wheel and rear brake drum by unscrewing the 2 guides with a 12mm wrench.If the brake drum cannot be removed by hand, screw the guides into adjacent holes and pull the part by extrusion
- Unlock the eccentric locks of the shoes, remove the lower and upper springs.Usually spring eccentrics are turned by hand, but sometimes you need to use pliers
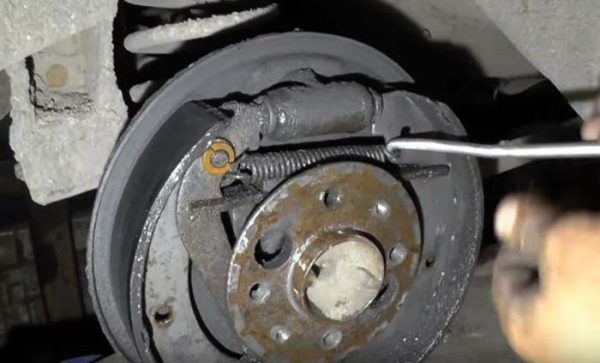
- Dismantle the pads, pull out the spacer bar. Unscrew the coupling of the working circuit tube, take it to the side and plug it with a wooden plug.To remove and reinstall the springs, it is recommended to make a special hook from a metal bar
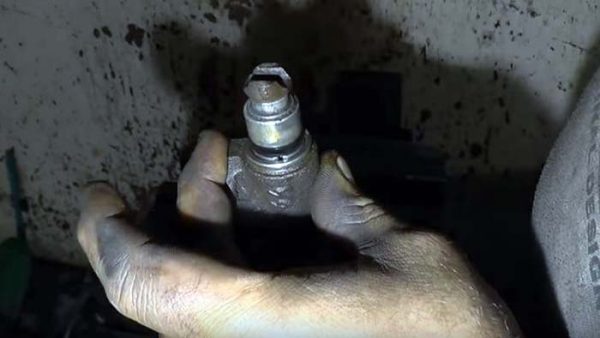
- Using a 10 mm wrench, unscrew 2 bolts securing the RC (the heads are located on the reverse side of the metal casing). Remove the cylinder.Before unscrewing the fastening bolts, it is advisable to treat with aerosol lubricant WD-40
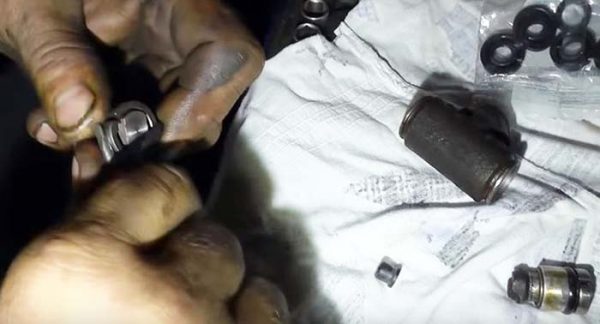
- Remove the pistons from the hydraulic cylinder body, having previously removed the rubber anthers. Remove the dirt from the inside, wipe the part dry.
- Change the sealing rings on the pistons, lubricate the friction surfaces and assemble the cylinder. Put on new dusters.Before installing new cuffs, clean and wipe the piston grooves
- Install the RC, pads and drum in reverse order.When assembling the working cylinder, it is allowed to clog the piston with gentle tapping

If the RC leaked fluid as a result of a malfunction, clean and thoroughly wipe all parts of the brake mechanism before reassembly.
After installation, bleed some of the liquid along with air by pumping up pressure in the circuit with a pedal and loosening the bleed fitting. Do not forget to replenish the supply of the working medium in the expansion tank.
Video: how to change rear slave cylinder seals

Air removal by pumping
If during the repair process a lot of fluid leaked out of the circuit and air bubbles formed in the system, the repaired hydraulic cylinders will not be able to function normally. The circuit must be pumped using the instructions:
- Put a ring wrench and a transparent tube directed into the bottle onto the bleed fitting.Bottle with tubing connects to fitting on front caliper or rear hub
- Have an assistant depress the brake pedal 4-5 times, holding it at the end of each cycle.
- When the assistant stops and holds the pedal, loosen the fitting with a wrench and watch the fluid flow through the tube. If air bubbles are visible, tighten the nut and have an assistant re-pressurize.In the process of pumping, the fitting is turned off by half a turn, no more
- The procedure is repeated until you see a clear liquid without bubbles in the tube. Then finally tighten the fitting and install the wheel.
Before removing air and during the pumping process, the tank is replenished with new fluid. The working substance filled with bubbles and drained into a bottle cannot be reused. Upon completion of the repair, check the operation of the brakes on the go.
Video: how the VAZ 2107 brakes are pumped

The design of the VAZ 2107 brake system is quite simple - there are no ABS electronic sensors and automatic valves installed on modern cars. This allows the owner of the "seven" to save money on visits to the service station. To repair the GTZ and working cylinders, special tools are not needed, and spare parts are quite affordable.

