Device, repair and adjustment of carburetors of the DAAZ 2107 series
Content
The latest classic models of the Zhiguli VAZ 2107 were equipped with engines with a working volume of 1,5–1,6 liters and carburetors of the DAAZ 2107 Ozone series, produced by the Dimitrovgrad plant. The main advantages of these products are maintainability and simplicity of design compared to imported counterparts. Any owner of the "seven" who understands the device and the principle of operation of the unit can repair and adjust the fuel supply.
Purpose and design of the carburetor
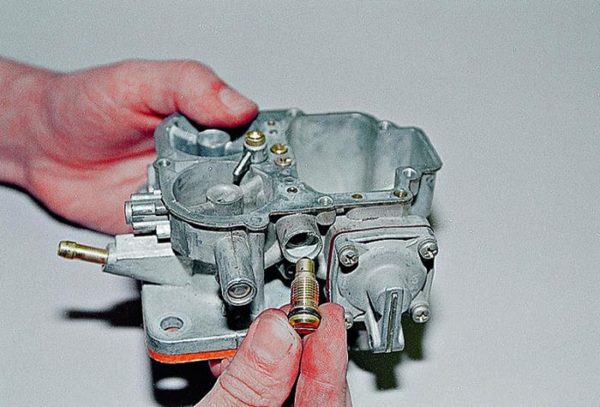
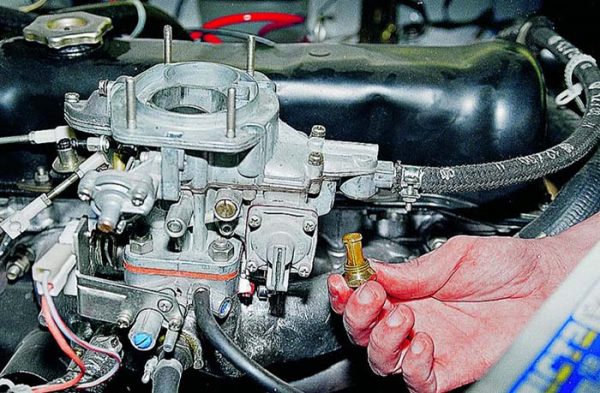
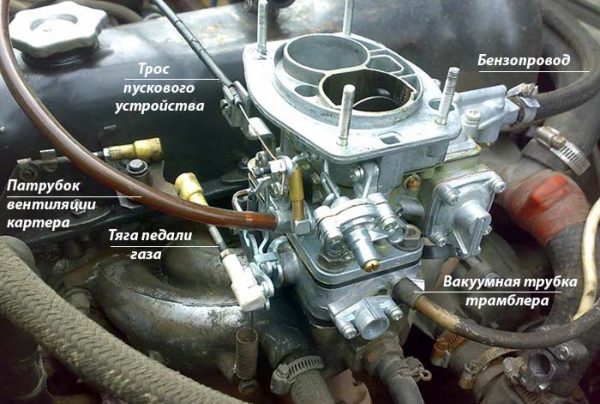
The DAAZ 2107 two-chamber carburetor is installed to the right of the engine (when viewed in the direction of the car) on four M8 studs screwed into the intake manifold flange. From above, a round air filter box is attached to the unit platform with 4 M6 studs. The latter is additionally connected to the carburetor by a thin crankcase ventilation tube.
The design of the DAAZ 2105 and 2107 fuel supply units completely repeats the design of the Italian Weber carburetors used on the first VAZ models. Differences - in the size of the diffusers and the diameters of the holes of the jets.
The purpose of the carburetor is to mix gasoline with air in the right proportions and dose the mixture depending on the engine operating mode - cold start, idling, driving under load and coasting. Fuel enters the cylinders through the intake manifold due to the vacuum created by the engine pistons.
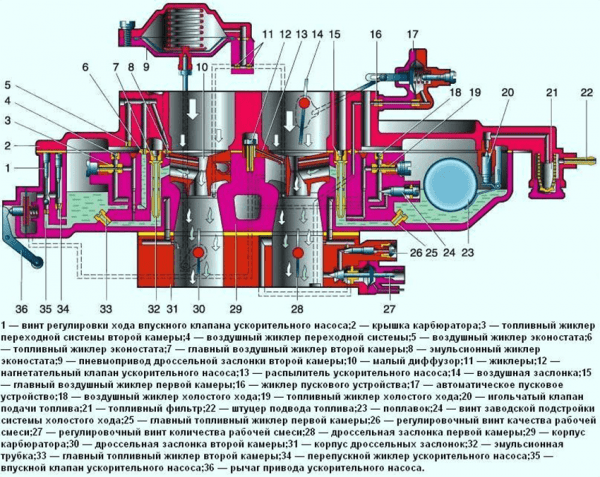
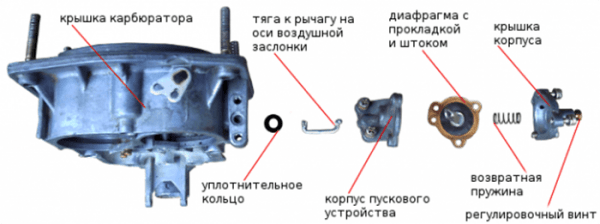
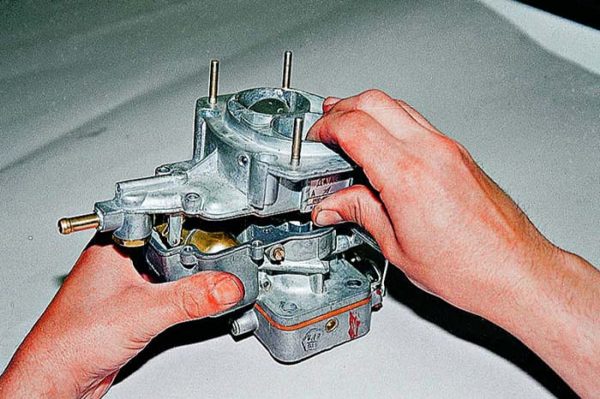
Structurally, the unit is divided into 3 nodes - the top cover, the middle part and the lower throttle block. The cover contains the following parts:
- membrane and damper of the starting device;
- econostat tube;
- fine fuel filter;
- float and fitting for connecting the gasoline line;
- needle valve closed by a float petal.
The cover is screwed to the middle part with five screws with M5 thread, a sealing cardboard gasket is provided between the planes.
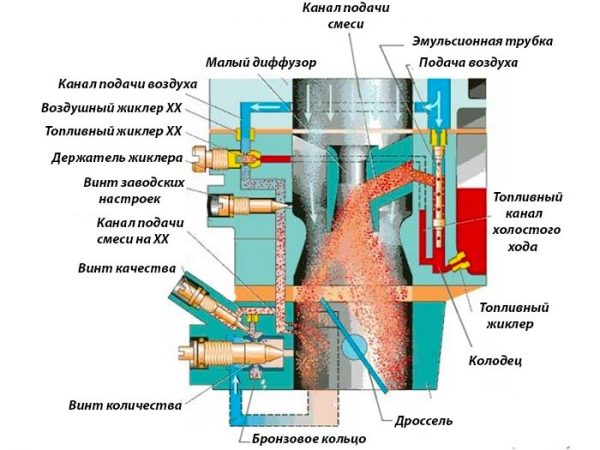
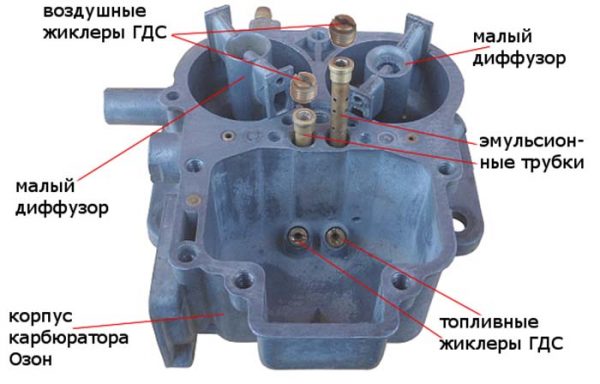
The main dosing elements are located in the body of the middle module:
- float chamber where the main fuel jets are installed;
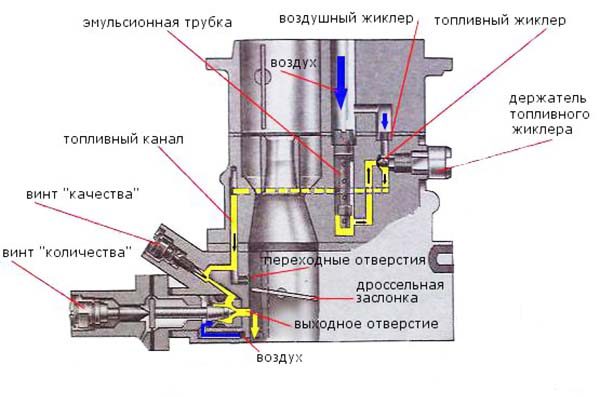
- idling system (abbreviated as CXX) with air and fuel jets;
- transitional system, whose device is similar to CXX;
- the main fuel dosing system, including emulsion tubes, air jets, large and small diffusers;
- accelerator pump - a chamber with a diaphragm, atomizer and a shut-off ball valve;
- a vacuum actuator screwed to the body at the back and opening the throttle of the secondary chamber at high engine speeds (more than 2500 rpm).
 In the middle part of the VAZ 2107 carburetor there are elements of the dosing system - jets, diffusers, emulsion tubes
On the latest modifications of DAAZ 2107–20 carburetors, instead of the usual idle jet, there is an electric valve that operates in conjunction with an electronic control unit.
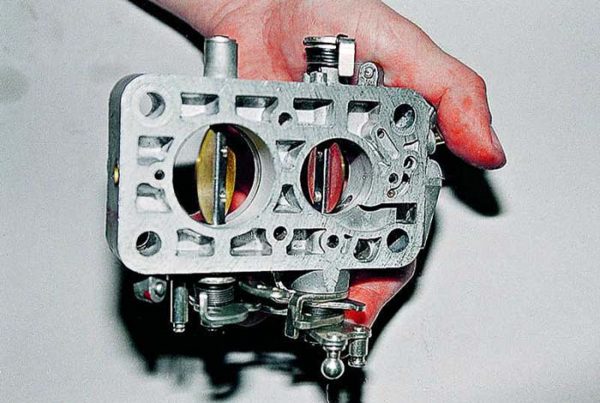
The lower part is attached to the middle module with 2 M6 screws and is a rectangular case with two throttle valves installed in chambers with a diameter of 28 and 36 mm. Adjusting screws for the quantity and quality of the combustible mixture are built into the body on the side, the first one is larger. Next to the screws there is a vacuum tap for the distributor membrane.
Video: a detailed review of the "classic" carburetor

How does the Ozone carburetor work?
Without understanding the principle of operation of the dosing device, it is impossible to engage in serious repairs and adjustments. The maximum is to adjust the fuel level in the chamber, clean the mesh and the CXX jet screwed on the outside of the case. To fix deeper problems, it is worth studying the algorithm of the unit, starting with a cold start of the engine.
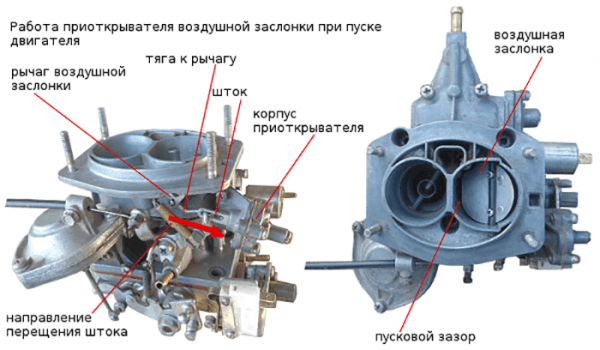
- The driver pulls the handle of the starting device to the end, the upper damper completely closes the air supply to the primary chamber. At the same time, the first throttle opens slightly.
- When the starter rotates, the pistons draw in clean gasoline without adding air - the engine starts.
- Under the influence of rarefaction, the membrane slightly opens the upper damper, freeing the way for air. The air-fuel mixture begins to flow into the cylinders, otherwise the engine will stall from over-enrichment.
- As the motorist warms up, he sinks the "suction" handle, the throttle closes and fuel begins to flow into the manifold from the idle hole (located under the throttle).
When the engine and carburetor are fully functional, a cold engine starts without pressing the gas pedal. After turning on the ignition, the idle solenoid valve is activated, opening a hole in the fuel jet.
At idle, the air-fuel mixture enters the manifold through the channels and jets of the CXX, the main throttles are tightly closed. Quality and quantity adjustment screws are built into these channels. When the main throttles are opened and the main metering system is switched on, the position of the screws does not matter - the combustible mixture is fed into the engine directly through the chambers.
To start moving, the driver engages a gear and presses the accelerator pedal. The fuel supply pattern is changing.
- The primary throttle opens. Due to rarefaction, air and gasoline are sucked in through the main jets, mixed in the emulsion tube and sent to the diffuser, and from there to the manifold. The idle system operates in parallel.
- With a further increase in the speed of the crankshaft, the vacuum in the intake manifold increases. Through a separate channel, the vacuum is transmitted to a large rubber membrane, which, by means of a thrust, opens the second throttle.
- So that at the moment of opening the secondary damper there are no dips, part of the fuel mixture is fed into the chamber through a separate channel of the transition system.
- For dynamic acceleration, the driver sharply presses the gas pedal. The accelerator pump is activated - the thrust acts on the diaphragm, which pushes gasoline to the nozzle of the sprayer. He gives out a powerful jet inside the primary chamber.
When the pedal is pressed "to the floor" and both throttles are fully open, the engine is additionally fed with fuel through the econostat tube. It draws fuel directly from the float chamber.
Troubleshooting
Preventive cleaning of the internal channels and dosing elements of the carburetor is recommended to be done at intervals of 20 thousand kilometers of the car. If the unit is operating normally, then it is not necessary to adjust the composition and the amount of the mixture supplied.
When there are problems with the fuel supply on the "seven", do not rush to turn the screws of quantity and quality. Without understanding the essence of the malfunction, such actions will only worsen the situation. Adjust only after the carburetor has been repaired.
It is also necessary to make sure that the ignition system and fuel pump are working, check the compression in the cylinders. If when you press the accelerator, shots are heard in the air filter or exhaust pipe, look for an ignition malfunction - the spark discharge is applied to the candle too early or late.
If these systems are functioning normally, it is not difficult to determine the signs of a malfunctioning carburetor:
- "on a cold" engine starts and immediately stalls;
- idling disappears - the engine stalls when the accelerator pedal is released;
- sharp pedal depression causes a dip instead of dynamic acceleration;
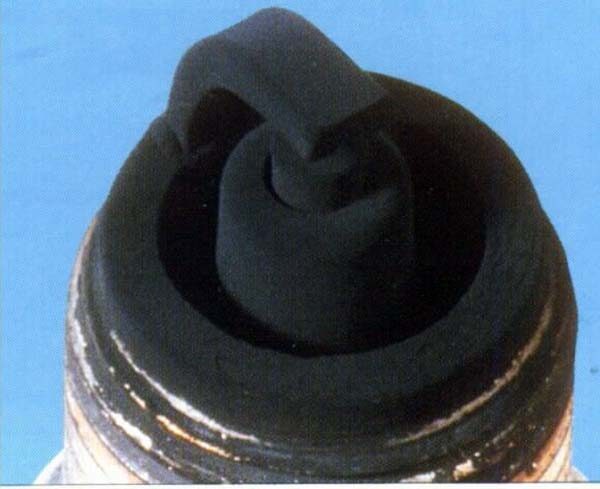
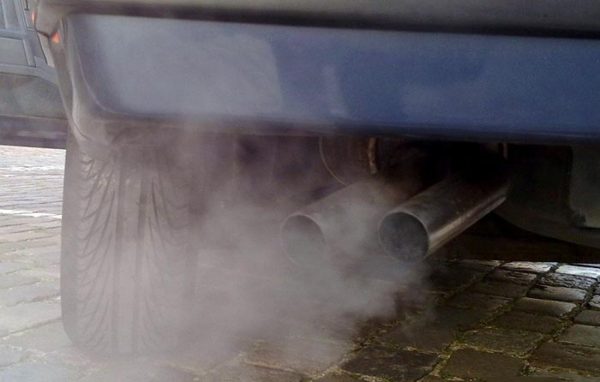
- candles are “flooded” with gasoline - a layer of black plaque forms on the electrodes, smoke of the same color comes out of the exhaust pipe, soot particles fly;
- the car consumes a lot of fuel, but there is a loss of power and jerks in the process of movement.
These symptoms appear singly or together, but an increase in gasoline consumption is observed in all cases. Often, the actions of the driver lead to this - the car “does not drive”, which means that you need to push the gas harder.
If you encounter any problem from the list, get it repaired immediately. By continuing to operate a car with a faulty carburetor, you accelerate the wear of the engine cylinder-piston group.
Tools and fixtures
To repair and adjust the Ozone carburetor, you should prepare a specific set of tools:
- thin and standard screwdrivers - flat and Phillips;
- pliers with thin lips;
- open-end wrenches 6-13 mm in size;
- pointed wooden sticks (you can use toothpicks);
- rags.
Consumables are purchased as needed. To clean and flush the nodes, it is better to buy an aerosol liquid or prepare a mixture of diesel fuel, solvent and white spirit. It does not hurt to buy cardboard gaskets in advance and change the air filter. You should not take repair kits - manufacturers often put fake jets there with uncalibrated holes.

A great help in the repair will be a compressor that creates an air pressure of 6-8 bar. Pumping rarely gives a good result.
Problems with starting the engine
If the spark discharge is supplied in a timely manner, and the compression in the cylinders is at least 8 units, look for a problem in the carburetor.
- A cold engine starts with several attempts, often stalls. Check the starter membrane located on the cover, it probably does not open the air damper and the engine “chokes”. Replacing it is easy - unscrew the 3 M5 screws and pull out the diaphragm.The operation of the starting device is disrupted due to a torn membrane or a limp o-ring
- The power unit is started only with the help of the gas pedal. The reason is a lack of fuel in the float chamber or a malfunction of the fuel pump.
- A warm engine starts after a long rotation of the starter, sometimes pops are heard in the air filter housing, a gasoline smell is felt in the cabin. In this case, the fuel level is too high - the fuel simply “floods” the manifold and candles.
Often, the starting device fails due to a jumped cable. The driver pulls the “choke” handle, but the engine stalls several times until it starts. The reason is that the air damper does not work or does not close the chamber completely.
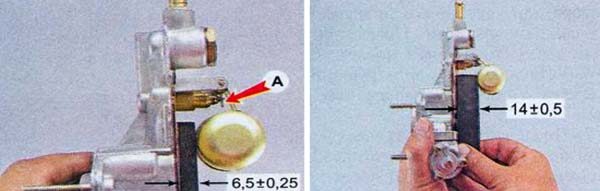
To check the fuel level in the float chamber, remove the filter housing and carburetor top cover by unscrewing 5 screws. Disconnect the gas hose, turn the part upside down and measure the distance to the plane of the cover. The norm is 6,5 mm, the length of the float stroke is 7,5 mm. The indicated intervals are adjusted by bending the brass stop tabs.
The reason for the high level of gasoline with a normally adjusted float is a faulty needle valve. Shake out the remaining fuel from the nozzle, turn the cap with the float up and try to gently draw air from the nozzle with your mouth. The sealed valve will not allow this to be done.
No idling
If you experience erratic engine idling, follow the instructions below.
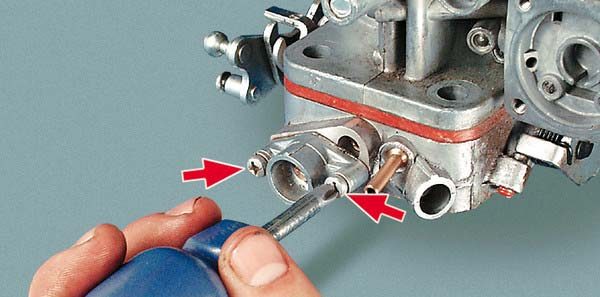
- Unscrew the CXX fuel jet located on the right side of the carburetor in the middle block with a flat screwdriver. Blow it out and put it in place.The idle jet is inserted into the cavity of the screw screwed into the middle block of the carburetor
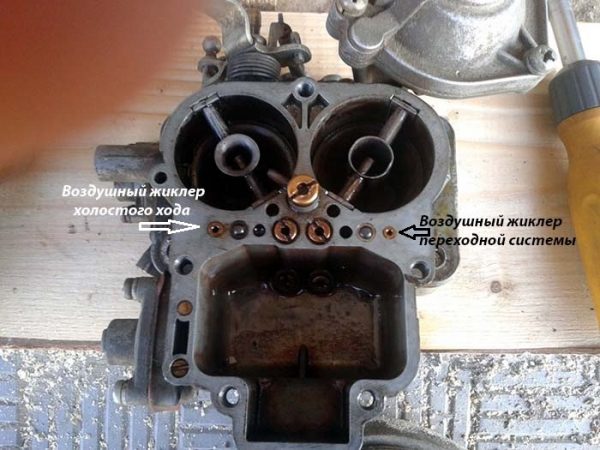
- If idling does not appear, remove the filter and the unit cover. On the platform of the middle module, find two bronze bushings pressed into the channels. These are the air jets of the CXX and the transition system. Clean both holes with a wooden stick and blow with compressed air.The air jets of the CXX and the transition system are located symmetrically to the longitudinal axis of the unit
- If both previous manipulations failed, remove the fuel jet and blow an ABRO-type aerosol into the hole. Wait 10-15 minutes and blow out the channel with a compressor.
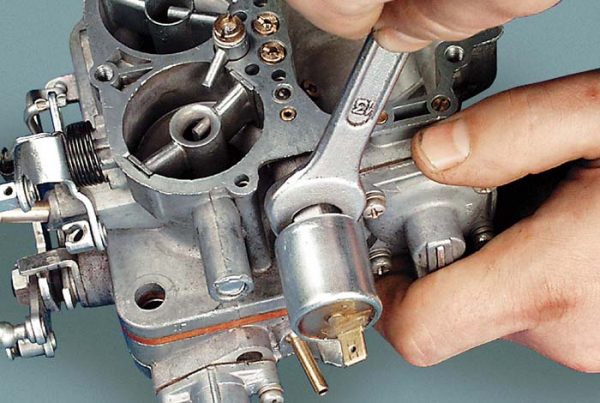
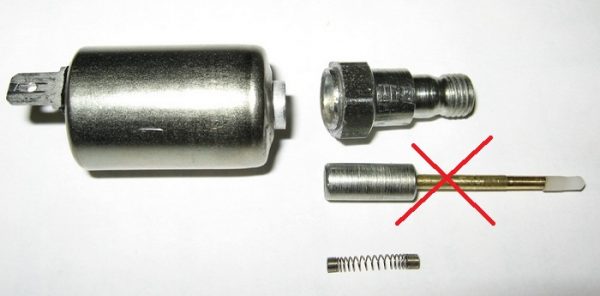
In the modification of the carburetor DAAZ 2107 - 20, the culprit of the problem is often an electric valve installed instead of a conventional screw with a jet. Unscrew the element with a key, pull out the jet and connect the wire. Then turn on the ignition and bring the body to the mass of the car. If the stem does not retract, the valve must be changed.
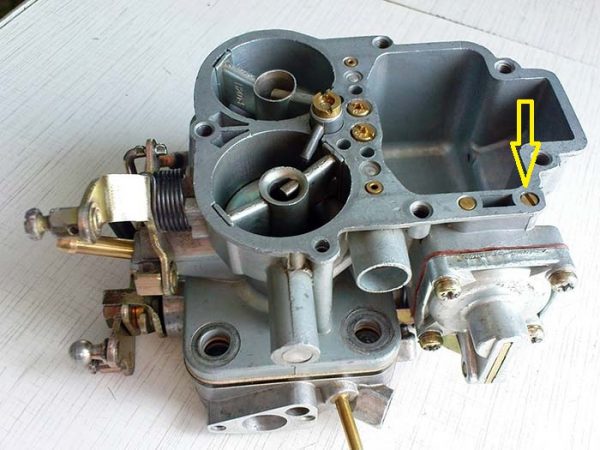
If the above measures did not help to eliminate the blockage, you need to clean the channel in the throttle body. Dismantle the quantity adjusting screw together with the flange by unscrewing 2 M4 bolts, blow the cleaner into the opened cavity. Then assemble the unit in the reverse order, the adjusting screw does not need to be turned.
Video: idling and fuel level in DAAZ 2107 units

Crash during acceleration
The malfunction is diagnosed visually - dismantle the air filter and pull the primary throttle rod sharply, observing the atomizer inside the chamber. The latter should give out a long directed jet of fuel. If the pressure is weak or absent altogether, proceed to repair the accelerator pump.
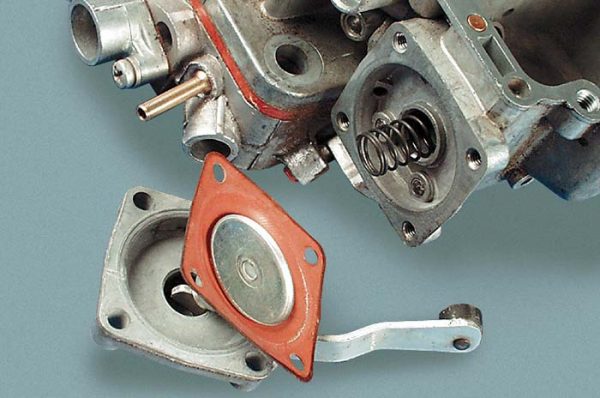
- Place a rag under the diaphragm flange (located on the right wall of the float chamber).
- Loosen and remove the 4 screws holding the lever cover. Carefully detach the element without losing the springs. Fuel from the chamber will leak onto the rags.After unscrewing the accelerator pump cover, remove the membrane and check its integrity
- Check diaphragm integrity and replace if necessary.
- Remove the top section of the carburetor and use a large flathead screwdriver to unscrew the spray nozzle screw. Clean and blow out the calibrated hole.The atomizer of the accelerator pump is screwed to the upper plane of the middle block of the unit

If the atomizer works properly, but gives out a short jet, then the ball check valve located in the side of the float chamber has failed. Unscrew the cap screw with a thin flat screwdriver and stir the ball in the well with a steel awl. Then fill the hole with an aerosol and blow out the dirt.
Small dips in the process of movement may indicate clogging of the jets of the transition system, installed mirror jets CXX. The elements are removed and cleaned in the same way - you need to unscrew the screw from the back of the case and blow through the holes.
Video: accelerator pump repair

How to eliminate the drop in engine power
The motor does not develop nameplate power when it does not have enough fuel. There can be several reasons for the problem:
- low level of gasoline in the float chamber (the elimination method is discussed above);
- clogged strainer at the inlet to the carburetor;The filter mesh is built into the nut located on the lower plane of the cover
- contamination of the main fuel jets;
- failure of a large membrane that opens the throttle of the second chamber.
To clean the filter mesh, it is not necessary to disassemble the unit - unscrew the nut located under the fuel line fitting with an open-end wrench. Remove and clean the filter by temporarily plugging the hole with a rag to prevent gasoline from leaking out.
The main fuel jets are located at the bottom of the petrol chamber. To get and clean them, dismantle the top of the carburetor. Do not confuse the parts when reinstalling, the marking of the jet of the primary chamber is 112, the secondary is 150.
The wear of the vacuum drive diaphragm is determined visually. Remove the element cover by unscrewing the 3 screws and check the condition of the rubber diaphragm. Pay special attention to the O-ring built into the hole in the flange. Replace worn parts by disconnecting the linkage from the secondary throttle shaft.

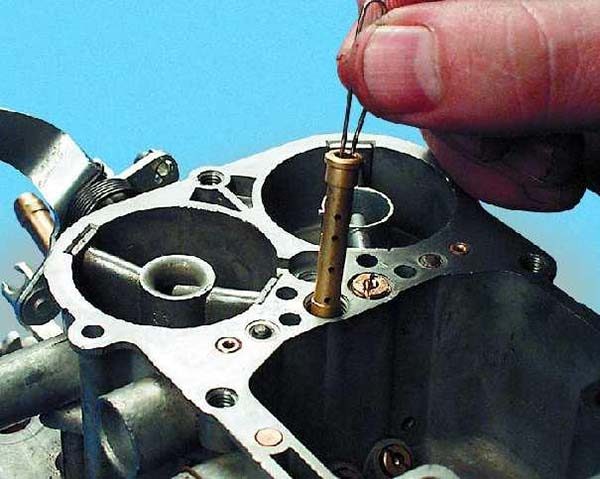
Another reason for the poor supply of the combustible mixture is the contamination of the emulsion tubes. To check them, unscrew the main air jets located on the upper flange of the middle module of the unit. The tubes are removed from the wells with narrow tweezers or with a paper clip.
Do not be afraid to mix up the air jets in places; they are the same in DAAZ 2107 carburetors (marking 150). The exception is the DAAZ 2107-10 modification, where the primary chamber jet has a larger hole and is marked with the number 190.
Increased gas mileage
If the spark plugs are literally flooded with fuel, perform a simple check.
- Start the warm engine and let it idle.
- Use a thin flat screwdriver to tighten the mixture quality screw, counting the turns.
- If the screw is turned all the way, and the engine does not stall, there is a direct extraction of gasoline through the main diffuser. Otherwise, you need to check the fuel level in the float chamber.
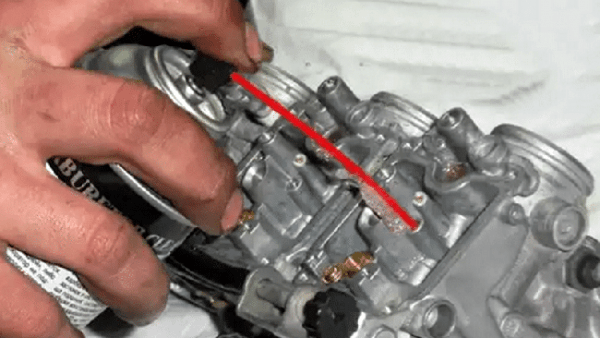
To begin with, try to do without disassembly - unscrew all the jets and adjusting screws, then pump an aerosol cleaner into the channels. After purging, repeat the diagnosis and return the quality screw to its original position.
If the attempt was unsuccessful, you will have to dismantle and disassemble the carburetor.
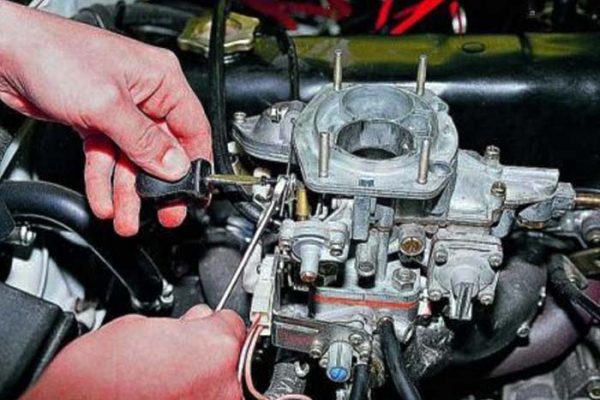
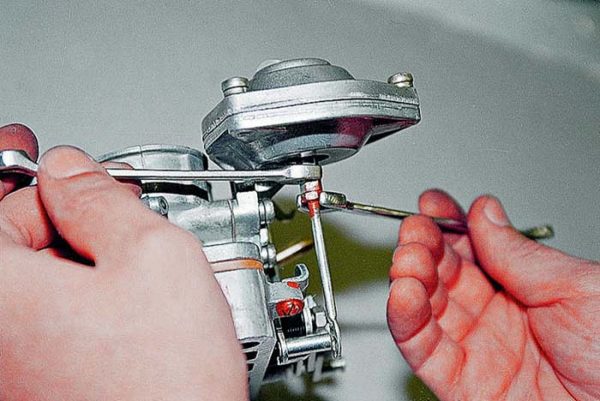
- Disconnect the vacuum and gasoline tube from the unit, disconnect the "suction" cable and the accelerator pedal linkage.For dismantling, the carburetor must be disconnected from other units
- Using a 13 mm wrench, unscrew the 4 fastening nuts, remove the unit from the manifold.
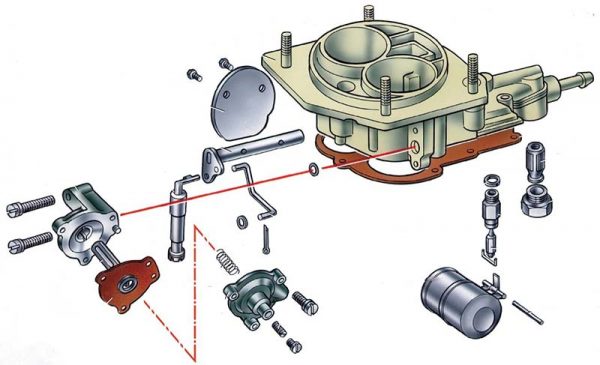
- Disassemble the carburetor into 3 parts, separating the cover and the lower damper block. In this case, it is necessary to dismantle the vacuum drive and the rods connecting the starting device with the chokes.The shutters should tightly cover the chambers without gaps and cracks.
- Check the tightness of the throttle valves by turning the lower block against the light. If gaps are visible between them and the walls of the chambers, the dampers will have to be changed.
- Remove all membranes, jets and emulsion tubes. Fill the opened channels with detergent, and then spill with diesel fuel. Blow and dry every detail.Before assembly, each part should be cleaned, blown and dried.
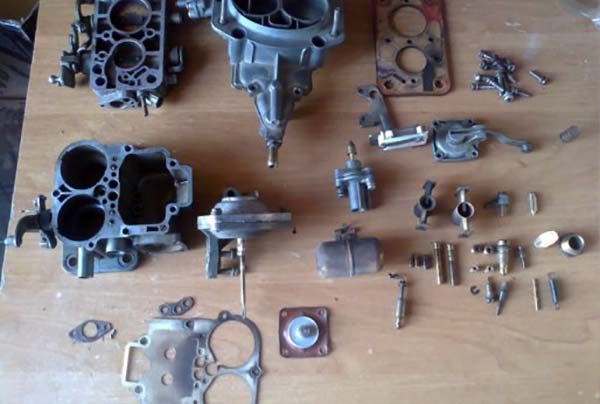
Before assembly, it does not hurt to align the bottom flange of the middle section - it is usually bent from prolonged heating. The defect is eliminated by grinding on a large grinding stone. All cardboard spacers must be replaced.
Video: checking and overhaul of the Ozone carburetor

Adjustment procedure
The initial setting is performed during the installation of the carburetor on the car after flushing. In this case, you need to adjust the following items.
- Starter cable. The braid is fixed with a bolt in the socket, and the end of the cable is inserted into the hole of the screw clamp. The purpose of the adjustment is to ensure that the air damper closes completely when the handle is pulled out from inside the passenger compartment.Cable locking screw is tightened with air throttle open
- The vacuum drive rod is adjusted by screwing in a threaded rod and finally fixing it with a lock nut. The working stroke of the membrane should be enough to fully open the secondary throttle.The vacuum drive rod is adjustable in length and fixed with a nut
- The throttle support screws are adjusted in such a way that the dampers overlap the chambers as much as possible and at the same time do not touch the edges of the walls.The task of the support screw is to prevent the damper from rubbing against the chamber walls

It is not allowed to adjust the idle speed with the support screws.
Ideally, the final adjustment of the carburetor is made using a gas analyzer that measures the content of carbon monoxide CO in the exhaust. In order for the fuel consumption to fit into the norm, and the engine to receive a sufficient amount of combustible mixture, the CO level at idle should fit in the range of 0,7-1,2 units. The second measurement is performed at 2000 rpm of the crankshaft, the permissible limits are from 0,8 to 2,0 units.
In garage conditions and in the absence of a gas analyzer, candles serve as an indicator of optimal fuel combustion. Before starting the engine, they need to be checked for operability and cleaned, ideally, new ones should be put in. Then manual adjustment is made.
- Loosen the quantity screw by 6–7, quality by 3,5 turns. Using the “suction”, start and warm up the engine to operating temperature, then drown the handle.With the help of two adjusting screws, enrichment and the amount of mixture at idle are adjusted
- By turning the mixture amount screw and watching the tachometer, bring the crankshaft speed to 850-900 rpm. The engine must run for at least 5 minutes so that the spark plug electrodes show a clear picture of combustion in the cylinders.
- Turn off the power unit, turn out the candles and inspect the electrodes. If no black soot is observed, the color is light brown, the adjustment is considered complete.
- If soot is found, clean the spark plugs, replace and start the engine again. Turn the quality screw 0,5-1 turn, adjust the idle speed with the quantity screw. Let the machine run for 5 minutes and repeat the electrode check operation.

Adjusting screws have a significant effect on the composition and amount of the mixture during idling. After pressing the accelerator and opening the throttle, the main metering system is turned on, preparing the fuel mixture according to the throughput of the main jets. Screws can no longer affect this process.
When repairing and adjusting the DAAZ 2107 carburetor, it is important not to lose sight of the little things - to change all worn parts, gaskets and rubber rings. The slightest leak leads to air leakage and improper operation of the unit. Jets require careful handling - picking calibrated holes with metal objects is unacceptable.

