Variator and scooter clutch
Content
A typical feature of scooters is their final drive through a CVT, an ingeniously simple system of continuous power transmission. Its maintenance and optimal adjustment allow you to achieve the best driving performance of the scooter.
Scooter variator and clutch maintenance
The scooter features a CVT final drive, also known as a converter, an ingeniously simple multi-piece continuously variable transmission that transfers power from the engine to the rear wheel. The lightweight CVT is ideal for small engines and inexpensively replaces the manual transmission and driveline or chain drive available on most motorcycles. The CVT was first used on scooters by the German manufacturer DKW in the late 1950s on the DKW Hobby model with a 75cc two-stroke engine. Cm; this system made it possible to increase the maximum speed of the car to 60 km / h approx.
When it comes to maintaining and customizing your scooter, we quickly get to the topic of the variator. This is due to the fact that, on the one hand, the components are subject to some wear, and on the other hand, an incorrectly selected variator can lead to a drop in engine power.
Operation
To understand how a CVT works, let's start by remembering the gear ratio on a bike with multiple gears (like a mountain bike), as many of us have already seen: we use a small chain sprocket in the front for starting here. and a big one in the back. As the speed increases and the stern drag decreases (for example, when descending), we pass the chain through a large chainring at the front and a smaller chainring at the rear.
The operation of the variator is the same, except that it runs continuously with a V-belt instead of a chain and automatically adjusts (“changes”) depending on the speed by adjusting the centrifugal force.
The V-belt actually pivots at the front and rear in a slot between two V-shaped tapered pulleys, the distance between which on the crankshaft can vary. The front inner pulley also houses the centrifugal weights of the variator rollers, which rotate in precisely calculated curved tracks.
A compression spring presses the tapered pulleys against each other from behind. When starting, the V-belt rotates at the front next to the shaft and at the rear at the outer edge of the bevel gears. If you accelerate, the inverter reaches its operating speed; the variator rollers then run along their outer tracks. Centrifugal force pushes the movable pulley away from the shaft. The gap between the pulleys narrows and the V-belt is forced to move a larger radius, that is, to move outward.
The V-belt is slightly elastic. This is why it pushes the springs on the other side and moves inward. In the final position, the conditions are reversed from the initial conditions. The gear ratio is changed to the gear ratio. Scooters with a variator, of course, also require idling. The automatic centrifugal clutch is responsible for separating the engine power from the rear wheel at low rpm and re-engaging them as soon as you accelerate and exceed a certain engine rpm. For this, a bell is attached to the rear drive. At the rear of the variator in this bell, centrifugal weights with friction linings controlled by springs rotate.
Slow motion
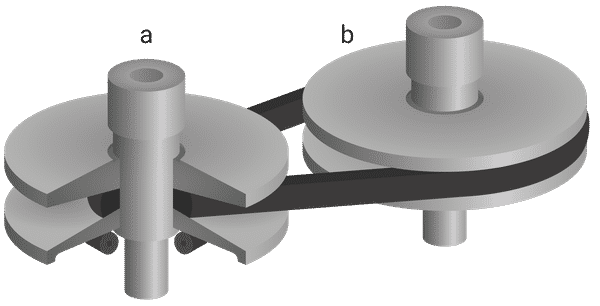
a = Engine, b = Final drive
Engine speed is low, the variator rollers rotate close to the axis, the gap between the front tapered pulleys is wide.
Increasing speed
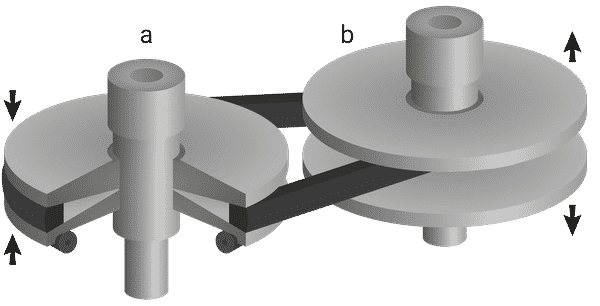
a = Engine, b = Final drive
The variator rollers move outward, pressing the front tapered pulleys together; the belt reaches a larger radius
The synchronization of centrifugal weights with their friction linings adjacent to the bell is dependent on the stiffness of the springs - low stiffness springs stick together at lower engine speeds, while high stiffness springs provide better resistance to centrifugal force; adhesion occurs only at higher speeds. If you want to start the scooter at optimum engine speed, the springs must be matched to the characteristics of the engine. If the stiffness is too low, the engine stalls; if it's too loud, the engine hums loudly to start.
Maintenance - What items need maintenance?
V-belt
The V-belt is a wearing part of scooters. It should be replaced regularly. If the service intervals are exceeded, it is possible that the belt will break "without warning", which will in any case cause the car to stop. Unfortunately, the belt can get stuck in the crankcase, resulting in collateral damage. Refer to your vehicle owner's manual for service intervals. They depend, among other things, on the power of the engine and should normally run between 10 and 000 km.
Bevel pulleys and bevel wheels
Over time, belt movement causes rolling marks on the tapered pulleys, which can hinder the operation of the variator and shorten the life of the V-belt. Therefore, tapered pulleys must be replaced if grooved.
CVT rollers
CVT rollers also wear out over time. Their shape becomes angular; then they must be replaced. Worn rollers result in a loss of power. Acceleration becomes uneven, jerky. Frequently clicking sounds are a sign of wear on the rollers.
Bell and clutch springs
The clutch linings are regularly subjected to frictional wear. Over time, this causes a notch and groove in the clutch housing; parts must be replaced at the latest when the clutch slips and therefore no longer holds properly. The clutch springs relax due to expansion. Then the clutch pads break and the scooter starts when the engine speed is too low. Have the springs replaced by a specialized clutch service.
Training
Make sure your work area is clean and dry before disassembling the inverter. If possible, choose a place where you can leave the scooter if you need other parts. To work, you will need a good ratchet, a large and small torque wrench (the drive nut must be tightened to 40-50 Nm), a rubber mallet, circlip pliers, some lubricant, a brake cleaner, a cloth or a set of paper towel rolls and be sure to hold and fixing tools described below. It is advisable to place a large rag or cardboard on the floor so that the removed parts can be neatly placed.
Tip: Before disassembling, take pictures of the parts with your smartphone, which saves you the stress of reassembling.
Inspection, maintenance and assembly - let's get started
Create disk access
01 - Loosen the air filter housing
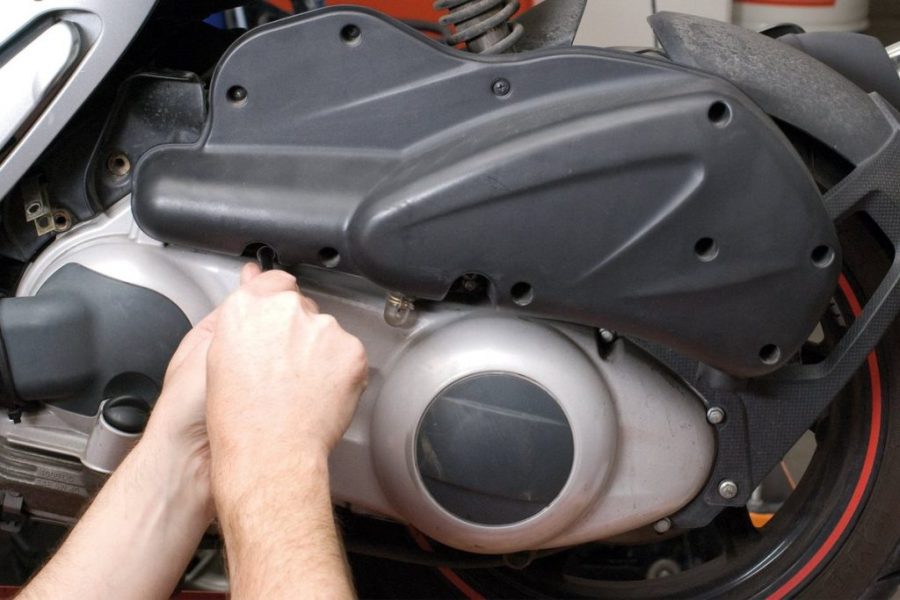
Step 1 Photo 1: Start by loosening the air filter housing ...
To access a disc, you must first remove its cover. To do this, clean the outside, checking which components need to be removed to gain access to the drive. It is possible that the rear brake hose is attached to the bottom of the cover or that the trigger is located at the front. As in our example, on some models it is necessary to remove the suction tube from the fan cooling system or from the air filter housing.
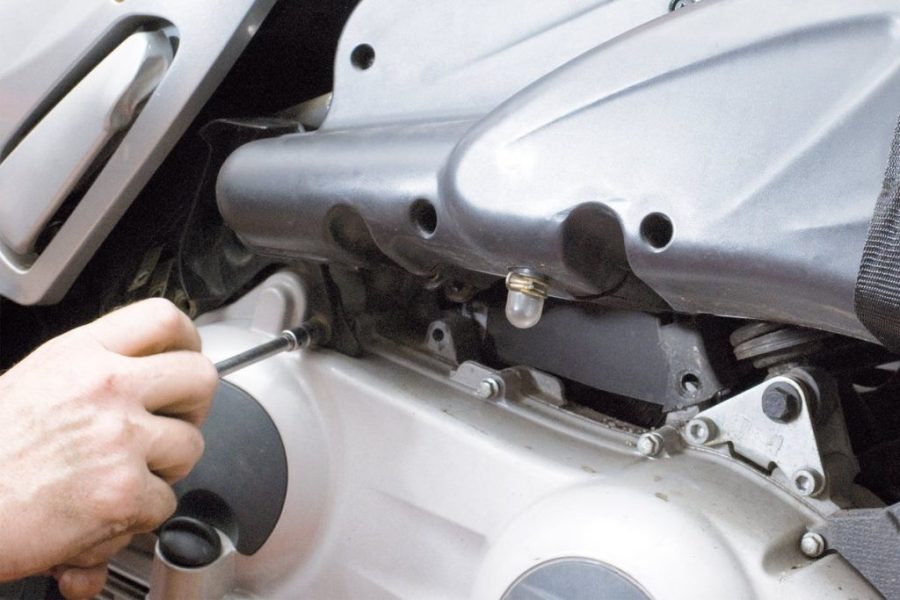
Step 1, photo 2: ... then lift it up to access the screws
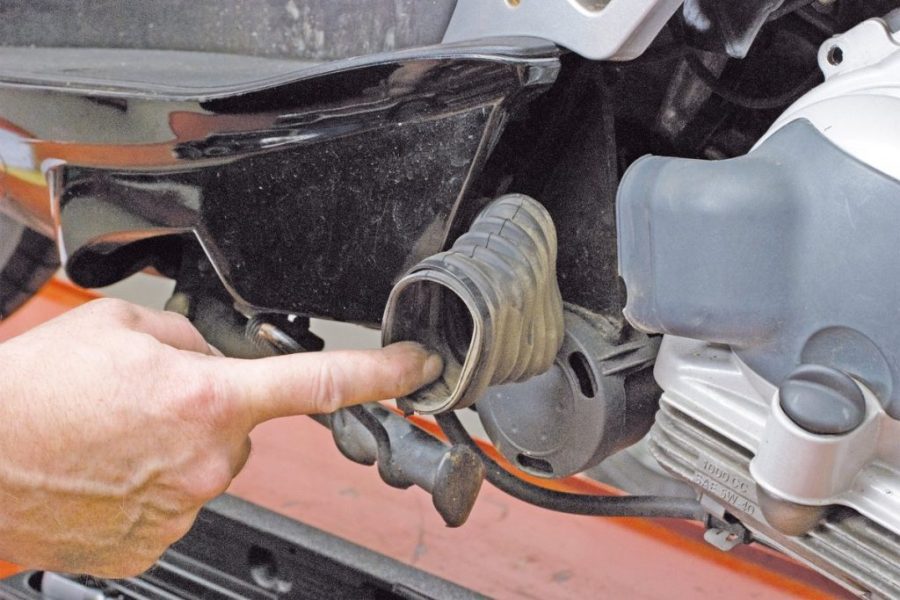
Step 1, photo 3: Remove the rubber grommet.
02 - Remove mudguard

The covers that prevent the drive cover from being removed must of course also be removed.
03 - Loosen the rear shaft nut
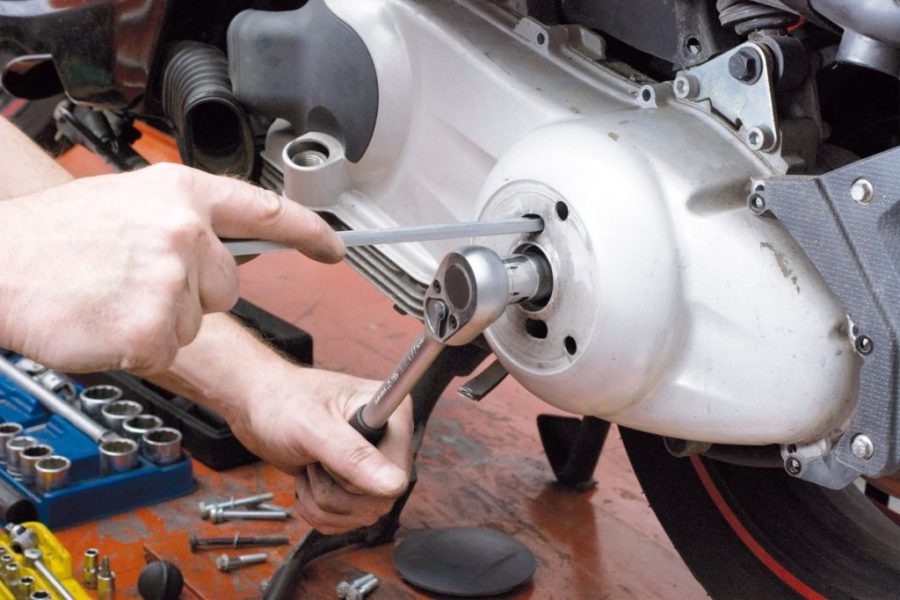
In some cases, the rear drive shaft fits into the cover and is secured with a nut that must be loosened first. A small cover, which must be removed separately, is located on the large drive cover. You must remove this. To loosen the nut in question, lock the variator with the special locking tool.
04 - Loosen the variator cover
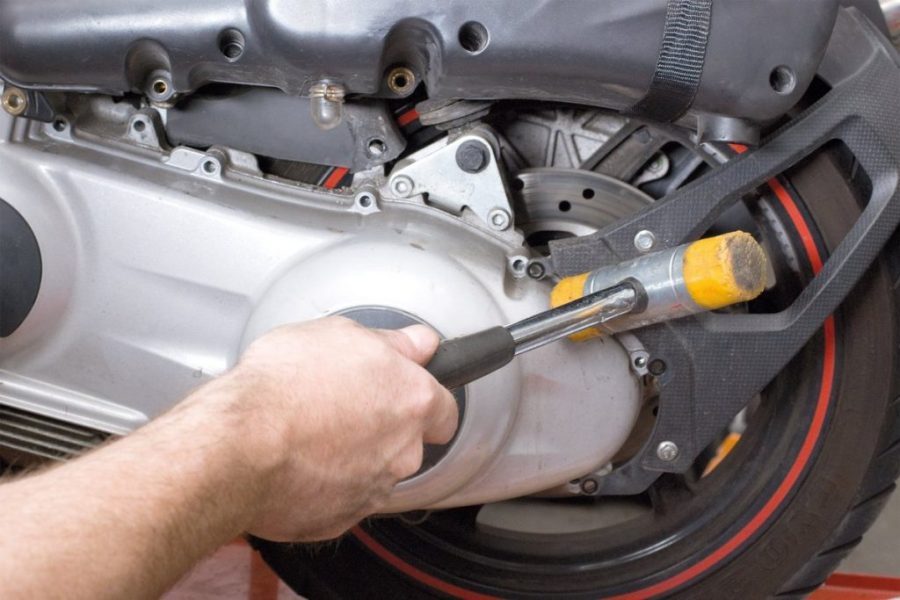
Step 4, photo 1: Loosen the vario lid.
After making sure no other components are blocking the drive cover, gradually loosen the mounting screws crosswise from outside to inside. If the screws are different sizes, pay attention to their position and do not lose the flat washers.
A few blows with a rubber mallet will help loosen it.

Step 4, photo 2: Then remove the drive cover.
You can now remove the cover. If it cannot be detached, check carefully where it is held. You may have forgotten the screw, do not force it. Do not use a rubber mallet to loosen the drive cover firmly in its slot until you are completely sure you have loosened all the screws.

Step 4 Photo 3: Do not lose the adjusting sleeve covers.
After removing the cover, make sure that all accessible adjusting sleeves remain in place; don't lose them.
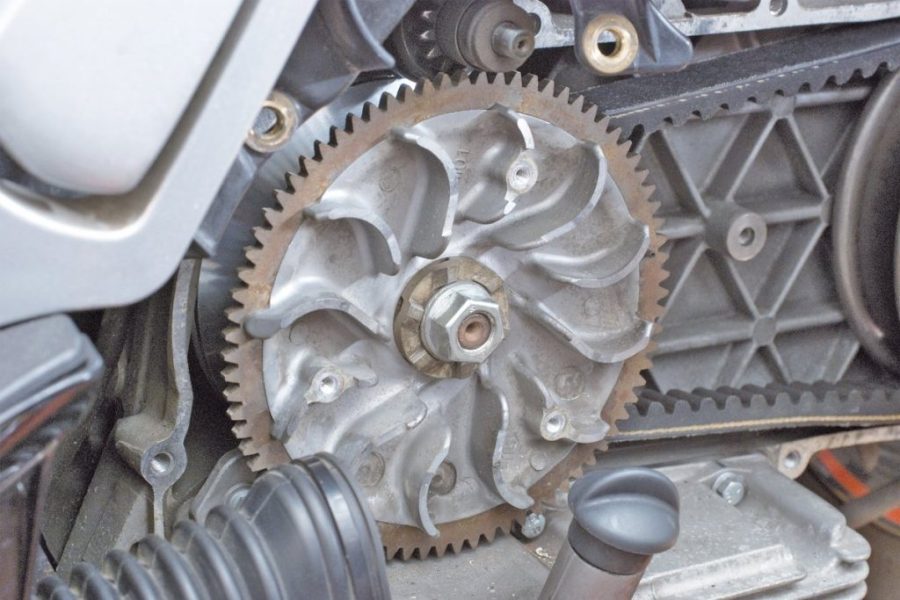
In most cases, if the rear propeller shaft protrudes into the cover, the bushing is loose. You mustn't lose it. Thoroughly clean the inside of the cover from dust and dirt. If there is oil in the variator housing, then the engine or drive gasket is leaking. Then you have to replace it. The dimmer is now in front of you.
Inspection and maintenance of the V-belt and variator rollers.
05 - Remove Variomatic Coating

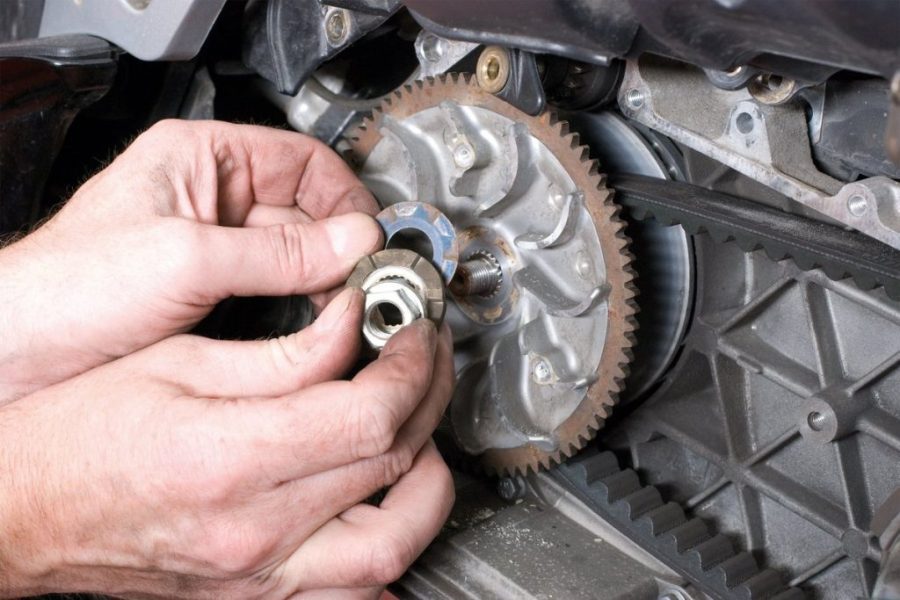
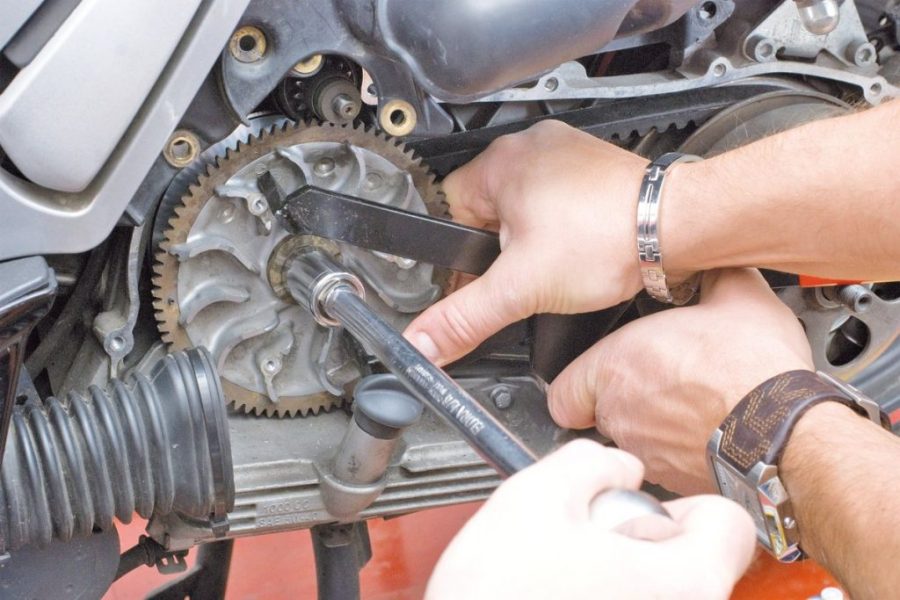
Step 5 Photo 1: Lock the variator and loosen the center nut ...
To install a new V-belt or new CVT pulleys, first loosen the nut securing the front tapered pulleys to the crankshaft journal. To do this, the drive must be locked with a special lock.
Step 5, photo 2:… remove the metal ring to work better
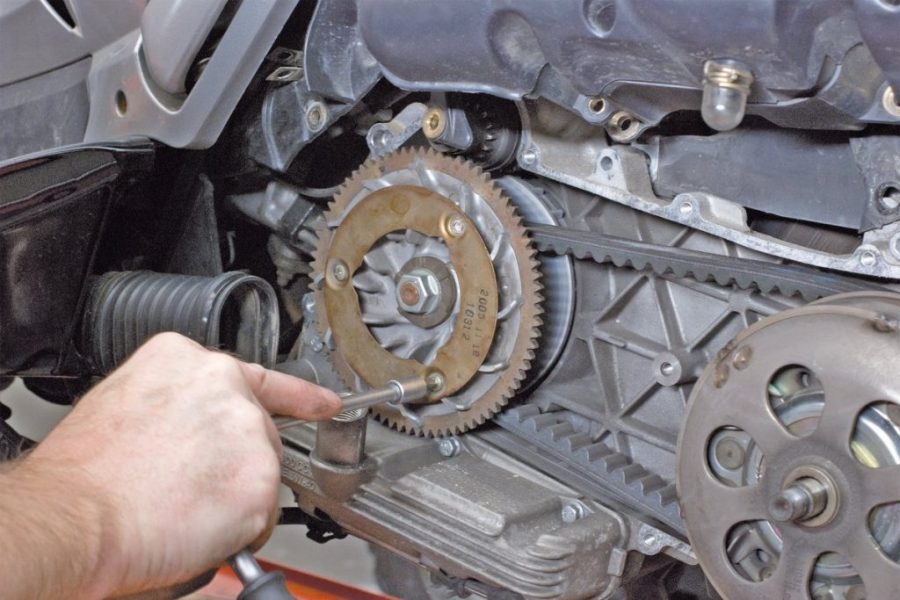
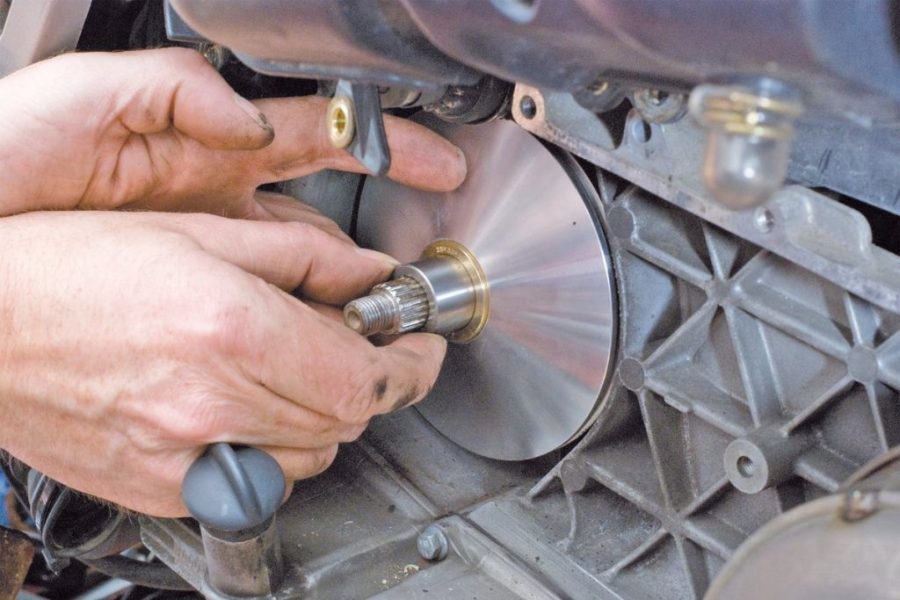
06 - Remove front bevel pulley
If a front tapered pulley is installed, you can purchase a commercial striker / striker suitable for your vehicle. If there are solid holes or ribs in the front, you can install the bracket.
Skillful craftsmen with their own hands can also design a ratchet mechanism or flat steel bracket on their own. If you get stuck in the cooling fins, work carefully so that they do not break.
The note : Since the nut is very tight, it is important to use a suitable tool to hold the variator securely. Otherwise, you risk damaging it. Get help if necessary. Then your assistant should hold the tool in place by applying force as you loosen the nut.
After loosening and removing the nut, the front tapered pulley can be removed. If the starter drive wheel is located behind the nut on the shaft, pay attention to its mounting position.
07 - V-belt
The V-belt is now available. It should be free of cracks, fractures, worn out or broken teeth, and it should be free of oil stains. Its width should not be less than a certain value (check with your dealer for wear limit). A large amount of rubber in the crankcase may mean that the belt is not rotating properly in the drive (find out the cause!) Or that a service interval has expired. Premature V-belt wear can be caused by improperly installed or worn tapered pulleys.
If tapered pulleys have grooves, they must be replaced (see above). If they fade when exposed to heat, then they are deformed or improperly fitted. If the V-belt is not yet to be replaced, clean it with brake cleaner and pay attention to the direction of rotation before proceeding.
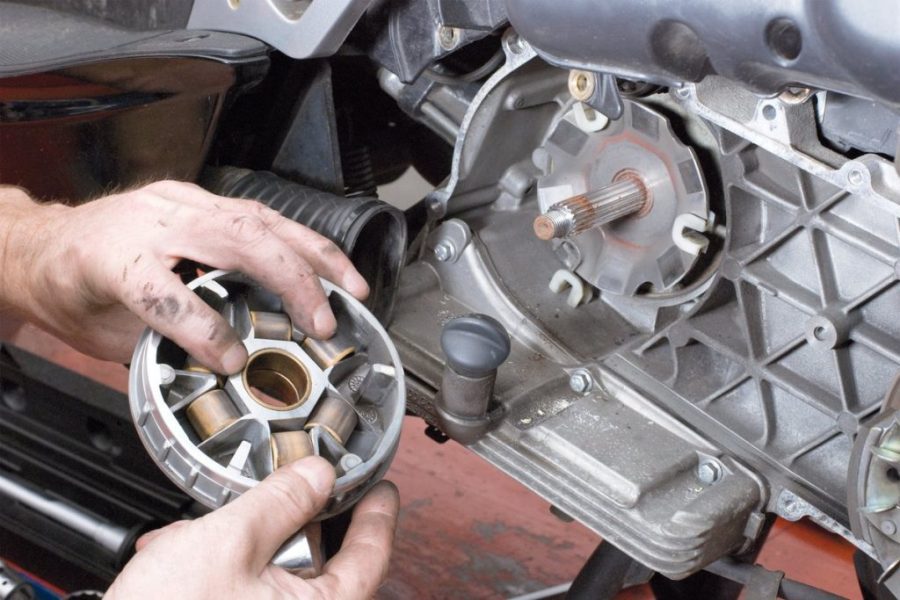
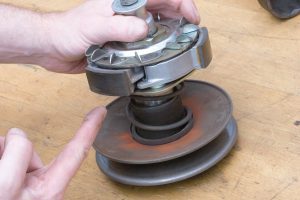
08 - CVT rollers
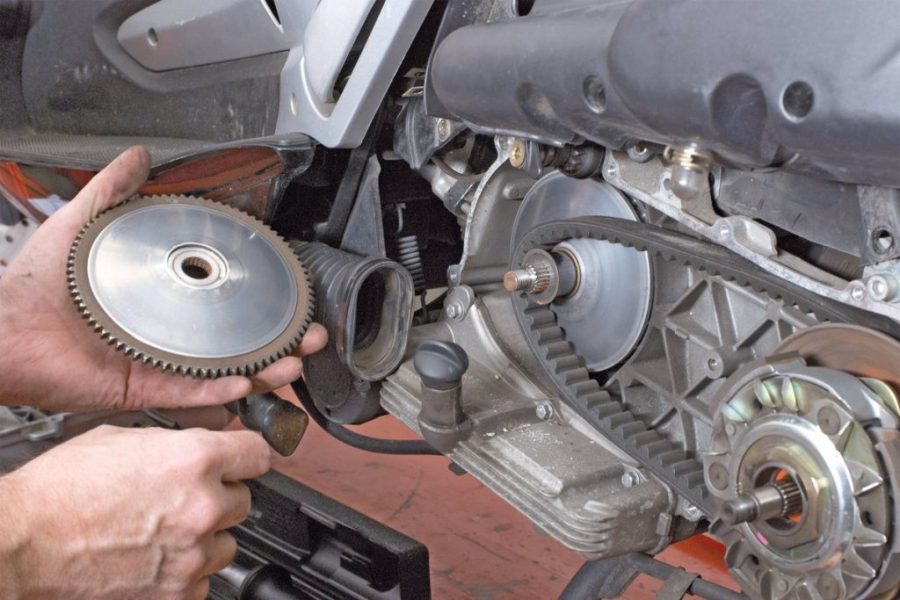
Step 8, photo 1:… and remove the entire variator block from the shaft
To check or replace the clutch rollers, remove the front inner tapered pulley with clutch housing from the shaft.
The housing can be attached to the pulley or left loose. To ensure that not all components fall out and the weights of the inverter remain in place, you must firmly and securely hold the entire unit.
Then remove the variator roller cover - accurately mark the mounting position of the various parts. Clean them with brake cleaner.
Step 8 Photo 2: Drive Interior
Check the variator rollers for wear - if they are recessed, flattened, have sharp edges or the wrong diameter, the play must be replaced.
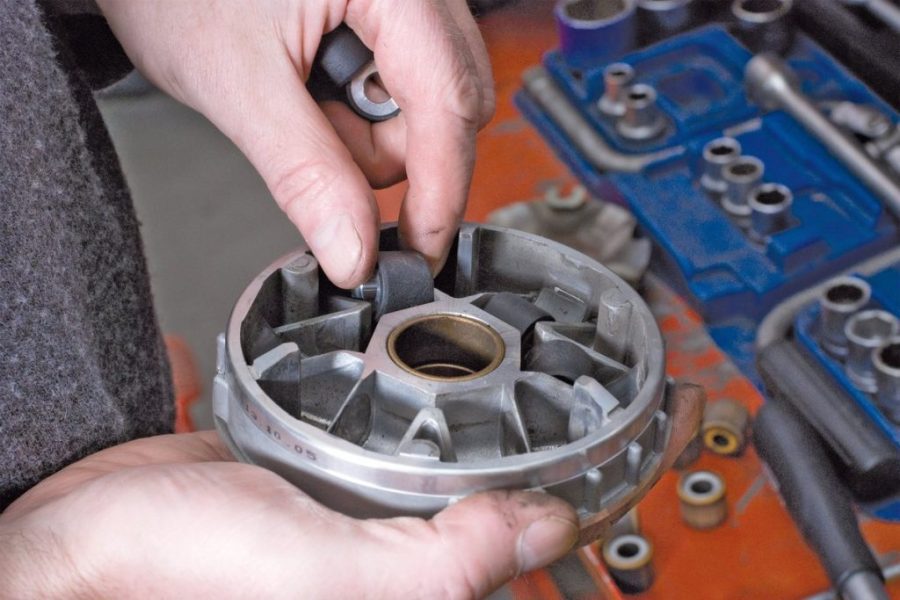
Step 8 Photo 3: Replace Old Worn CVT Rollers
09 - Install the variator on the shaft
When assembling the variator housing, lightly grease the rollers and steps of the variator, depending on the model of the scooter, with grease, or install them dry (ask your dealer).
If there is an O-ring in the variator housing, replace it. When installing the unit onto the shaft, make sure the variator rollers remain in place in the housing. If not, remove the clutch cover again to replace the rollers.
10 - Move back the conical pulleys
Spread the rear tapered pulleys so that the belt can go deep between the pulleys; thus, the belt has more space in the front.
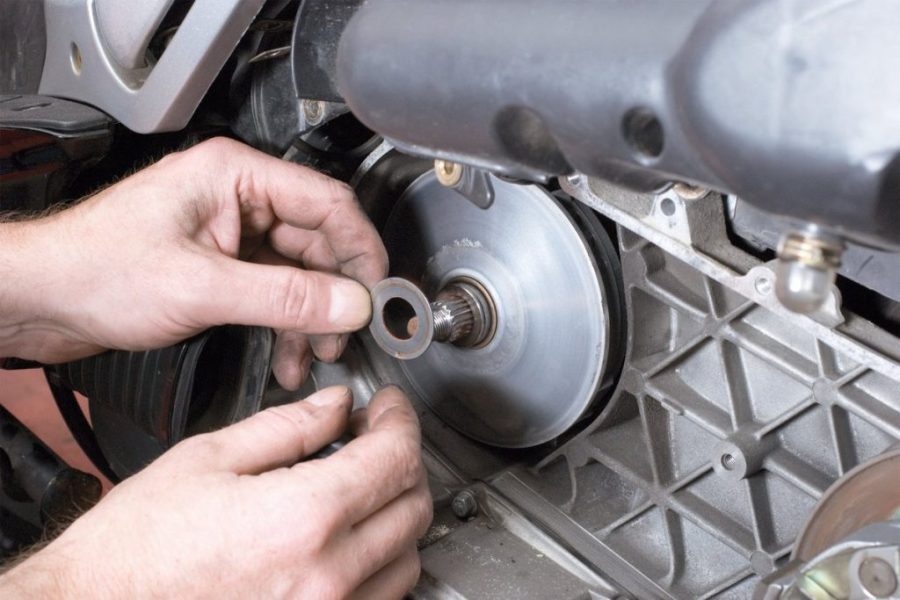
11 - Install the spacer washer.
Then install the drive outer front bevel pulley with all relevant components - lubricate the shaft with a small amount of grease before installing the bushing. Make sure that the path of the V-belt is even between the pulleys and does not jam.
12 - Install all pulleys and center nut...
Step 12 Photo 1. Install all pulleys and center nut ...
Before installing the nut, double-check that all components are in their original position and apply some thread lock to the nut.
Then take a locking tool as an aid and tighten the nut with a torque wrench to the torque specified by the manufacturer. If necessary, have an assistant hold the locking tool in place! Once again make sure the tapered clutch pulleys are in direct contact with the housing seal face when you turn the clutch.
If they are warped, check the assembly again! Make sure the V-belt is taut by pulling it slightly out of the space between the tapered pulleys.
Step 12 Photo 2:… and tighten the nut securely. Get help if needed
Clutch inspection and maintenance
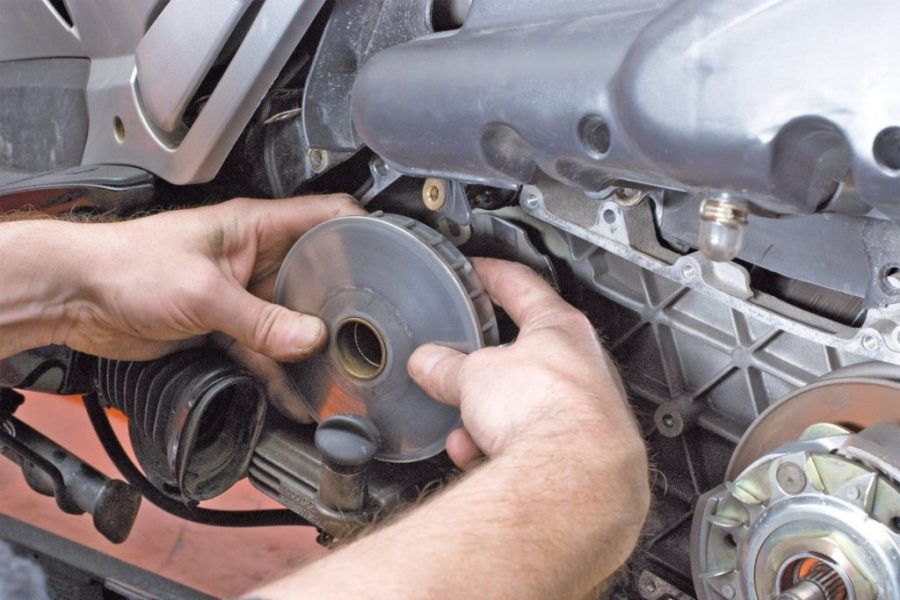
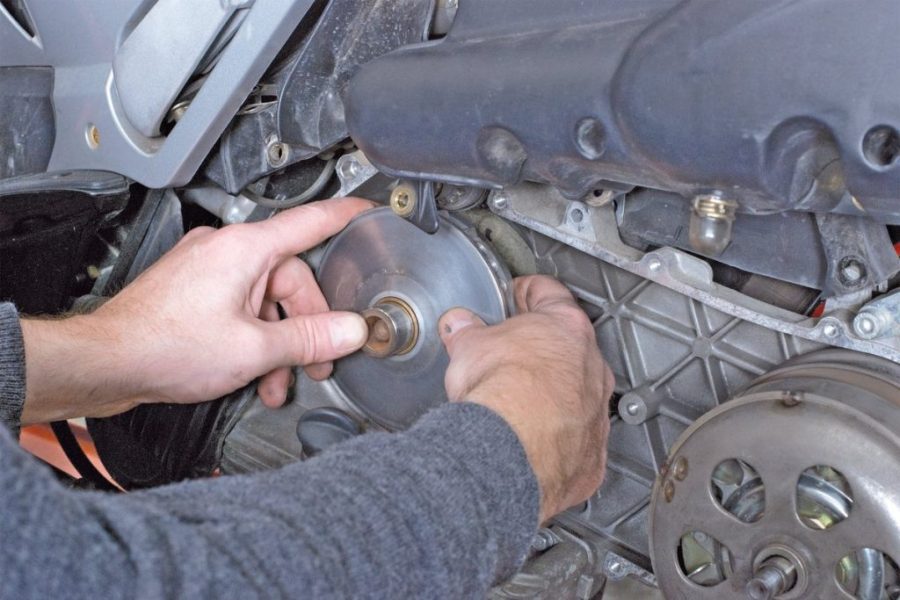
13 – Clutch disassembly

Remove the clutch housing from the shaft so that you can check their inner running surface and the centrifugal weight linings. Ask your dealer for the wear limit value. It is very important to replace pads less than 2 mm thick or wear resistant ones.
The adhesion can be checked even when the V-belt is still in place.
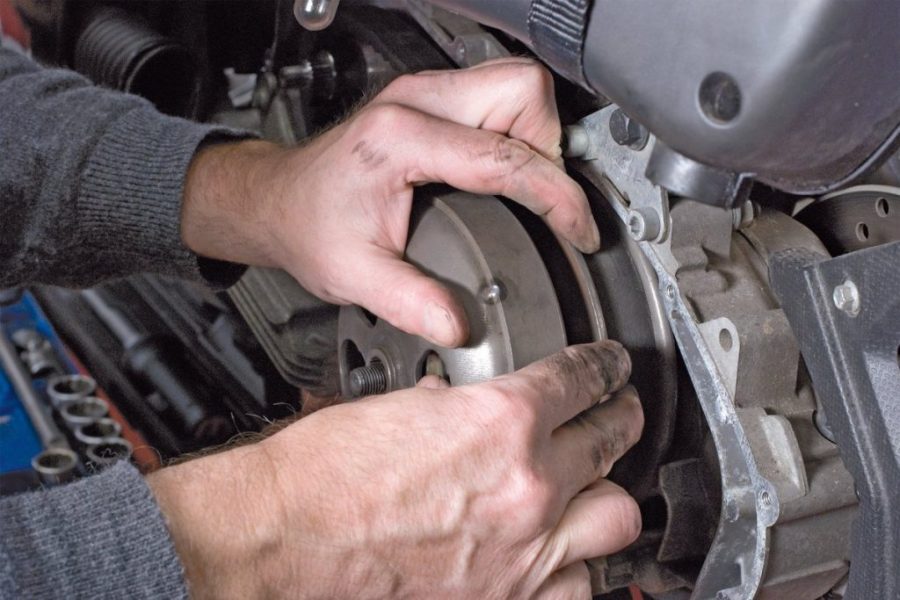
The best way to replace clutch linings and springs is to remove the rear bevel pulley / clutch assembly from the shaft. Indeed, the unit must be screwed on and this operation is complicated by the presence of a spring inside. To do this, first remove the V-belt. Hold the clutch housing firmly to loosen the center shaft nut. To do this, grasp the flare holes with a tool or hold the flare firmly from the outside with a strap wrench. It is helpful for this operation to have an assistant who holds the holding tool securely in place while you loosen the nut.
If the nut is outside, loosen it before removing the drive cover; thus, this step is already completed, as in our example. By unscrewing the nut, you can lift the clutch housing and check its internal condition for wear (bearing marks) as indicated above. If the clutch pads are worn or the centrifugal weight spring is loose, the tapered pulley / clutch assembly must be removed from the shaft as previously described. The device is held in place by a large central nut.
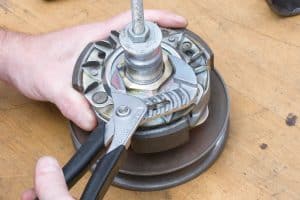
To release it, hold the clutch, for example. a metal strap wrench and a suitable special wrench; Water pump pliers are not suitable for this!
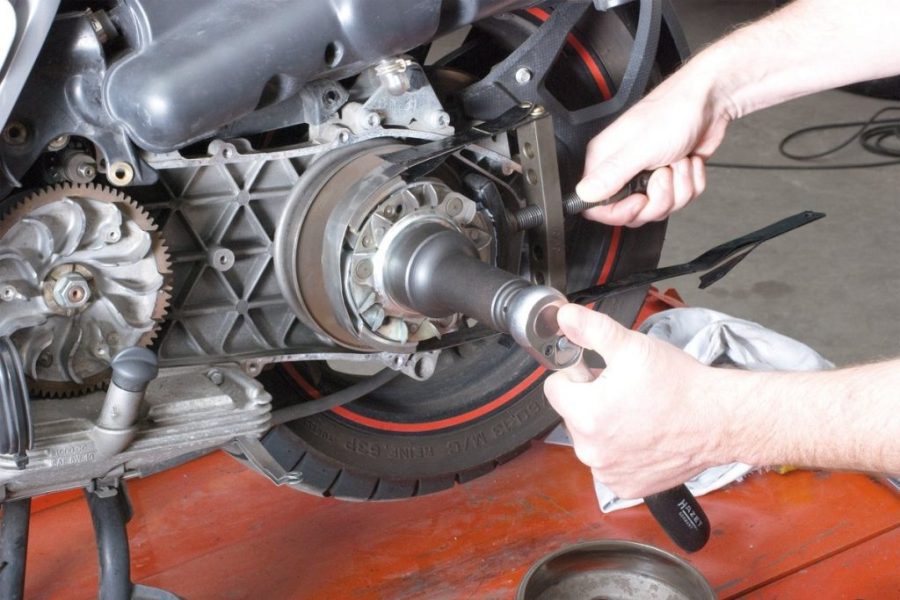
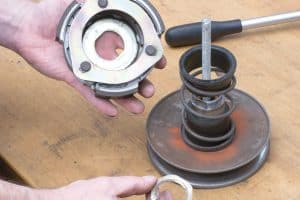
TIP! Make a spindle with a threaded rod
When the tapered pulleys are pushed inward by the spring, the device bounces after loosening the nut; you must consider this and tighten the device to remove the nut from the shaft in a controlled manner.
For engines larger than 100 cc, the spring rate is very high. Therefore, to maintain spring compression, we strongly recommend holding the assembly outward with a spindle, which slowly relaxes after removing the nut.
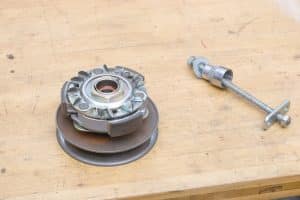
Make a spindle with a threaded rod →
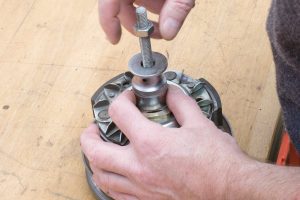
Install the spindle ... →
... Remove the nut ... →
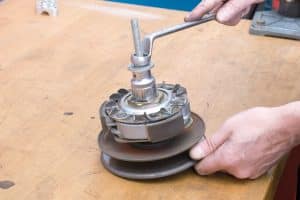
... Then loosen the spindle clutch assembly →
The relaxed spring is now visible →
Remove clutch from tapered pulley →
14 - Install new clutch linings.
During reassembly, this pin also helps to compress the spring so that the nut can be easily installed.
After disconnecting the coupling from the tapered pulleys, you can replace the springs and linings. When replacing gaskets, use new circlips and make sure they are in place.
Clutch Bearing Maintenance
Inside the cylinder liner of a tapered pulley there is usually a needle bearing; Make sure no dirt gets into the bearing and make sure it rotates easily. If necessary, clean them with a spray of PROCYCLE brake cleaner and lubricate with grease again. Also check the bearing for leaks; if for example. grease comes out of the bearing and spreads over the V-belt, it can slip.
Clutch assembly
Clutch assembly is carried out in reverse order. To tighten the outer center nut, use a torque wrench (3/8 in., 19 to 110 Nm) and consult your dealer for torques. Re-check that all components are assembled correctly before closing the drive cover, then return all external components to their original position.