Crankshaft bearings and their replacement
Content
The crankshaft is one of the key parts of any vehicle with a piston engine. A separate one is devoted to the device and purpose of the crankshaft. Now let's talk about what helps it function smoothly. Let's talk about inserts.
The liners are installed between the main journals of the crankshaft and the bed in the cylinder block, and also between the connecting rod journals and the inner surface of the lower heads of the connecting rods. In fact, these are plain bearings that reduce friction during rotation of the shaft and prevent it from jamming. Rolling bearings are not applicable here, they simply cannot withstand such operating conditions for a long time.
In addition to reducing friction, the liners allow you to correctly position and center parts. Another important function of them is the distribution of lubricant with the formation of an oil film on the surface of the interacting parts.
The insert is a composite part of two flat metal half-rings. When paired, they completely cover the crankshaft journal. There is a lock at one of the ends of the half-ring, with its help the liner is fixed in the seat. Thrust bearings have flanges - side walls, which also allow the part to be fixed and prevent the shaft from moving along the axis.

There are one or two holes in the semi-rings, through which lubrication is supplied. On the liners, which are located on the side of the oil channel, a longitudinal groove is made, along which the lubricant enters the hole.
 The bearing has a multilayer structure based on a steel plate. On the inner (working) side, an anti-friction coating is applied to it, usually consisting of several layers. There are two structural subspecies of liners - bimetallic and trimetallic.

For bimetallic ones, an anti-friction coating of 1 ... 4 mm is applied to a steel base with a thickness of 0,25 to 0,4 mm. It usually contains soft metals - copper, tin, lead, aluminum in different proportions. Additions of zinc, nickel, silicon and other substances are also possible. There is often an aluminum or copper sublayer between the base and the anti-friction layer.
A tri-metal bearing has another thin layer of lead mixed with tin or copper. It prevents corrosion and reduces wear of the anti-friction layer.
For additional protection during transport and running-in, the half-rings can be coated with tin on both sides.
The structure of the crankshaft liners is not regulated by any standards and may vary from manufacturer to manufacturer.
Liners are precision-type parts that provide gaps within certain limits during crankshaft rotation. Lubricant is fed into the gap under pressure, which, due to the eccentric displacement of the shaft, forms a so-called oil wedge. In fact, under normal conditions, the crankshaft does not touch the bearing, but rotates on an oil wedge.
A decrease in oil pressure or insufficient viscosity, overheating, deviation of the dimensions of parts from the nominal ones, misalignment of the axes, the ingress of foreign particles and other reasons cause a violation of fluid friction. Then in some places the shaft journals and the liners begin to touch. Friction, heating and wear of parts increase. Over time, the process leads to bearing failure.
After disassembling and removing the liners, the causes of wear can be judged by their appearance.

Worn or damaged liners cannot be repaired and are simply replaced with new ones.
Possible problems with the liners will be reported by a dull metallic knock. It gets louder as the engine warms up or the load increases.
If it knocks at the crankshaft speed, then the main journals or bearings are seriously worn out.
If the knock occurs at a frequency two times less than the crankshaft speed, then you need to look at the connecting rod journals and their liners. The problematic neck can be determined more precisely by turning off the nozzle or spark plug of one of the cylinders. If the knock disappears or becomes quieter, then the corresponding connecting rod should be diagnosed.
Indirectly, problems with necks and liners are indicated by a pressure drop in the lubrication system. In particular, if this is observed at idle after the unit has warmed up.
Bearings are main and connecting rod. The first are placed in the seats in the body of the BC, they cover the main journals and contribute to the smooth rotation of the shaft itself. The latter are inserted into the lower head of the connecting rod and together with it cover the connecting rod journal of the crankshaft.
Not only bearings are subject to wear, but also shaft journals, so replacing a worn bearing with a standard size bushing may result in the clearance being too large.
Oversize bearings with increased thickness may be required to compensate for journal wear. As a rule, the liners of each subsequent repair size are a quarter of a millimeter thicker than the previous one. The bearings of the first repair size are 0,25 mm thicker than the standard size, the second ones are 0,5 mm thicker, and so on. Although in some cases the repair size step may be different.
To determine the degree of wear of the crankshaft journals, it is necessary not only to measure their diameter, but also to diagnose for ovality and taper.
For each neck, using a micrometer, measurements are made in two perpendicular planes A and B in three sections - sections 1 and 3 are separated from the cheeks by a quarter of the length of the neck, section 2 is in the middle.

The maximum difference in diameters measured in different sections, but in the same plane, will give the taper index.
The difference in diameters in perpendicular planes, measured in the same section, will give the value of ovality. For a more accurate determination of the degree of oval wear, it is better to measure in three planes every 120 degrees.
Clearances
The clearance value is the difference between the inner diameter of the liner and the diameter of the neck, divided by 2.
Determination of the inner diameter of the liner, especially the main one, can be difficult. Therefore, for measurement it is convenient to use a calibrated plastic wire Plastigauge (Plastigage). The measurement procedure is as follows.
- Clean the necks of grease.
- Place a piece of calibrated rod across the surface to be measured.
- Install the bearing cap by tightening the fasteners to rated torque with a torque wrench.
- Do not rotate the crankshaft.
- Now unscrew the fastener and remove the cover.
- Apply the calibration template to the flattened plastic and determine the gap from its width.

If its value does not fit within the allowable limits, the necks must be ground to the repair size.
Necks often wear unevenly, so all measurements must be taken for each of them and polished, leading to one repair size. Only then can you select and install liners.
When choosing inserts for a change, it is necessary to take into account the model range of internal combustion engines, and it happens that even a specific model of internal combustion engine. In the vast majority of cases, bearings from other units will be incompatible.
Nominal and repair dimensions, clearance values, possible tolerances, bolt torques and other parameters related to the crankshaft can be found in the repair manual for your car. The selection and installation of liners should be carried out in strict accordance with the manual and the marks stamped on the crankshaft and body of the BC.
The correct procedure for changing bearings involves the complete dismantling of the crankshaft. So, you have to remove the engine. If you have the appropriate conditions, the necessary set of tools, experience and desire, then you can proceed. Otherwise, you are on the road to a car service.
Before removing the covers of the liners, they should be numbered and marked so that they can be installed in their original places and in the same position during installation. This also applies to liners, if they are in good condition and their further use is expected.
The removed shaft, liners and mating parts are thoroughly cleaned. Their condition is checked, special attention should be paid to checking the cleanliness of the oil channels. If the liners have defects - scuffing, delamination, traces of melting or sticking - then they need to be replaced.
Further, the required measurements are made. Depending on the results obtained, the necks are polished.
If the liners of the desired size are available, then you can proceed with the installation of the crankshaft.
Assembly
Those intended for placement in the BC bed have a groove for lubrication, and those half rings that are inserted into the covers do not have grooves. You cannot change their places.
Before installing all the liners, their working surfaces, as well as the crankshaft journals, must be lubricated with oil.
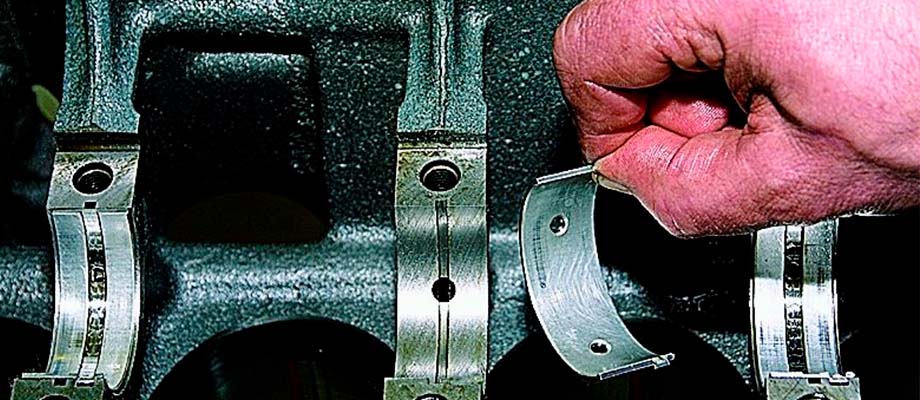
and bearings are installed in the bed of the cylinder block, and the crankshaft is laid on them.
The main bearing covers are put in place in accordance with the markings and marks made during dismantling. The bolts are tightened to the required torque in 2-3 passes. First, the central bearing cover is tightened, then according to the scheme: 2nd, 4th, front and rear liner.
When all caps are tightened, turn the crankshaft and make sure that the rotation is easy and without sticking.
Mount the connecting rods. Each cover must be put on its own connecting rod, since their factory boring is done together. The locks of the earbuds must be on the same side. Tighten the bolts to the required torque.
There are many recommendations on the Internet for replacing bearings without the need for a very troublesome removal process. One such method is to use a bolt or rivet that is inserted into the neck oil hole. If necessary, the bolt head must be ground off so that it does not exceed the thickness of the liner in height and passes freely into the gap. When turning the crankshaft, the head will rest against the end of the bearing half ring and push it out. then, in a similar way, a new insert is placed in place of the extracted one.
Indeed, this method works, and the risk of damaging anything is small, you just need to get to the crankshaft from the inspection hole. However, it can have unpredictable consequences, so you will use it at your own peril and risk.
The problem with such folk methods is that they do not provide for detailed troubleshooting and measurements of the crankshaft and absolutely exclude grinding and fitting the necks. Everything is done by eye. As a result, the problem may turn out to be disguised, but after some time it will reappear. This is at best.
It is extremely unworthy to change failed liners without taking into account the wear of the crankshaft journals. During operation, the neck may, for example, acquire the shape of an oval. And then a simple replacement of the liner is almost guaranteed to lead to its turning soon. As a result, at least there will be scuffs on the crankshaft and it will have to be polished, and as a maximum, a serious repair of the internal combustion engine will be required. If it turns, it may fail.
Incorrect clearance will also cause serious negative consequences. Backlash is fraught with knocking, vibration and even more wear. If the gap, on the contrary, is less than the permissible one, then the risk of jamming increases.
Although to a lesser extent, other mating parts are gradually worn out - the connecting rod heads, the crankshaft bed. This should not be forgotten either.