Replacement of the split set
Content
Transmission chains, sprockets and driven wheel are wear parts. While modern O, X, or Z type o-ring chain kits can provide impressive mileage, one day you will still have to replace the chain kit.
Replace the chain kit on the motorcycle
Modern O, X or Z type O-ring chain kits achieve an impressive service life, in particular due to the continuous improvement of production technology; however, chain drive components are subject to constant wear.
If you find that the teeth of the sprockets and ring gear are bent and you have to tighten the chain more and more often, the only thing you need to do is buy yourself a new set of chain! However, in most cases the kit will break even before it gets there, as you manage to lift the chain ring links a few millimeters even if the chain is properly tensioned or the chain is slack. If you are quick-witted, you will replace the entire kit, because you know that the new chain quickly reaches the level of wear on the chain link and sprocket. Chains with O, X or Z type o-rings contain a permanent lubrication system that lubricates the bolts inside the chain.
A transmission chain is always as strong as its weakest link. If you are installing the chain with a quick-release rivet clutch, be sure to rivet it securely with a suitable chain tool.
Warning: If you've never riveted chains correctly before, entrust the job to a specialist workshop! We recommend quick couplings for vehicles with a maximum capacity of 125 cm³. Quick disconnect couplings specially designed for Enuma chain also available. Be sure to collect them strictly according to the instructions provided.
Replacing the chain kit - let's get started
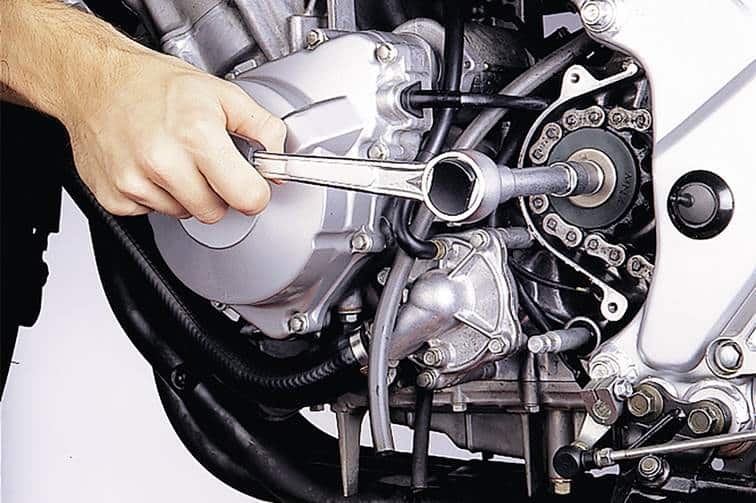
01 - Disconnect the gear
To access the chain sprocket, you may need to remove the step, the gear selector (note the position!) And the cover. When you lift the cover, check to see if the clutch can be triggered; try not to lift it if possible. To keep the vehicle safe, engage first gear and lock the brake pedal (ask your assistant) so that the gear can be disengaged. The gear can be secured in different ways (center nut with lock washer, center screw with lock washer, shim with two smaller screws). If necessary, first remove the shroud (eg bend the lock washer) before loosening the pinion screw or nut using a suitable socket wrench using sufficient force.
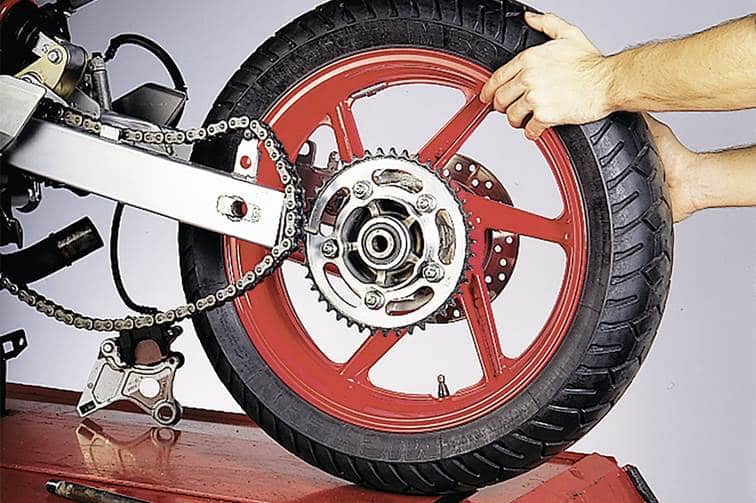
02 - Remove the rear wheel
Now remove the rear wheel. If you cannot use the center stand, please note that the motorcycle lift attached to the swing arm is not suitable for disassembling the swing arm. Disassemble the chain guard and rear clip, if equipped. Loosen the axle nut and remove the axle with a plastic hammer. Use a plank to help you if desired. While holding the wheel firmly, gently slide it towards the ground, push it forward and remove it from the chain.
The note : Pay attention to the installation position of the spacers!
03 - Replace the crown
Unscrew the crown from the support on the rear wheel. Also bend the existing lock washers in advance. Replace lock washers or self-locking nuts. Clean the mat and fit a new crown. Tighten the screws crosswise and, if possible, tighten with a torque wrench following the manufacturer's instructions. If necessary, carefully lower the lock washers again. Check the wheel again: are all bearings and o-rings in good condition? Is the starting damper behind the crown support still tightened? Replace damaged parts.
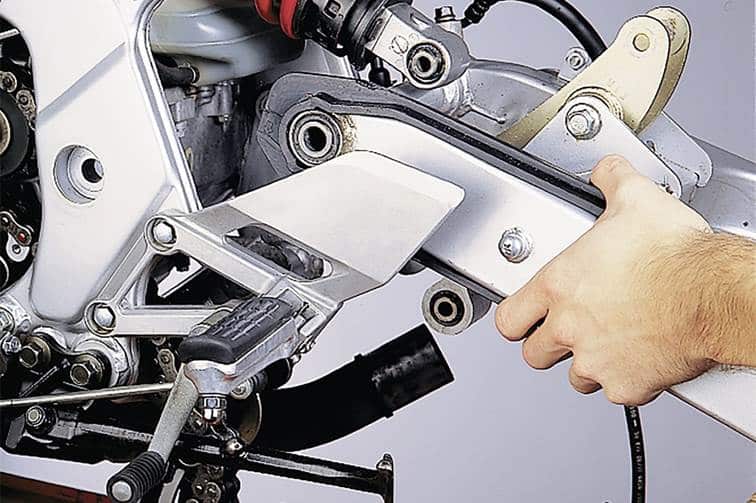
04 - Swing arm
If it is necessary to install an endless chain, the pendulum must be removed. If you are using a quick coupler, this step is not necessary. Go straight to step 07... To disassemble the swingarm, proceed as follows: first disconnect the brake hose from the swingarm, but do not unscrew it from edge to edge and do not open the brake system in any way! Simply remove the brake bar from the swingarm, wrap the disassembled brake block in a rag, and then place it under the motorcycle. The swingarm is now connected to the motorcycle only through the suspension and axle. In the case of a double suspension, remove their lower mounts from the swingarm. In the case of center suspension, it may be necessary to disconnect the return levers. Then carefully remove the pendulum.
05 - Replacing the chain sprocket
The gear can now be replaced. Be sure to pay attention to its installation position (there are often two sides: one large, the other flatter). Only correct assembly will ensure that the chain is correctly aligned, an unaligned chain can break! Note. Once this area has been properly cleaned, you can position the new sprocket and chain correctly. Use a new lock washer if necessary, then install the nut / screw. Wait before tightening them with a torque wrench.
06 - Clean, lubricate and assemble
Thoroughly clean all parts of the swingarm and swingarm with suitable cleaning agents. Lubricate all moving parts (bushings, bolts). If the pendulum is protected from chain friction by a sliding part, and this part is already very thin, replace it. After removing the swingarm, re-lubricate its hinges. Follow manufacturer's instructions for lubrication.
If possible, ask another person to help you assemble the pendulum that will mount the axle and you will place the pendulum in the frame. Then install the shock absorbers and, if necessary, the return arms (in the case of single suspension struts), observing the torques specified by the manufacturer. Then install the wheel, making sure that the brake, brake support and spacers are installed correctly.
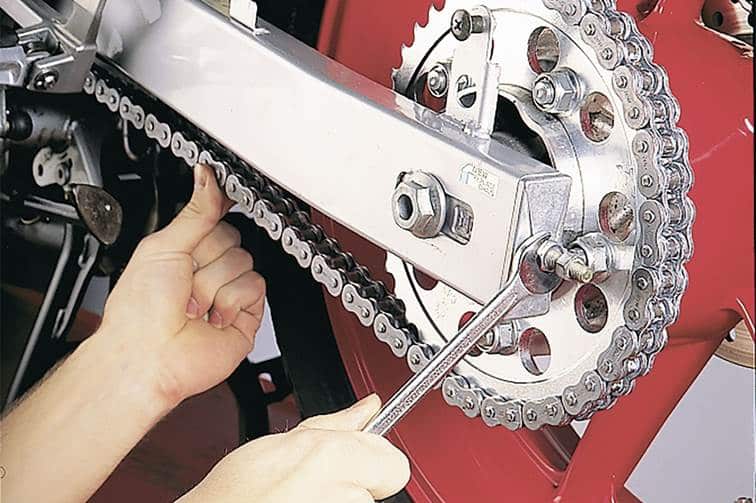
07 - Chain with lock
If you are installing the chain using a quick coupler, carefully follow the included assembly instructions and / or chain tool owner's manual.
08 - Adjust chain tension
You are almost done: to adjust the chain slack / tension, do the following: manually rotate the rear wheel and calculate the tightest position. This is important because too tight the chain will damage the transmission output bearings, resulting in very high repair costs. The default setting is that you can barely run two fingers down the center of the chain's lower sag when the car is loaded and on the ground. Ideally, sit on the bike while a second person checks it. To adjust the clearance using the adjusting mechanism, you must free the axle and raise the motorcycle. It is important to evenly adjust both sides of the swingarm to maintain wheel alignment. If in doubt, check with a chain alignment tester, long straight bar or wire. Note that a chain that is too tight, worn, or poorly maintained can break, in most cases causing the crankcase to break or fall, or worse! The Chain Monkey system helps you tighten the chain.
Finally, tighten the swingarm pivot, wheel axle and gear with a torque wrench according to the manufacturer's instructions. If possible, tighten the rear axle nut with a new cotter pin. Once the cover, gear selector, chain guard, etc. are installed, re-check all fasteners. Make sure the chain is properly tensioned after about 300 km, as new chains are stretched first.
And don't forget about the lubricant! If you travel a lot and enjoy excursions, an automatic chain lubricator can help you extend the life of your chain kit and save you hours of work. See "Mechanic's Tips" "Chain Lubrication System and Chain Maintenance".