Coolant replacement Lacetti
Content
- What coolant for Lacetti?
- When to change the coolant
- How much coolant does the Lacetti have
- What is needed to replace the coolant
- Replacing the coolant
- Expansion tank Lacetti
- How to choose and dilute antifreeze concentrate
- Leaking drain plug on radiator
- Flushing the cooling system
- How to drain all the coolant completely
- Replacing the coolant without an inspection ditch and overpass
The process of replacing the coolant with the Lacetti is not complicated, but there are some nuances that we will consider.
What coolant for Lacetti?
The Chevrolet Lacetti cooling system uses high-quality ethylene glycol-based coolant (antifreeze).
The most important component of antifreeze is silicates, which protect aluminum from corrosion.
As a rule, antifreeze is sold in the form of a concentrate, which must be diluted with distilled water in a ratio of 50:50 before filling. And when using a car at a temperature below minus 40 ° C, in a ratio of 60:40.
Preliminarily (before pouring into the cooling system), antifreeze must be diluted with distilled water).
The most popular today are antifreezes of the G11 standard and G12 / G13 standard groups. In fact, the designations G11, G12, G12+, G12++ and G13 are trade names for VW antifreeze standards TL 774-C, TL 774-F, TL 774-G and TL 774-J. Each of these standards imposes strict requirements on the composition of the product, as well as on the totality of its properties.
G11 (VW TL 774-C) - blue-green coolant (color may vary depending on the manufacturer). The shelf life of this antifreeze does not exceed 3 years.
Red antifreeze G12 is a development of the G11 standard. This made it possible, first of all, to increase the recommended service life up to 5 years. G12 + and G12 ++ antifreezes are quite different from regular G12 in their composition and properties. Antifreezes of these standards have a red-purple-pink color, and also have a long shelf life; however, unlike G12, they are much less aggressive, more environmentally friendly and can be mixed with blue G11. Mixing G11 and G12 is strongly discouraged. A further development was the standard antifreeze G13. They also come in lilac pink and are fully backwards compatible.
When to change the coolant
It all depends not on the brand and recommendations of the car manufacturer, but on the antifreeze used and the condition (age) of the car.
If you use G11 antifreeze, you need to replace it every 2 years, or 30-40 thousand kilometers.
If G12, G12+, G12++ are flooded, then the replacement must be brought to mind after 5 years or 200 thousand kilometers.
Personally, I use G12 ++ and change it every 4 years or 100 thousand kilometers.
But, to be honest, 100 thousand km. I never rode. Four years have passed faster than I could reach such a mileage.
Also in life there may be cases when you yourself make adjustments to the timing of replacement and the antifreeze used. Let me give you two examples from my life.
Firstly, there was a war in our country, and even grocery stores stopped working. Therefore, it was generally possible to forget about auto parts stores. The mail didn't work either. So I had to buy a can of Green Felix from local street vendors. At the first opportunity, I later tried to change it to the usual red G12 ++. But in its two years, this "bright green" has served well.
The second plug flowed into the cooling jacket in the cylinder head. Naturally, the oil mixed with antifreeze and had to be replaced much earlier.
And most importantly - do not exceed the replacement intervals. Old coolant actively corrodes the cylinder head, pump, fitting and other elements of the cooling system.
How much coolant does the Lacetti have
For 1,4 / 1,6 engines, this is 7,2 liters
For 1,8 / 2,0 engines, this is 7,4 liters.
If HBO is installed in the car, the volume will be higher.
What is needed to replace the coolant
To replace the coolant, we need:
- Screwdriver
- Concentrated antifreeze or ready-to-use antifreeze
- Distilled water (about 15 liters)
- Container for draining used coolant. It is highly desirable to use a container with scrolling slices. I use a 10 liter jar of primer for this.
- rubber or silicone hose with a diameter of 10 mm.
- For the convenience of work, a viewing hole or overpass is required. But not absolutely necessary.
If you change the coolant without an inspection trench or overpass, then you need low power and a 12mm key.
Replacing the coolant
Note! Change the vehicle coolant at an engine temperature not exceeding +40°C to avoid burns.
Open the expansion tank cap to depressurize the system and close it again!
We take a container for draining the remaining liquid, a rubber tube, a screwdriver and a head for the car.
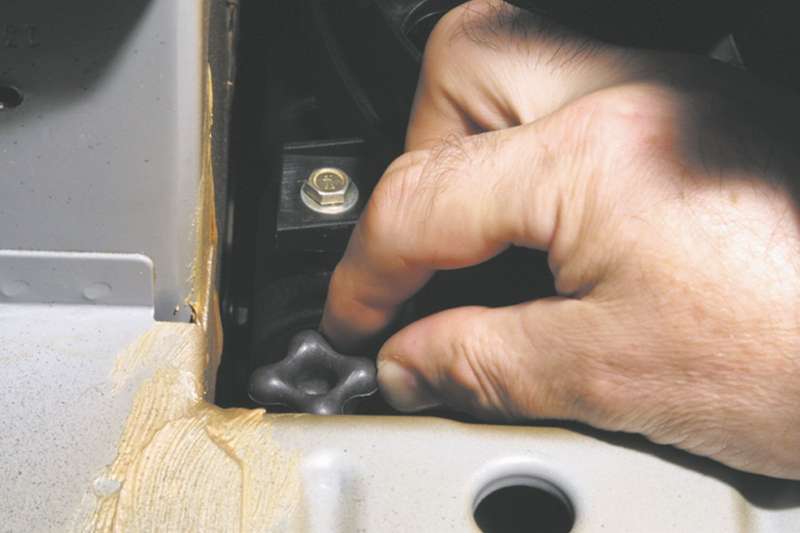
We unscrew the five screws of the motor protection and remove the protection.
From the lower end of the radiator, slightly to the right of the center (if you look in the direction of travel), we find a drain fitting and attach a tube to it. It cannot be worn, but it will shed less liquid. We direct the other end of the tube into a container to drain the liquid.
It is more convenient to use transparent silicone hose
Loosen the radiator drain plug a few turns using a flathead screwdriver. Just not much, otherwise it can fly off under the pressure of the liquid!
Now open the filler cap again. After that, the waste fluid should begin to flow faster from the drain fitting. The leak will take a long time, so for now you can vacuum the interior and wash the rugs
We wait until the liquid begins to flow out less intensively.
We unscrew the cap of the expansion tank and disconnect the hose from the tank that goes to the throttle assembly. We close the fitting on the tank with your finger and blow into the hose with your mouth
Then the liquid will come out faster and in a larger volume (i.e. it will remain less in the system)
When only air comes out, we can say that we have drained the used antifreeze.
We twist the radiator drain fitting back into place and connect the hose back to the expansion tank we removed.
If the coolant level in your car was at a minimum, then you need to drain about 6 liters
If the tank was at the MAX mark, more liquid will naturally merge.
The main thing is that it is poured into the system and merges. If it fits less, then somewhere there is a cork or other problems in the form of blockages.
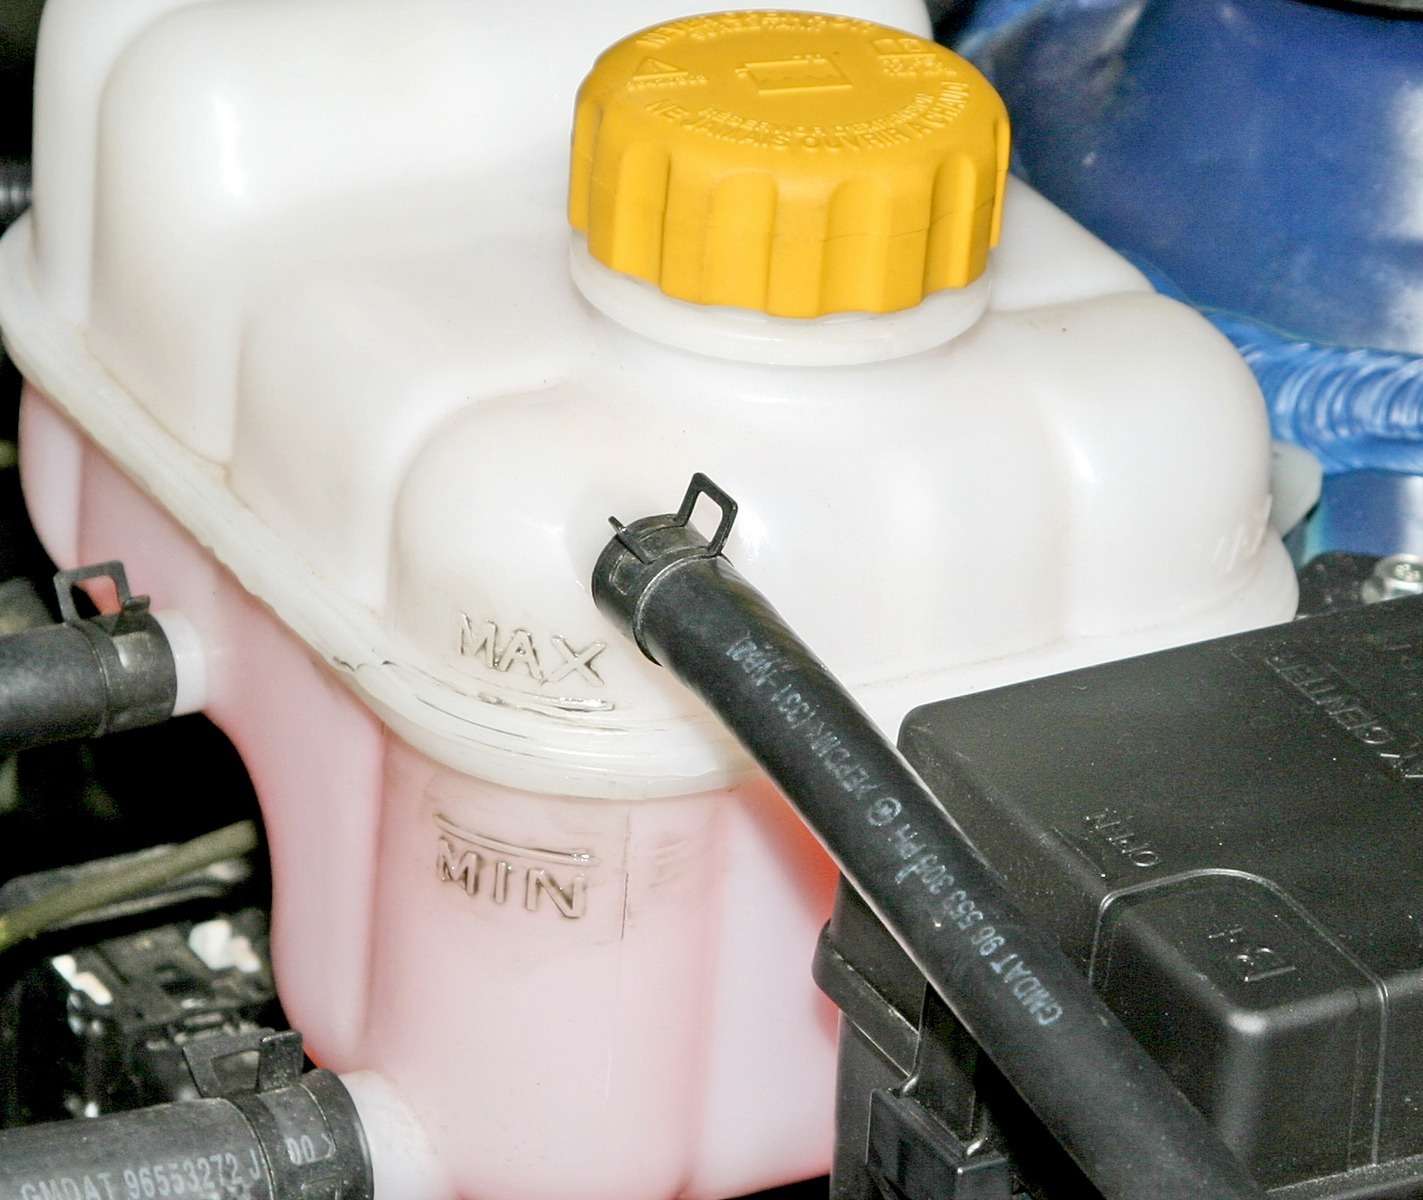
Pour distilled water into the tank
We start and warm up the engine to operating temperature.
Maintain engine speed at about 1 rpm for 3000 minute.
Set the cabin heating control to the red zone (maximum heating). We turn on the heater fan and check if hot air comes out. This means that fluid circulates normally through the heater core.
Note. In modern cars, there is no tap on the heating radiator. The temperature is controlled exclusively by the air flow dampers. And in the radiator, the liquid constantly circulates. Therefore, it is necessary to turn on the heating to the maximum only in order to make sure that there are no plugs in the heater core and that it is not clogged. And not "put antifreeze on the stove."
Again, we carry out all the manipulations to drain the liquid and drain the water.
If the water is very dirty, it is better to rinse again.
It is also very convenient to wash the expansion tank.
Expansion tank Lacetti
As soon as after washing the water has left the tank, you can immediately disassemble it so as not to waste time. While the rest of the water is draining, you can easily rinse the tank.
To do this, use pliers to rearrange the quick-release clamps on the tank and disconnect the hoses
There are only three hoses. We disconnect them and with a 10mm wrench we unscrew the two nuts that hold the tank.
Then, with effort, lift the tank up and remove it.
Here are the tank mounts
The mounting bolts are circled, and the arrow shows the bracket on which the tank sits firmly.
We wash the tank. In this, I am helped by means for washing plumbing (toilet bowls, etc.). In especially dirty cases, when oil has got into the coolant, I will have to wash it with more aggressive means, up to gasoline.
We install the tank in its place.
Note. Do not lubricate the tank fittings with any lubricant. Better yet, degrease them. The fact is that in the cooling system the pressure is higher than atmospheric and the hoses can fly out of the lubricated or simply oiled fittings and the clamps will not hold them. And a sharp leak of coolant can have sad consequences.
How to choose and dilute antifreeze concentrate
The choice of antifreeze consists of two basic rules.
First of all, choose trusted manufacturers. For example, DynaPower, Aral, Rowe, LUXE Red Line, etc.
Secondly, the expiration date must be indicated on the package. In addition, it must be engraved or applied to the bottle itself, and not to the attached label. It makes no sense to take G12 antifreeze, which expires in two years.
Also on the label should be clearly indicated the proportions of dilution of the concentrate with distilled water.
Here is an example. At the bottom of the bottle is the production date and expiration date until February 2023.
And a plate for diluting the concentrate, understandable even to those who cannot read
If you dilute the concentrate by half with water, you get an antifreeze with a frost resistance of 37 degrees Celsius. I do. As a result, I get 10 liters of ready-made antifreeze at the output.
Now pour new coolant into the expansion tank, remembering to tighten the drain fitting on the radiator.
We start and warm up the engine. We keep the speed at about 3000 rpm for one minute. We make sure that the coolant level does not fall below the “MIN” mark.
Record the replacement date and odometer reading.
After the first ride, add antifreeze until it is just above the "MIN" mark.
Attention! The level must be checked and topped up when the engine is cold!
After the engine has cooled down, check the coolant level in the reservoir and top up.
Leaking drain plug on radiator
If the drain fitting no longer tightly closes the drain hole, do not rush to buy a new radiator.
Unscrew the accessory completely. Has a rubber o-ring
You must remove it and go to a hardware or plumbing store. There are usually a huge selection of such things and they can be picked up. The cost will be a penny, unlike a new radiator.
Flushing the cooling system
Now about alternative ways to bleed the cooling system. In addition to distilled water, three other methods are popular:
1. A special chemical that is sold in shops and markets. Personally, I don't risk it because I've seen enough. The most recent case - a neighbor washed the Vazovsky spot. Outcome: the internal heater stopped heating. Now you need to get to the heater core. And who knows, knows what it's worth...
2. Rinse with straight-through tap water. Those hose from the water supply are lowered directly into the expansion tank, and the drain fitting on the radiator is left open, and the water passes through the cooling system with traction. I don't support this method either. First, water follows the path of least resistance and will not flush the entire system equally. And secondly, we have absolutely no control over what enters the cooling system. Here is an example of a simple coarse filter in front of my counter
If at least one of them gets into the system, the pump may jam. And this is an almost guaranteed breakage of the timing belt ...
3. Washing with citric acid and other popular methods. See point one.
So my personal opinion is that it is better to shorten the antifreeze replacement interval than to engage in dubious activities.
How to drain all the coolant completely
Yes, in fact, some used antifreeze may remain in the cooling system. To drain it, you can put the car on a slope, disconnect the hoses, blow it with air and perform other manipulations.
The only question is WHY? Personally, I do not understand the point of spending so much time and effort collecting all the drops. Yes, and again, it is better not to touch the hose connections, otherwise 50/50 will flow.
We also flush the system and the antifreeze will no longer be used, but a highly diluted antifreeze with distilled water will be used. Diluted 10-15 times. And if you wash it twice, only the smell remains. Or maybe it won't
When I put the level back in the expansion tank, it takes me about 6,8 liters of antifreeze.
Therefore, it is better to spend this time communicating with family and children than to spend it on an event with dubious benefits.
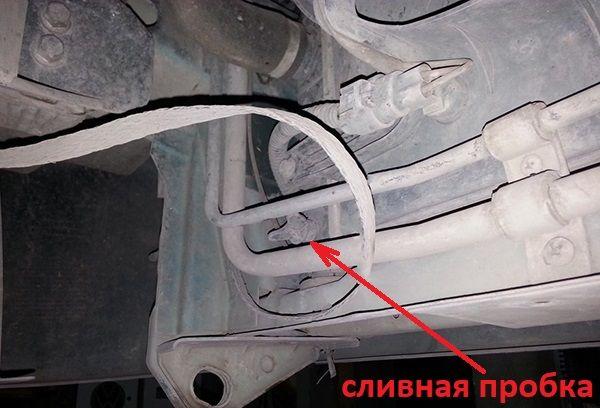
Replacing the coolant without an inspection ditch and overpass
Is it possible to replace antifreeze like this? Of course it is possible and even easier.
Under the radiator, you need to put a low container (for example, a container). Open the hood and you will see the drain plug
Now it remains only to take the 12mm key and unscrew the plug. All other procedures are carried out in the same way as described above.
This method works well for those with only one cooling fan installed, like me. If you have two fans, getting to the cork will be more difficult.