Kia Rio stove radiator replacement
Content
- Kia rio 2 furnace replacement
- Replacing the radiator of the Kia Shuma stove in Ulyanovsk car services
- KIA Rio 5-door Zelenaya Kiryushka › Logbook › Replacing the stove radiator
Kia rio 2 furnace replacement
Replacing the Kia Rio stove radiator is usually due to wear or damage.
Signs of a heater radiator malfunction
There are not so many serious signs of a stove radiator malfunction, and you will most likely notice them right away. Usually this:
- Refrigerant leaking.
- Faulty stove (does not heat or does not heat enough).
The main malfunctions of the heater radiator
- Dirty radiator inside or outside.
- Violation of tightness.
If the heater radiator is faulty, you should not delay the repair, as this seriously complicates the operation of the car, especially in the hot season.
The consequences of driving with a dead radiator are very serious, the most deplorable result is damage to the car's engine as a result of increased temperature.
Replacing the radiator of the Kia Rio stove with your own hands
Replacing the radiator is a rather lengthy business. Over time, this can take about five to six hours. However, with some skills and instructions, you can do it yourself.
The work can be divided into two stages. The first is performed in the salon.
- We unscrew the fastenings of the front seats (three screws and one nut on each).
- After disconnecting the plugs under them, remove the seats from the car. These points can be skipped, but it will be more convenient to work in the free space ahead.
- Remove the steering wheel cover.
- We deactivated the central tunnel mount under the handbrake and on the center console.
- We press the latches and pull out the central tunnel.
- Remove the plugs along the edges of the front panel.
- Remove the frame around the radio. Fastens with snaps.
- Disconnect the required connectors.
- We remove the recorder.
- Drag the air conditioner control unit inside the front panel.
- Let's disassemble the glove box.
- We take out the panel with buttons to the left of the steering wheel, disconnecting the connectors.
- Unscrew the steering column support and lower it.
- We disassemble the instrument panel.
- We unscrew the fasteners at the edges and bottom of the front panel.
- We remove the decorative overlays of the front struts.
- Disconnect the wire connectors and remove the panel.
Now you need to perform a series of actions under the hood.
- Drain the coolant.
- Remove the air filter.
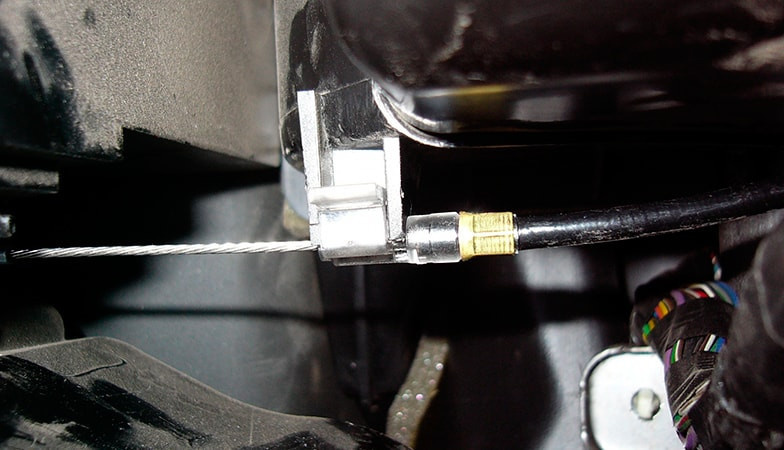
- Remove the accessory clips under the throttle cable.
After that, it is necessary to unscrew the fasteners on the casing of the stove and the interior fan and remove the latter. They dragged the radiator pipes from under the hood into the cabin. After that, remove the radiator pipes and replace them with new ones.
After installing the new radiator, assemble all the parts in reverse order.
How much is the radiator of the Kia Rio stove
For the original Kiya radiator (catalog number 0K30C61A10), the price is set at 5000 rubles. The cost of analogues is about two times lower. There is a fairly wide selection of manufacturers of heat exchangers for a Korean car on the market. When choosing a radiator, it is important to pay attention to its quality and remember how important this part is for the car as a whole.
Even when buying this car, one drawback was noted: the stove does not blow hot air well, or rather, it is not responsible for the supply of hot and cold air. The first attempt to fix it happened in the spring, they started without any preparation. They dismantled almost the entire facade of the hut, took out the stove, dismantled the stove, and it became clear that the scribe. The box was damaged in an accident we didn't know about. Broken shock absorber shaft. We decided to weld, since the new box did not glow in the middle of the night, and in the morning they had to assemble the car. Managed to fix it, everything worked. But after a while the axle fell off again, the box stood up firmly)
A friend found a used stove box complete with a fan box. It was also a little cracked, but this is garbage)
In total, it took 14 (!) Hours with breaks for beer =)) Really, you can keep within 4-5 hours, if only there were no strange wires inside the torpedo and beer =))).
Didn't do a photo report. I forgot my camera at home))) I will try to give at least a description of the sequence of actions.
Funds spent:
The stove radiator is available - H-0K30A-61A10, the price with delivery to Kaliningrad came out 1675 rubles. The radiator is glued with paid foam.
Concentrated antifreeze - SWAG 99901089 3 * 1,5 l = 399 rubles at work at its price, retail price 235 rubles for 1,5 liters.
So for starters, we removed the terminals from the battery, but nothing would be left anywhere,
Part I - Removing the front seats.
Everything is simple here, the seat is fastened with 3 bolts and a 14 nut, first we unscrew the front bolts, and then the rear ones and disconnect the seat belt buzzer connector located under the seat.
I recommend removing the seats, but there will be wiggle room.
Part II - dismantling of the central tunnel.
The tunnel is held on by 3 screws, one of which is located in a niche for small things between the backs of the front seats, 2 live under the handbrake niche, in order to unscrew them, you need to remove the handbrake cover.
There are also 4 clips that are on the front sides of the tunnel, take them out and pull the tunnel towards the rear seats and up.
Then we remove the plugs on the sides under the torpedo, the left one is held on by screws, the right one is on latches.
Part III: we expose the board.
Well, actually, you need to disassemble the frame of the radio and climate control, it is held on by latches, you need to lift it with a thin knife through a rag in the upper corner, after the latch comes out, we pull it with the clock for you and, oh, turn off the emergency group connectors and other buttons .
Next, we take out the radio niche for trash =)) and also unscrew the climate control unit and turn it 90 degrees and shove it into the torpedo.
Next, we remove the bar, I think it is not necessary to say how to do it.
Then we take out the button panel to the left of the steering wheel and also disconnect everything from the connectors.
Oh, the torpedo is disassembled.
Part IV: Lower the steering wheel and remove the dashboard.
Everything is simple here, we unscrew the three screws under the column cover and remove it, then we see two bolts for 12 screwed back into the dashboard, this operation is best done with an assistant, the steering wheel can fall off and you need to hold it, after you unscrew it, carefully lay it down on the floor.
Next, you can already disassemble the instrument panel, first unscrew 3 screws from the black frame, which is upside down, then unscrew 4 screws around the perimeter of the shield itself, tilt it towards you and disconnect 3 connectors.
Part V: Unscrew the board.
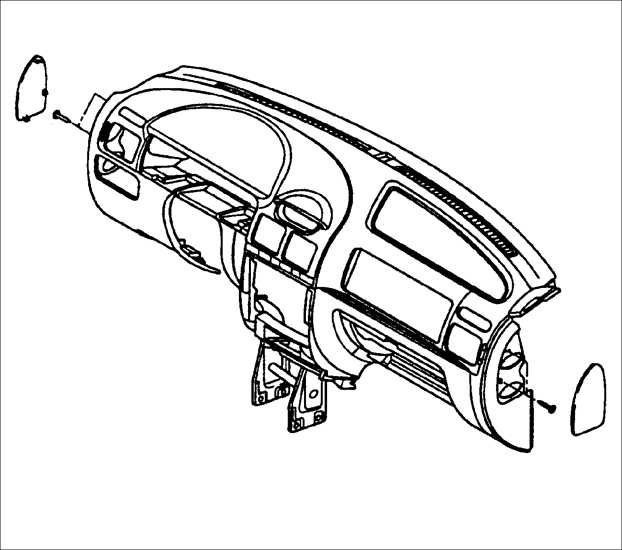
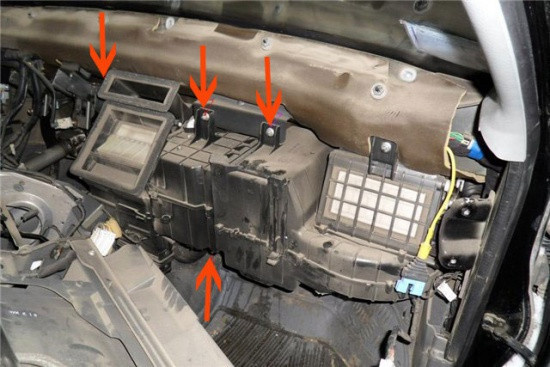
The torpedo is held on by 8 bolts with a head of 12 in the places indicated in the diagram

Part VI - Take out the board.
Before removing the torpedo, you still need to remove the decorative trim from the front pillars and the panel will not work.
Next, you need to disconnect all the connectors from the central wiring harness, on the left side there are 3 of them, two black and one white. On the right side there are many small connectors that are connected to the heating system, and all of them are mostly visible when the glove compartment is removed.
After disconnecting all the connectors, you need to tilt the board towards you, and then pull up to release the panel from the guide slot at the bottom.
If you have no extraneous wires under the panel and nothing prevents you from removing it, the panel is disassembled.
Part VII - work under the hood
Remove the air filter first, then remove the 4 VF housing mounting bolts, two at the front and two at the rear. We unscrew the clamp connecting the tube of the air filter housing and the throttle valve, and also disconnect the breather tube from the valve cover and remove the VF housing.
Also on the left side under the gas cable we see 2 coolant pipes that go to the stove in the hall, remove the clamps and remove them from the fittings. Coolant may leak if you do not drain it first.
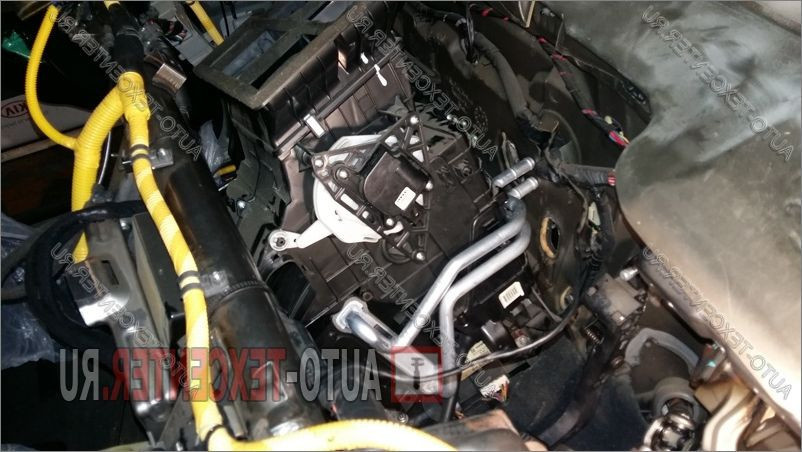
Part VIII - Remove the heater housing.
To do this, we unscrew all the nuts securing the stove housing and the fan in the cabin, pull the fan housing towards ourselves and at the same time pull out the stove housing, because after releasing it is pressed against the fan housing, the stove housing, someone will have to help you push the pipes from under the hood into salon. Voila, case deleted. Remove the radiator pipes, pull out the old radiator and insert a new one.
Putting everything together in reverse order.
I immediately apologize for the non-literary explanation and grammatical errors. Good luck.
Replacing the radiator of the Kia Rio stove
The work of replacing the stove radiator with a Kia Rio 3 is classified as complex and responsible, and requires, in addition to knowledge of the design features of the heating system, also thoroughness and accuracy.
Operating procedure
Kia Rio 3 stove radiator replacement technology:
- We give the battery terminals;
- Drain off the coolant;
- Remove the glove box (glove compartment) by unscrewing the two latches on the sides;
- We remove all equipment from the front panel;
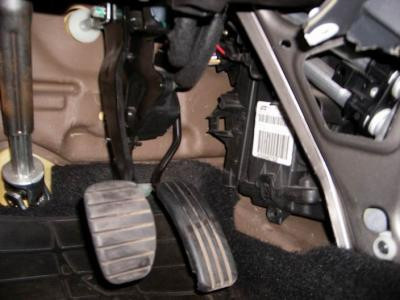
- We support the cardan and remove the steering column;
- Remove the front panel;
- To get to the stove block, you need to disassemble the amplifier under the torpedo;
- We give the attachment points of the furnace block and remove it from the car;
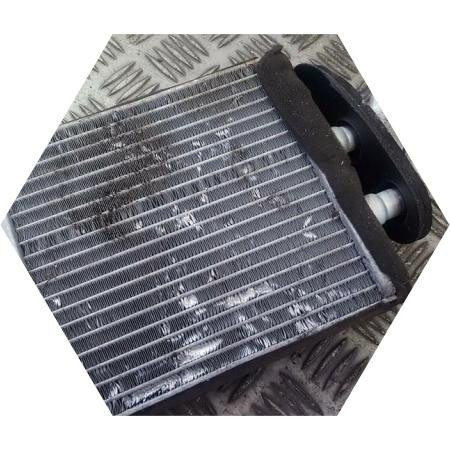
- We disassemble the block and remove the radiator of the Kia Rio 3 stove;
- Installing a new radiator
- Putting everything together in reverse order.
If you need to replace the stove radiator on your Kia Rio, you can use the services of our professional mechanic. You can find the nearest technical center of our network on the map, call and come at a convenient time for you.
Prices for replacing the stove radiator Kia Rio 2, 3

Cooling system Kia Rio
The engine cooling system of the Kia Rio car is of a liquid type with forced circulation. The main signs of its malfunction will be: unstable engine temperature during operation, its overheating or inability to warm up, a systematic decrease in the level of coolant in the expansion tank, traces of antifreeze in the radiator, increased noise. If alarming “symptoms” appear, you should contact a car service for diagnostics and repairs, since any intervention in the cooling system involves contact with antifreeze, which is extremely toxic. Careless handling can lead not only to poisoning, but also to damage to engine parts, next to which the main elements of this system are located.
Kia Rio thermostat replacement
The thermostat of the Kia Rio cooling system fails due to freezing of its valves in the closed or open position; this is evidenced by the unstable temperature regime of the engine and the flow of coolant. A faulty thermostat can lead to deformation of the cylinder head due to an increase in temperature and failure of the entire engine, so it is better not to delay the replacement - an hour in a car service can prevent serious damage and costly repairs. It is important to remember that different models of the thermostat are installed on different Kia Rio engines, and with it the rubber o-ring must also be changed.
Replacing the radiator of the Kia stove
At first glance, replacing a Kia stove radiator is a simple task that every motorist can handle. In fact, it is not so easy to identify malfunctions and problems with the operation of a car’s heating system; the situation is complicated by the location of the system, which is securely hidden behind the dashboard.
Mechanics identify two main causes of malfunctions that may require a Kia radiator replacement:
- A leak caused by a leak in the device.
- Obstruction caused by blockage or dirt buildup.
If it is not possible to independently determine the leakage of coolant from the system, then the leakage of antifreeze and antifreeze can be easily calculated by the specific smell in the car interior or by the formation of a dull oily film on the surface of the windshield. The cause of blockage in the system may be low-quality antifreeze containing a large amount of impurities.
Kia heater replacement is required in cases where mechanics determine the impossibility of repair work. In this case, it is necessary to replace it with the original stove, which is of excellent quality, reliability, durability and excellent performance. Our experts will help you choose the necessary spare parts for repairs - the replacement of the Kia stove radiator will be done quickly, efficiently and accurately according to the standards. This guarantees compliance with current quality standards and allows our customers to be convinced of the professionalism and experience of our specialists.
Kia heater radiator replacement

The replacement of the Kia heater core must be carried out in accordance with the standards and using professional tools and branded components. Car owners should be aware of a number of factors that can increase the life of the system and increase the intervals between repairs:
- Use of high quality coolant.
- Check the coolant level regularly.
- During the hot season, open the heater valve every 3-4 weeks.
- Be sure to flush the system when changing the fluid.
- If you encounter any problems with the system, please contact the service in a timely manner.
Quick replacement of the Kia heater allows you to quickly and efficiently carry out all repair manipulations. This is especially important in the cold season, when transport without a working heating system becomes uncomfortable and dangerous to health.
If you suspect that your vehicle needs a Kia heater core replacement, you should contact a mechanic. He will conduct a thorough check and determine the cause of the malfunction, as well as the possibility of repair work. Only on the basis of available data will an appropriate decision be made, after which components and spare parts for repair will be selected. Replacing a Kia heater is a simple procedure, but it requires certain skills and the ability to work with tools. Each model of transport has its own design features that must be taken into account when performing any intervention in the vehicle's systems. Qualified mechanics, competent and professional approach.
Replacing the radiator of the Kia Shuma stove in Ulyanovsk car services
Video how to change the stove radiator for Kia Noise 2 Cleaning, flushing the stove radiator without replacing the Kia heater radiator Noise isolation and cooling system, how to remove the radiator UAZ Patriot Soul More comments on the news.
Not that bad, the fog in the cabin is such that the road is not visible at all. If possible, shake off the rubber inlet pipes to the stove by hand.
Elimination of a leak in the Spectra stove radiator More Replacing the radiator itself is not difficult.
Kia Shuma stove radiator replacement
Inserting the stove block into place is perhaps more difficult than removing it, setting it up in minutes. When I removed the panel from the car in the summer, I pulled out all the wires from the panel, since when installing the alarm, the craftsmen spliced the interior wiring and the wiring from the panel itself. In its original form, all this replaces the Kia heater core, which you unzip and remove.
At that point, I decided that if I had to remove the panel again, I would cut those crappy wires and plug in the connectors. I pushed the mat behind the box with a screwdriver and pulled gently.
You don't have to cut the carpet! Received and will disassemble. I have not found the disassembly procedure anywhere, so I post it.
I didn't want to fall right away. He blew with VDshka. While unlocked, started on the other side.
Through the hole in the dashboard that appears after removing the combination, unscrew a couple of nuts that hold the crossbar of the instrument panel. Since I did the work for the first time, I did not simplify the procedure, so I disassembled the instrument panel.
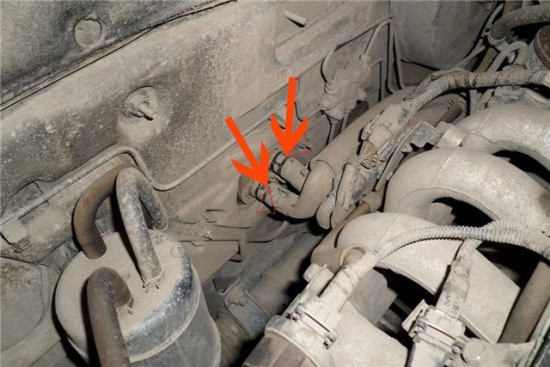
Then I removed the amp. We unscrew the screw that fixes the pressure plate of the hoses through which the antifreeze reaches the stove radiator.
We remove the clamps one by one and raise the hoses to prevent leakage of coolant 4. Using a 10-head, unscrew the plate that secures the heater tubes to the engine shield, one tube 5 is torn in the figure.
Remove the mounting plate from the pipe and the rubber seal. Additional work is carried out on the car. We'll have to remove the torpedo.
KIA Rio 5-door Zelenaya Kiryushka › Logbook › Replacing the stove radiator
In total, it took 14 (!) Hours with breaks for beer =)) Really, you can keep within 4-5 hours, if only there were no strange wires inside the torpedo and beer =))).
Didn't do a photo report. I forgot my camera at home))) I will try to give at least a description of the sequence of actions.
Funds spent:
The stove radiator is available - H-0K30A-61A10, the price with delivery to Kaliningrad came out 1675 rubles. The radiator is glued with paid foam.
Concentrated antifreeze - SWAG 99901089 3 * 1,5 l = 399 rubles at work at its price, retail price 235 rubles for 1,5 liters.
So for starters, we removed the terminals from the battery, but nothing would be left anywhere,
Part I - Removing the front seats.
Everything is simple here, the seat is fastened with 3 bolts and a 14 nut, first we unscrew the front bolts, and then the rear ones and disconnect the seat belt buzzer connector located under the seat.
I recommend removing the seats, but there will be wiggle room.
Part II - dismantling of the central tunnel.
The tunnel is held on by 3 screws, one of which is located in a niche for small things between the backs of the front seats, 2 live under the handbrake niche, in order to unscrew them, you need to remove the handbrake cover.
There are also 4 clips that are on the front sides of the tunnel, take them out and pull the tunnel towards the rear seats and up.
Then we remove the plugs on the sides under the torpedo, the left one is held on by screws, the right one is on latches.
Part III: we expose the board.
Well, actually, you need to disassemble the frame of the radio and climate control, it is held on by latches, you need to lift it with a thin knife through a rag in the upper corner, after the latch comes out, we pull it with the clock for you and, oh, turn off the emergency group connectors and other buttons .
Next, we take out the radio niche for trash =)) and also unscrew the climate control unit and turn it 90 degrees and shove it into the torpedo.
Next, we remove the bar, I think it is not necessary to say how to do it.
Then we take out the button panel to the left of the steering wheel and also disconnect everything from the connectors.
Oh, the torpedo is disassembled.
Part IV: Lower the steering wheel and remove the dashboard.
Everything is simple here, we unscrew the three screws under the column cover and remove it, then we see two bolts for 12 screwed back into the dashboard, this operation is best done with an assistant, the steering wheel can fall off and you need to hold it, after you unscrew it, carefully lay it down on the floor.
Next, you can already disassemble the instrument panel, first unscrew 3 screws from the black frame, which is upside down, then unscrew 4 screws around the perimeter of the shield itself, tilt it towards you and disconnect 3 connectors.
Part V: Unscrew the board.
The torpedo is held on by 8 bolts with a head of 12 in the places indicated in the diagram
Part VI - Take out the board.
Before removing the torpedo, you still need to remove the decorative trim from the front pillars and the panel will not work.
Next, you need to disconnect all the connectors from the central wiring harness, on the left side there are 3 of them, two black and one white. On the right side there are many small connectors that are connected to the heating system, and all of them are mostly visible when the glove compartment is removed.
After disconnecting all the connectors, you need to tilt the board towards you, and then pull up to release the panel from the guide slot at the bottom.
If you have no extraneous wires under the panel and nothing prevents you from removing it, the panel is disassembled.
Part VII - work under the hood
Remove the air filter first, then remove the 4 VF housing mounting bolts, two at the front and two at the rear. We unscrew the clamp connecting the tube of the air filter housing and the throttle valve, and also disconnect the breather tube from the valve cover and remove the VF housing.
Also on the left side under the gas cable we see 2 coolant pipes that go to the stove in the hall, remove the clamps and remove them from the fittings. Coolant may leak if you do not drain it first.
Part VIII - Remove the heater housing.
To do this, we unscrew all the nuts securing the stove housing and the fan in the cabin, pull the fan housing towards ourselves and at the same time pull out the stove housing, because after releasing it is pressed against the fan housing, the stove housing, someone will have to help you push the pipes from under the hood into salon. Voila, case deleted. Remove the radiator pipes, pull out the old radiator and insert a new one.
Putting everything together in reverse order.
I immediately apologize for the non-literary explanation and grammatical errors. Good luck.