Replacing timing belts and injection pump on Audi A6 2.5 TDI V6
Content
This article will discuss how to replace the timing belt and injection pump belt. "Patient" - Audi A6 2.5 TDI V6 2001 automatic transmission, (eng. AKE). The sequence of work described in the article is suitable for replacing the timing belt and high-pressure fuel pump with ICE AKN; AFB; AYM; A.K.E.; BCZ; BAU; BDH; BDG; bfc. Discrepancies can occur when working with cars of different years of manufacture, but most often discrepancies appear when working with body parts.
| Kit for replacing timing belts and injection pump Audi A6 | |||
|---|---|---|---|
| Manufacturer | Name | Catalogue number | Price, rub.) |
| Wahler | Thermostat | 427487D | 680 |
| Elring | Shaft oil seal (2 pcs.) | 325155 | 100 |
| INA | Tension roller | 531030710 | 1340 |
| INA | Tension roller | 532016010 | 660 |
| Ruville | Guide roller | 55701 | 1100 |
| DAYCO extension | V-ribbed belt | 4PK1238 | 240 |
| Gates | Ribbed belt | 6PK2403 | 1030 |
The average cost of parts is indicated as of prices for the summer of 2017 for Moscow and the region.
list of tools:
Support -3036
Latch -T40011
Double-arm puller -T40001
Fixing bolt -3242
Nozzle 22 - 3078
Camshaft locking tool -3458
Locking device for diesel injection pump -3359
basic workflow
We start, first of all, the upper and lower protection of the internal combustion engine is removed, as well as the air filter duct, do not forget about the intercooler pipes coming from the intercooler radiator. After that, the fastening of the front engine cushion is removed from the intercooler pipe.
We begin to remove the bolts securing the air conditioner radiator, the radiator itself must be taken to the side, it is not necessary to disconnect from the mains... We unscrew the bolts securing the automatic transmission oil lines, move the lines towards the sternum of the body. Disconnect the cooling system pipes, the coolant must be drained, do not forget to find the container in advance. The electrical connectors and chips must be disconnected from the headlights, the cable must be removed from the bonnet lock.
The front panel bolts must be unscrewed and removed along with the radiator. The radiator does not need to be put in the service position, as the work to be done will require you to have as much free space as possible. That is precisely why it is advisable to spend 15 minutes draining the coolant, as well as removing the radiator assembly with the headlights.
We start work on the right side of the internal combustion engine, remove the air intake duct that leads to the air filter.
Now we disconnect the flowmeter connector and remove the air filter cover.
The air duct is removed between the intercooler and the turbocharger.
The fuel filter can be removed without disconnecting the hoses and sensor mounting blocks, they just need to be taken to the side. We release access to the camshaft plug of the right cylinder head.
We begin to remove the plug at the rear of the right camshaft.
When removing, the plug will collapse, remove the plug carefully, try not to spoil the sealing edge of the landing (arrow).
In the event that it is not possible to purchase a new plug, you can align the old one. Apply good sealant on both sides.
Go to the left side, it must be removed from it: vacuum pump, expansion tank.
Do not forget to set the third cylinder piston to TDC... This is done as follows: first we check if the "OT" mark on the camshaft is aligned with the center of the oil filler neck.
We also remove one plug, and install the crankshaft retainer.
Do not forget to check whether the plug hole is aligned with the TDC hole on the crankshaft web.
Replacing the injection pump belt
We proceed to the removal of the injection pump belt. Before removing the belt, you will need to remove: the upper timing belt cover, viscous coupling and fan.
also a ribbed belt for driving attachments, a ribbed belt for driving an air conditioner.
The ancillary drive belt cover is also removable.
We proceed.
First of all, remove the injection pump drive damper.
Note that the damper hub center nut no need to weaken... Insert the retainer No. 3359 into the toothed pulley of the injection pump drive.
Using the # 3078 wrench, loosen the injection pump belt tensioner nut.
We take the hexagon and use it to remove the tensioner from the belt clockwise, after which the tensioner nut must be slightly tightened.
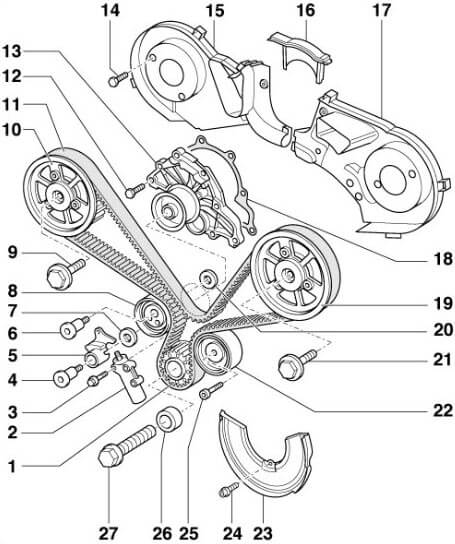
Timing Belt Removal Procedure
After the injection pump belt is removed, we begin to remove the timing belt. First of all, we unscrew the bolts of the left camshaft pulley.
After that, we dismantle the external drive pulley of the injection pump together with a belt. We carefully inspect the tensioner bushing, you need to make sure it is intact. A serviceable bushing rotates freely in the housing; backlash should be completely absent.
Teflon and rubber seals must be intact. Now we continue, you need to unscrew the crankshaft pulley bolts.
We remove the crankshaft pulley. The crankshaft center bolt does not need to be removed. The power steering and fan pulleys, as well as the lower timing belt cover, must be removed.
Using wrench # 3036, hold the camshaft and loosen the pulley bolts of both shafts.
We take an 8 mm hexagon and turn the tensioner roller, the tensioner roller must be turned clockwise until the holes in the tensioner body and the holes in the rod are aligned.
In order to avoid damage to the tensioner, you do not need to make great efforts, it is advisable to turn the roller slowly, in a hurry. We fix the rod with a finger with a diameter of 2 mm and start removing: the intermediate and tension rollers of the timing, as well as the timing belt.
After the injection pump and timing belt will be removed. Pay attention to the state of the water pump and thermostat.
As all the details are removed, we begin to clean them. We proceed to the second part, the reverse of the installation of the parts.
We start to install a new pump
It is advisable to apply sealant to the pump gasket before installation.
After we put the thermostat, the thermostat housing and the gasket should preferably be smeared with a sealant.
When installing, make sure that the thermostat valve is oriented at 12 o'clock.
We proceed to the installation of the timing belt; before installing, you need to make sure that the "OT" mark is located in the center of the oil filler neck.
After that, we check whether the latch No. 3242 is correctly installed.
Do not forget to check the correctness of the bars No. 3458.
In order to facilitate the installation of camshaft marks, it is better to use counter support No. 3036 for their rotation. As soon as all the marks are set, they need to be fixed with a puller No. T40001. Do not forget to remove the left pulley from the camshaft.
The rotation of the right camshaft sprocket should be checked on a tapered fit. If necessary, the bolt can be tightened by hand. We proceed to install the timing belt tensioner and intermediate roller.
The timing belt must be worn in the following sequence:
- Crankshaft,
- Right camshaft,
- Tension roller,
- Guide roller,
- Water pump.
The left branch of the belt should be put on the left camshaft pulley and set them together on the shaft. After tightening the center bolt of the left camshaft by hand. Now we check that the rotation of the pulley is on a tapered fit, there should be no distortions.
Using an 8 mm hexagon, you do not need to turn the tensioner roller a lot, you need to turn it clockwise.
The tensioner rod retainer can already be removed.
We remove the hexagon, and instead install a double-sided torque wrench. With this key, you need to turn the tensioner roller, you need to turn it counterclockwise with a torque of 15 Nm. That's it, now the key can be removed.
Using wrench # 3036, hold the camshaft, tighten the bolts to a torque of 75 - 80 Nm.
Now you can start assembling, we put the cover plate for fastening the mounted units of the ribbed belts, the fan. Before you start to install the cover plate, you need to fix the new tension roller of the high pressure fuel pump belt in the seat, tighten the fastening nut by hand.
Now the lower timing belt cover, power steering and fan pulleys are installed.
Before installing the crankshaft pulley, you need to align the tabs and grooves on the crankshaft gear. The crankshaft pulley bolts must be tightened to 22 Nm.
We proceed to the installation of the injection pump drive belt:
First of all, you need to check whether all the timing marks are correctly set. After we put all the rollers on the lid-plate.
Now, wielding a 6 mm hexagon, move the pump tensioner roller clockwise to the lower position, tighten the nut by hand.
That's it, we throw on the injection pump drive belt, it must be worn together with the left gear on the camshaft and pump pulleys. Remember to make sure the bolts are centered in the oval holes. If necessary, you will have to turn the gear. We tighten the fastening bolts by hand, check the absence of free rotation of the toothed pulley and distortions.
Using a wrench No. 3078, the nut of the tensioner of the high-pressure fuel pump drive belt is loosened.
We take the hexagon and turn the tensioner counterclockwise, until the marker is aligned with the benchmark. Then, tighten the tensioner nut (torque 37 Nm), the toothed pulley bolts (22 Nm).
We take out the clamps and slowly turn the crankshaft two turns clockwise. We insert the retainer No. 3242 into the crankshaft. It is advisable to immediately check the possibility of free installation of the strips and the injection pump retainer. also once we check the compatibility of the benchmark with the marker. If they are not aligned, then we adjust the tension of the injection pump belt also once. We begin to install the vacuum pump of the left camshaft, the end cap of the right camshaft and the plug of the engine block.
Install the pump damper for the injection pump drive.
Tighten the damper mounting bolts to 22 Nm. You do not need to immediately install the upper timing belt covers, but only if you plan to adjust the start of injection and a dynamic check using diagnostic equipment, if you are not going to perform this procedure, then the covers can be installed. We put the radiator and headlights in place, and connect all the electrical equipment.
We start the internal combustion engine, in order for air to come out.
Source: http://vwts.ru/forum/index.php?showtopic=163339&st=0
Audi A6 dashboard icons
- Oil change in automatic transmission Audi A6 C5
How much oil is in an Audi A6 engine?
- Audi A6 C5 Front Suspension Assembly Replacement
Audi A6 antifreeze quantity
How to replace the turn signal and emergency flasher relay on the Audi A6?
- Replacing the stove Audi A6 C5
- Replacing the fuel pump on the Audi A6 AGA
- Removing the starter Audi A6