Replacing the timing belt for VAZ 2113, VAZ 2114, VAZ 2115
Content
The timing belt synchronizes the engine. Without it, the car simply will not start, and if it works and the belt breaks, flies out, the engine immediately stalls. And if the engine bends the valves, then it will not only stop, but also bend the valves. True, this does not apply to 8-valve cars of the Samara-2 family. The strap must be changed, controlled and checked in time. Belt breakage, overhang and other problems depend on the quality of the belt and pump. We recommend that you always carry a new belt in the trunk with you, as replacement is a simple and short process. Such a prospect is much more pleasant than a breakdown away from home, a garage or a gas station. Only a tugboat or a crane will save you here.
Note!
You will need the following tools: wrenches, socket wrench “10”, mounting spatula (sold at an auto shop at an affordable price, but a thick and strong screwdriver will do instead), a special key for turning the tension roller (two thin drills and a screwdriver will do instead ), clamp with union heads.
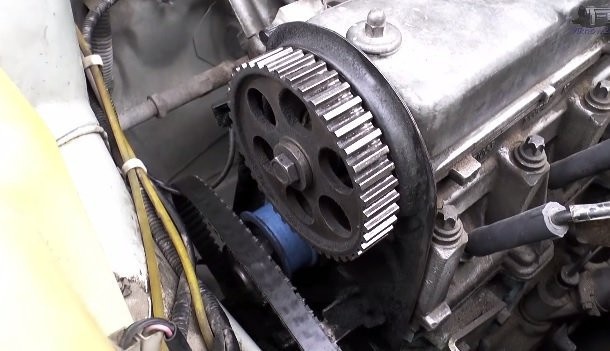
Timing belt location
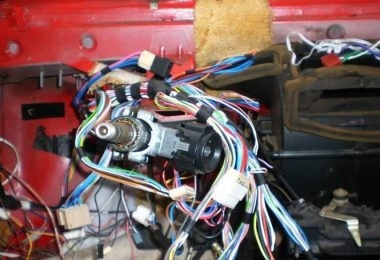
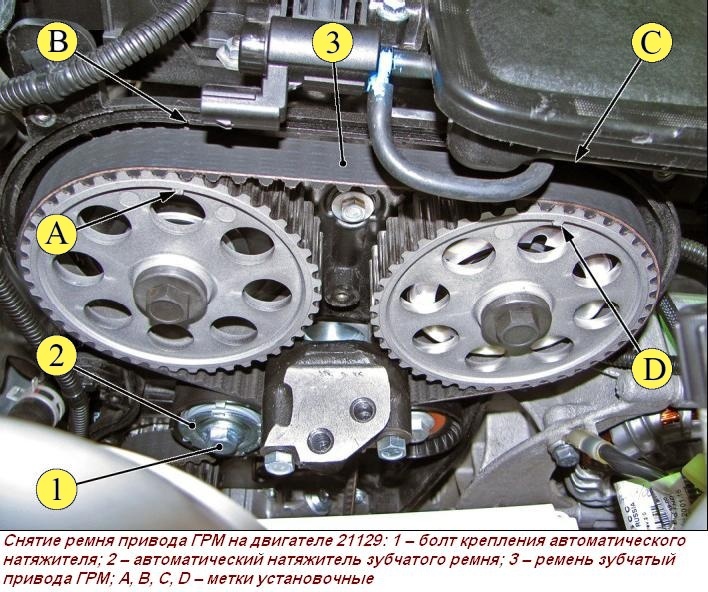
The belt is hidden under a cover of dirt and other debris. This cover is made of plastic and can be easily removed by unscrewing the fixing screws. After removing the cover, the entire timing mechanism will appear before your eyes (except for the pistons, their connecting rods, valves, etc., which are located in the cylinder block). Next, we publish a photo where the belt is clearly visible (indicated by the red arrow), and the camshaft pulley is indicated by the blue arrow, the pump is indicated by the green arrow, the tension roller (adjusts the belt tension) is indicated by the yellow arrow. Remember the details above.
When is it necessary to change the belt?
It is advisable to inspect it every 15-20 thousand kilometers. Visual signs of wear are obvious: traces of oil, wear marks on the toothed surface of the belt (attaches the pulleys and holds the belt), various cracks, wrinkles, rubber peeling and other defects. The manufacturer recommends changing every 60 km, but we do not recommend such long intervals.
Replacing the timing belt on the VAZ 2113-VAZ 2115
Withdrawal
1) First, remove the plastic cover that covers the strap, from dirt, all kinds of water and grease. The cover is removed as follows: take a wrench or ring wrench and unscrew the three screws that hold the cover (the screws are already unscrewed in the bottom photo). Two bolts are present on the side and hold the cover together, while one is in the middle. By unscrewing them, you can remove the engine cover from the car.
2) Now turn off the car by removing the negative battery terminal. Then remove the alternator belt; read the details in the article: “Replacing the alternator belt with a VAZ”. Set the piston of the fourth and first cylinders to TDC (TDC). Simply put, both pistons are perfectly straight, with no corners. The publication will be useful to you: "Installing the piston of the fourth cylinder at TDC on a car."
3) Then take the “13” key and use it to slightly loosen the tension roller mounting nut. Loosen until the roller begins to rotate. Then turn the roller by hand to loosen the belt. Grasp the belt and carefully remove it from the rollers and pulleys. You need to start from the top, from the camshaft pulley. It will not work to remove from all the pulleys, so we just throw off the belt from above.
4) Next, remove the right front wheel (removal instructions are available here: "Correct replacement of wheels on modern cars"). Now take a socket head or any other key that can be used to unscrew the bolt holding the generator drive pulley (the pulley is indicated by the red arrow).
Note!
The bolt is unscrewed with the help of a second person (assistant) and a mounting spatula (or a thick screwdriver with a straight blade). On the left side (in the direction of travel of the car) of the clutch housing, remove the plug marked in red. Then a spatula or screwdriver is inserted between the teeth of the flywheel (the teeth are marked in blue); the steering wheel cannot turn. We'll have to use force, the main thing is not to overdo it. Having unscrewed the bolt, remove the pulley and put it aside!
5) You now have excellent access to the crankshaft pulley and belt. At the last moment, the belt is removed from the lower pulley. Now it has been completely removed.
Note!
Although this does not apply to 8-valve cars of the Samara family, we will explain for general information: you are not used to shifting the camshaft and crankshaft pulleys with the belt removed. If not, then it knocks down the valve timing (they are easily set, you need to set the flywheel and pulley according to the marking). When turning the pulley, for example on an earlier 16 valve, the valve will converge with the piston group and they may bend a little.
Installation
1. It is carried out in the reverse order of removal from the sequence, taking into account some nuances:
- first of all, we recommend cleaning the rollers and the tension roller from dirt and various types of grease that accumulate over time;
- after cleaning, degrease the pulleys and the tension roller with white spirit;
- run the installation.
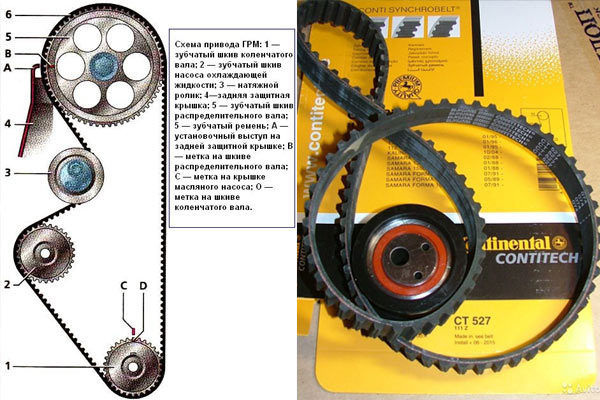
Install the belt first on the pulley from the bottom, going up. It will skew during dressing, so pull it with your hands and make sure it is straight and the pulleys are not skewed. After installation, make sure that the marks match, then proceed with the installation of the tension roller. Install the belt on the idler pulley (see photo 1), then slide down and install the alternator drive pulley in its place. Make sure the pulley hole labeled A matches the mounting sleeve labeled B in the second photo. If you have a torque wrench (a handy thing that allows you to tighten bolts and nuts to a certain torque without over-tightening them), tighten the bolt holding the alternator drive pulley. Tightening torque 99–110 N m (9,9–11,0 kgf m).
If it turns about 90° (photo 4), then the belt is adjusted correctly. If not, repeat the adjustment.
Note!
An overtightened belt will result in failure of the pulley, belt, and pump. A weak and poorly tensioned belt will jump off the pulley teeth when driving at high speeds and disrupt the valve timing; the engine will not work properly.
2. After installing the parts in place, be sure to check the coincidence of the marks and check the belt tension.
Additional video
A video on the topic of today's article is attached below, we recommend reading it.