Honda Civic Clutch Replacement
Content
To perform work on removing the crankcase and replacing the clutch kit, you will need the following list of tools:
- Wrenches and sockets, best in a set from 8mm to 19mm.
- Extension and ratchet.
- Install.
- Removable wrench for removing the ball joint.
- Head 32, for hub nut.
- A 10 head, thin-walled with 12 edges, will be needed to unscrew the clutch basket.
- Special wrench for draining gear oil.
- When installing, a centering mandrel for the clutch disc is required.
- Brackets for hanging the front of the car.
- Jack.
To replace, prepare in advance all the necessary spare parts and elements.
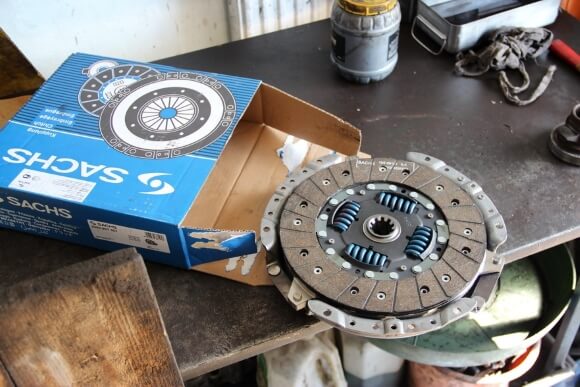
- New clutch kit.
- Transmission oil.
- Brake fluid for bleeding the clutch system.
- Fat "Litol".
- Universal grease WD-40.
- Clean rags and gloves.
Now a little about the procedure for replacing the clutch on a Honda Civic:
- Removing the transmission.
- Removing the installed clutch.
- Installing a new clutch.
- Release bearing replacement.
- Installation of the gearbox.
- Assembly of previously disassembled parts.
- Filled with new gear oil.
- Flushing the system.
Now let's take a closer look at all the points of the plan in order.
Dismantling the gearbox
To disassemble the box, you will need to disassemble some components and assemblies of the car. These include the battery, starter motor, clutch slave cylinder and transmission mounts. Drain the transmission oil from the system. Disable the vehicle speed and reverse sensors.
You also need to disconnect the shift lever and torsion bar, disconnect the driveshafts, and finally disconnect the engine housing. After that, the gearbox can be removed from under the car.
Removing the installed clutch
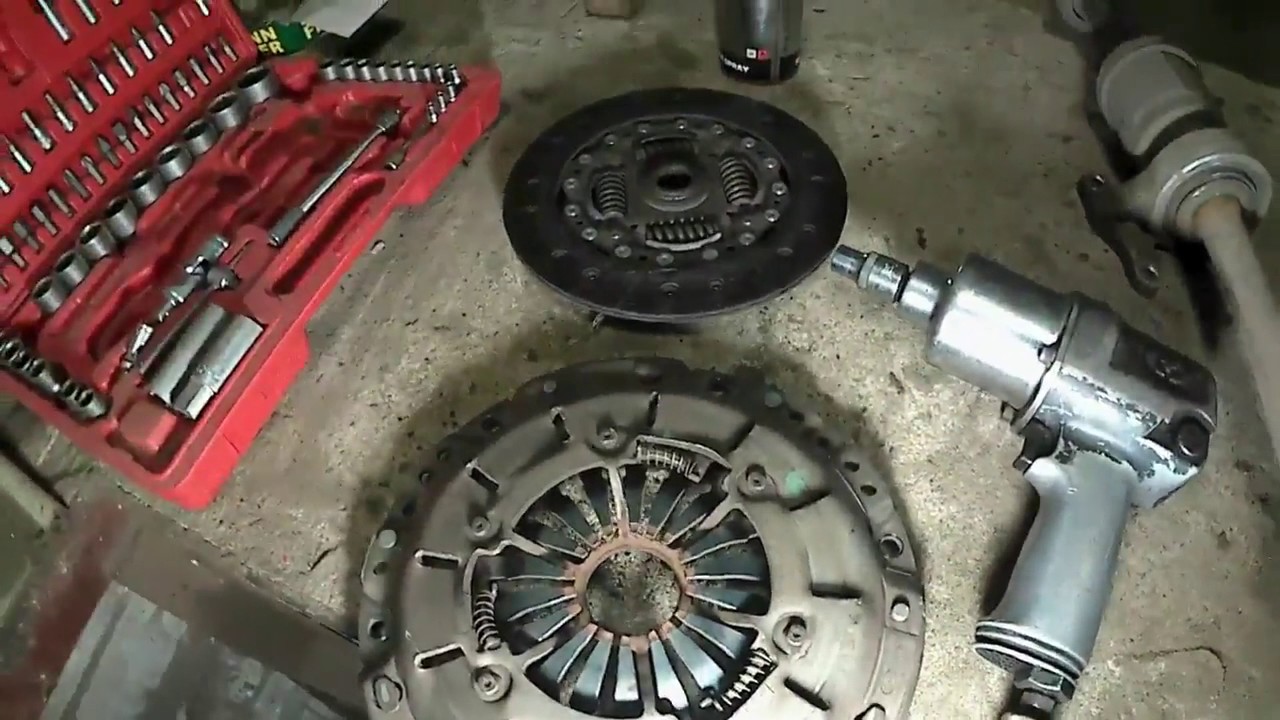
Separate the clutch basket.
Before removing the clutch basket, it is necessary to install a centering mandrel inside the hub disc. If this is not done, then the clutch disc will simply fall off during the process of removing the basket, as it is held solely by the pressure plate of the basket, which presses the driven disk against the flywheel. Lock the clutch assembly from rotating and begin to disengage the clutch basket. To unscrew the mounting bolts, you need a 10 head with 12 edges and thin walls.
Remove the clutch disc.
When the basket is removed, you can proceed to the removal of the slave unit. After removing the disc, visually inspect it for damage and wear. The friction linings of the disc are particularly susceptible to wear, which can lead to the formation of grooves on the friction linings of the clutch basket. Inspect the shock absorber springs, they may have play.
Disconnect the flywheel to replace the pilot bearing.
In any case, it is necessary to disassemble the steering wheel, even if it does not show signs of wear and its replacement is not required. Removal will allow you to assess the external condition of the flywheel and will help you get to the pilot bearing, which needs to be replaced. The bearing is pressed into the center of the flywheel, and to replace it, you will need to remove the old one and press in the new one. You can remove the old pilot bearing from the side that protrudes above the flywheel. With the old bearing removed, take the new one and lubricate it on the outside with grease, then carefully place it in the center of the flywheel on the seat until it hits the circlip. Planting it will not be difficult, an awl made from improvised materials will come in handy.
Installing a new clutch kit.
After replacing the pilot bearing, reinstall the flywheel and use a drift to install the pressure plate. Cover the entire frame with a basket and evenly tighten the six mounting bolts that go to the handlebar. After completing the installation process, remove the centering mandrel and proceed with the installation of the gearbox.
Replacing the release bearing
The release bearing must be replaced every time the clutch is dismantled and its components replaced. It is located on the input shaft, or rather on its trunnion and is attached to the end of the clutch fork. The clutch release is removed along with the fork by disconnecting the ball spring holding the clutch fork, which is located outside. Lubricate the inside of the trigger groove and the shaft journal with grease before installing a new trigger. In addition, the fork must also be lubricated where it contacts the bearing, ball stud seat, and recess for the clutch slave cylinder pusher. Then engage the disengagement with the clutch fork and slide it onto the shaft.
Installing the gearbox
Use a jack and raise the transmission until the clutch disc hub comes out of the input shaft journal. Next, you can proceed to connect the gearbox to the engine. Carefully insert the crankcase trunnion into the disc hub, this can be difficult due to the misalignment of the splines, so it is worth starting to rotate the housing at an angle around its axis until the splines match. Then push the box to the engine until it stops, it is necessary that the length of the bolts for fixing is sufficient, tighten them, thereby stretching the gearbox. When the box has taken its place, proceed to assemble the disassembled parts.
Pour new oil into the transmission.
To do this, unscrew the filler plug and fill in new oil to the required level, that is, until excess oil comes out of the filler hole. The manufacturer recommended filling in the original transmission oil for cars - MTF, it is believed that the gearbox will work more smoothly and clearly, and the quality of the oil filled will depend on the gearbox resource. To fill the oil, use a container of the required volume and a hose as thick as the drain hole. Fix the container on the gearbox crankcase, put one end of the hose into the container and the other into the crankcase drain hole, choose the shortest hose so that the thick gear oil flows out faster.
Bleed the clutch system.
To bleed the system, you need a hose, you can use the same one that was used to fill in new oil, empty containers, brake fluid, and other things. Open the drain valve of the clutch slave cylinder with a key of 8, put a hose on it, lower the other end into the container into which you first fill in the brake fluid, the hose must be immersed in it.
Then start downloading. When adding brake fluid to the reservoir, depress the clutch pedal simultaneously. If the pedal fails, help it return before the return force appears. After achieving the elasticity of the pedal, drain the liquid until no air bubbles come out of the drain hose. At the same time, keep an eye on the reservoir of the clutch master cylinder so that the fluid level does not fall below the minimum allowable indicator, otherwise all actions will have to be carried out from the very beginning. At the end of the process, open the drain valve on the clutch slave cylinder and add fluid to the reservoir to the maximum mark.