Renault Sandero clutch replacement
Content
Renault Sandero clutch replacement
Repair and maintenance of Renault Sandero is often carried out by car owners themselves. This is due to the fact that this is an inexpensive model, and its technical device is relatively simple. This car is mainly equipped with manual transmissions. The service life of the clutch largely depends on the careful handling of the car.
The Renault Sandero clutch is made in a combined way. One cable comes from the clutch pedal, which wears out over time and needs to be replaced and adjusted. The release bearing drive hydraulic cylinder is located inside the clutch housing and is installed with the release bearing.
Signs of an imminent clutch replacement Renault Sandero
Manifestations that you will soon need to repair or replace the Renault Sandero clutch are:
- vibrations, jerks and jerks of the machine during clutch operation when engaging 1st gear
- incomplete disengagement of the clutch in the extreme position of the pedal, the clutch “leads”, gears are switched on with difficulty or not switched on at all
- increased noise when pressing the clutch pedal
- incomplete engagement of the clutch in 4th and 5th gears, the clutch “slips”, there is a strong smell of burnt friction linings
Features of Renault Sandero clutch replacement
Replacing a clutch is a rather complicated process. The masters of the Renault Repair technical center perform it within 4-6 hours of work. These jobs require special equipment, tools and skills to perform such a complex job.
Renault Sandero clutch replacement is one of the most time-consuming car repair work. When replacing the clutch, you have to disassemble and disassemble many components and assemblies of the machine. We recommend that you carry out this type of complex repair work in specialized technical centers such as Renault Repair.
Taking into account the high labor intensity of replacing the Renault Sandero clutch, we recommend replacing the entire clutch kit as a whole. Although some parts can still be repaired, their resource has already been significantly reduced, and another disassembly of the clutch may be due to their fault in the near future. The kit includes: clutch basket, pressure plate with built-in spring dampers and friction linings, release bearing, diaphragm leaf spring pressing the clutch disc to the flywheel.
The device and components of Renault cars. Operation, maintenance and adjustments.
Renault Sandero clutch device and repair
Renault Sandero cars are equipped with a dry single-plate clutch with a central diaphragm spring.
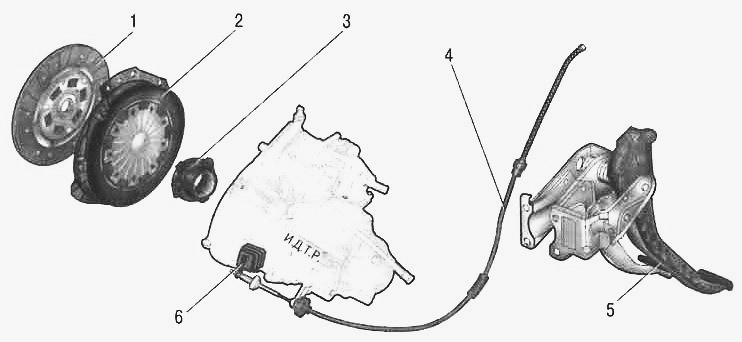
Rice. 1. Details of the Renault Sandero clutch and its locking operation
1 - driven disk; 2 - clutch cover with pressure plate; 3 - release bearing; 4 — a cable of a drive of deenergizing of coupling; 5 - clutch pedal; 6 - shutdown plug.
The Renault Sandero clutch pressure plate (basket) is mounted in a stamped steel casing 2, bolted to the flywheel.
The driven disk 1 is mounted on the splines of the input shaft of the gearbox and is held by a diaphragm spring between the flywheel and the pressure disk.
Clutch release bearing 3 of a closed type, which does not require lubrication during operation, is installed in a guide sleeve pressed into the hole in the clutch housing. The guide sleeve is a non-separable assembly that includes an oil seal and front input shaft bearing.
The bearing is moved by a fork 6 mounted on a ball bearing screwed into the clutch housing. The fork is inserted into the grooves of the bearing coupling without additional fastening.
The free fork lever, sealed in the crankcase with a rubber bushing, is actuated by a drive cable 4, the second end of which is fixed in the pedal sector 5.
The stroke of the working pedal 5 is adjusted as the lining of the Renault Sandero clutch disc wears out with an adjusting nut attached to the threaded end of the cable.
The clutches of engines with a working volume of 1,4 and 1,6 liters are identical in design and differ only in the diameters of the pressure and driven disks. For a 1,4 liter engine, the diameter is 180 mm, for a 1,6 liter engine - 200 mm.
The working stroke of the outer arm of the clutch release fork is somewhat different, that for a 1,4 liter engine it is 28-33 mm, for a 1,6 liter engine it is 30-35 mm.
The Renault Sandero Stepway uses a hydraulic clutch release transmission. The clutch release drive consists of a clutch pedal, a clutch master cylinder, a clutch release bearing combined with a working cylinder, and connecting lines.
The transmission uses brake fluid, which is poured into a supply tank, which is located in the master brake cylinder and serves simultaneously to actuate the brake system and disengage the clutch mechanism.
The Renault Sandero Stepway clutch master cylinder is mounted on the dashboard, and the cylinder rod is connected to the pedal. The filler tube runs from the reservoir in the brake master cylinder to the clutch master cylinder.
When you press the pedal, the rod moves, creating fluid pressure in the working line, which acts on the clutch slave cylinder. The slave cylinder is mounted inside the clutch housing and aligned with the release bearing.
When pressure is applied, the slave cylinder piston acts on the bearing, moving it forward and disengaging the clutch.
The coil spring constantly presses the release bearing against the diaphragm spring of the Renault Sandero Stepway clutch basket. The diaphragm spring returns the bearing to its original position after depressurizing the line.
The release bearing contains an infinite supply of grease and is maintenance free. Because the bearing and diaphragm spring are in constant contact, there is no play in the clutch mechanism, so no adjustment is required.
At the junction of the clutch slave cylinder with the fluid supply line, which is a steel tube, there is a clutch hydraulic exhaust valve.
Read more: If you urgently need a Nissan Qashqai replacement of front or rear stabilizer bushings
Clutch Release Hydraulic Release Renault Sandero Stepway
- We pump the clutch release hydraulic drive to remove air after depressurization, which is possible when replacing drive parts.
- Remove the protective cap from the bleed valve of the working cylinder and insert a transparent tube into it.
- Insert the other end of the tube into a container of brake fluid so that the free end of the tube is immersed in the fluid. It is advisable to install the container under the car below the level of the crane.
- The assistant presses the Renault Sandero Stepway clutch pedal several times and keeps it pressed.
- To bleed the drive, remove the cable retainer with a screwdriver.
- Slightly (by 4 by 6 mm) push the steel tube out of the plastic box. In this case, part of the brake fluid and air bubbles that have entered the system are thrown into a container under the machine. The transparent tube allows you to control the process.
- Insert the steel tube into the body, holding it with your hand, repeat the procedure until no more air comes out of the fitting.
- If necessary, add brake fluid to the master cylinder reservoir.
Renault Sandero clutch replacement
Renault Sandero clutch replacement:
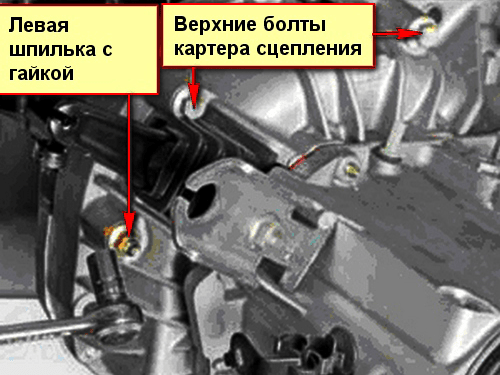
- Remove the transmission.
- While holding the flywheel with a screwdriver (or a mounting blade) so that it does not turn, unscrew the six screws that secure the clutch pressure plate housing to the flywheel. Loosen the bolts evenly: each bolt by one turn of the wrench, moving from bolt to bolt along the diameter.
- Depressurize the clutch and driven plates from the flywheel by holding the driven plate.
- Inspect the Renault Sandero clutch disc. Cracks in the details of the driven disk are not allowed. Check the degree of wear of the friction linings. If the rivet heads are sunk less than 0,2 mm, the surface of the friction linings is oily or the rivet connections are loose.
- Check the reliability of the fastening of the damping springs in the hub bushings of the driven disk by trying to move them by hand in the hub bushings. If the springs move easily in place or are broken, replace the disc.
- Check the runout of the clutch disc, if deformation is detected during visual inspection, if the runout exceeds 0,5 mm, replace the disc.
- Inspect the friction surfaces of the Renault Sandero clutch basket and flywheel, paying attention to the absence of deep scratches, abrasions, nicks, obvious signs of wear and overheating. Replace defective blocks.
- If the rivet connections between the pressure plate and body parts are loose, replace the basket assembly. Visually assess the condition of the pressure plate diaphragm spring. Cracks in the diaphragm spring are not allowed.
- The contact points of the spring petals with the release bearing must be in the same plane and not have obvious signs of wear (wear should not exceed 0,8 mm). If not, replace the clutch basket assembly.
- Inspect the connecting links of the body and disc. If the links are deformed or broken, replace the pressure plate assembly. Visually inspect the condition of the compression spring support rings. Rings must be free of cracks and signs of wear. If not, replace the Renault Sandero clutch basket assembly.
- Before installing the clutch, check the ease of movement of the driven disk on the splines of the input shaft of the gearbox. If necessary, eliminate the causes of jamming or replace defective parts.
- Apply high melting point grease to the driven disc hub splines.
- When installing the clutch, first use the mandrel to install the Renault Sandero clutch disc, and then on the three centering bolts - the basket body and screw in the screws securing the body to the flywheel.
- Screw in the bolts evenly, one turn of the wrench, moving alternately from bolt to bolt in diameter. Screw tightening torque 12 Nm (1,2 kg/cm).
- Record the fix and install the reducer.
- Install the lower end of the release cable on the gearbox and adjust the length of the threaded end of the cable.
Replacing the bearing and release fork Renault Sandero
One of the signs that the release bearing needs to be replaced is increased noise when the clutch pedal is depressed.
When replacing the Renault Sandero release bearing due to noise, check the condition of the pressure spring petals of the transmission disc. In case of severe wear of the ends of the petals at the points of contact of the bearings, replace the drive disk assembly.
The clutch release bearing assembly is mounted on the guide bush and connected to the clutch release fork.
The fork with its trunnions is completely inserted into the blind grooves of the bearing clutch and rests on a ball bearing screwed into the clutch housing. The fork is fixed in a certain position with its corrugated rubber boot inserted into the window of the clutch housing.
- Disassemble the gearbox if it was not disassembled to repair the clutch.
- After moving the release bearing along the guide forward, remove the fork from the clutch grooves and remove the bearing.
- If it is necessary to replace the release fork of a Renault Sandero car, remove the boot from the crankcase hole and remove the fork from the ball joint.
- If necessary, remove the dust cap from the plug.
- Lubricate the outer surface of the guide bush, the splines of the input shaft of the gearbox, the ball joint of the release fork, the surfaces of the fork in contact with the ball joint and the bush, with a thin layer of refractory carrier grease.
- Install the release fork and new bearing/clutch assembly (make sure it rotates smoothly and silently with no play) in the reverse order of removal.
No additional fixation of the clutch release fork in the bearing and ball joint is provided. Therefore, after installing the fork and bearing (and even more so after installing the gearbox), do not rotate the fork in a vertical plane, as this can lead to its exit from the grooves
couplings.
Replacing and adjusting the Renault Sandero shutdown cable
- To facilitate subsequent installation, before removing the cable, measure the length of the free threaded part of the lower end of the cable (at the adapter).
- Moving the cable forward, remove its tip from the slot of the release fork.
- Remove the shock absorber with cable sheath from the support on the gearbox housing.
- In the passenger compartment under the instrument panel, disconnect the end of the cable from the clutch pedal sector.
- Remove the cable cover from the bumper on the dashboard shield and remove the cable by pulling it out of the shield towards the engine compartment.
- Install the Renault Sandero release cable in the reverse order of removal.
- After installing the new cable, perform the initial cable installation. Measure the dimensions respectively between the end of the shock absorber and the release fork (equal to 86 ± 5 mm), as well as between the end of the shock absorber and the end of the cable (equal to 60 ± 5 mm).
- If the dimensions are not as specified, adjust them by turning the cable end adjusting nut with the lock nut loose.
- Depress the clutch pedal three times as far as it will go and measure the distance again. Repeat the adjustment if necessary.
- Make sure the free end of the clutch release fork travels 28-33mm for the 1,4L engine and 30-35mm for the 1,6L engine.
Current repair of a set of pedals for Renault Sandero
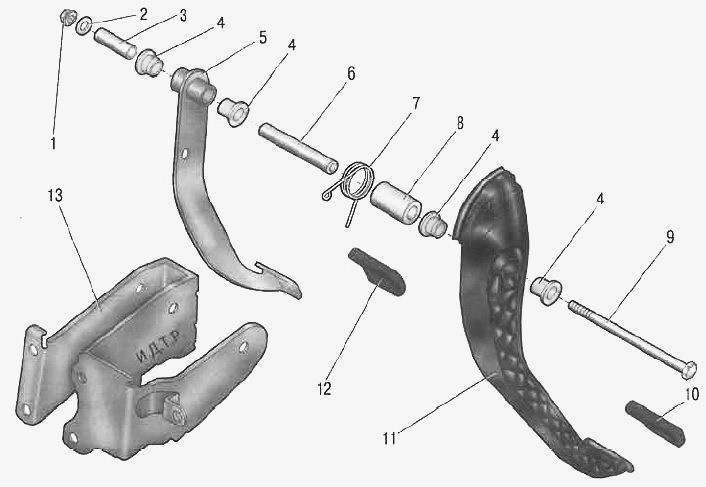
Rice. 2. Renault Sandero Pedal Assembly Components
1 - axle nut; 2 - washer: 3, 6, 8 - spacers; 4 - pedal bushing; 5 - brake pedal; 7 - return spring of the clutch pedal; 9 - pedal axis; 10 - clutch pedal pad; 11 - clutch pedal; 12 — a plate of a platform of a pedal of a brake; 13 - pedal mounting bracket.
The clutch pedal 11 (Fig. 2), made of plastic, is mounted on the same axle with the welded steel brake pedal 5. The axle 9 is fixed with a nut 1 on the bracket 13 mounted on the front shield of the car. Body.
The clutch pedal returns to its original position by spring 7. The pedals are attached to the shaft through plastic bushings 4. In case of a squeak or pedal jamming on the shaft, disassemble and repair the pedal assembly.
- Disconnect the bent end of the clutch pedal return spring from the end of the pedal assembly bracket.
- Disconnect the Renault Sandero release cable from the clutch pedal sector.
- Disconnect the brake booster pushrod from the brake pedal.
- Using the second wrench, unscrew nut 1 (Fig. 2), which fixes the pedal shaft, preventing the shaft from turning.
- remove the axle from the holes of the pedals and support, alternately removing the remote bushing 3, the brake pedal 5 assembly with bushings 4, the remote bushing 6, the spring 7, the remote bushing 8 and the clutch pedal 11 assembled with the shaft 4 bushings.
- Remove the plastic bushings from the holes in the pedals 4. Replace worn or damaged bushings.
- Reassemble the pedal assembly in the reverse order of disassembly. Lubricate the pedal axle and its bushings with a thin layer of grease. If necessary, install a new clutch pedal return spring.
- Connect the clutch release cable and brake booster push rod to the clutch and brake pedals, respectively.
Removing clutch parts Renault Sandero
We remove the “basket”, the driven disk and the release bearing to replace them in case of failure.
They also removed the "basket" and the driven disk when replacing the flywheel and the rear crankshaft oil seal.
We carry out work in a viewing ditch or overpass. Operations are shown on a Logan vehicle.
When replacing clutch parts, you can not completely disassemble the gearbox (as this will force you to carry out laborious operations to remove the subframe), but only move it away from the engine to the desired distance.
- Disconnect the cable terminal from the "negative" terminal of the battery.
- Remove the drive from the left wheel.
- Loosen the bolt securing the left subframe bracket to the body and loosen the nut that secures the bracket to the suspension arm.
- Disconnect the clutch cable from the clutch release fork and transmission bracket.
- Disconnect the transmission control linkage from the transmission switch.
- Remove the speed sensor.
- Remove the crankshaft position sensor.
- Disconnect the wiring harness from the reversing light switch.
- Disconnect the engine control harness connector from the control oxygen sensor harness connector.
- Remove the sensor block from the transmission support and disconnect the sensor harness from the transmission support.
- Remove the starter.
- Release the gearbox housing bracket and remove the wiring harness. We unscrew the four screws that secure the engine crankcase to the gearbox.
- Replaced adjustable stops under the engine and gearbox. Remove the rear and left brackets from the power unit.
- Disconnect the ground cables from the gearbox, unscrew the bolts and nuts securing the gearbox to the engine block.
- While holding the inner housing of the right wheel drive hinge, remove the gearbox from the engine by removing the input shaft from the clutch disc hub.
In this case, the differential side gear spline shaft will protrude through the end of the right sprocket inboard joint housing. We remove the gearbox from the engine (at a distance at which it will be possible to disassemble the clutch parts) and support the left side of the gearbox on the subframe.
Attention: When disassembling and installing the gearbox, the gearbox input shaft must not rest on the petals of the diaphragm spring, so as not to damage them.
To replace the release bearing, move it along the guide sleeve to the end of the transmission input shaft, disengaging the clutch release fork lugs from the bearing.
We remove the bearing (for clarity, it is shown on the removed gearbox).
We removed the fork from the ball joint and removed the end of the fork from the dust cap.
Before installing the bearing, apply grease to the surface of the guide bushing, the clutch release fork legs, and the fork ball joint. We replaced the broken rubber boot of the shutdown fork with a new one.
Install the clutch release bearing in reverse order.
When installing the support bearing 2, the studs must enter the plastic hooks 1 on the bearing sleeve.
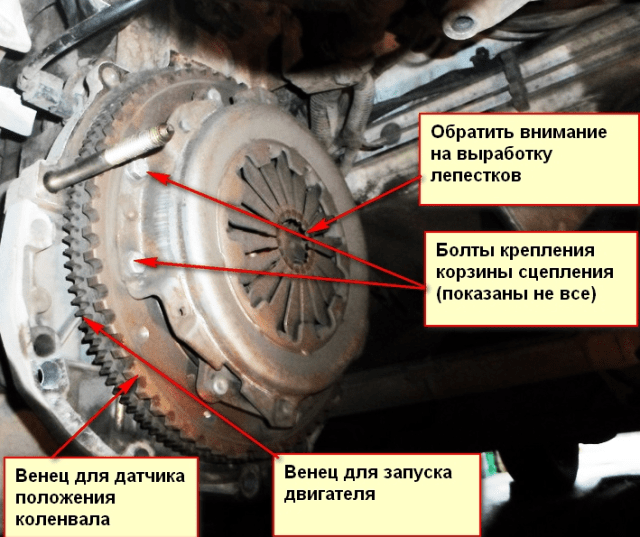
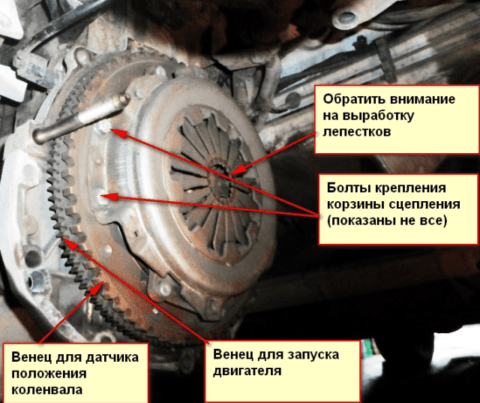
Having installed the mounting blade between the teeth of the flywheel crown and leaning on the gearbox mounting bolt with the “11” head, unscrew the six bolts securing the clutch housing to the flywheel.
We unscrew the bolts evenly, each, no more than one turn per pass, so as not to deform the "basket" of the clutch.
If the bolts are difficult to unscrew, we hit their heads with a hammer with a soft metal striker.
We remove the "basket" and the clutch disc (for clarity, we show it with the gearbox disassembled).
We install the driven disk and the "basket" of the clutch in the reverse order.
When installing the driven disk, we orient its protruding part (shown by the arrow) to the clutch “basket”.
We position the "basket" of the clutch so that the flywheel bolts enter the corresponding holes in the "basket".
We insert the centering mandrel (the centering mandrel is suitable for coupling VAZ cars) into the splines of the driven disk and insert the mandrel shank into the crankshaft flange hole.
Primed and evenly tightened opposite clutch cover bolts to flywheel (one turn per pass).
Finally, tighten the bolts to the required torque.
We take out the centering mandrel of the driven disk.
We install the gearbox and all the removed parts and assemblies in the reverse order. We carry out adjustment of the clutch drive.
Renault Sandero clutch replacement
In the article, we will consider the repair of a clutch with a manual transmission of a car.
Removing and installing clutch
When replacing the clutch, it is recommended to replace the entire clutch kit.
You will need a tool that is used to remove the gearbox, as well as an 11 wrench, a screwdriver; you will need a mandrel for centering the driven disk (suitable from the VAZ).
We install the car in a viewing hole or elevator
The clutch cover is attached to the flywheel with six bolts.
When installing the old basket, keep the position of the basket in relation to the steering wheel to ensure balance.
We unscrew the six screws that hold the basket, preventing the flywheel from turning with a mounting blade.
We evenly loosen the tightening of the bolts with one turn of the key, moving from bolt to bolt in diameter.
With tight unscrewing, you can hit the bolt heads with a hammer.
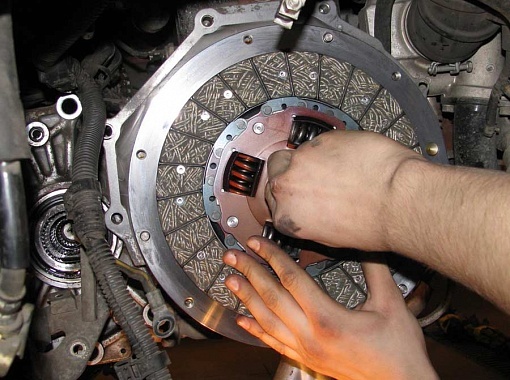
Remove the basket and clutch disc from the engine flywheel while holding the clutch disc
After removing the clutch, inspect the clutch disc.
Cracks in the details of the driven disk are not allowed.
We check the degree of wear of the friction linings.
If the rivet heads are sunk less than 0,2 mm, the bushing surface is oily, or the rivet connections are loose, the driven disk must be replaced.
If the lining of the driven disk is oily, check the gearbox input shaft oil seal.
It may need to be replaced.
We check the reliability of fixing the shock absorber springs in the bushings of the hub of the driven disk, trying to move them by hand in the bushings of the hub.
If the springs move easily in their springs or are broken, replace the disc.
We check the axial runout of the driven disk, if its deformation is detected during external examination.
If the runout is greater than 0,5 mm, replace the disc.
We inspect the working friction surfaces of the flywheel and pressure plate, paying attention to the absence of deep scratches, abrasions, nicks, obvious signs of wear and overheating. We replace faulty nodes.
After loosening the rivet connections of the pressure plate and body parts, we replace the pressure plate.
By external inspection, we evaluate the condition of the diaphragm spring "B" of the pressure plate.
Cracks in the diaphragm spring are not allowed. Places "B" of contact between the petals of the spring and the release bearing must be in the same plane and not have obvious signs of wear (wear should not exceed 0,8 mm). If not, replace discs as a set.
We examine the links of the connection "A" of the body and the disk. If the links are deformed or broken, replace the pressure plate assembly.
By external inspection, we evaluate the condition of the support rings "B" of the pressure spring. Rings must be free of cracks and signs of wear.
Before installing the clutch, we check the ease of movement of the driven disk along the splines of the input shaft of the gearbox.
We apply refractory grease to the splines of the hub of the driven disk
When installing the clutch, first install the driven disc using a drift
We install the driven disk so that the protruding part of the disk hub (shown by the arrow) is directed towards the diaphragm spring of the clutch housing.
After that, we install the clutch basket on three centering pins and screw in the bolts that attach the crankcase to the flywheel.
We evenly screw in the bolts, one turn of the key, alternately moving from one bolt to another in diameter. Screw tightening torque 12 Nm (1,2 kgcm).
We take out the cartridge and install the gearbox.
We installed the lower end of the clutch release cable into the transmission and adjusted the length of the threaded end of the cable (as described below).
Replacing the bearing and clutch release fork
Increased noise at the moment of disengaging the clutch with the pedal depressed indicates the need to replace the release bearing.
The release bearing "A" assembled with the clutch (Fig. 1) is mounted on the guide sleeve and connected to the release fork "B".
The fork is inserted with knuckles and rests on a ball joint screwed into the clutch housing.
The fork is fixed with a corrugated rubber boot inserted into the window of the clutch housing.
To remove the release bearing, remove the gearbox (article - Removing the manual transmission from a Renault Sandero car)
Moving the release bearing along the guide sleeve forward, remove the sleeve from its clutch grooves and remove the bearing.
If it is necessary to remove the release fork, remove its cover from the hole in the clutch housing and remove the fork from the ball joint.
If necessary, remove the dust cover of the plug
Lubricate the outer surface of the guide bush with a thin layer of refractory grease
Lubricate the transmission input shaft splines
Lubricate release fork ball joint
Lubricate the surface of the fork in contact with the ball joint
Lubricate the fork legs
Install the fork and release bearing in reverse order.
Additional fixation of the clutch release fork on the clutch release bearing and ball joint is not provided.
Therefore, after installing the yoke and bearing, do not rotate the yoke in a vertical plane, as it may come off the splines of the coupling.
Replacing and adjusting the clutch cable
Before removing the cable, we measure the length of the free threaded part of the lower end of the cable at the gearbox.
Sliding the cable forward, we remove its tip from the groove of the shutdown fork
Remove the cable boot damper from the bracket on the gearbox housing.
Disconnect the tip of the cable from the sector of the clutch pedal
We take out the cable sleeve from the bumper to the bulkhead and remove the cable, pulling it out of the shield into the engine compartment
Install the clutch cable in reverse order.
After installing the cable, we carry out the initial installation of the cable. We measure the dimensions L and L1, respectively, between the end of the shock absorber and the release fork, as well as between the end of the shock absorber and the end of the cable.
Size L should be (86±) mm, size L1 - (60±5) mm. If the dimensions are not within the specified ranges, adjust by turning the cable end adjusting nut with the lock nut loose.
As the clutch disc lining wears during operation, the initial setting of the clutch release cable also changes. In this case, the clutch pedal moves up, its full travel increases, and the clutch engages with a delay at the end of the pedal stroke. In this case, check and restore the original installation of the cable with the adjusting nut on its threaded end.
Depress the clutch pedal three times to the stop and again measure the distance L and L1. Repeat the adjustment if necessary.
We check that the free end of the clutch release fork is within 28-33 mm for a 1,4 liter engine and 30-35 mm for a 1,6 liter engine.
Pedal assembly repair
The clutch pedal is made of plastic.
It is mounted on the same axle with a steel brake pedal. Shaft 9 is fixed with nut 1 on support 13 mounted on the front shield of the housing.
Spring 7 is installed to return the pedal to its original position.
The pedals are attached to the axle with plastic bushings.
If the pedals creak or stick, the pedal assembly should be disassembled and repaired.
You will need two keys for 13.
Disconnect the bent end of the clutch pedal return spring from the edge of the pedal assembly bracket.
Disconnect the release cable from the clutch pedal sector
Disconnect the brake booster pushrod from the brake pedal
We unscrew the nut 1 (Fig. 1) holding the pedal shaft, preventing the shaft from turning with the second key.
We take out the axle from the holes of the pedals and from the bracket, removing in turn the remote bushing 3, the brake pedal 5 assembled with bushings 4, the remote bushing 6, the spring 7, the remote bushing 8 and the clutch pedal 11 assembled with bushings 4 from the axle.
We take out 4 plastic bushings from the holes in the pedals, we replace the worn bushings.
We assemble the pedal assembly in the reverse order.
How to replace clutch Logan, Sandero
How to change the clutch Renault Logan, Sandero ...
Hello readers of the Aauhadullin.ru blog. Today we will see how to replace the Renault Logan clutch. The work is difficult, in order to replace the clutch in a car, it is necessary to remove the gearbox.
As you understand, you have to work, spending a lot of precious time! Let's find out what and how to disconnect and disconnect from the gearbox and disassemble, almost half of the car. At the same time, we run under the car and into the engine compartment. In my childhood, in 1975, my father bought a used Moskvich-403. And here he constantly, something changed. I have played with the clutch and gearbox many times. I remember that it was my job to remove and install the stabilizer, yes, of course, I removed the box.
I remember that we removed the gearbox with him, repaired the clutch for two hours, before that we trained with him!
Clutch repair
So, let's start replacing the Renault Logan clutch: Before replacing the clutch, we drive the car into an inspection hole.
- Replacing the Renault Logan clutch begins with the fact that you need to disconnect the negative battery terminal.
- With a key, and preferably with a socket head (30), we start, but do not unscrew the nuts of the front hubs of both wheels.
- We put the jack, raise the front wheels and remove them.
- In addition, it is already possible to completely unscrew the hub nuts and with a head (by 16) proceed to disassemble the ball bearings.
The Renault Logan ball joint, unlike the VAZ models, is attached to the brake fist with a cam insert and fastened with a bolt on the side. So you need to unscrew the side bolt and pull it out. Insert a wedge-shaped spike with a spacer or powerful impact tool into the slot and, opening it, remove the ball joint from the socket.
Mounting and removal of the ball joint is shown in the photo below:
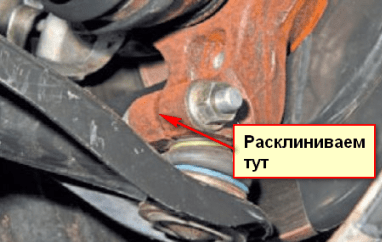
Fig 1. Assembling the ball joint
- We took out the ball joints on both sides and removed both outer CV joints from the hubs.
- Also, for the convenience of replacing the clutch, we removed the protective covers from both wheels.
- On the right side, we remove the disk, simply pulling it out of the seat, then it comes out easily.
- Before removing the left drive, it is necessary to remove the engine protection and drain the oil from the box.
- Then you need to remove the bumper protection, they are located below, at the corners of the bumper. They are fastened with two clips and three self-tapping screws on each shield.
- The lower part of the bumper, which is attached to the subframe, we unscrewed with a T30 open end wrench.
- Unscrew the exhaust pipe with the head (10).
- After unscrewing, it is necessary to unscrew the oxygen sensor (lambda probe) from the connector).
- Next, remove the second oxygen sensor installed after the catalytic converter.
- We remove two or three rubber bands from the muffler, on which the muffler hangs, set aside so that it does not interfere with us when replacing.
- We hang the muffler with a cable on the bottom of the car.
We have a free space to remove the subframe ...
- Also, if you have a car with power steering, then you need to unscrew the fastening of the power steering tube to the subframe, this is done with a key (by 10).
- The steering rack is attached to the subframe from above with two bolts. We wrap them with a key (at 18).
- We unscrewed the bracket for the rear engine mount, but not all of it. First, we release the rear bolt from the bracket, it is not necessary to unscrew it completely, and then we unscrew the front bolt from the pillow and remove the bracket from the groove of the rear bolt. The bracket stays on the subframe.
Pay attention to the cooling radiator. They have different bras. Until 2008, the radiator was attached to the body with side brackets. And after 2008, the radiator began to be installed on vertical studs included in the subframe.
So if you have a car made after 2008, you will need to tie it to the hood latch panel so it doesn't fall when the subframe is removed. Tie it with wire or strong rope behind the radiator diffuser. You need to bind at two points, on the right and on the left. Otherwise, one end will sink.
It's time for the stretcher. With a key (17), we wrap four bolts, the bolts are located at the corners of the subframe. The rear of the subframe is attached to the body with the same bolts as the stabilizer bushings. At the same time, you can check the condition of these bushings and, if necessary, replace them.
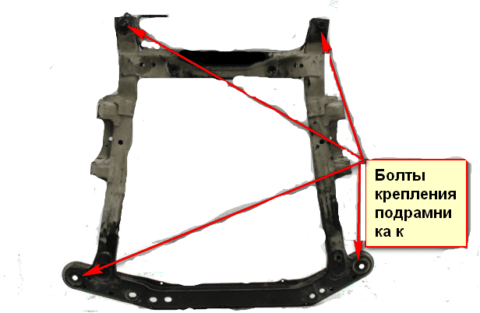
Fig. 3. Stretcher
After removing the subframe, drain the oil from the crankcase and remove the left drive. The Renault Logan unit, unlike the VAZ models, is installed by attaching the anther with three bolts (13) to the body.
The process of disassembling the gearbox will begin for the convenience of replacing the clutch. Therefore, I give a photo with the designations of the necessary parts when disassembling the box:
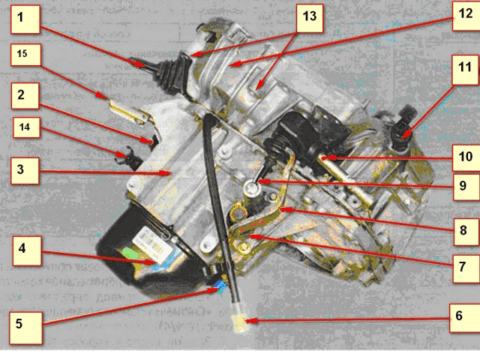
Fig 4. Control point, top view
1. Clutch fork, 2. Filler cap, 3. Transmission housing, 4. Rear transmission cover, 5. Reverse light switch, 6. Breather, 7. Shift mechanism, 8. Shift lever, 9. Link 10. Shift Lever, 11. Speed Sensor, 12. Clutch Housing, 13. Upper Mount Bolt Holes, 14. Engine Compartment Harness Mount, 15 Cable Cover Mounting Bracket, Clutch Actuator Four Engine Oil Pan To Crankcase Bolts clutches, not yet shown in this picture, are located at the bottom of the crankcase. And on the left side, where the bracket for the engine compartment harness is located, there are two more bolts for attaching the ground wires to the box body.
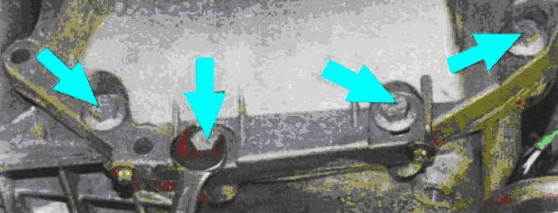
Rice. 5. Bolts for securing the oil pan to the clutch housing
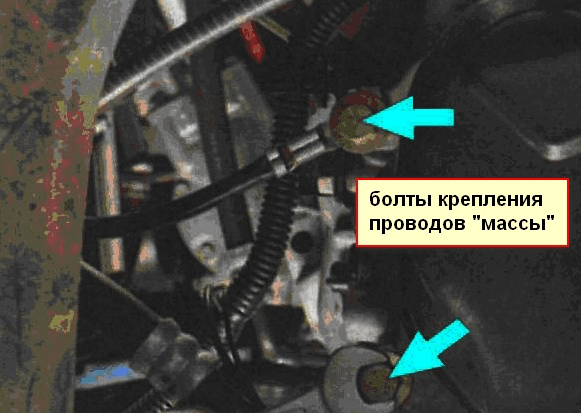
Fig 6. Explanations for the figure
- After removing the left block, next to it, slightly to the left, there is a reverse sensor (pos. 15 in Fig. 4).
- Then, to the left of the rear cover of the gearbox, we find two bolts for fastening the “ground” wires (Fig. 6), unscrew them and set them aside so that they do not interfere in the future.
- Then release the engine compartment harness from the bracket (fig. 4, pos. 14).
- The power steering hose must be tensioned and tied so that it does not fall and interfere with work.
- We remove the clutch drive cable, first removing its end from the clutch fork (Fig. 4, item 1), and then removing the sheath from its support (Fig. 4, item 15).
- Now it's the turn of the four screws shown in Figure 5.
- Disconnect the speed sensor connector (Fig. 4, pos. 11), it can be easily removed, you need to press the flag and pull the connector up.
- Next, using the key (by 13), loosen the clamp that secures the gearbox control rod to its lever (Fig. 4, pos. 10).
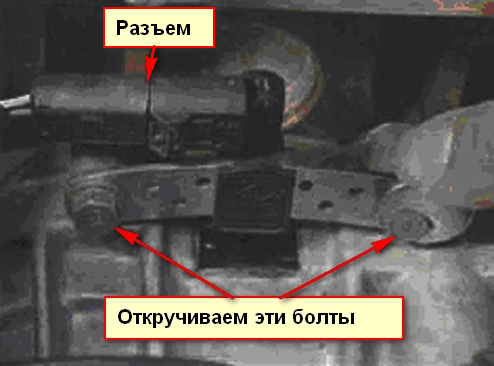
An important point when replacing the clutch on a Renault Logan car! Before removing the rod, it is necessary to mark in any convenient way (for example, with paint) the relative position of the rod and the lever so as not to disturb its adjustment in the future. We managed to unscrew the two starter screws, as the screws holding them also hold the box. There is another starter bolt, but we will remove it later.
The next step in replacing the clutch is to remove the crankshaft position sensor connector. If the connector cannot be removed, you can simply unscrew the two bolts that secure it to the clutch housing and remove it completely. An image of this connector is shown below, in Figure 7.
Rice. 7 crankshaft position sensor
Look at the photo where the sensor is located on the engine and the location of the eyebolt, which will come in handy in the following steps:

Rice. 8 Crankshaft position sensor location and eyebolt
Next, you will need to hang the motor. In clutch replacement services, cars use special racks. Who makes repairs in the garage with his own hands, comes up with what he can. I once watched for a long time how a friend adapted two rods to replace the Renault Logan clutch.
It looked like the photo below:
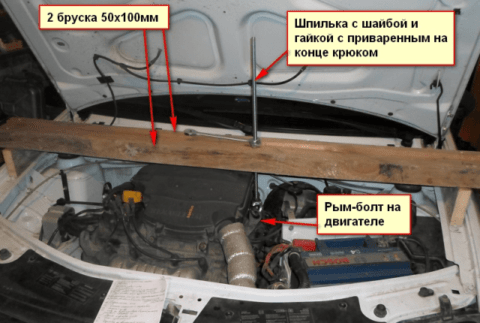
Rice. 9 Engine installation method for clutch replacement
Only then did a friend use thick steel wire instead of stealth. By passing one end through the eye bolt and turning over the beam to the desired length. This option is simpler and cheaper to perform, since you do not need to look for a bolt, weld a hook to it.
Here you have! We hang out the engine, then you need to remove the left engine mount. Between the power steering cylinder and the main brake cylinder, from above, far below, three bracket mounting bolts are visible on the left engine mount. Using an extension cord and a head (by 16), we unscrew these three bolts.
The appearance of the bracket assembly with the bracket is shown in the photo below:
Rice. 10 Left engine mount with air conditioning
At this stage of replacing the clutch of Renault Logan cars with manual transmission, you need to lower the engine a little by unscrewing the pin on the previously installed cross member. You must lower it whenever the appropriate support allows it, but at the same time, you must ensure that the rubber pad built into the support does not break. We have access to the two upper screws of the clutch housing (fig. 4 pos. 13) and the breather.
We remove the breather and see that now we can unscrew the third starter screw. Loosen three screws. Our mechanical box was secured with two studs and nuts. When viewed from the side of the rear cover of the transmission, on the left, under the clutch fork, there is a nut.
For clarity, here is a photo of these posts:
Rice. 11 left pin
And the second instead next to the right steering wheel seat:

Rice. 12 Second pin on reverse
Having asked an assistant to hold the box, we unscrew these two nuts from the studs, remove them and carefully lower them to the floor. In this case, it is necessary to make considerable efforts, since the box is heavy and it is necessary to remove it from the racks by shaking it a little.
Well, here we have free access to the clutch:
Rice. 13 Access to the clutch for replacement
Since the housing has been removed, the first step is to check the release bearing. We squeeze the clutch fork and see how easily the release moves along its guide axis. Then we look at how the release bearing rotates, if it makes noise or twitches, then it should be replaced.
Next, use the socket head (at 11) to remove the clutch basket together with the disc and check its condition. If the petals of the basket have uneven or heavy wear, then the basket should be replaced. We study the condition of the clutch disc.
I do this: I take the disc with both hands and shake it hard, if the disc springs dangle, then it must be replaced. It is also subject to replacement if the rivets are recessed into the friction linings less than 0,2 mm, and also if the linings are cracked or heavily oiled.
Next, we look at the wear of the friction points of the flywheel and basket. There should be no deep scratches, abrasions, and wear should be small and uniform in a circle.
Installing the clutch
Before installing a new clutch kit, it is recommended to degrease the flywheel in the contact area with the disc. When buying a clutch kit to replace Renault Logan, it is important that it includes the installation instructions shown in the photo below.
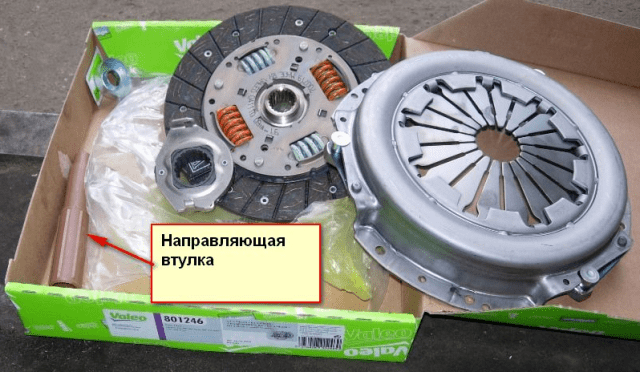
Fig. 14 Clutch kit
When installing the clutch, the disc must be positioned with a protruding part towards the basket. We install the disk and basket on the flywheel, insert the guide sleeve shown in the photo above, until it stops in the center of the basket. This is necessary to center the position of the disc and basket on the flywheel. First, we prime all the bolts in the basket, and then gradually tighten them with a force of 12 N∙m. Well, after replacing the clutch, we put the gearbox back. All this is done in the reverse order of removal.
After installing the gearbox, we connect all the connectors and install the clutch release cable in its place. We adjust its tension with the end nuts where it attaches to the clutch fork. We also connect all the rods and tubes to their places. Reinstall the removed engine mounts. We loosened the stud of the beam on which the engine was suspended.
When installing the transmission control rod on your lever, do not forget to mark its relative position with paint. They must be installed according to these labels. Otherwise, you will have to additionally deal with the adjustment of the gear shift.
Then you can install both nodes, ball joints and wheels in their places. Do not forget to add oil to the gearbox and you can start the car for a test drive. Hear how the machine runs smoothly, shifts easily and without extraneous noise.
With the replacement of the clutch, I spent a day and was pleased that I fixed it myself. The main one studied the device and learned how to replace the clutch in a Renault Logan, Sandero car.