Replacing the fuel filter on a Toyota Corolla
Content
The cleanliness of the filter determines the purity of high-quality fuel and the smooth operation of the engine in any operating conditions. Therefore, replacing the Toyota Corolla fuel filter is one of the most important vehicle maintenance operations. The design of the machine allows you to make a change with your own hands.

Where is the fuel filter located?
The fuel filter on modern Toyota Corollas is located in the fuel module inside the tank. This arrangement of filters is standard for vehicles equipped with a multiport fuel injection engine. On earlier models (produced before 2000), the filter is located in the engine compartment and is attached to the engine shield.
Replacement frequency
The manufacturer does not stipulate the replacement of the filter as a scheduled maintenance, and this equally applies to Toyota Corolla in the bodies of the 120 and 150 series. Many services, based on the realities of car operation in Russia, recommend replacement prophylactically every 70-80 thousand kilometers. Replacement can be made earlier if there are signs of contamination of the filter element. Since 2012, in the Russian-language service literature of Toyota Corolla, the filter replacement interval has been indicated every 80 thousand km.
Choosing a filter
In the fuel intake module there is a coarse filter at the inlet, inside the module itself there is a fine fuel filter. For replacement, you can use original spare parts and their analogues. Before buying a filter, it is advisable to clarify the model installed on the machine.
When choosing original fine cleaning parts, it should be borne in mind that the Corolla in the 120th body was equipped with two types of filters. Early releases from 2002 to June 2004 used part number 77024-12010. On machines from June 2004 until the end of production in 2007, a filter with a modified design was used (art. No. 77024-02040). One filter option was installed on the 150 body (part number 77024-12030 or larger assembly option 77024-12050).
In addition, Corolla 120 cars were produced for the Japanese domestic market under the designation Toyota Fielder. These machines use a fine filter with the original number 23217-23010.
Analogues
The coarse fuel filter is usually not changed, but in case of damage it can be replaced with a non-original Masuma MPU-020 part.
Many owners, due to the high cost of original filters, begin to look for more affordable parts with a similar design. However, for cars in the 120 body, such parts simply do not exist.
For 150 bodies, there are several cheaper analogues, from manufacturers JS Asakashi (article FS21001) or Masuma (article MFF-T138). For those who want to save money, there is a very cheap version of the Shinko filter (SHN633).
For Fielder, there are similar Asakashi (JN6300) or Masuma (MFF-T103) filters.
Replacement for Corolla 120 body
Before starting work, empty the tank as much as possible, preferably before the remaining fuel indicator lights up. This is necessary to minimize the risk of spilling gasoline on the upholstery.
Tools
Before replacing the filter, prepare the following materials and tools:
- a screwdriver with a thin flat blade;
- crosshead screwdriver;
- pliers for disassembling the spring clip;
- rags for cleaning;
- a flat container on which the pump is disassembled.
Step by step guide
Algorithm of actions:
- Raise the left rear seat cushion and fold down the sound deadening mat to access the fuel inlet module hatch.
- Clean the installation site of the hatch and the hatch itself from dirt.
- Using a screwdriver, release the hatch mounted on a special thick putty. The putty is reusable, it should not be removed from the contact surfaces of the hatch and the body.
- Clean any accumulated dirt from the fuel module cover.
- Disconnect the power connector from the fuel pump unit.
- Start the engine to release fuel under pressure in the line. If this point is neglected, when the tube is removed, gasoline will flood the car interior.
- Disconnect two tubes from the module: fuel supply to the engine and fuel return from the adsorber. The pressure tube is attached to the module with a lock that slides to the side. The second tube is fixed with a conventional ring spring clip.
- Loosen the eight screws with a Phillips screwdriver and carefully remove the module from the tank cavity. When removing the module, it is important not to damage the side fuel level sensor and the float mounted on the long arm. It is better to carry out further work in a prepared container in order to avoid getting gasoline residues from the module on the elements inside the car.
- Release the lever latch and remove the float.
- Separate the halves of the module body. The plastic connector clips are located closer to the top of the module. The clips are quite fragile and it is important to perform this operation carefully.
- Remove the fuel pump from the module and disconnect the filter. The fuel pump will come out with force due to the presence of rubber o-rings. It is important not to lose or damage the rings that hold the fuel pressure in place.
- Now you can change the fine filter. We blow the module case and the coarse filter with compressed air.
- Assemble and install the module in reverse order.
Replacing the filter on the Corolla 120 hatchback
On a 2006 hatchback car, the fuel filter is installed differently, so the replacement procedure has several nuances. Also, such a scheme was used on all 120 British-assembled Corollas.
Replacement sequence:
- The hatch of the module is mounted on four bolts for a Phillips screwdriver.
- The module itself is tightly inserted into the tank body; a special extractor is used to extract it.
- The module has a completely different look. To remove it, you must first disconnect the hose at the base of the module. The hose can only be removed after preheating with a hair dryer.
- The filter itself with the pump is located inside the glass of the module and is attached to three latches.
- The fuel gauge must be removed to access the filter.
- You can remove the filter from the module cover only when heated with a hair dryer. The fuel lines will have to be cut. It is important to remember which of the filter tubes is inlet and which is outlet, as there is no marking on the body.
- Pry off the filter pump with a 17mm bolt.
- Install a new Toyota 23300-0D020 (or equivalent Masuma MFF-T116) filter and install new piping between filter and pump. The tubes should bend easily as the pump halves are pre-charged in the tank.
- The coarse filter is in a glass and is simply washed with a carb cleaner.
- Further assembly and installation is carried out in the reverse order.
An important point in the work is to ensure the tightness of the fit of new tubes in the fitting. Before installing the module in the tank, it is better to check the quality of work using a pump and a soapy solution. According to various reviews, the MFF-T116 filter does not fit well with the pump. Below is a series of photos explaining the replacement procedure.
Replacing TF in the 150th body
Replacing the fuel filter on a 2008 Toyota Corolla (or whatever) in the 150 body has a few differences from the same procedure on the 120 body. When replacing, make sure the o-rings are properly installed as they keep pressure on the fuel filter in the fuel system. Since 2010, a safety system has been used, the essence of which is that the fuel pump only works when the engine crankshaft rotates. In the absence of residual pressure in the system, the starter has to turn the engine much longer until the pump creates pressure in the fuel supply line.
Prepare
Since the modules are similar in design, there are no special requirements for the tools and equipment of the construction site. You will need the same tools and materials as when changing the filter on machines with a 120 body.
Stages of work
When replacing the filter in a 150 body, there are a number of points that you need to pay attention to:
- The fuel module is fixed in the tank with a plastic threaded ring equipped with a rubber seal. The ring rotates counterclockwise. To remove the ring, you can use a wooden rod, which is attached at one end to the edges of the ring, and the other end is lightly tapped with a hammer. The second option would be to use gas wrench handles that hold the ring by the ribs.
- The module has additional fuel lines for tank cavity ventilation. Disconnecting the tubes is similar.
- The module has two seals. The rubber sealing ring 90301-08020 is placed on the injection pump at the place of its installation on the filter housing. The second ring 90301-04013 is smaller and fits into the check valve fitting at the bottom of the filter.
- When reinstalling, carefully install the nut spacer. Before re-tightening the nut, it is necessary to install it until the marks on the nut and on the body (near the fuel hose to the engine) are aligned, and only then tighten it.
The video shows the process of replacing the fuel filter on a 2011 Toyota Corolla.
Filter on other Corolla
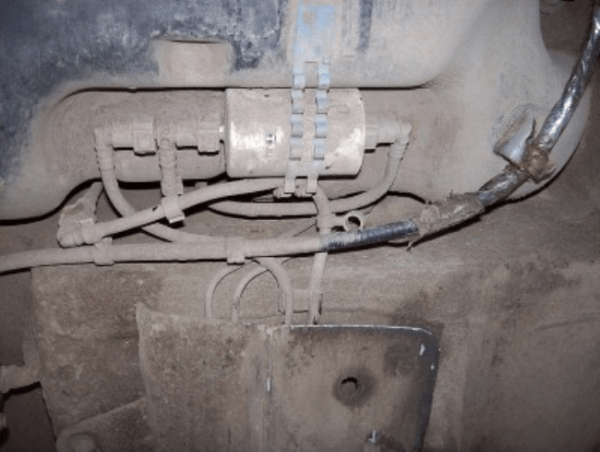
On the Corolla 100 body, the filter is located in the engine compartment. To replace it, it is necessary to remove the rubber air supply pipe from the filter to the throttle module. The branch pipe is fixed with conventional screw clamps with a 10 mm nut. A fuel pipe, fixed with a 17 mm nut, fits the filter, the filter itself is attached to the body with two 10 mm bolts. The lower fuel supply hose can be unscrewed through the tie rod hole on the left arch. There is no pressure in the system, so the supply of gasoline will be negligible. A new filter can then be installed (the cheaper SCT ST 780 is often used). A similar filtering system is used in the Corolla 110.
Another option is the right-hand drive 121 Corolla Fielder, which can be front-wheel drive or all-wheel drive. The location of the module on it is similar to the model 120, but only on all-wheel drive vehicles. In such configurations, an additional fuel sensor is installed on the right. In this case, the module itself has only one tube. On front-wheel drive vehicles, the module is installed in the center of the body, and two pipes go to it.
When removing the module from the tank, it is necessary to remove the additional fuel supply pipe from the second section of the tank. This tube is only on all-wheel drive Fielders. A front-wheel drive car has a conventional pressure regulator valve.
Cost of work
The price of original filters for model 120 is quite high and ranges from 1800 to 2100 rubles for the first part 77024-12010 and from 3200 (long wait - about two months) to 4700 for the latest version 77024-02040. A more modern 150-case filter 77024-12030 (or 77024-12050) is estimated from 4500 to 6 thousand rubles. At the same time, the cost of analogues Asakashi or Masuma is about 3200 rubles. The cheapest analogue of Shinko will cost 700 rubles. Since there is a risk of damage or loss of O-rings when replacing, two original parts, part numbers 90301-08020 and 90301-04013, must be purchased. These rings are inexpensive, their purchase will cost only 200 rubles.
An analogue of a coarse filter will cost about 300 rubles. For "English" cars, the original filter is estimated at about 2 thousand rubles, and the non-original one is about 1 thousand rubles. You will also need new tubes and o-rings, for which you will have to pay about 350 rubles. The SCT ST780 filter for Corolla 100 and 110 costs 300-350 rubles.
Spare parts for Fielder are much cheaper. So, the original filter costs 1600 rubles, and the analogues from Asakashi and Masuma cost about 600 rubles.
Consequences of untimely replacement
Untimely replacement of the fuel filter is fraught with various damage to the elements of the fuel system, which will require costly repairs. With a slight contamination of the filter, the fuel supply at high speeds worsens, which is expressed in a decrease in the overall dynamics of the Toyota Corolla car and increased fuel consumption. Increased fuel consumption leads to overheating and failure of the catalytic converter.
Dirt particles can get into the fuel lines and injectors to inject fuel into the cylinders. Cleaning clogged nozzles is a rather expensive procedure, and besides, such an operation does not always help. If they are damaged or heavily clogged, the nozzles should be replaced.
A clear embodiment of the quality of gasoline - propylene filter