Replacing the handbrake cable Lada Kalina
Content
Removing elements of the parking brake system
We will show the work of replacing the cable using the example of the left cable.
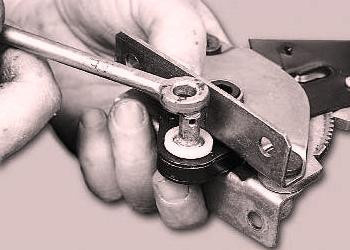
We unscrew the lock nut and the adjusting nut of the parking brake lever rod (see "Adjusting the parking brake").
Remove the equalizer cable from the parking brake lever linkage.
We take out the front tips of the equalizer wires and remove it.
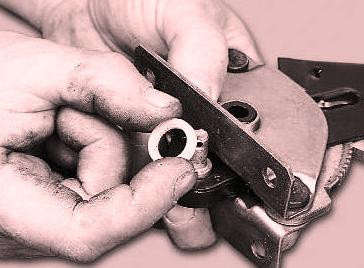
We take out the tip of the left cable housing from the bracket.
We disconnect the rear tip of the left cable from the lever for manually engaging the pads (see "Replacing the brake pads of the rear wheels").
We take out the tip of the cable from the hole in the brake shield.
Loosen the nut with a 10 wrench.
and remove the bracket to secure the cable box to the rear suspension beam.
Remove the cable box from the bracket on the bracket to fix the rear suspension beam.
Bend the bracket with a screwdriver.
and remove the cable from the bracket on the chassis.
We stretch the left parking brake cable through the protective screen of the fuel lines.
Similarly, remove the right cable from the parking cable.
Install the wires in the following order. We assemble one of the cables in reverse order and insert its front end into the cable equalizer. We introduce the thrust of the parking brake lever into the equalizing hole and give the adjusting nut a few turns.
To install another cable, we recommend making a fixture from a metal tube with a length of about 300 mm and a hole with a diameter of 15-16 mm. At one end of the tube, we drill a hole and cut a thread into it (M4-M6).
Installer term
We fix the cable on the body supports and the bracket for attaching the rear suspension beam.
We put the tube on the rear end of the cable and fix the cable sheath at the end with a screw.
With a rod (you can use a key from a set of sockets) we press on the tip of the wire, compressing its spring.
This will release the front end of the cable from the bushing and allow it to be inserted into the equalizer.
We carry out further installation of the cable in the reverse order. After replacing the cables, we adjust the parking brake.
To remove the parking brake lever, unscrew the parking brake lever stem jam nut and adjusting nut
We removed the cable equalizer from the parking brake lever linkage. Removing the steering wheel cover
Using the “13” head, unscrew the two bolts securing the parking brake lever bracket to the floor tunnel.
Remove the bracket with the parking brake switch.
Remove the parking brake lever with bracket and rod assembly by pulling the rod through the rubber sealing boot.
Using a screwdriver, pry off the thrust shaft mounting bracket.
and take it off
Remove the parking brake lever shaft and linkage.
Install the parking brake lever in reverse order. We adjust the parking brake (see "Adjusting the parking brake").
Handbrake cable adjustment on viburnum

Welcome! Handbrake cable - time goes by and little by little it stretches and stretches, and there comes a point when it just can't pull the rear brake pads because it's stretched so much and just can't pull anything anymore, we fix all this to make it clearer to you!
In general, this cable, who doesn’t know, goes from the handbrake (it goes under the bottom) and to the rear brake pads, the cable itself is attached to these pads, so when you raise the handbrake, the rear pads also come into motion, that is, they come into contact with the walls brake drum and in connection with this there is friction between the shoes and the drum (the shoes are strongly pressed against the drum, preventing it from moving) and because of this friction the rear wheels stop and do not move anywhere, but when the cable is weakened or pulled too much, it is more cannot pull the brake pads to the drum, and due to this friction, it is done with less effort and therefore the handbrake keeps the car worse and worse.
Note! In order to adjust the parking brake cable, stock up on the tools you will use to make the adjustment, which are wrenches and WD-40 type grease so that all the soured and rusty bolts come out better and don't break at the same time!
- Parking brake adjustment
- Additional video clip
Where is the parking brake cable located? In total, there are two cables on Kalina and they pass under the bottom of the car, for example, if you take classic cars such as VAZ 2106, VAZ 2107, etc., then they also put two cables on them, but the rear cable was one whole and immediately went to two rear wheels, but on Kalina it’s a little different, there are two cables and each of them leads to a separate rear wheel of the car (the cables in the diagram below are marked with a red arrow for clarity), and both cables are connected by a leveling bar, which is indicated by a blue arrow, here by the way you will need to adjust this bar and set your parking brake accordingly, but more on that later in the article, but now we are moving on with the scenario.
When should the parking brake cable be adjusted? It has to be adjusted when it stretches too much (Actually, if the cable is of good quality, it will stretch much more and much shorter), as well as when the rear pads are worn (Rear pads are worn) like any other brake system mechanisms wear out and wear out, like we said earlier, due to these pads, only friction is created that holds the car, but the more the pads wear out, the worse this friction becomes and in connection with this, the handbrake starts to hold the car very badly in one place).
Note! If you want to learn more about how you can check the performance of the handbrake cable, read an interesting article in which we describe everything in detail, and it is called: "Checking the handbrake on all cars"!
What else you need to know, have you ever paid attention to how many clicks the handbrake makes when you pull it up? So if the cable is tight, then the handbrake will definitely have to work in the region of 2-4 clicks, and during everyday driving, when the cable is already a little tight, the handbrake can work from 2 to 8 clicks, but no more, if more, urgently adjust cable in the car, because the parking brake will no longer hold the car.
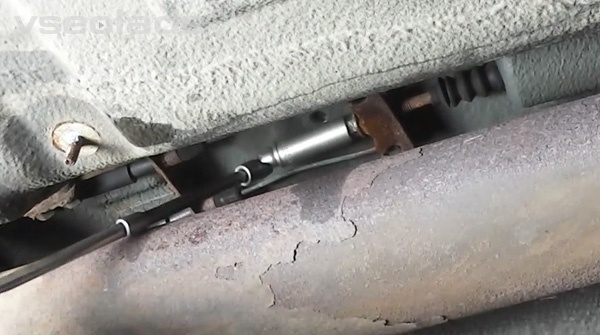
1) Many people are afraid to get into their car, although there is nothing wrong with that, the main thing is not to use too much brute force when working, but this is not about that, back to the topic. First of all, you will need to drive the car into an inspection hole and unscrew the four nuts from there (they are numbered in the photo below) that secure the metal casing, and then you will need to move this casing to the front of the car body.
Note! This cover protects the handbrake mechanism from salt and water particles that can quickly deform and render it unusable, and, as you may have noticed, it is located in the front of the car, just above the muffler, almost next to the engine!
By the way, since this is the bottom of the car, all the dirt and water gets into these nuts without problems, so to speak, and over time they turn sour and rust, in connection with this it becomes very difficult to unscrew them, because the above brute force is not required, because that you can just break the bolts or tear off the edges of the nuts, which will cause problems when reinstalling this metal case, so stock up on some kind of lubricant, such as WD-40, and apply it on all the nuts and especially on the threaded part of the studs, then for this we give move the grease a little and carefully slowly unscrew the four nuts that hold this casing!
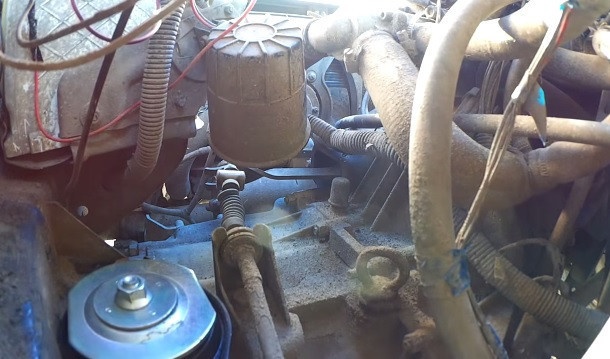
2) When the nuts are unscrewed, as mentioned above, you will need to take this housing with your hands and move it to the front of the car (you need to move it until you see the handbrake mechanism shown in the small photo below for clarity), but in order to see this handbrake mechanism in its entirety, we recommend removing the muffler from the side cushion, as shown in the large photo below, otherwise it will be much more difficult to move the muffler body out of the metal.
Note! Be careful with the muffler, don't burn yourself with it, especially if your engine gets very hot or just up to operating temperature!
3) And finally, when everything is done and you have full access to the entire mechanism, take the key or whatever is more convenient for you and use it to first unscrew the two nuts (the nuts are unlocked when you turn one, for example, clockwise and against each other , in general, in two different directions, in connection with this they are disconnected and can continue to rotate only if the nuts are locked, you are unlikely to unscrew one of them without unlocking it), and then you will need to turn the adjusting nut (indicated by the red arrow) in the direction you want, that is, if you need to apply the parking brake, tighten the nut so that it moves the adjustment bar mentioned above. (indicated by a blue arrow), and if you suddenly need to release the parking brake (example K dragged.
Note! When you're done and you've got those 2-4 clicks, finish your job and make sure both nuts are locked together, but you don't have to touch the adjusting nut to lock, i.e. just use a wrench to tighten the locknut marked the green arrow of the adjusting nut in the photo above and then lock them so that the adjusting nut does not loosen while driving!
Supplementary Video: For more information on adjusting the parking brake mechanism, see the following video:
Finishing of the VAZ 2110 handrail
Repair of the handbrake cable VAZ
| Over time, the parking brake on VAZ vehicles does not work the way it used to. This may be due to wear on the parking brake cable housing, which allows dirt to enter the cable through the holes formed, interfering with normal operation. The parking brake cable does not have to be replaced with a new one, it can be repaired. |
To determine the condition of the parking brake cable, it must be removed. The disassembly process is shown in the video: We inspect the handbrake cable housing for scratches. We check the operation of the cable and spring by pulling and releasing the cable. Nothing should interfere with your movement. Most often, to restore the cable to work, it must be lubricated with synthetic lubricant (do not use oil, it will thicken in the cold). And also remove scuffs on the body so that dirt does not get inside. Scuffs can be “patched” with electrical tape, but there is another, more productive way - using thermal cambra, which can be purchased at a hardware store. We put it on the handbrake cable and heat it so that it shrinks around the perimeter of the cable. After installing such an additional sheath and lubricating the cable, it can be safely used for several more years. The process of checking the condition and repairing the handbrake cable is shown in the video: By the way, a thermal cambra can also be installed on the new handbrake cable, which will extend its service life. We add that there is another way to modify the handbrake.
How to adjust the parking brake? Safety and comfort
Welcome! Clutch cable - thanks to it, you can control the clutch fork, and at this time you can disconnect the clutch from the flywheel, thanks to the release bearing, a cable is used on all front-wheel drive cars, because it is located in the deep front, on the classic, the clutch master and slave cylinders are used together with the cable ( there is no clutch cable), these cylinders work differently, unlike the cable (the cable just pulls), but the result is the same (the clutch is disconnected from the flywheel due to the release bearing) and the action occurs due to the same drive, i.e. due to clutch pedals.
Note! To carry out the replacement work, you will need to use: Be sure to use wrenches, and in addition to them, you can use any other wrench that can unscrew the bolts and nuts, in addition to this, you will also need a gauge or stock up on a ruler and pliers instead!
- Replacing and adjusting the clutch cable
- Additional video clip
Where is the clutch cable located? We won’t be able to show in detail where it is located, since it is located below and the angle that was taken in the photo below simply will not allow you to see this place, but we will still try to describe where it is, and it is, first look for the box, for greater clarity in the photo, it is marked with a red arrow, a cable is connected to this gearbox that comes from the passenger compartment, so you can already make an approximate conclusion where the cable goes, to all this, look at the blue arrow, which also shows the approximate location of the cable clutch in the engine compartment of the car.
When should the clutch cable be changed? Any cable, including the cable that goes to the parking brake, which goes to the gas (The gas cable is correctly called) must be replaced if it breaks (If it breaks, you won’t be able to use the system at all, that the cable goes, for example, the gas cable broke, the car no longer rides, the clutch cable has broken, the clutch system will no longer work the same way), with strong tension, which, by the way, greatly interrupts the operation of the clutch system (the clutch may not be completely disconnected from the flywheel, so gear shifting will be difficult and with a creak) , as well as switching during souring.
How to replace and adjust the clutch cable on a VAZ 1117-VAZ 1119?
Disassembly: 1) To begin with, while in the cabin, go to the clutch pedal and remove the cable sheath stopper from the pedal support, this is done very simply, that is, take the key and use it to unscrew the stopper fastening nut (see photo 1), as soon as the nut is turned, the stopper is removed from the bracket pin (see photo 2), after which access to the coupling pin opens, from which you will need to remove the stopper with pliers or a screwdriver (see photo 3), after removing the plug, remove the compensation mechanism housing with the same finger wear of the lining of the driven disk (see photo 4).
2) Now manually remove the plastic bushing from the clutch pedal finger (see photo 1), check its condition, it should not be deformed or badly worn, otherwise replace it with a new bushing (Before installing a new bushing, lubricate it Lubricate Litol-24 or LSTs-15), then remove the rubber seal of the cable cover from the hole it closes (see photo 2), then get out of the car and move to the engine compartment of the car to the box, reaching it, pull the tip of the clutch cable forward and thus disengage the fork (see photo 3), and then unscrew the strap and remove it from the tip of the cable, as shown in the fourth photo.
3) And, finally, we remove the cable from the bracket in the box, we immediately notice the fact that the bracket on the Lada Kalina is one-piece, and not detachable, as shown in the photo below (The photo below shows only another car, not a bracket, but the clutch fork is shown ), therefore, from this hole it will be necessary to stretch the cable (the cable is indicated by the blue arrow) into the car interior (in the direction indicated by the green arrow) and, therefore, lead the entire cable from the engine compartment to the car and thus completely remove it from the car (with removing the cable, remove the guide sleeve from the clutch cable housing).
Installation: Installation of a new cable starts from the passenger compartment, and to be more precise, you will first need to push the cable from the passenger compartment into the engine compartment and then, while it is in the passenger compartment, put the wear compensation mechanism of the clutch disc lining on the clutch bolt and fix it with a locking bracket, after fixing the cable stopper install the bushings in place and thread the cable housing rubber seal into the hole while it is in the car, and then you can proceed to the engine compartment, where you will need to push the cable through the bracket (see photo 1) and install the cable guide bushing cover, when the bushing is installed, on the clamp is twisted at the lower end of the clutch cable, and it should be twisted in such a way that the tip of the cable protrudes 0-1 mm from the end of the strap, having achieved this protrusion, overcoming the force of the cable spring, pull it forward to the end, and when the cable is fully extended, take gauge and, holding the end of the cable extended, measure the distance indicated by the letter "L" in the photo o 2, this distance should be “27mm”, if the distance does not match, then turn the strap on the end of the cable, make sure that it is exactly the same, once everything works for you, install the end of the cable into the groove of the clutch fork and release it, and also make sure that under the action of the spring, the toe is installed without play on the clutch fork and, finally, pressing the clutch pedal two or three times, measure the distance “L” again and, if necessary, adjust the clutch cable on the car.
Note! This distance, which is indicated by the letter "L", is the adjustment distance, which should be exactly this, with the correct adjustment of the cable, but also keep in mind that the cables are different and if any defects are found that can be longer than the regular native cable, or to be shorter, then there won’t even be a “27mm” distance, so buy good parts from trusted places and if you see that the release bearing is already starting to work with such a fit (that is, you don’t press the clutch pedal, but there is already noise from the release bearing), then in this case, you can neglect and adjust the cable no longer according to the information that the factory writes, but precisely because your choice!
Additional video clip: You can see how the clutch cable is replaced on the example of a VAZ 2110 car in the video below, but please note that the cable is replaced a little differently on Lada Kalina, but after reading this article and watching the video, most likely you won't have any trouble changing the cable.
Some drivers, in an effort to achieve less wear on the parking brake cable, try to use it less frequently.
Such "economy" leads to a bad result - the cable, rarely moving in the casing, gradually loses its mobility and eventually gets stuck and breaks. Use the parking brake if necessary.
Replacing the pull rod spring of the pawl of the parking brake lever
If the parking brake lever does not lock in the selected position, check the pawl spring first. If the spring is OK, replace the lever.
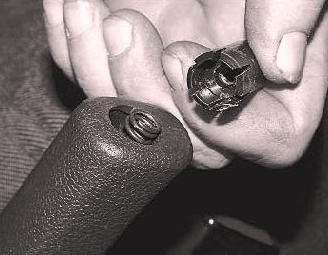
1. Unscrew the lever button
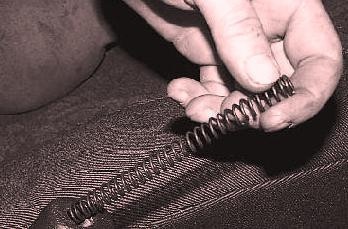
2. Remove pawl spring. Replace defective spring
Parking brake lever repair
You will need: two "13" keys, one "13" socket wrench (head), one Phillips screwdriver, pliers.
1. Disconnect one cable from the negative battery plug.
2. Remove the tunnel lining from the floor.
3. From the bottom of the car, using a “13” wrench, unscrew the lock nut and the parking brake adjusting nut and remove the equalizer 1 from the rod 2.

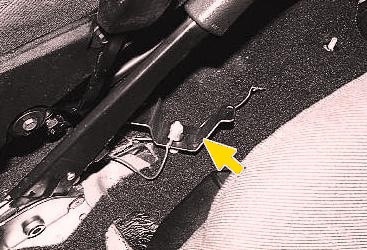
4. Remove the protective cover from the floor opening and remove it from the link.
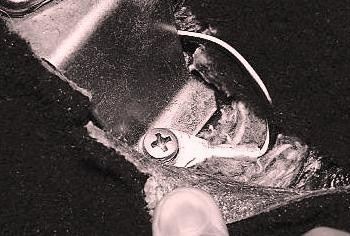
5. From inside the passenger compartment, remove the screw from the front fastening of the parking brake switch bracket.
Please note that the ground wire of the switch is fixed with a screw.

6. Using the “10” key, unscrew the four bolts securing the parking brake lever (the two front ones also hold the switch bracket).
7. Set the switch bracket aside.
8. Remove the parking brake lever by pulling the link out of the hole in the floor.
9. To replace the stem, remove cotter pin 1 and remove washer 2.
10. Remove the link from the axle.
11. Replace worn or cracked plastic bushings.
Assemble and install the parking brake lever in the reverse order of disassembly.
After installing the lever, adjust the parking brake