DIY roof rack
The problem of free space in the trunk worries any car owner. If you like to go on long trips with your family in your car or go fishing and hunting with friends, then you can not do without an additional roof rack.
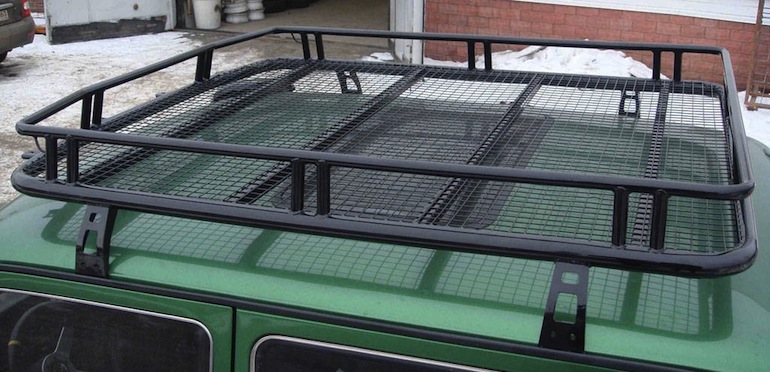
Such a trunk is called expeditionary., because you can’t put very heavy objects on it, but those things that you will need during the trip - tents, fishing rods, folded bicycles, clothing sets and so on - all this can be easily placed on the roof rack.
Also popular is this type of trunk, such as autoboxing. Its main advantage over the expedition one is that all your things will be protected from the weather, and the box itself has a streamlined shape and will not affect the aerodynamic properties of your car too much.

Nowadays, cars are rarely equipped with roof racks. Although there are regular places for their installation, as well as roof rails on crossovers or station wagons.
You can order from the masters or buy a trunk that fits your car in size, but it will all be quite expensive. Those people who have the skills to work with metal can make such a trunk on their own with all the necessary tools.
Making a roof rack with your own hands
Material selection
First of all, you need to decide on the material. It is clear that the best choice is metal. But you need a metal with low weight and excellent strength characteristics.
Aluminum is the best option as it is light weight, easy to work with, fairly durable and corrosion resistant.
You can also use a profile thin-walled tube, they prefer to install it on domestic SUVs - LADA Niva 4x4 or UAZ Patriot.
Very cheap option - this is sheet stainless steel, it is quite flexible and durable, however, its disadvantage is the weight, which is definitely more than that of aluminum and a metal profile.

Measurements
When you have decided on the type of metal, you need to make accurate measurements. This will help you calculate the total weight of the future structure, its approximate cost and, of course, the amount of materials.
It is best not just to measure the length and width of the roof, but to immediately draw up a project:
- skeleton;
- jumpers that are used to reinforce the structure;
- sides;
- carrier panel - it will be the bottom of your trunk, and also strengthen it.
You can come up with additional elements - to make the front side of the car streamlined in the direction of the car, so as not to disturb the aerodynamics very much.
Getting Started
If you have a detailed plan and scheme of work, then you can consider that the job is half completed.
- First, the profile is cut with a grinder according to the drawn up scheme.
- Then the perimeter of the expedition trunk is welded - you will get a rectangle of a certain size.
- The perimeter is reinforced with longitudinal bridges, which are also welded to the resulting base. For greater reinforcement, the longitudinal lintels are interconnected, resulting in a lattice base - the bottom of your trunk.
- A rectangular trunk is not very beautiful, it can spoil not only the aerodynamics, but also the appearance of your car. Therefore, an arc is usually welded to the front, which is made from the same metal profile.
- Then proceed to the manufacture of the sides of the trunk. To do this, cut from metal racks about 6 centimeters long. It is worth noting that the sides are usually made removable, that is, these racks are best not just welded to the base, but put on a thread. To do this, holes are drilled in the base, into which bushings are then welded. Bushings are needed so that when the bolts are tightened, the metal profile is not deformed.
- The racks are welded to the top bar, which is the same size as the base bar, with the only difference being that the left and right side bars are usually made a little shorter, and the two front bars connecting the bar and base are set at an angle to make your trunk look different. like an ordinary metal box, but followed the contours of the car. The front arc, by the way, is also used for this purpose.
- Now that the trunk is almost ready, you need to paint it and attach it to the roof of the car. In order for the paint to hold well, you first need to prime all surfaces well and allow the primer to dry. Then we apply paint, best of all from a spray can - so there will be no streaks and it will lie in an even layer.
- There are many ways to attach such a trunk - if you have roof rails, then they can easily withstand the weight of the entire structure, and it usually amounts to 15-20 kilograms. If there are no roof rails, then you will have to drill the upper part of the body and install the trunk on special brackets. Some cars have special regular places - notches for fastening. If you wish, you can find various types of fasteners in stores that will allow you not to drill your car.
Advantages and disadvantages of forwarding trunks
The most important advantage is the additional space for transporting any things you need. The trunk is also an excellent protection against dents and blows from above.

Many other examples of roof racks can be found. Some people just install a few cross rails to which they can attach whatever they want. Also, fog lights are usually installed on such trunks, and a radio antenna is attached. If you're heading off-road, the rooftop is a great place to store essential tools like a shovel or hijack.
However, there are also a number of disadvantages:
- deterioration of aerodynamics;
- fuel consumption increases - even small cross rails can lead to the fact that the consumption in the extra-urban cycle will increase by half a liter-liter;
- noise insulation worsens, especially if the mount is not fully thought out;
- if the weight is not properly distributed, handling may be impaired.
It is because of these shortcomings that it is desirable to make such trunks removable, and use them only when necessary.
In this video you will learn how to make a car roof rack on your own.
Loading…

