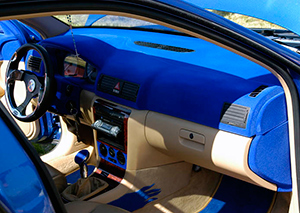
Flocking a car interior - a luxurious do-it-yourself interior!
Content
In the modern automotive industry, most parts inside the cabin are made of plastic. You can’t call such salons original, but the situation can be corrected without drastic changes! Car interior flocking is a great way to transform your car from the inside!
Flock - what kind of material?
Simply put, flock is finely chopped or chopped textile fibers. The material is divided into two types - an uncalibrated flock under a microscope will look like a mass of fibers of different lengths, but the cut (calibrated) material is verified with high accuracy, up to fractions of a millimeter! Cotton, viscose, polyamide - half a century ago, flock was made from natural fibers, but today they have been replaced by synthetics, which are characterized by increased resistance to mechanical stress.

Especially polyamide - its fibers are always perpendicular to the surface, while viscose is more delicate and less resistant to stress.
Depending on the size of the fibers, flocking can produce suede, velvet or felt-like surfaces. Processing can be selective or continuous - in the latter case, objects are covered with a continuous layer of flock, regardless of shape and material. Selective flocking is possible thanks to stencils - only the necessary part or detail of the interior is covered.

The application of fibers to the surface will not give the desired effect without special equipment - floccators. They generate a negative electrostatic field, due to which the fibers acquire the same position relative to the surface. Flockers can be both manual and stationary - a manual version is suitable for flocking a car.

Flocking the car interior - is it possible to do it yourself?
In fact, flocking technology is not as complicated as it might seem at first glance. Of course, most drivers will prefer to turn to specialists, because for self-processing you will have to buy equipment that certainly will not pay for itself in one “session”. In any case, those who want to give the car interior an unusual velvet or suede look will need knowledge of how the processing takes place - at a minimum, you will find a common language with the master, and at most you will be able to make reasonable claims in case of poor-quality work.

To flock the car interior, all parts to be processed must be dismantled and cleaned of dust and dirt. The plastic inside the cabin can be different, and the processing must be appropriate: if it bends, it is enough to walk on it with a sandpaper, but if it breaks, you need to treat it with a special composition - a primer, after which you need to wait 10 minutes.

Flock can be mixed, depending on what color or shade you would like to get. Then the material is poured into the floccator - 1/3 of the free space must remain inside the container. Depending on the material from which the surface is made, you need to choose the appropriate adhesive. Most often these are AFA11, AFA22 and AFA400.
Suede effect - flocking steps
One of the most important steps is the application of glue. It is important not to rush, because if the glue is applied unevenly, the final surface will also be inhomogeneous. Particular attention is paid to the corners. For plastic, you need a little glue - the excess is removed with a brush, otherwise the flock will “sink” in a large layer. If you are going to process materials that can absorb glue, for example, leather interior parts, then you need to apply it more.

If you decide to do the whole process yourself, you can slightly tint the glue for better visibility, so you can control the thickness of the glue. You can flock in stages - this will not affect the quality. If you decide to process the surface details, then before applying the glue, you should highlight the desired areas with tape or masking tape. However, immediately before flocking, they must be removed.
The workpiece must be grounded so that the flock does not scatter to the sides. To be precise, the adhesive must be grounded, so when catching the clips, pay attention to whether they touch the adhesive. Grounding should also be at the flokator and the table on which the part will be located. It can also be hung on hooks - it is important that you can get close to it from all sides. The flokator handle is usually made of metal, which must be grasped with a bare hand to ensure grounding.

When processing, it must be kept perpendicular to the part at a distance of 10 to 15 cm. It is necessary to apply the flock in several approaches, after each time blowing off the excess flock with a hairdryer. For a high-quality coating, three layers of material are enough. After flocking, the part must dry, at a temperature of 20 ° C, a day is enough. When the glue is completely dry, you should go over the part with a brush to remove the excess flock. We install the parts back into the salon and enjoy the updated and original interior! Do not forget about the steering wheel - against the backdrop of such beauty, it will need to be given attention, for example, to sheathe the steering wheel with leather!

