How and when to change brake discs
It is important for any driver not to miss the moment when old parts become unusable and it is time to install new ones in their place. This is especially true for the braking system, because otherwise there is a risk of an accident and we definitely do not need to explain what consequences this can lead to. Whether you like it or not, even the highest quality brake discs have to be changed. Let's figure out how to do it.
When to change
There are two situations in which brake discs are changed. The first case is when tuning or upgrading the brake system, when the driver decides to install ventilated brake discs. More and more drivers are switching from drum brakes to disc brakes as the latter are more efficient and last longer.
In the second case, they are changed due to breakage, wear or mechanical failures.
How do you know when it's time for a change? It's not difficult, your car will give itself away. In general, the "symptoms" that indicate heavy wear are as follows:
- Cracks or gouges that are visible to the naked eye
- The brake fluid level began to drop sharply. If this happens all the time, your brakes need to be repaired.
- Braking is no longer smooth. You began to feel jerks and vibrations.
- The car "steers" to the side when braking. The stiffness of the pedal disappeared, it became easier to go to the floor.
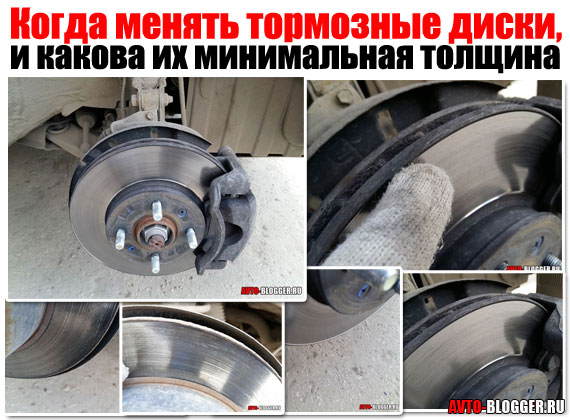
- The disk has become thinner. To diagnose the thickness, you will need a regular caliper, with which you can take measurements at several points and compare these results with information from the manufacturer. The minimum allowable disc thickness is indicated on the disc itself. Most often, a new and worn disc differ in thickness by only
2-3 mm. But if you feel that the brake system has begun to behave unusually, you should not wait for the maximum allowable wear of the disc. Think about your life and do not take risks once again.
Brake discs are always changed in pairs on each axle. It doesn't matter if you prefer a quiet ride or not, brake discs need to be checked regularly. Diagnostics are carried out for wear and check for mechanical defects.
Experience suggests that in practice the front brakes are repaired more often than the rear ones. There is an explanation for this: the load on the front axle is greater, which means that the brake system of the front suspension is loaded more than the rear.
Replacing the brake discs on the front and rear axles does not make much difference from a technical point of view. In general, experts recommend changing discs after the first groove; the second turning procedure is not allowed.
Change procedure
To change, we need the actual brake discs themselves and a standard set of tools:
- Jack;
- Wrenches corresponding to the size of the fasteners;
- repair pit;
- adjustable stand (tripod) and stops for installing and fixing the car;
- wire for fixing the caliper;
- Partner for "hold here, please."
When buying new discs (you remember, we change a pair on the same axle at once), we recommend that you grab new brake pads as well. Ideally from a single manufacturer. For example, consider a manufacturer of parts for Chinese cars. Mogen brand spare parts undergo scrupulous German control at all stages of production. If you want to save on pads and keep the old ones, be aware that on a new brake disc, the old pads can fill the grooves. This will inevitably happen, because it will not be possible to provide a uniform area of contact of the planes.
In general, the change procedure is quite typical and unchanged for most cars.
- We fix the car;
- Raise the desired side of the car with a jack, put a tripod. We remove the wheel;
- We dismantle the brake system of the working point. then we squeeze the piston of the working cylinder;
- We remove all the dirt from the hub and caliper, if we do not want to change the bearing later;
- The partner squeezes the brake pedal to the floor and firmly holds the steering wheel. In the meantime, your goal is to unscrew (“rip off”) the bolts that secure the disc to the hub. You can use the magical WD fluid and make the bolts function with it.
- We remove the brake clamp, and then fasten it with a wire so that it does not damage the brake hose;
- Now we need to disassemble the caliper assembly: we find and remove the pads, observe them visually and are heartily glad that we have acquired new ones;
- If you still have not purchased new pads, there is still an opportunity to do this;
- Remove the compression springs and the caliper clamp itself;
- We fix the hub, completely unscrew the fixing bolts. Ready! Now you can remove the brake disc.
To mount new drives, simply follow all of the above steps in reverse order.
After the shift, all that remains is to pump new brakes and your car is ready for new trips.