
How to use a multimeter to test a 220v outlet
Content
Different electrical devices require different amounts of energy to operate.
For heavy equipment in your home, such as washing machines, power from outlets should typically be 220V.
In addition, equipment can be damaged if excessive voltage is applied to it. Such equipment usually uses 120 V sockets.
How do you measure the amount of voltage generated by an outlet to make sure your equipment is working properly or not damaged?
In this article, you will find everything you need to know about testing 220V outlets, including how to perform a quick diagnosis with a multimeter.
Let's get started.

How to test a 220v outlet with a multimeter
Set the digital multimeter to an AC voltage range close to 220VAC and 240VAC, insert the black probe of the multimeter into the neutral port and the red probe into the hot port. If the multimeter does not show a value close to 220 VAC, the outlet is faulty.
There are many other things you need to know, and we'll dive into the details now.
- Take precautions
To determine if an outlet is putting out the right amount of voltage, you need to have current flowing in its circuit.
This means that there is a risk of electric shock, and with the voltage we are dealing with, measures must be taken to prevent this.
As a precaution, insulated rubber gloves should be used during the procedure.
You also avoid metal probes touching each other, as this can lead to a short circuit.
It is also recommended to hold both probes with one hand to minimize the effects of electric shock.
- Set the multimeter to AC voltage
Your appliances use alternating current (AC voltage) and that's what the sockets in your house give out.
To perform the appropriate checks, turn the dial of the multimeter to AC voltage. This is usually referred to as "VAC" or "V~".
Also, since you're going to be diagnosing a 220V outlet, make sure your multimeter is set to close to 220V (usually 200V).
This way you will get the most accurate results.
- Setting up the multimeter wires
Insert the large end of the test leads into the corresponding holes on the multimeter.
Connect the red "positive" wire to the port labeled "+" and the black "negative" wire to the connector labeled "COM". Don't confuse them.
- Insert the multimeter leads into the exit holes
Now you plug the multimeter leads into the appropriate output ports. As we all know, three-prong sockets usually have hot, neutral, and ground ports.
Insert the multimeter's positive test lead into the hot or working port, and the multimeter's negative test lead into the neutral port.
The neutral slot is usually the longer port to the left of the output, and the hot slot is the shorter one to the right.
The ground port is a U-shaped hole above the other ports.
If you're having trouble identifying outlet ports, our article on how to identify outlet wire with a multimeter will help.
Sockets with four pins can have an additional L-shaped port. This is another land port and can be ignored.
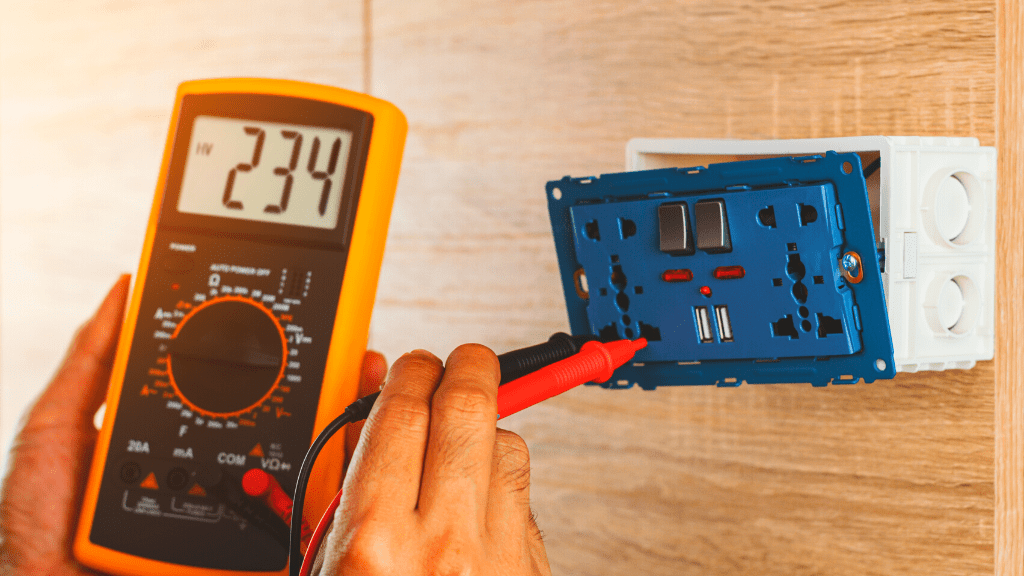
- Evaluate the results of the multimeter readings
This is where you determine if your 220 volt outlet is in good condition or not.
When you correctly insert the multimeter leads into the exit holes, the meter will display a reading.
If the value is between or very close to 220V to 240V AC, the outlet is good and another electrical component may be causing the problem.
Here is a video that will walk you through checking the outlet with a multimeter:

If the value is not close to this range, or if you get no reading at all, the output is faulty and needs to be checked carefully.
- Checking for Issues
You can run individual output port tests to see which one is bad.
Place the black probe into the ground port and insert the red probe into any of the other slots.
If you are not getting close to 120VAC from any of the slots, then that slot is bad.
Another way to check what is wrong with the outlet can be to check the ground with a multimeter.
In addition, if the multimeter gives the correct reading, you can connect electrical equipment and see if it works.
If that doesn't work, check to see if the wiring in the outlet is reversed.
To do this, check if the multimeter gives a negative reading when you plug the wires into the correct output jacks.
A negative value means that the wiring has been mixed up and the equipment may not be compatible with it.
In this case, do not plug the electrical equipment into a power outlet, as this may damage it.
Make the appropriate corrections as soon as possible and connect the equipment to see if it works.
Finally, you can look into your home's circuit breaker and see if it hasn't tripped.
Follow the same procedures to test 120 volt outlets.
The only difference is that instead of looking for readings close to 220 volts, you are looking for readings close to 120 volts.
Conclusion
Checking a 220 volt outlet is one of the easiest procedures.
You simply plug the multimeter leads into the hot and neutral sockets and see if the readings are close to the 220VAC range.
There is a danger of electric shock, so be sure to take safety precautions.
F.A.Q.
What setting should I use on the multimeter to test the outlet?
Set the multimeter to an AC voltage range close to 220 volts. This is usually denoted "VAC" or "V~". Your multimeter is set to VAC because that's what appliances and outlets use.
Can you get an electric shock with a multimeter?
Yes, you may be shocked when using a multimeter to test an outlet. This happens if the wires are exposed or if you touch the metal leads, as current is still flowing in the output circuit.

Alex Klein is an electrical engineer with over 15 years of experience. He is the host of the Electrouniversity YouTube channel, which has thousands of subscribers.
