
How to fix an engineer's square that is not a square?
Content
| If you have an engineer's square that you have checked and found that it is not actually a square, the following method can be used to fix it: | |
Other equipment you will need: | |
| float glass sheetThis is glass that has been formed by molten glass floating above the surface of molten metal (usually tin). This process produces a very precise and flat surface, which is essential to provide a reliable flat surface for your engineer's square to grind. |
 | |
 | Sandpaper or wet and dry paperYou will need a set of different grit sandpaper or wet and dry paper to remove material from the blade and stock. |
Get started | |
 | Please note: While this method is useful for correcting a square used for woodworking, you do not know what degree of accuracy you have achieved, so if you are doing more precise work you should have your engineer's square calibrated or corrected by a UKAS accredited company. |
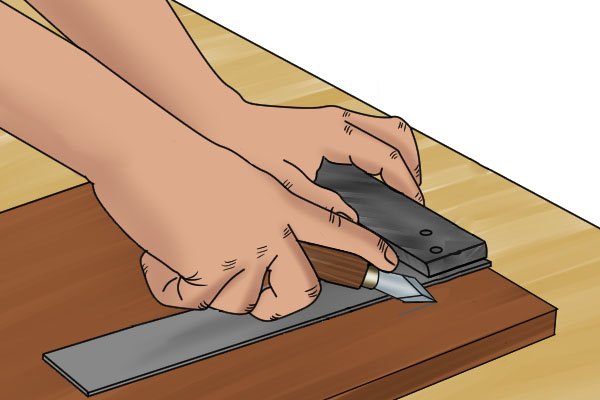
 | Step 1 - Glue the sandpaper to the float glass.Place a sheet of float glass on your workbench and glue a sheet of sandpaper or wet and dry paper to it. Start with rougher paper; this can then be changed to finer grit paper as you get close to the correct edge on your engineer's square. |
 | Step 2 - Wipe the blade with sandpaper.Then take your engineer's square and rub the outer edge of the blade against the paper you've glued to the glass. Apply more force to either the tip or end of the blade, whichever side needs more material removed to correct the square. |
 | |
 | Step 3 - Repeat with the inside edgeOnce the outer edge of the blade lines up with the inner edge of the stock, you will need to repeat this process for the inner edge of the blade. To do this, it is best to place the float glass right at the edge of the desktop. This will allow you to position the inside edge of the blade evenly on the sandpaper and the stock to hang over the edge of the glass and bench. |
 | Repeat the process of sanding the edge and checking for squareness of the blade on the inside edge, reducing the paper grain as you go. |
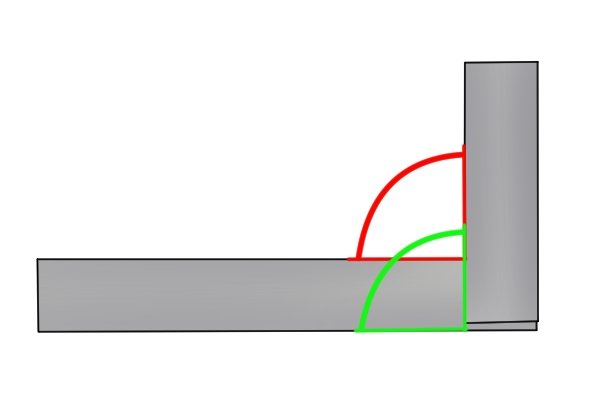
 | Once you do this, you will know that your engineer's square is the square between the inside of the blade and the inside of the stock (corner shown in red) and the outside of the blade and inside of the stock (corner shown in green). ). If your square is the square between both of these positions, then you will also know that the inside and outside of the blade are parallel to each other. |
 | Now you can check the outer edge of the blade to make sure the outer edge of the stock is square using a known square piece of wood. |
 | Step 4 - Repeat the process with a marginIf it's not a square, you can repeat the previous method with the outside edge of the workpiece, applying more pressure to the end of the workpiece that requires material removal to make it square. |
 | After you've completed this, your engineering square should be square between all of its edges, and also have parallel outer and inner edges on the stock and blade. |

