How to adjust Kalina valves
Content
Adjusting valve clearances
It is carried out only with a cold engine - the optimum ambient temperature is +20 degrees. Prepare in advance:
- pliers with narrow jaws;
- screwdriver;
- heads;
- syringe for removing oil;
- tweezers;
- valve cracker (device);
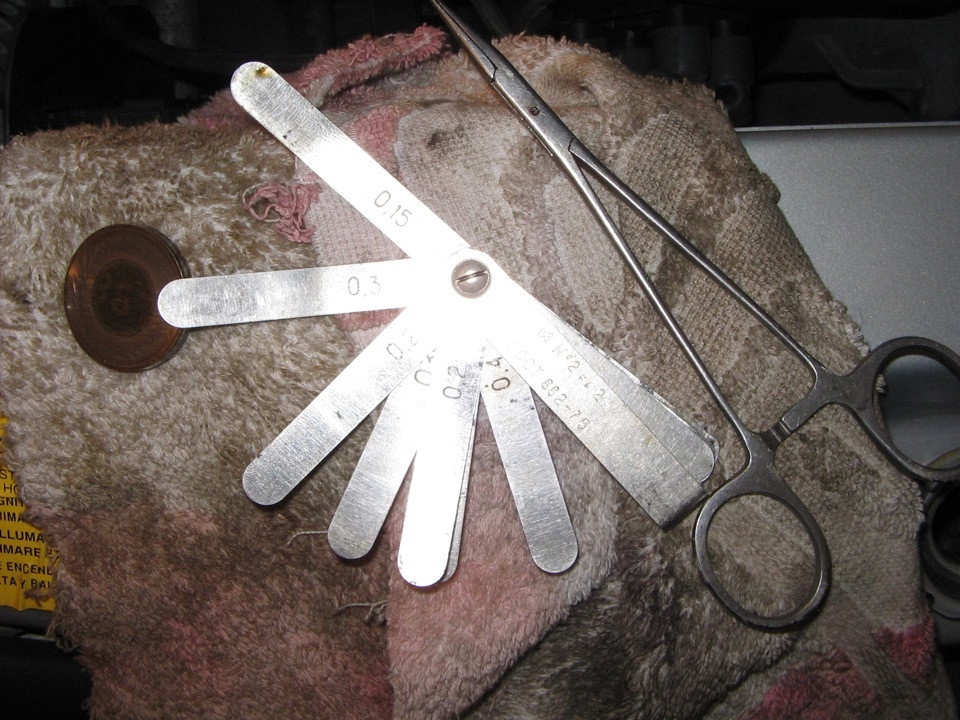
- probe (0,2 and 0,35 mm);
- adjusting washers.
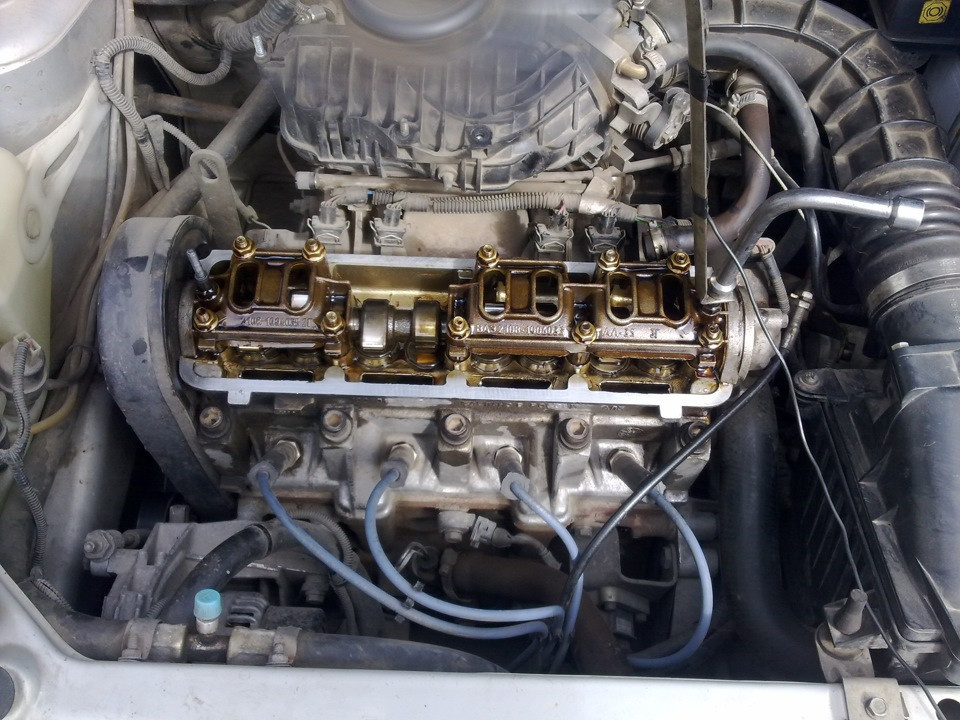
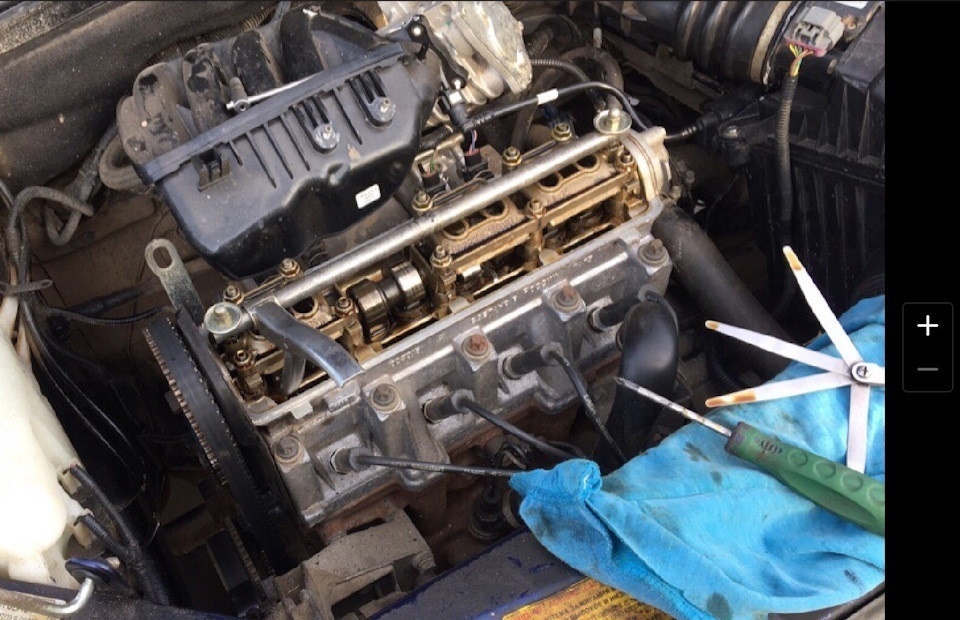
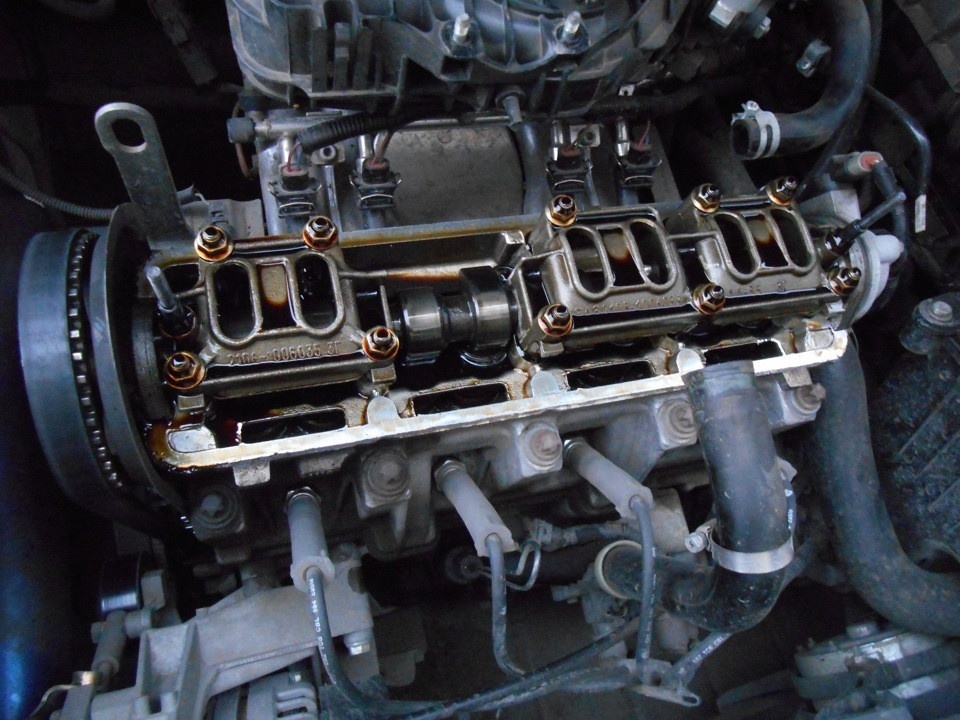
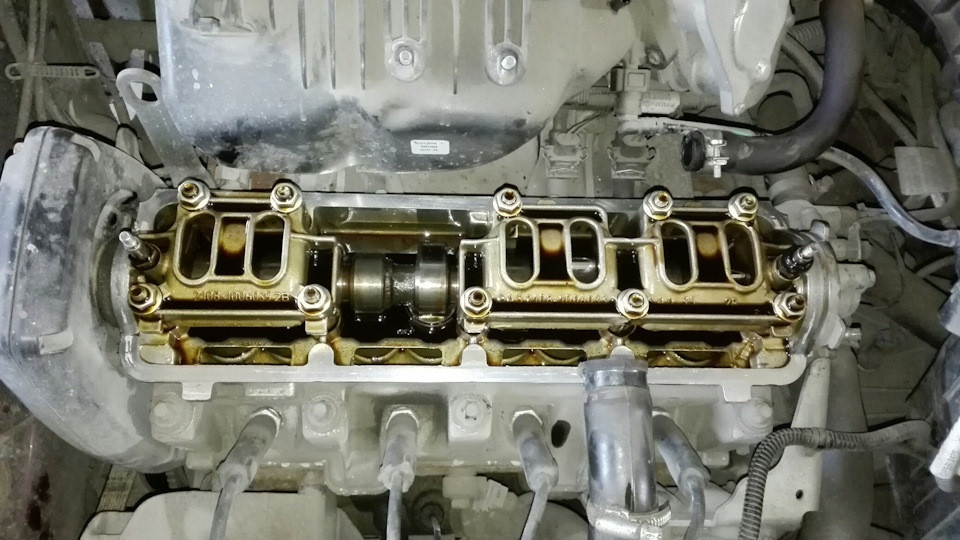
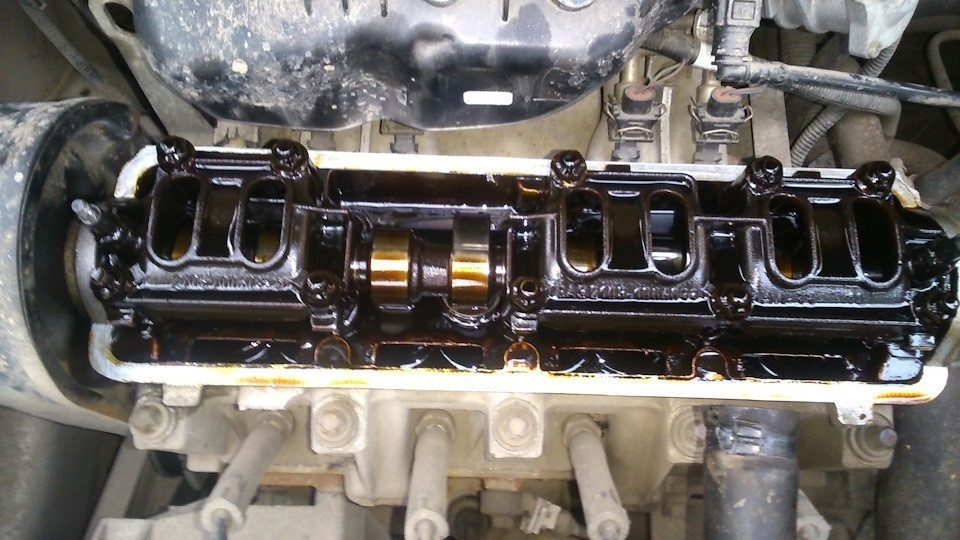
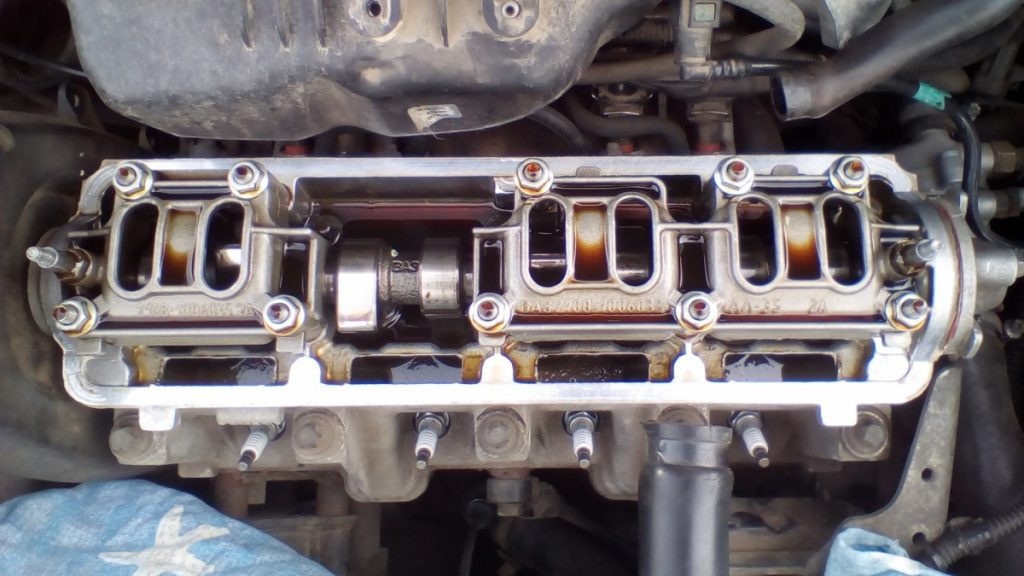
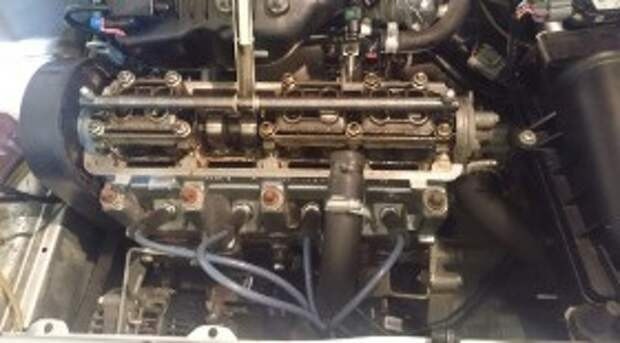
Loosen the bolts holding the valve cover, remove it and remove the spark plugs. At the same time, inspect the camshaft lobes to ensure there is no wear. Then use a syringe to remove the oil from the head. Attach the valve wire to the studs. Next steps:
- Turn the crankshaft and align the marks on the timing cover and pulley. Then turn the shaft another three teeth on the pulley.
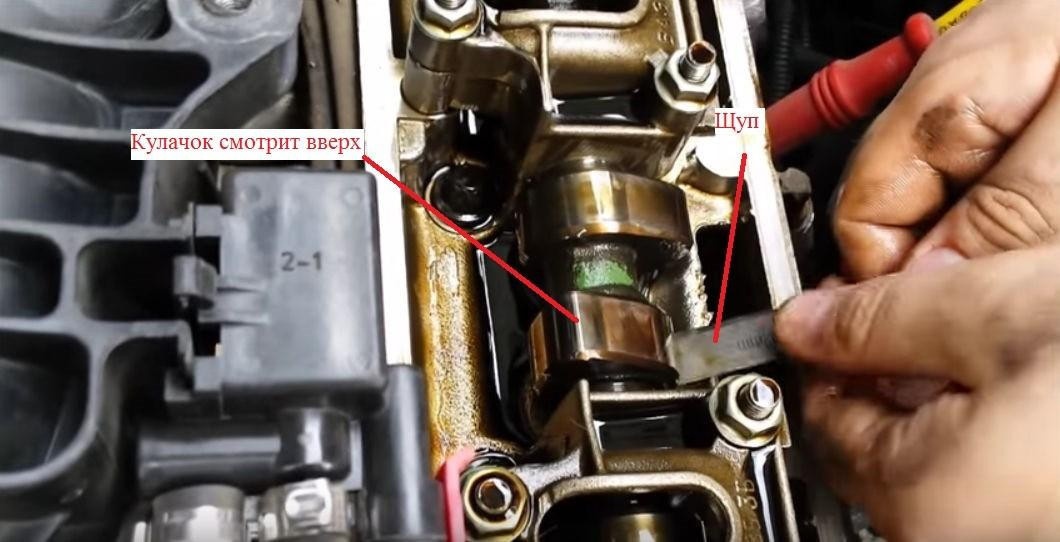
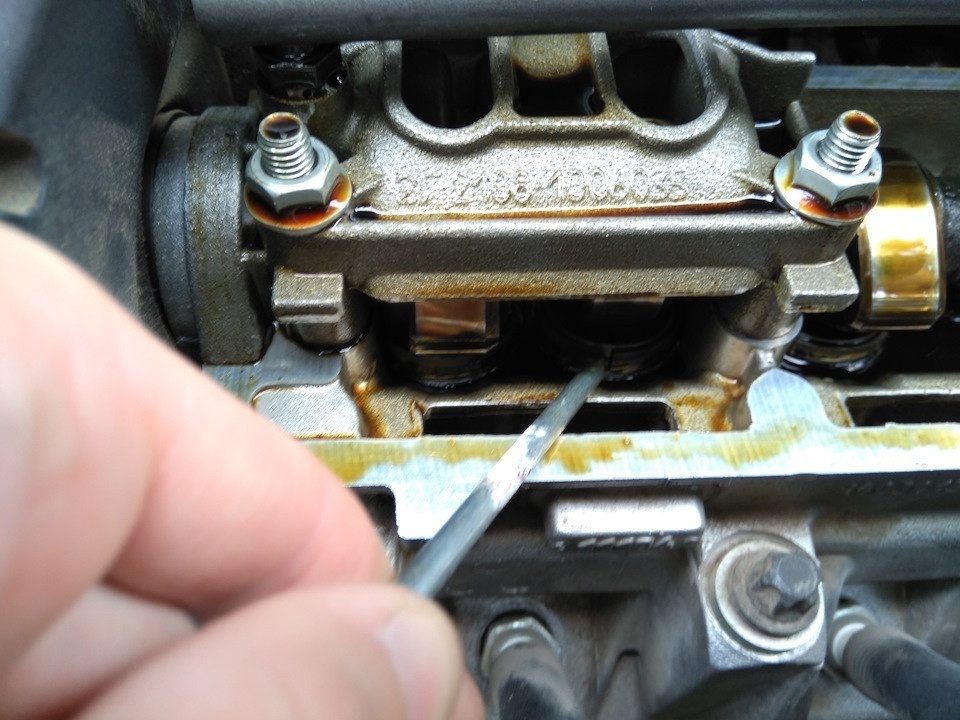
- Using a 0,2mm (inlet) and 0,35mm (outlet) feeler gauge, check the gaps. For reference: To determine where the inlet and outlet valves are, count from left to right: outlet-inlet, inlet-outlet, etc. Shims should be replaced when the feeler gauge passes easily. To do this, lower the valve with a tool, without turning the tappet with a flat screwdriver.
- Grasp the pusher at the bottom and use pliers to remove the old washer and install a new suitable one.
- Remove the retainer and check the gap again - the probe should pass without much effort.

Regulation order: 1st start - 2nd start, 5th start - 2nd start, 8th start - 6th start, 4th start - 7th start.
Valve adjustment Kalina, with an 8-valve engine, is necessary when an unpleasant and alarming sound appears, reminiscent of metallic noise under the hood. This indicates that the valves "require" immediate adjustment. To perform the above adjustment, you will need to prepare some tools, namely: screwdrivers (flat and Phillips), long nose pliers (or tweezers), a set of probes, washers to adjust the required size, a 10 wrench (head) with a handle, as well as a special adjustment tool.
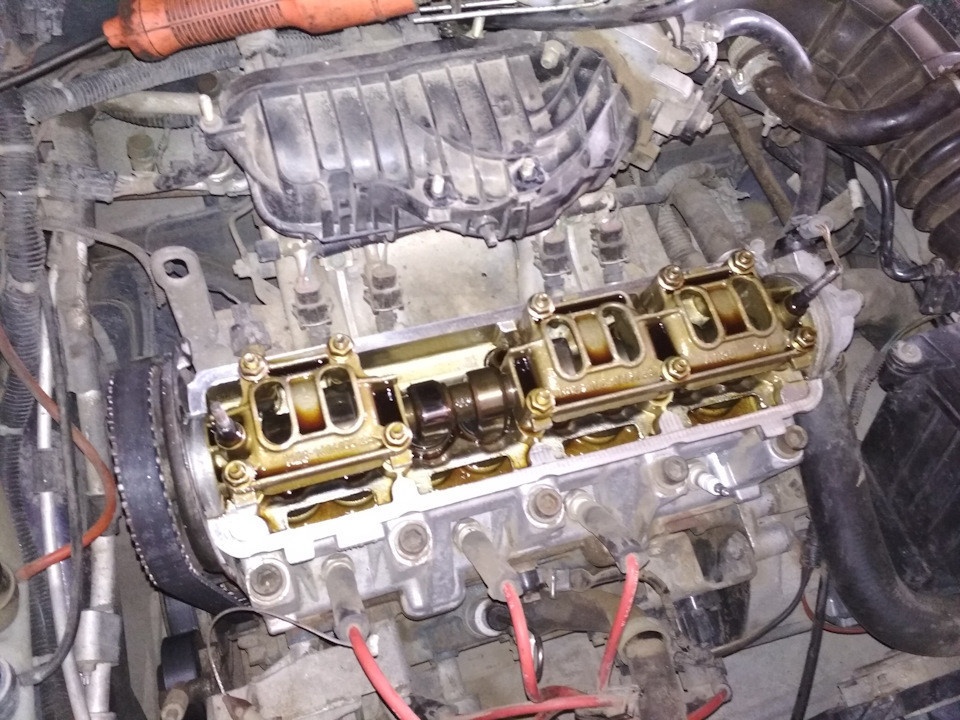
I would like to immediately warn motorists that the Kalina valves are only suitable for a cooled power unit, otherwise the set gaps will not meet the required technical standards. Remove the valve cover and install the shafts, crankshaft and camshafts according to the marked marks. In this case, the pistons of cylinders 1 and 4 must be at the TDC of the mechanism. There are different ways to adjust the valves, we will choose the faster one, in which we have to turn the crankshaft less, and we will adjust four valves at the same time.
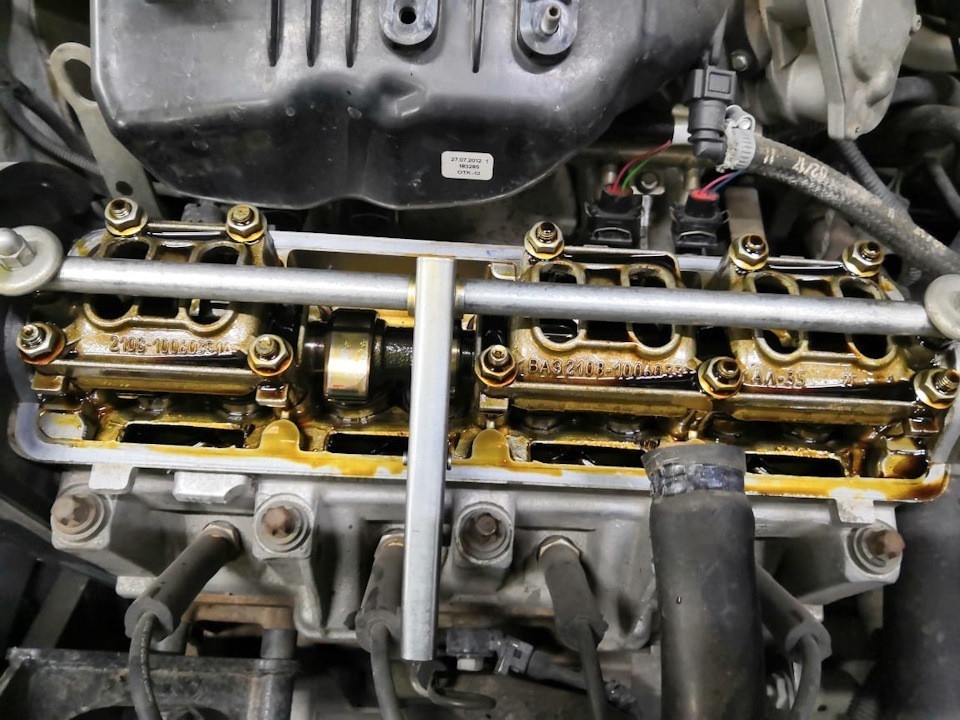
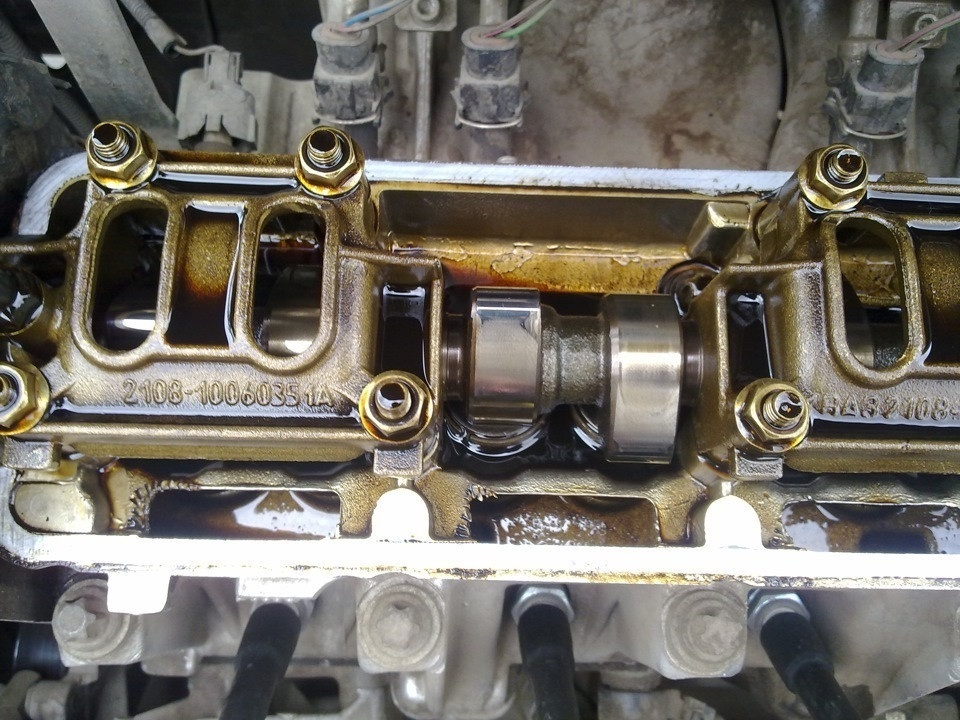
So initially we measure the gaps where the camshaft cams rise above the valves. In this case, it is 1,2,3,5 valves. Thermal gaps for Kalina intake valves correspond to 0,20 (+0,05 mm), and for exhaust valves 0,35 (+0,05 mm). Valves are calculated from left to right, first outlet-inlet, then inlet-outlet, and so on. Clearances that do not correspond to the nominal value are adjusted using gaskets. Now install the adjusting bar on the valve cover studs and secure it by screwing the nuts.
Then, with the lever of the adjustment mechanism, we press the adjustable valve to the stop, and with the help of the lever we fix the position of the valve pusher (in the pressed state). Using pliers, remove the old washer and install a new one (of the desired size) in its place. After removing the latch, press it with a pry bar until it is fully seated. After that, it is the turn of the next valves 4,6,7,8. You will need to make one revolution of the shaft (the camshaft should turn half a turn) and do the same work with the rest of the valves. According to experts, when the Kalina car has a run of up to 50 km, it is unlikely that it will be necessary to adjust the Kalina valves, since when checking their gaps (in the vast majority of cases), they comply with the required standards.
The valves of Lada Kalina cars play an important role in the gas distribution system, being responsible for the release of exhaust gases and the intake of the air-fuel mixture. Many car enthusiasts do not consider these details, despite their small size, to be very important. And some do not even know where they are and from time to time (depending on the type of engine) they are asked to perform maintenance.

Adjustment of thermal clearances in the valve mechanism of the engine
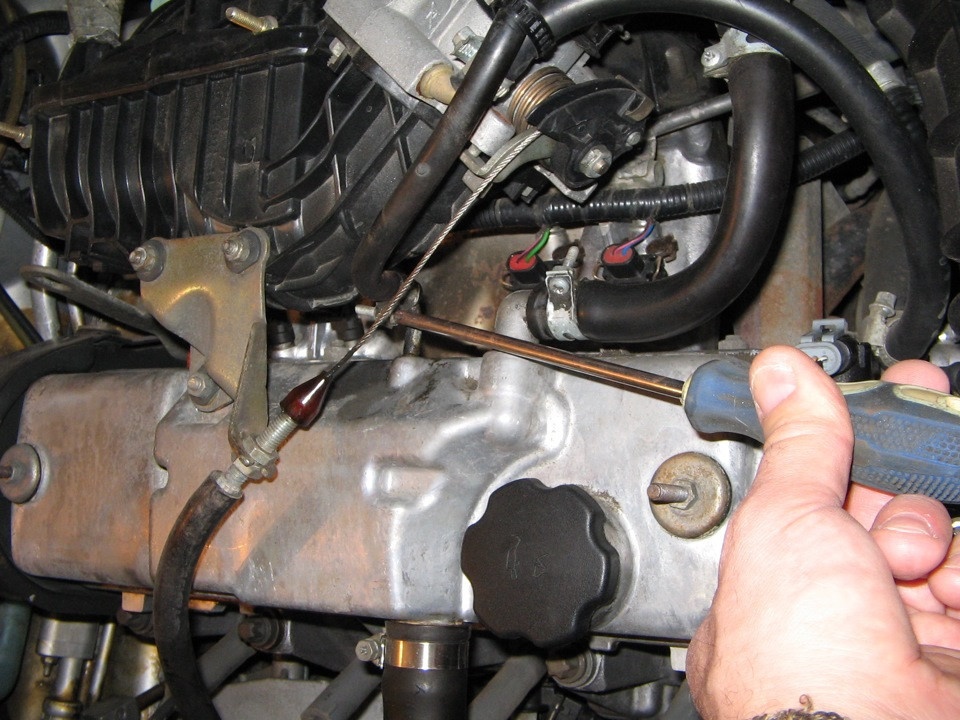
We measure and adjust the clearances on a cold engine. We remove the engine screen. Disconnect the throttle cable from the throttle assembly sector (see "Replacing the throttle cable"). After unscrewing the three fastening nuts, remove the throttle cable bracket and move the bracket with the cable to the side (see "Removing the receiver").
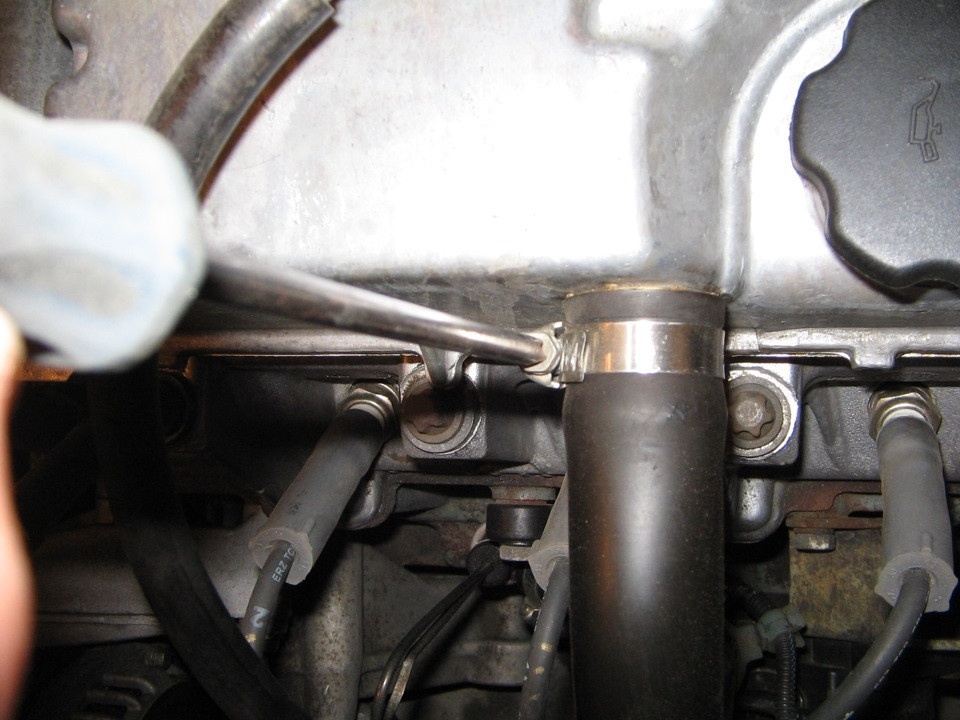
Using a Phillips screwdriver, loosen the lower crankcase ventilation hose clamp and remove the hose from the cylinder head cover tube.
Using a Phillips screwdriver, loosen the clamp on the crankcase ventilation hose (main circuit) and remove the hose from the cylinder head cover tube
Using a Phillips screwdriver, loosen the crankcase ventilation hose clamp (idle circuit) and disconnect the hose from the cylinder head cover fitting
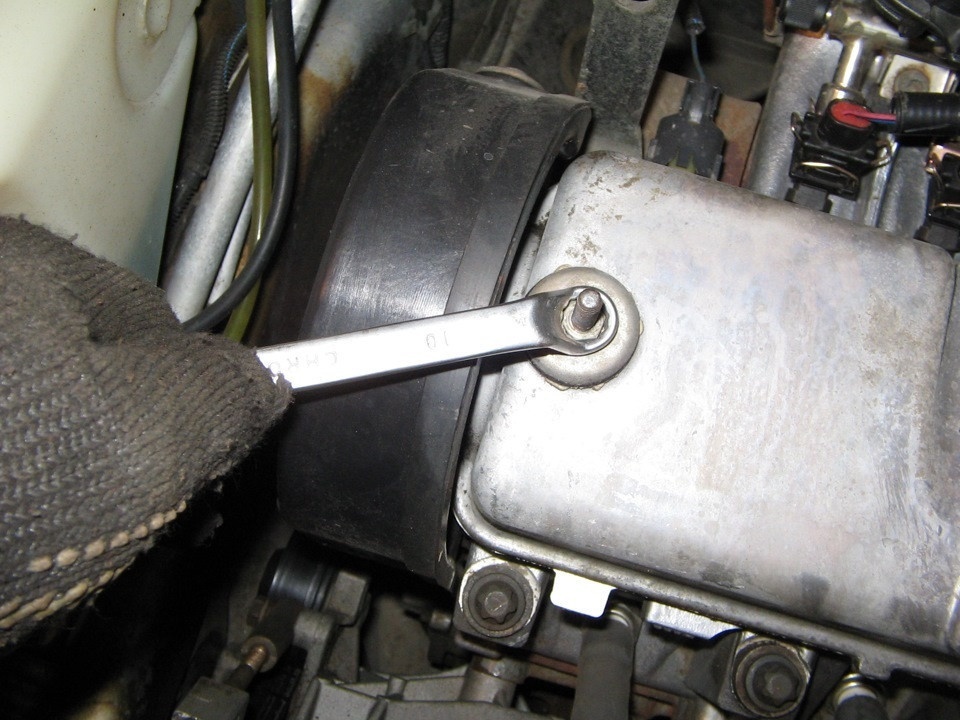
Using a 10 wrench, unscrew the two nuts holding the cylinder head cover and remove the discs.


Remove two rubber bushings.
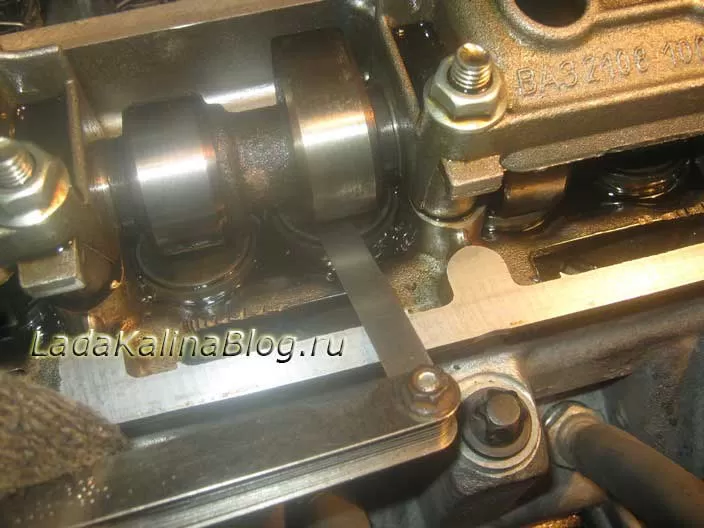
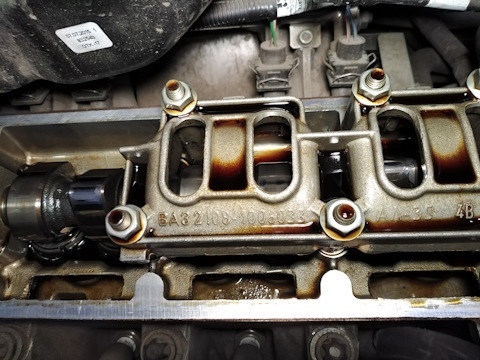
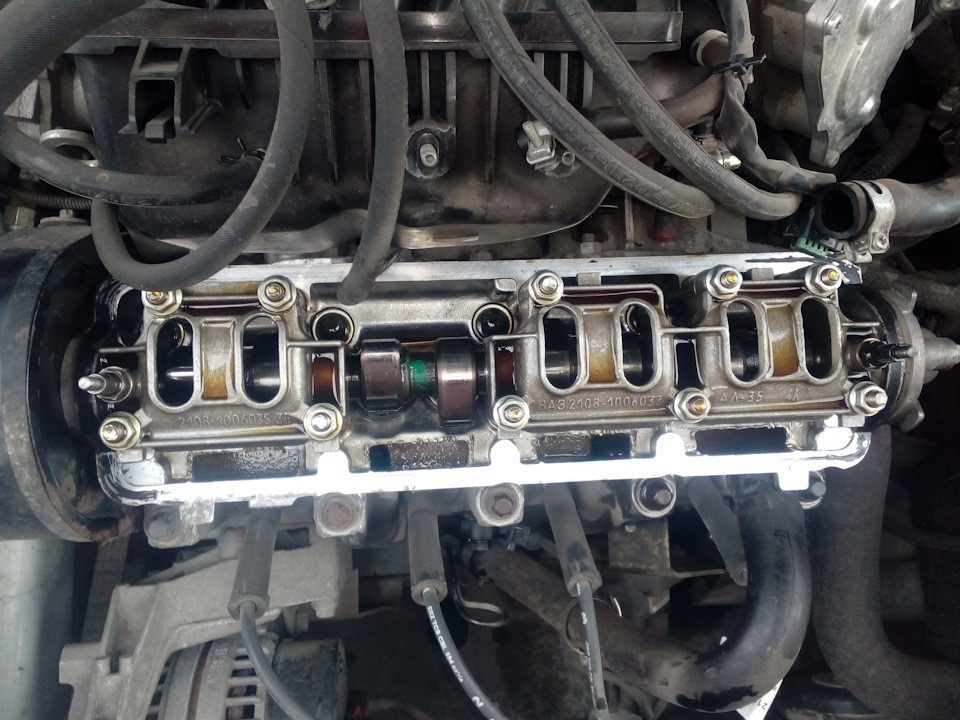
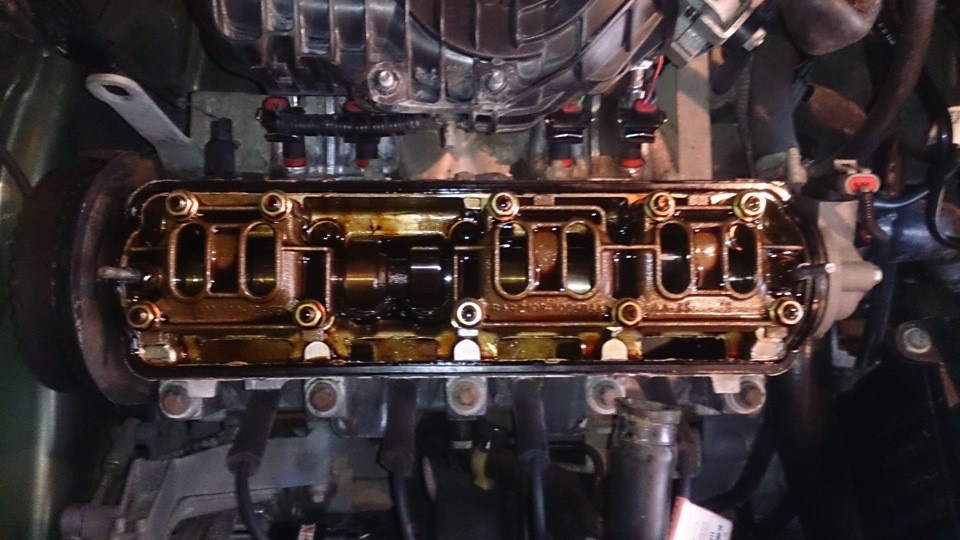
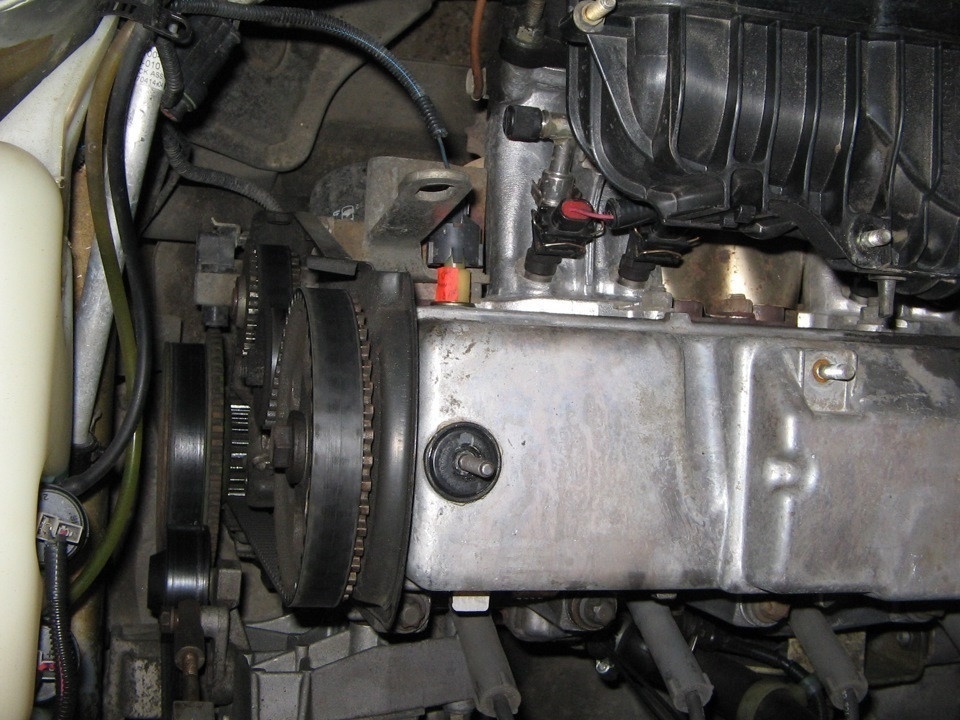
Remove the cylinder head cover. Remove the front timing belt cover. The procedure for checking and adjusting clearances in the valve actuator is as follows. Turn the crankshaft by the screw holding the alternator drive pulley clockwise until the alignment marks of the camshaft pulley and the rear timing belt cover are aligned. Then we turn the crankshaft clockwise another 40-50 ° (2,5-3 teeth on the camshaft pulley). With this position of the axes, we first check the clearances with a set of tracers ...
and third camshaft lobes. The clearance between the camshaft lobes and washers should be 0,20mm for intake valves and 0,35mm for exhaust valves. The clearance tolerance for all jaws is ± 0,05 mm. If the gap is out of specification...
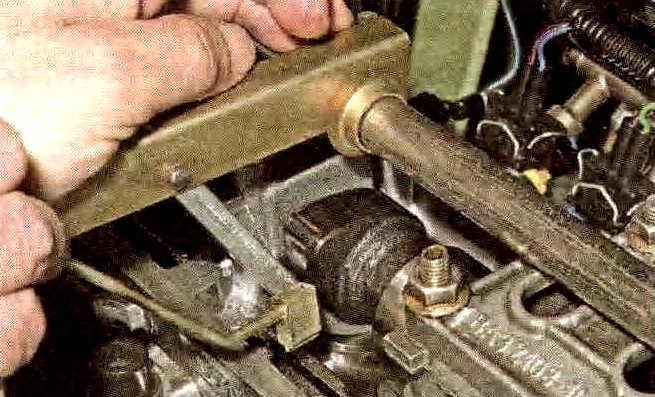
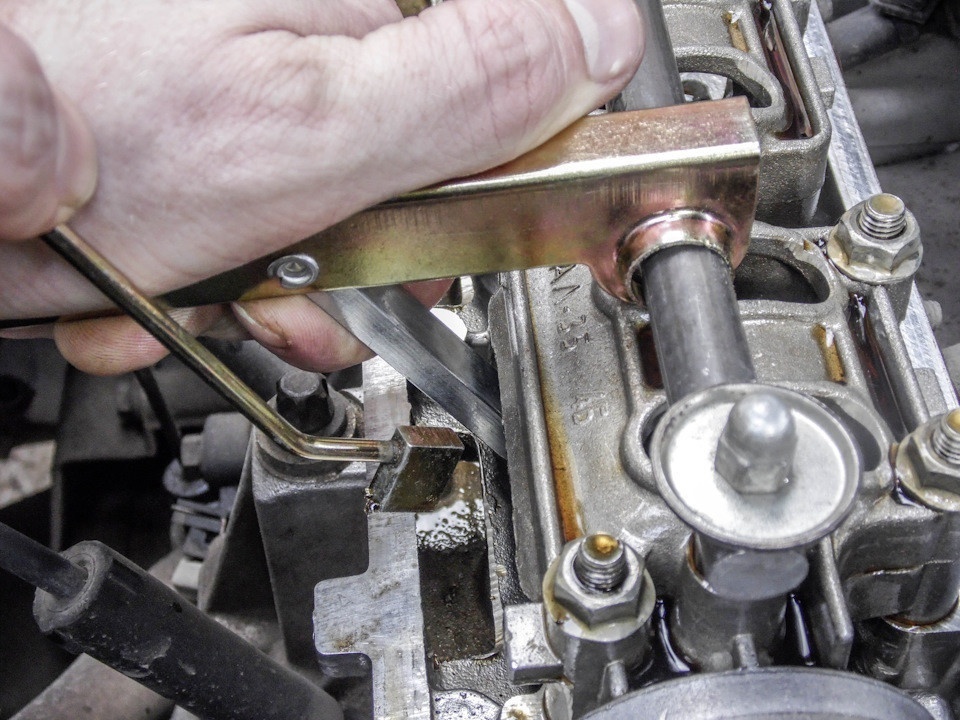
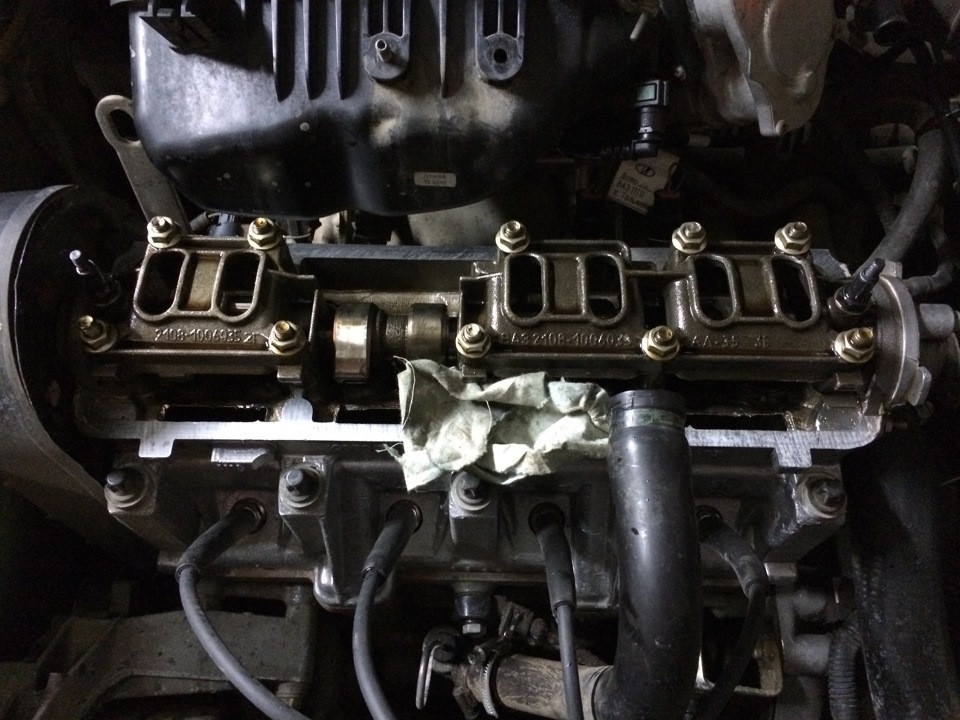
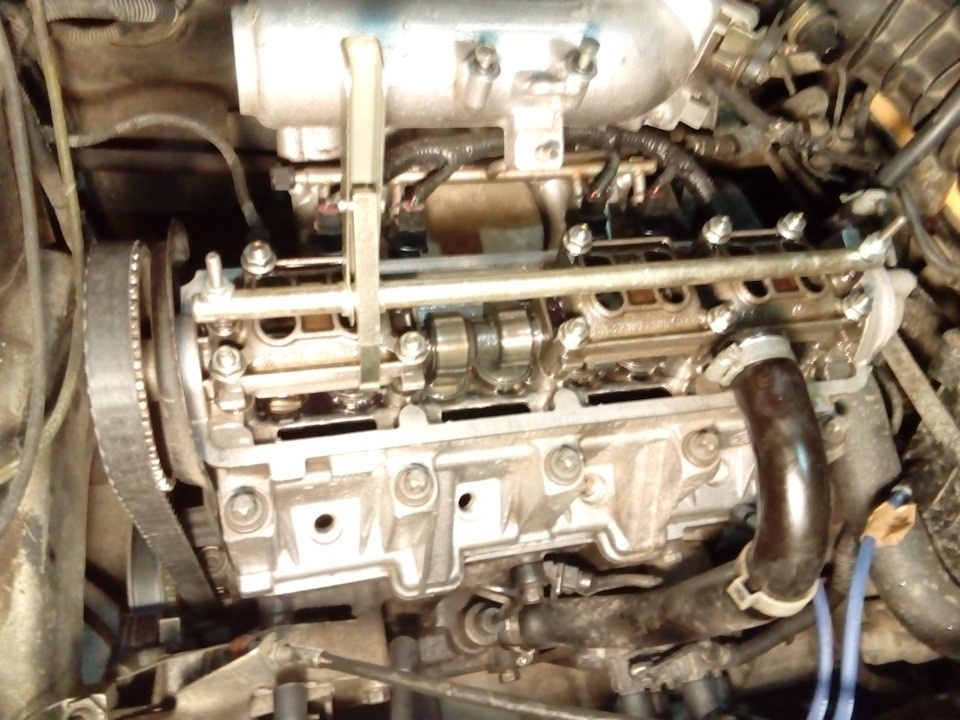
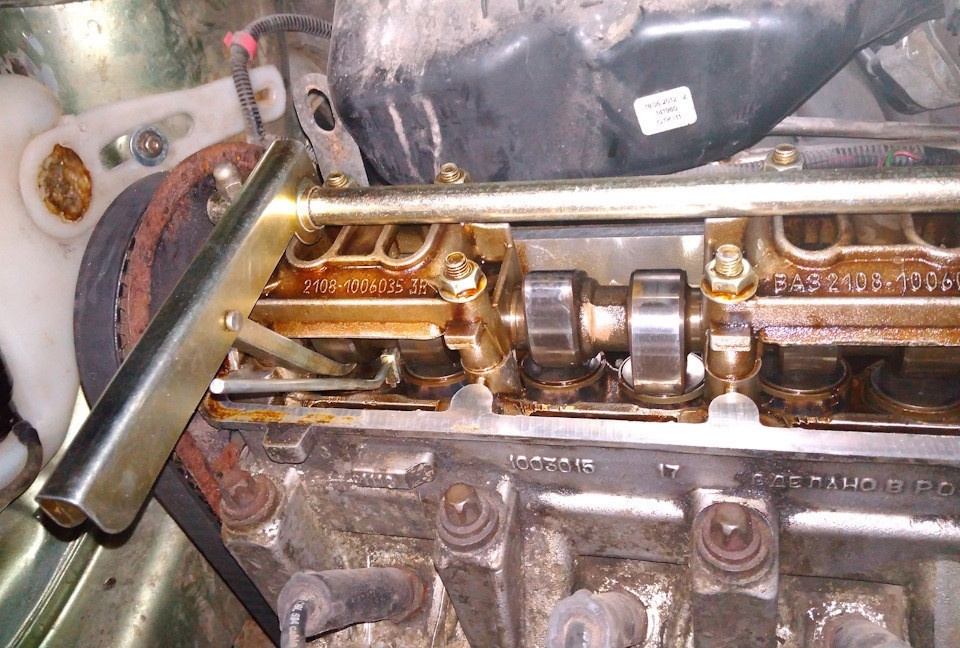
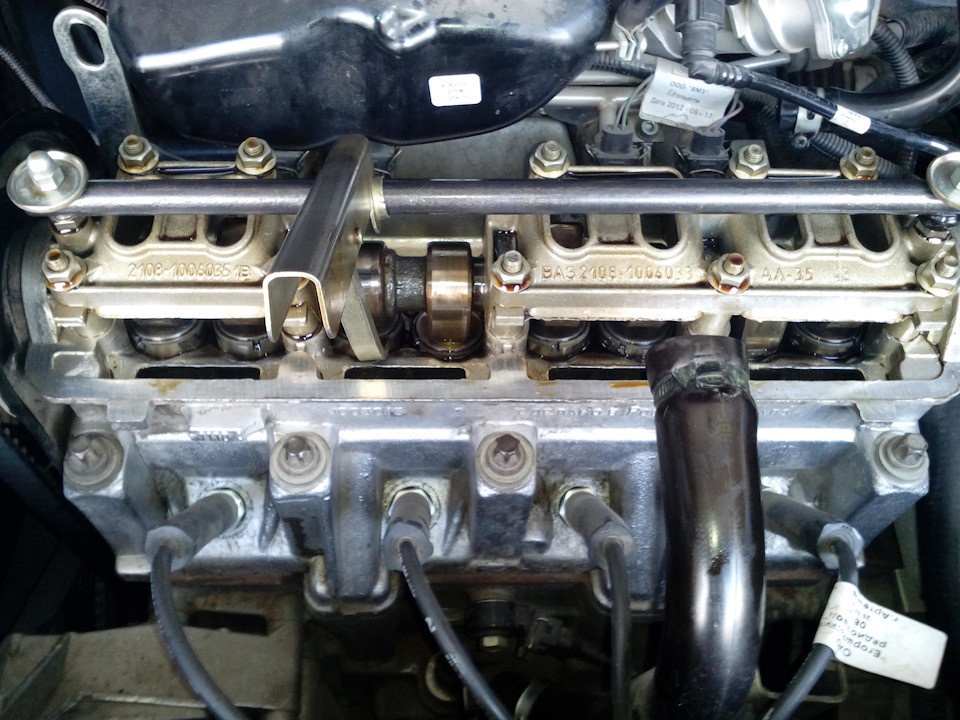
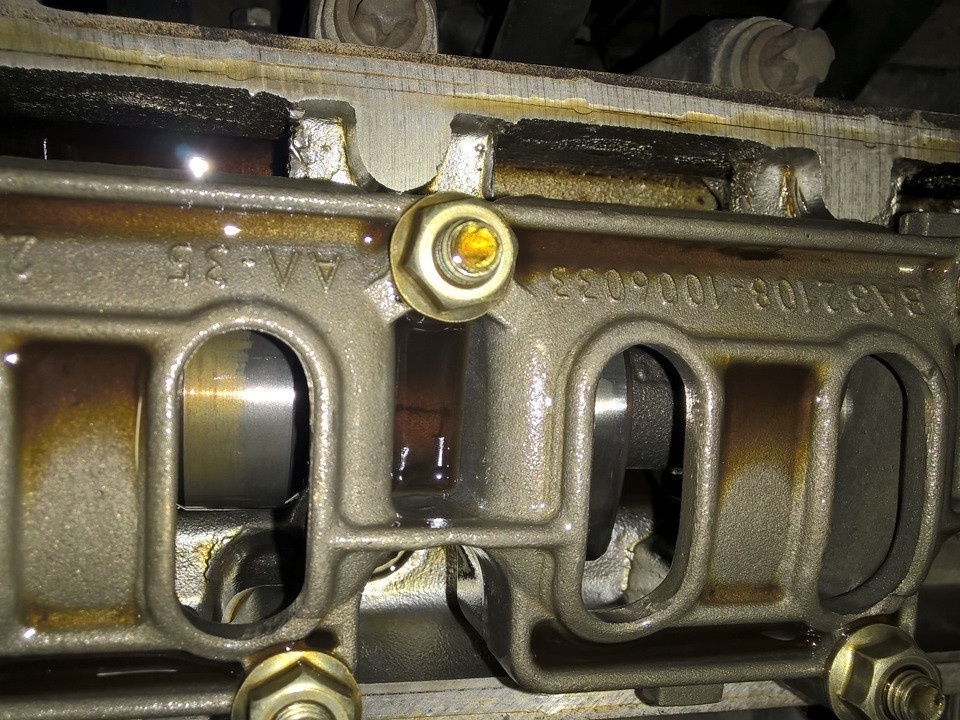
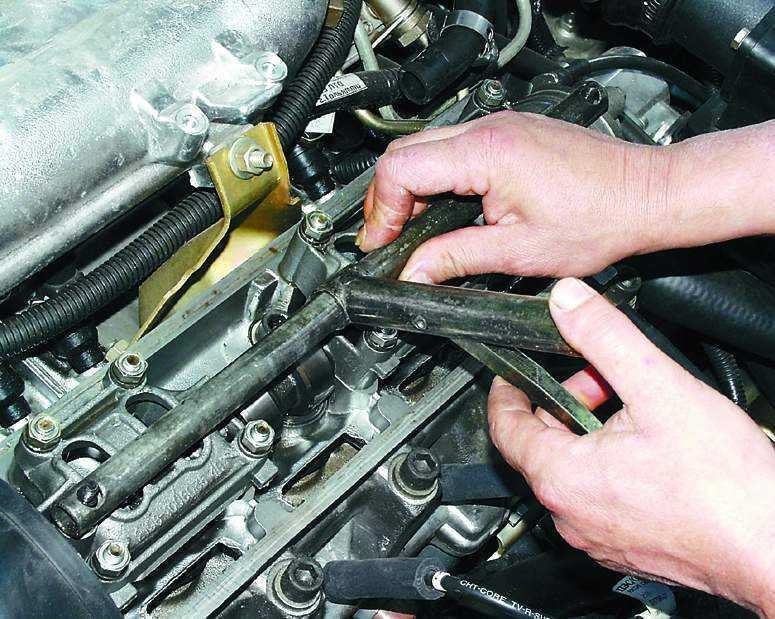
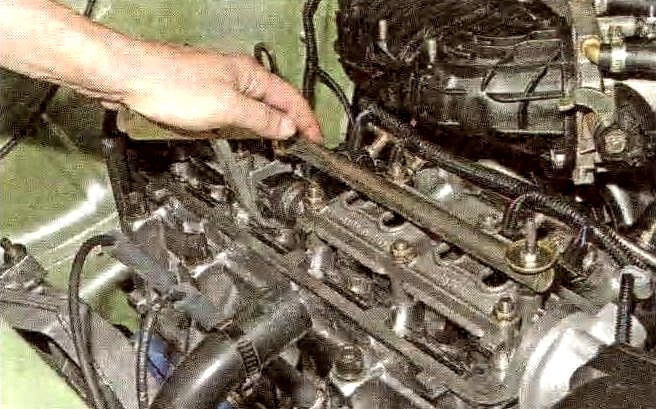
then install the valve adjuster on the camshaft bearing housing studs.
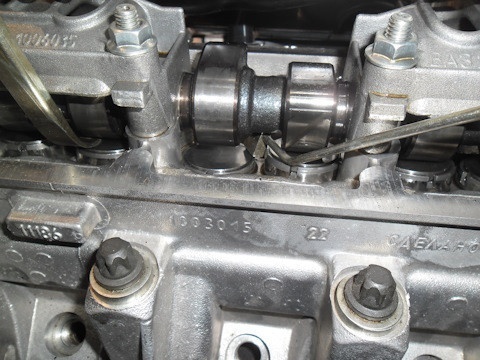
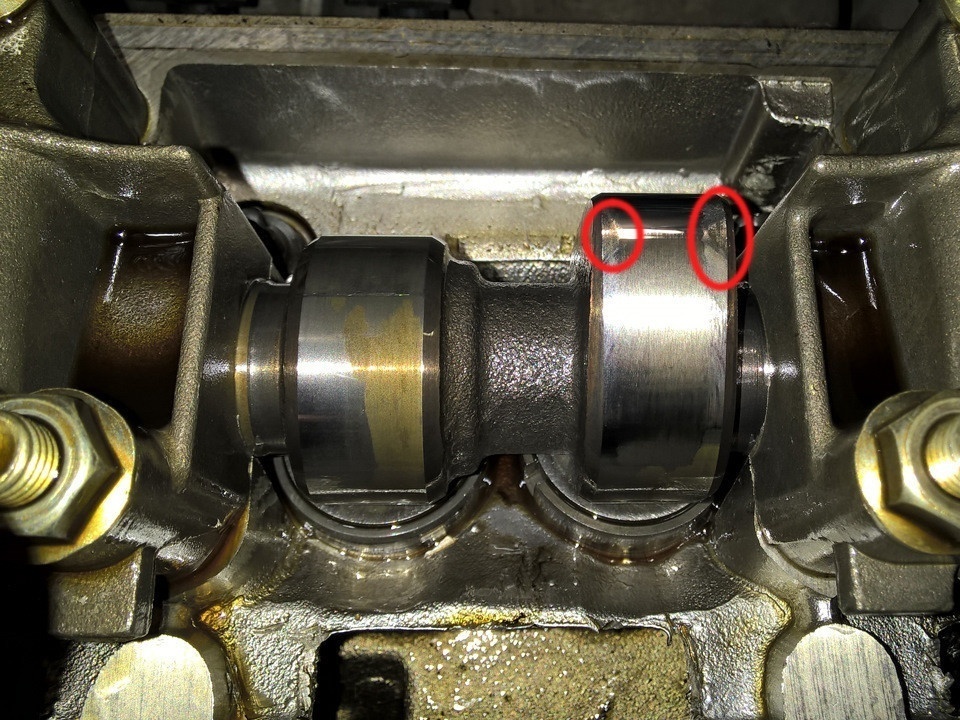
We turn the pusher so that the groove in its upper part faces forward (in the direction of the car).
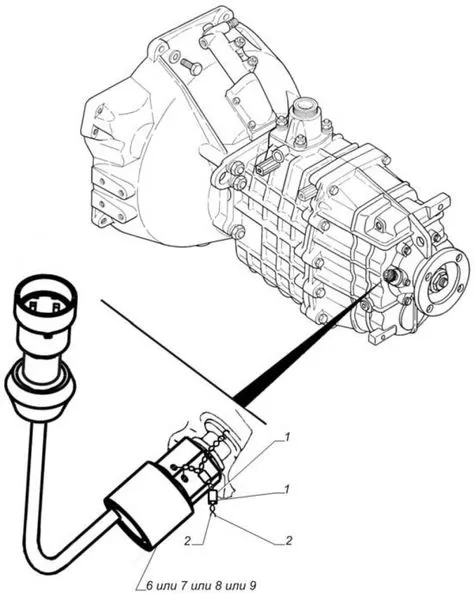
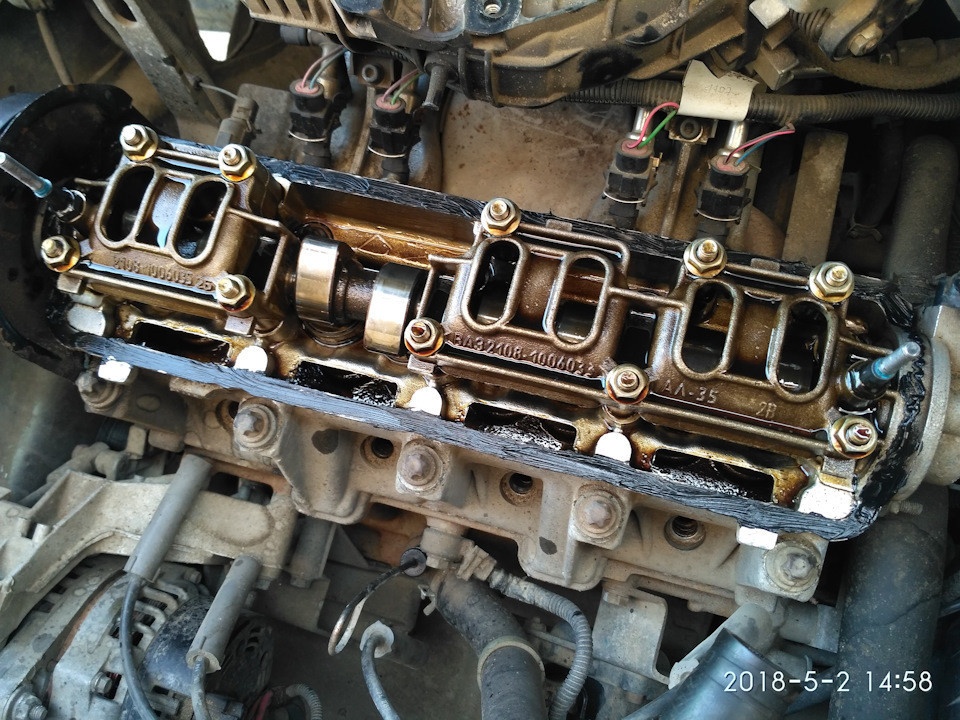
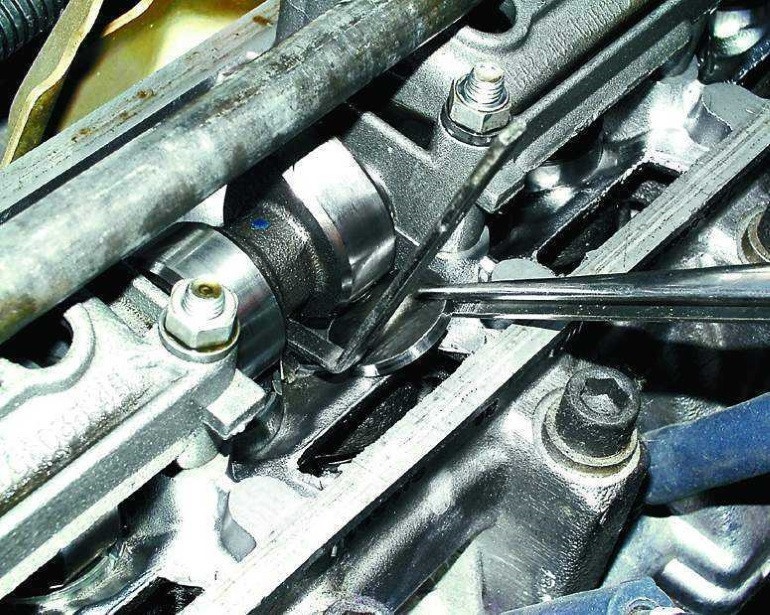
We introduce the "fang" of the device between the cam and the pusher (1 - nozzle, 2 - pusher)
By pressing the lever of the device, we sink the pusher with the “fang.
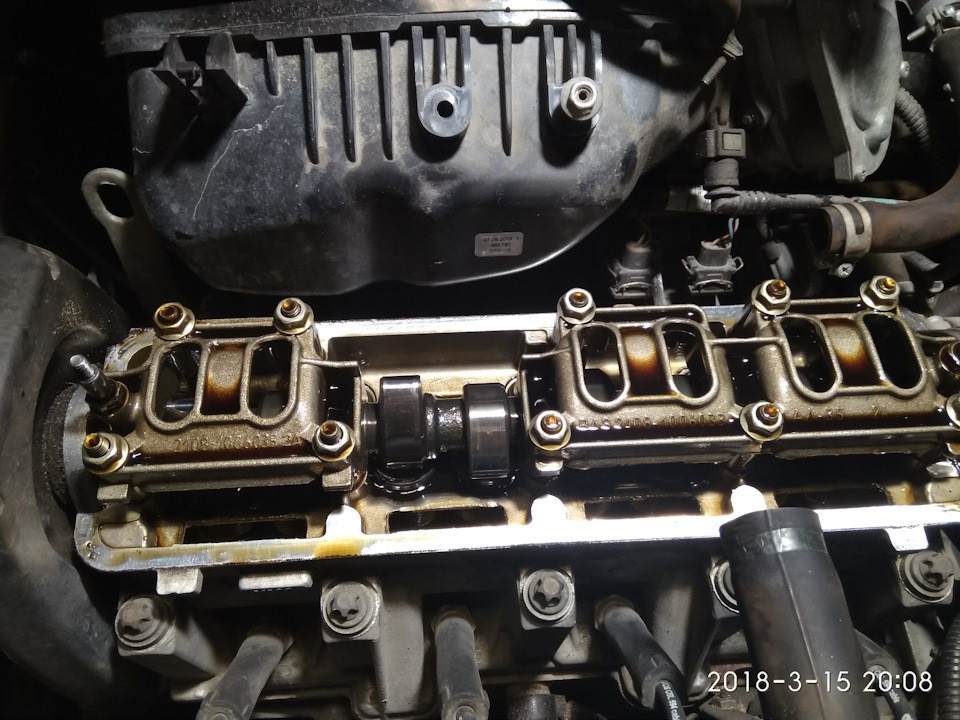
and install a retainer between the edge of the pushrod and the camshaft that holds the pushrod in the down position.

Fastening the valve lifters when replacing the strap: 1 - retainer; 2 - adjusting washer Move the device lever to the upper position
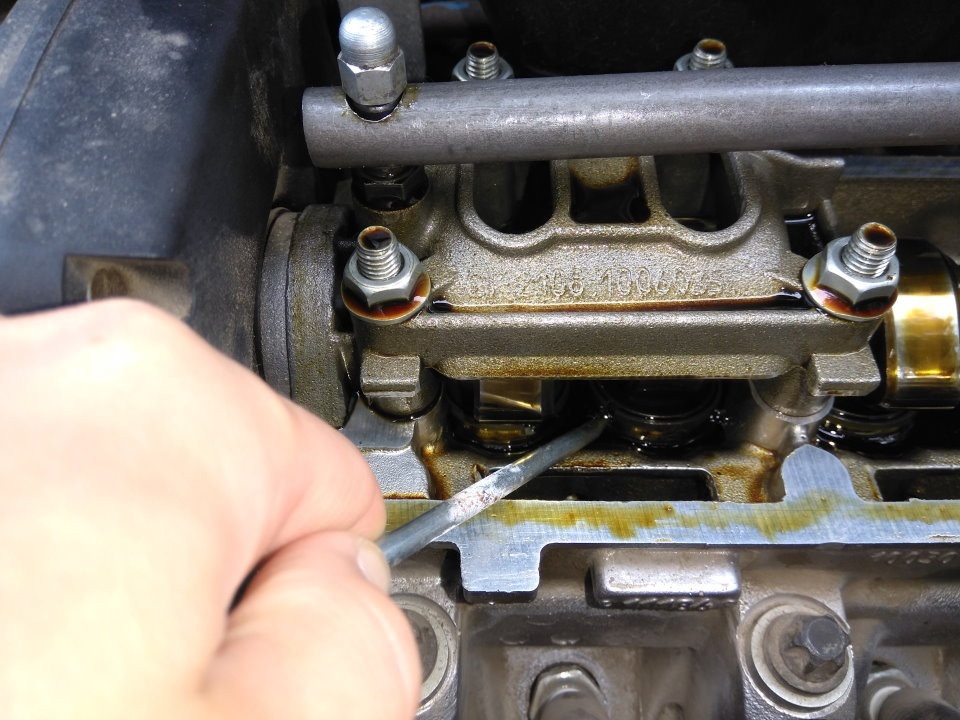
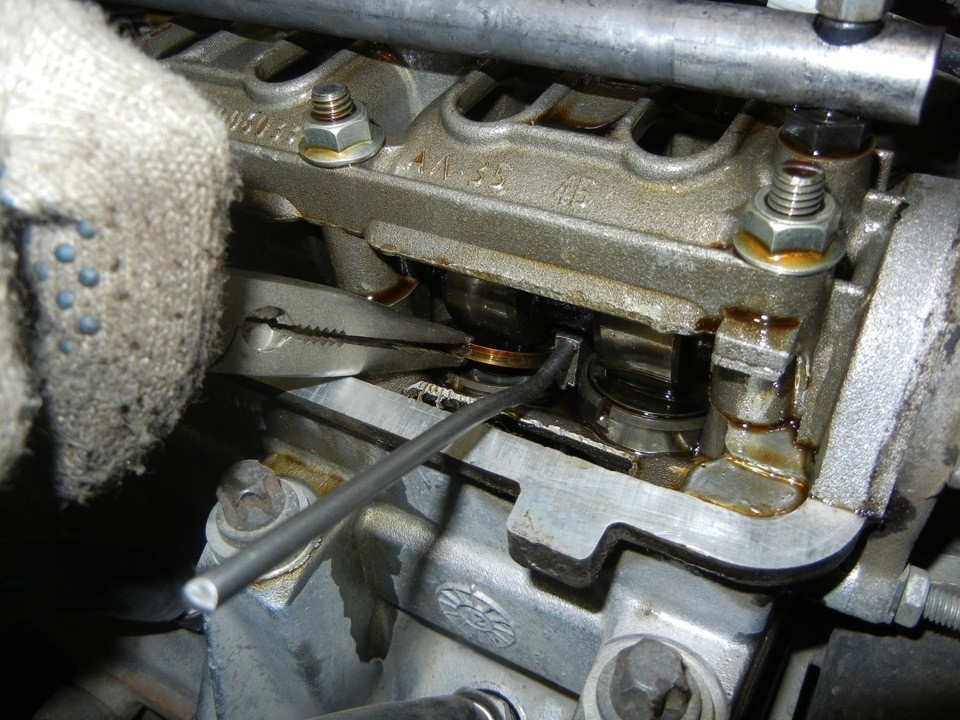
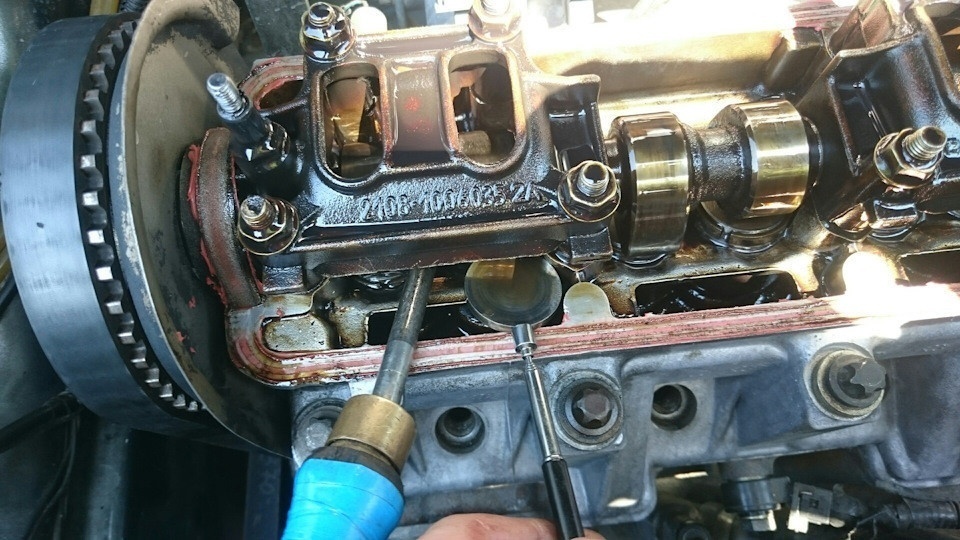
Using pliers, pry up the slot and remove the shim. If a valve adjustment tool is not available, two screwdrivers can be used. With a powerful screwdriver, leaning on the cam, we press the pusher down, inserting the edge of another screwdriver (with a blade width of at least 10 mm) between the edge of the pusher and the camshaft, fix the pusher and remove the adjusting washer screw with pliers. The gap is adjusted by selecting an adjusting washer of the required thickness.
To do this, measure the thickness of the removed washer with a micrometer. The thickness of the new shim is determined by the formula: H = B + (AC), mm, where “A” is the measured gap; "B" - the thickness of the removed washer; "C" - rating game; "H" is the thickness of the new washer. The thickness of the new washer is marked on its surface with an electrograph. We install a new washer on the pusher with the mark down and remove the retainer. Check the gap again. When properly adjusted, the 0,20 or 0,35 mm feeler gauge should enter the gap with a slight pinch. Sequentially turning the crankshaft half a turn, we check and, if necessary, adjust the clearances of other valves in the sequence indicated in the table.
| angle of rotation of the crankshaft from the position of the alignment mark, degrees | number of cams (counting - from the camshaft pulley) | |
|---|---|---|
| exhaust (gap 0,35 mm) | inlet (gap 0,20 mm) | |
| 40-50 | а | 3 |
| 220-230 | 5 | two |
| 400-410 | 8 | 6 |
| 580-590 | 4 | 7 |
We assemble the motor in the reverse order. Before installing the cylinder head cover.
replace the gasket with a new one.
How to adjust the 8-valve mechanism on the Lada Kalina model? Sooner or later, most owners of these practical Russian cars ask themselves a similar question. Carrying out this procedure on your own will not only be interesting, but also useful in terms of gaining experience.
Now let's move on to a more detailed consideration of the subject indicated here: valve adjustment.
Adjustment procedure
The procedure for adjusting the valves on all modifications of the 8-valve vessel is the same. There are differences only in injection machines from the dealership, viburnum 2 with a dealer engine. They have a lightweight piston group and ceramic and metal seats. In this sense, the gaps differ upwards by 0,05 mm. Knowing the order and adjustment scheme, you can adjust the valves yourself. Except for the lack of a set and a set of washers for adjustment. It is unprofitable to follow them to the market every time and buy the entire assortment.
Here is a detailed diagram for adjusting valves VAZ 2108, 2109, 2114, 2115
- First you need to cool the engine. You can use an additional cooling fan from any VAZ car. We put it on top so that the air flow is in the direction of the internal combustion engine and turn on the 12V power supply;
- When tuning 8-valve engines (11186, 11113 oka, 1118, 1111) with a mechanical throttle assembly, unscrew the throttle cable from the intake manifold reservoir;
- Remove the valve cover, timing belt side cover. Disconnect the large and small breather hoses going to the throttle valve nipple;
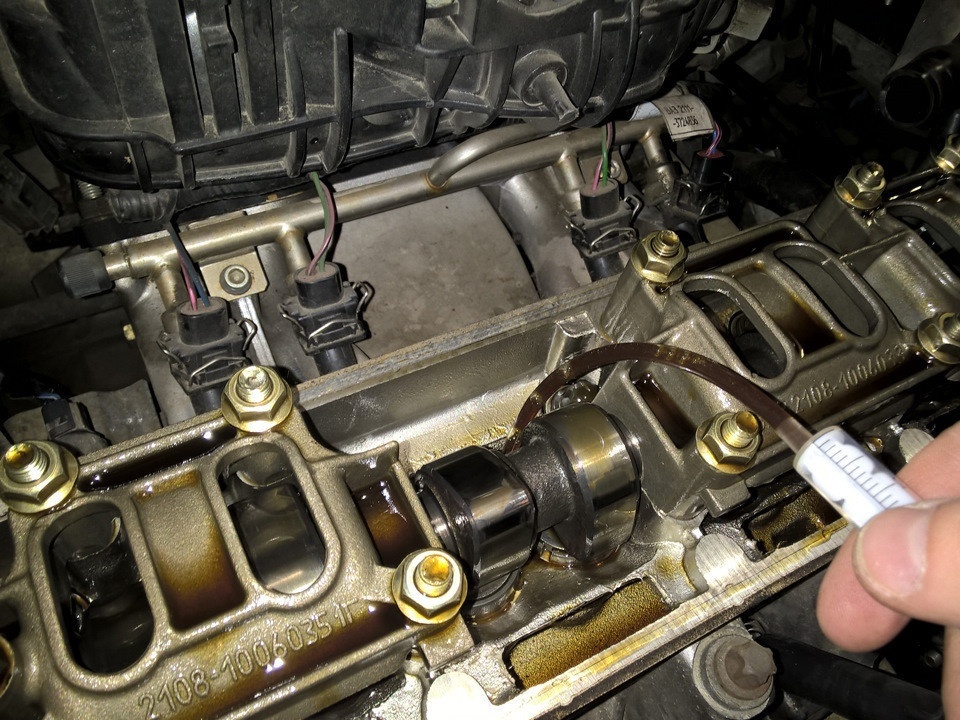
- Pump the oil close to the valve cups with a syringe or blower. It is most convenient to use a regular medical syringe with a white silicone hose at the end;
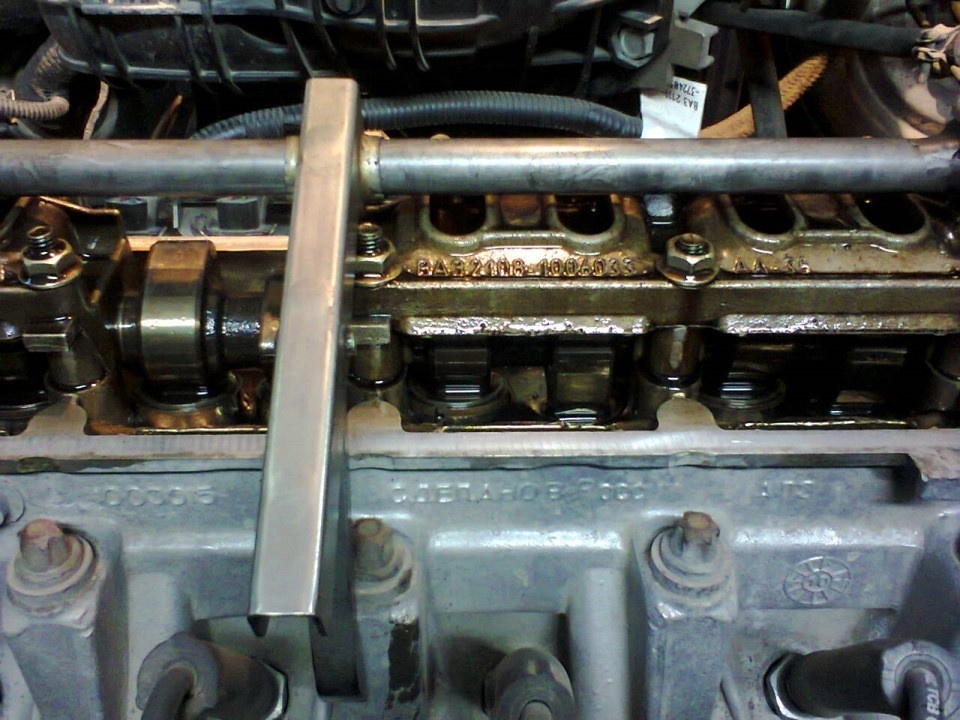
- Install an adjusting device - a rail for pressing the valve, also called a ruler;
- Set the first position for adjustment. Turn the camshaft clockwise to the mark and tighten 2-3 teeth. For cars with a lightweight piston group (grant, viburnum 2, earlier), turn strictly by the crankshaft. If it rotates behind the camshaft, then the timing belt may slip, and if this is not noticeable and bring the valve motor, then it will bend;
- Adjust in the following sequence: 1 output and 3 input cells;
- Rotate the camshaft 90 degrees. Set 5 output cells and 2 input cells;
- Rotate 90 degrees. Set 8 output cells and 6 input cells;
- Making the last 90 degree rotation and adjusting 4 output cells and 7 input cells;
- We mount in the reverse order. We put a new gasket under the valve cover so that the oil does not leak out.
- In carburetor engines, everything is carried out in a similar way. First you need to unscrew the filter housing and the suction cable. The frequency is the same as the 30 km injector.
Checking the clearances is also required after the repair of the cylinder head. Especially after replacing the guides. When replacing the bushings, the fasteners are countersinked with a special tool and deliberately recessed into the head. Therefore, it is necessary to follow the sequence, set the optimal gaps and repeat after 1000 km of run.
Tuning the 8kl engine for gasoline increases the mileage between tunings. If the engine is not designed to work on gas equipment, then the seats and valves will quickly burn out, and in order to somehow extend the service life, the gaps need to be made slightly larger than the standard ones. Usually they make +0,05 mm. If the gap is not tight, that is, it does not open, then the saddle has gone a decent distance into the head. In this case, you need to measure how much you need to increase the gap, disassemble the cylinder head and file the end of the valve. The second option would be to replace the seat or the cylinder head itself.

Lada Kalina hatchback LUX › Logbook › self-adjusting valves (Part One)
Greetings to all. Today I will tell you how to adjust the valves on an 8 valve engine with your own hands using a standard tool. The reason for my intervention in the operation of a repairable car was banal curiosity and the desire to make the engine run smoother, especially during warm-up, when the "diesel effect" occurs.
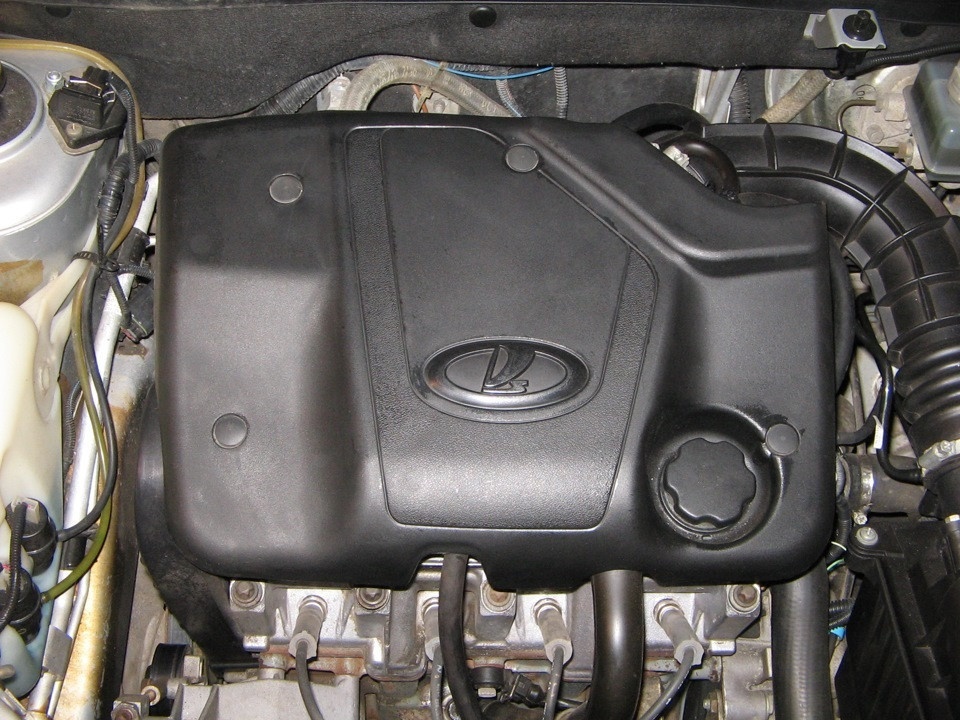
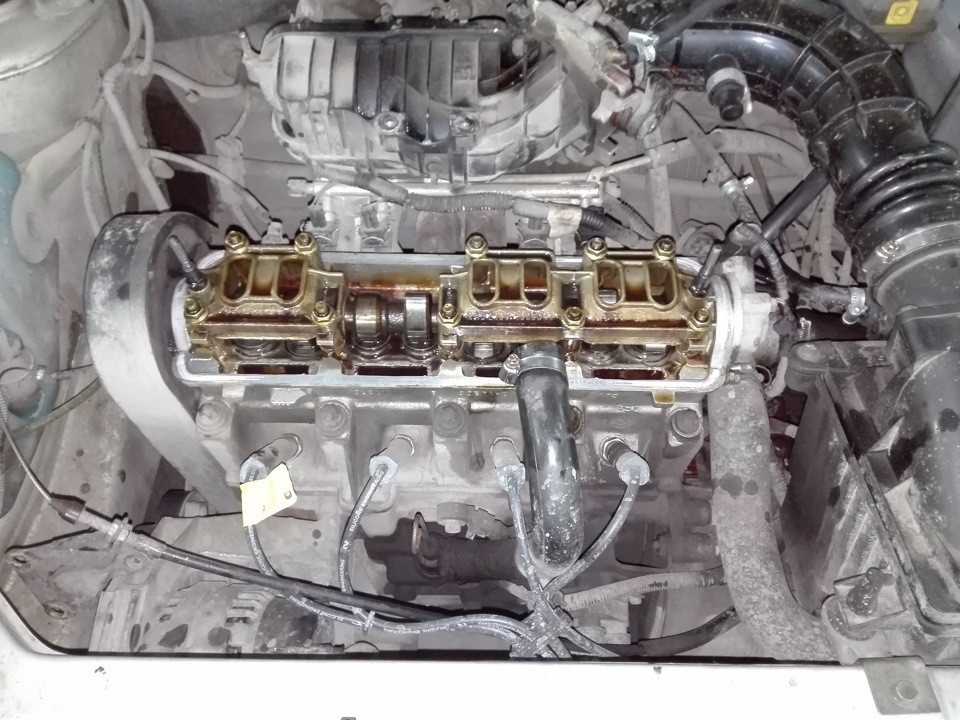
So, let's get started: unscrew the filler plug, remove the top casing and wring out all the clamps that go to the valve cover

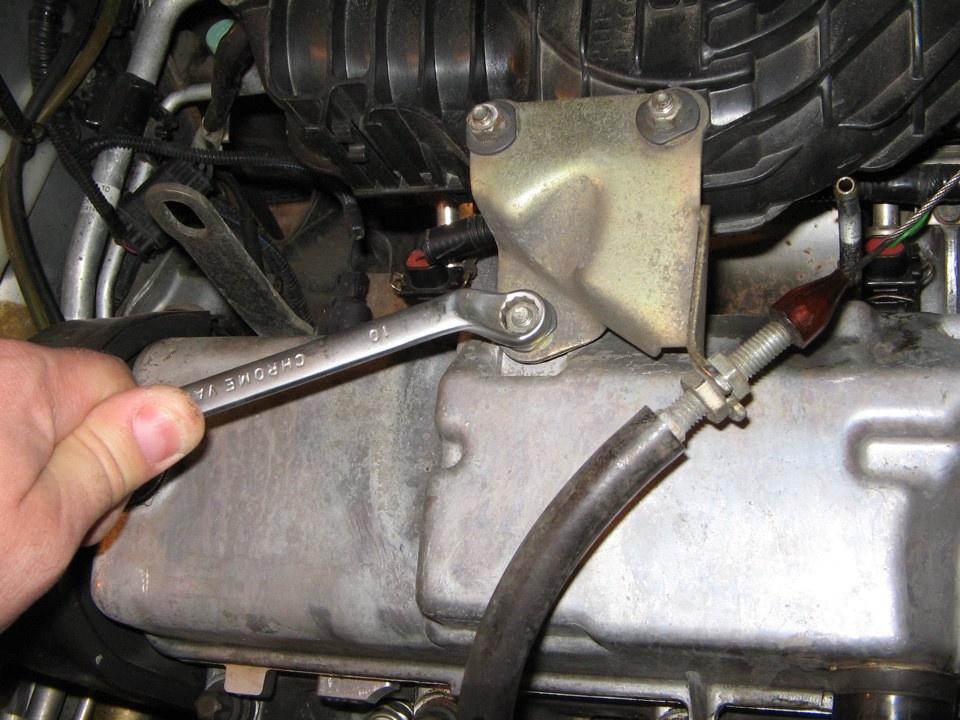
with a key of 10 we press the brackets for fastening the gas cable
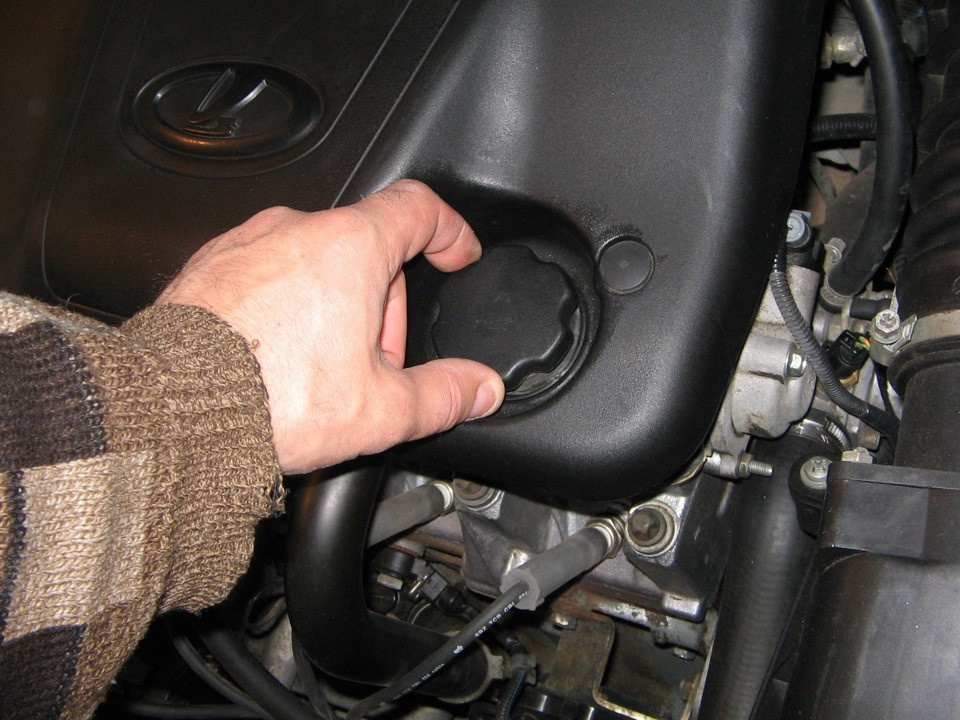
unscrew the valve cap
with the same key for 10, unscrew the three bolts of the timing belt cover
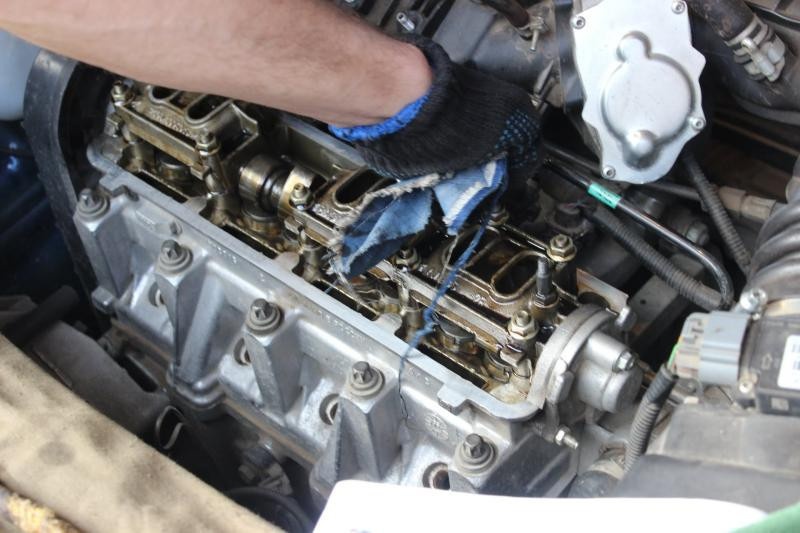
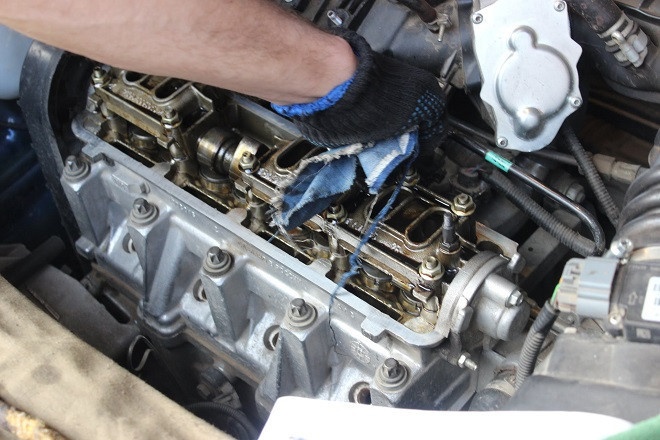
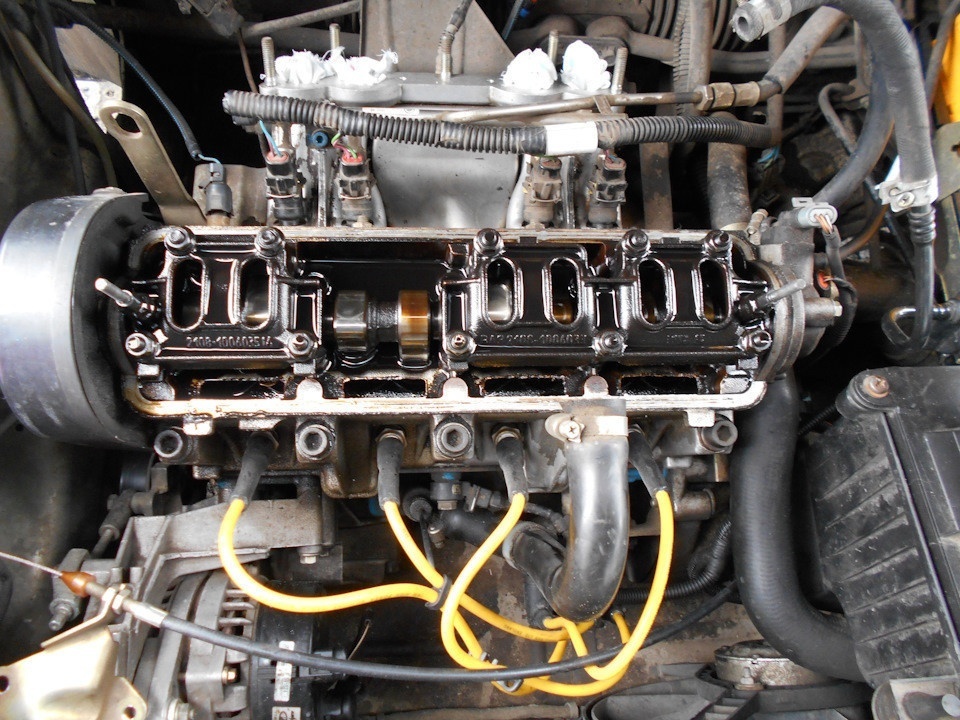
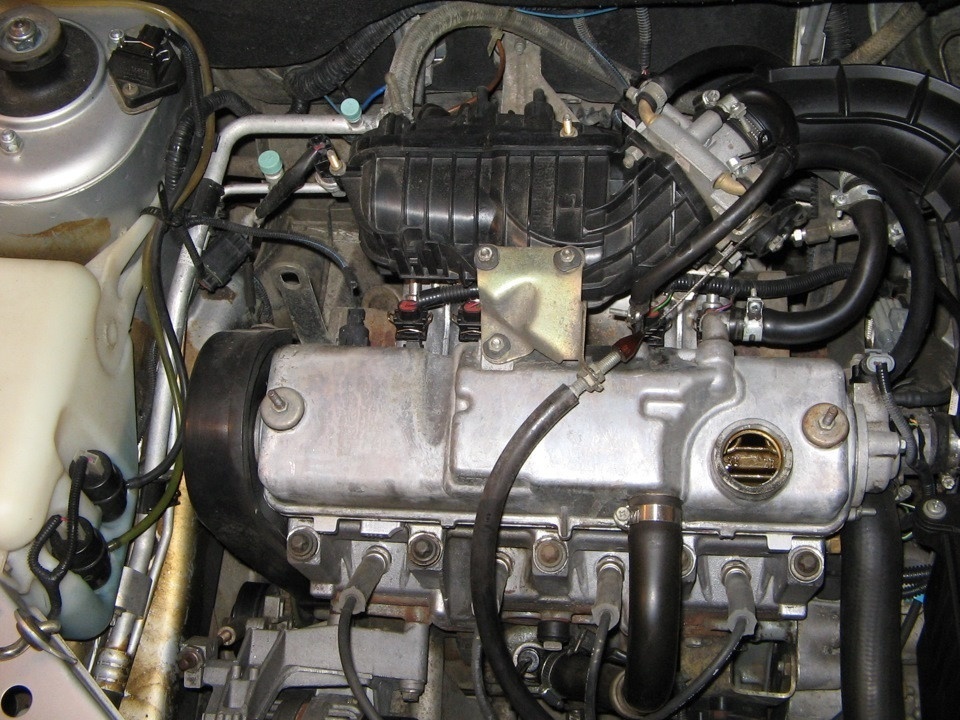
Well, now, without much fanaticism, we open the valve cover, trying to raise it to a horizontal position, without distortions.
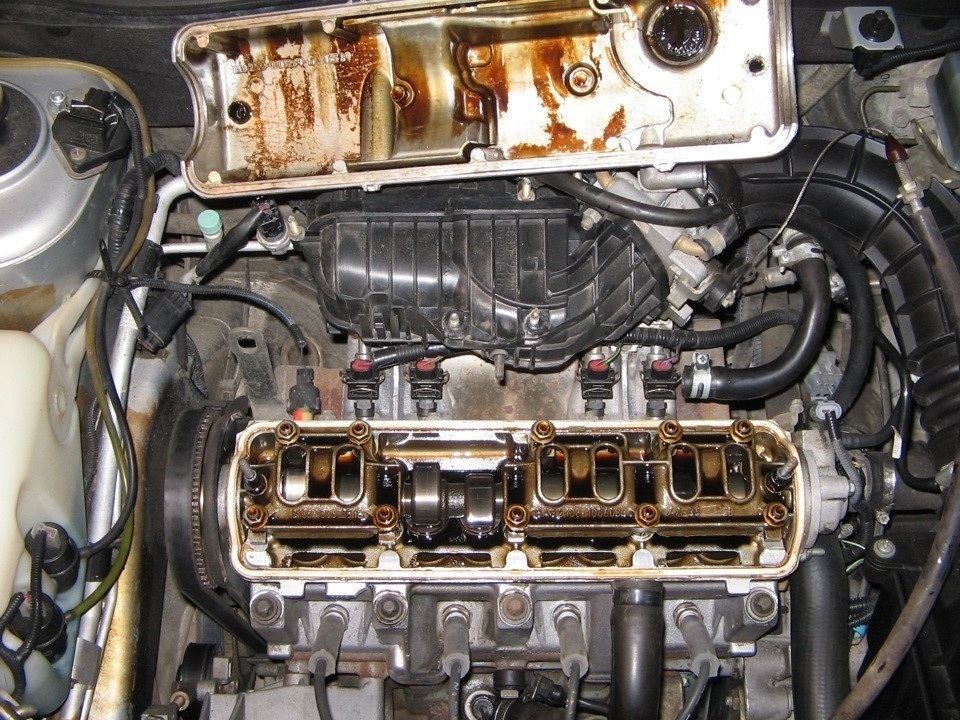
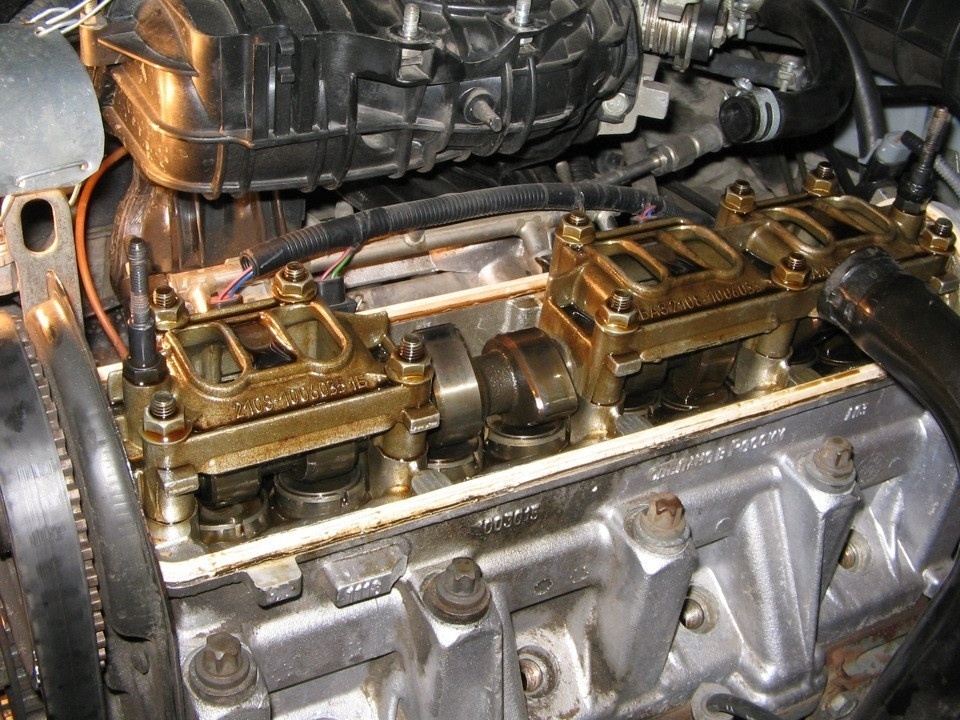
in the photo, a rubber gasket carefully glued to the head with a sealant;
Now the most time-consuming process begins, measuring the gaps. According to the instructions in the instructions, the measurement process is described, so I will not focus on this. I’ll say on my own: the gap is measured between the washer and the camshaft cam when the cam looks vertically up. It’s better to turn the camshaft with a key of 17, the car should be in neutral and it’s better to unscrew the candles so as not to create additional effort when turning the camshaft! Clearances during normal engine operation: Inlet - 0,15 ... 0,25 mm Exhaust - 0,3 ... 0,4 mm
Clearances during normal engine operation: Inlet - 0,15 ... 0,25 mm Exhaust - 0,3 ... 0,4 mm

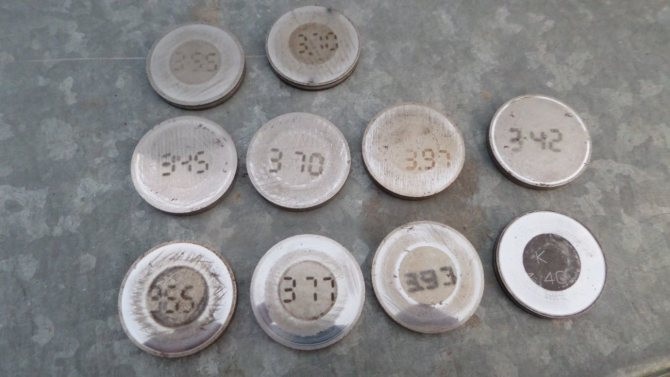
Inlet and Exhaust Valve Locations For complete information, after measuring the gap (it's best to do this a few times for accuracy by turning the camshaft), I also took out the washers to rewrite the thickness mark on them.
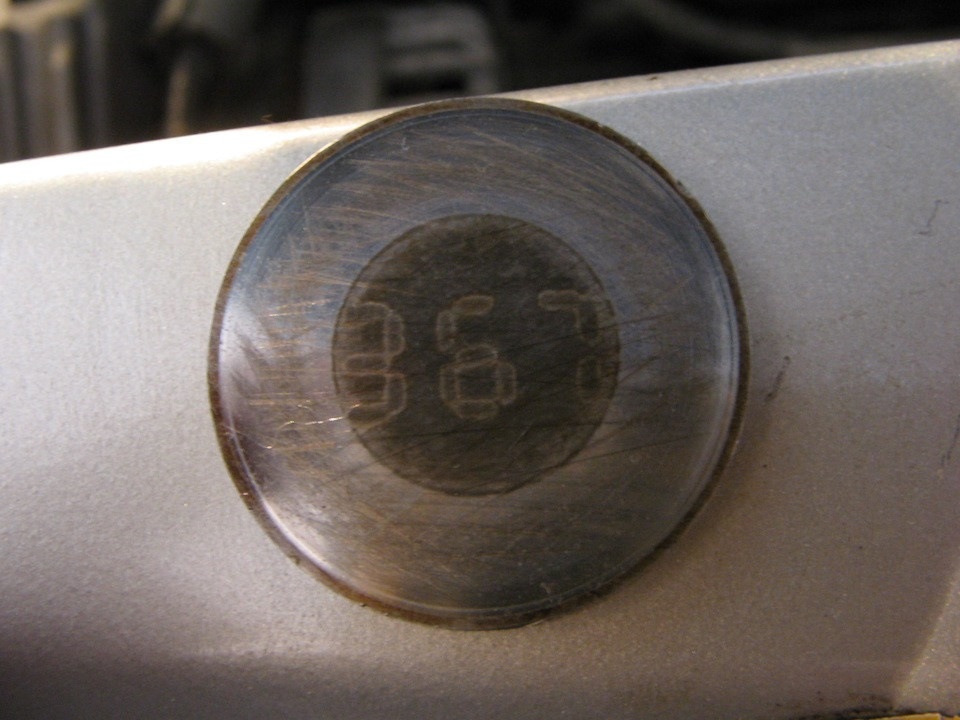
1st valve washer (exhaust
Here is what happened in my case
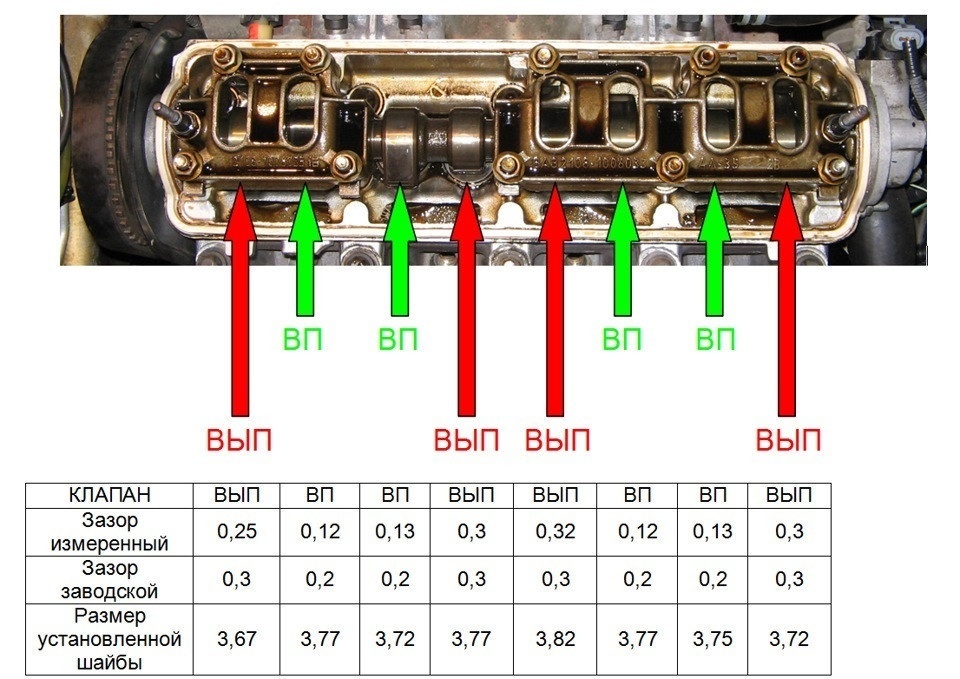
table with my measurements
Now the question arises, and not just one: 1. Is the exhaust valve of the first cylinder tight - did the probe 0,25 go up with great difficulty (is this at a speed of 0,3-0,4 mm)? All intake valve clearances showed 0,12-0,13mm (at a rate of 0,15-0,25mm)? the valves are clearly tight.


Do you think it is necessary to bring all the holes to the factory ones, or just make the first conclusion 0.3mm, and leave everything else as it is? OK, but somehow not enough .. for an input of 0,12mm? Can anyone advise?
I found an interesting video about valve adjustment -
Initially, the question arises: why do you need valve adjustment? If this operation was successful, then:
- the engine starts easily;
- the engine runs quietly;
- fuel consumption is minimal;
- there is no carbon deposits in the combustion chamber;
- increases the total engine life before overhaul.
If the car is new, then the first adjustment of the valves should be carried out after the first 20 thousand kilometers, when the factory settings are violated. It is not worth postponing the procedure, as this is fraught with valve wear.
Positive and negative sides of various engine modifications
8 valves; volume 1,6 liters
The engine is well known to motorists. Its quality and reliability are beyond doubt. Positive aspects of the engine:
- Regulated in almost all car services;
- There are no problems with the purchase of spare parts;
- In the event of a belt break, the valve does not “find” the piston; no breakage occurs;
- Excellent traction in low gears.
The negatives include:
- High noise level and increased vibration during operation;
- Constant valve adjustment is required;
- A car with this engine is not equipped with air conditioning.
16 valves; volume 1,4 liters
Positive aspects of the engine:
- Lowest fuel consumption;
- Noiselessness and absence of vibrations during the work;
- Able to quickly accelerate the car;
- The valves do not need to be adjusted.
The negative aspects can be called:
- With a sudden break in the valve belt, the valves bend relative to the pistons. In this case, in addition to the valves, the entire piston group will have to be changed;
- After 40 km, oil consumption increases.
16 valves; volume 1,6 liters
Positive aspects of the engine:
- Works very quietly;
- No vibration;
- The most powerful engine;
- Valve adjustment is not required.
On the negative side are:
- bending of the valves with a sudden rupture of the belt.
It is rather difficult to unequivocally answer the question which of the engines is better.
If low maintenance and simplicity are important to you, then the 8-valve engine is your choice. This option is more suitable for those motorists who prefer to maintain and repair their car on their own.
To a car enthusiast, it seems to me that 8 caps are an ideal choice for her, at least in terms of reliability. And the consumption of the 8-valve is less. This is essentially the engine of the nine.
If your region has high-quality gasoline, then 16 valves are better. If you go far to a normal network gas station, then 8 valves are better. In a 16-valve 95, excellent quality is needed, if this is not the case, the creak starts immediately under the hood of Kalina when you press the gas pedal.
Getting Started
You will need a set of tools and fixtures:
- end head with collar and ratchet;
- a syringe to remove engine oil;
- curly and flat screwdrivers;
- special tool for pressing valves;
- a series of special probes;
- tweezers;
- long-handled pliers;
- adjusting washers.
The procedure is really simple and can be performed independently, without the involvement of specialists. To save time or if the process seems too complicated, it is better to use the services of a car service. Such work is inexpensive - the standard figure does not exceed 800-1000 rubles, depending on the region.


Clearance adjustment instructions
Before proceeding with this operation, it is necessary to cool the engine. After that, the block head bolts are unscrewed, and the latter is disassembled. Additional work is as follows.
- Remove the timing cover.
- Remove the spark plugs (this will make it easier for the engine to turn).
- The surface under the head is cleaned of oil with a syringe.
- If the camshaft has a strong wear of the pusher cams, damaged and worn elements must be replaced.
- Instead of the head of the block, it is necessary to install a special device on the mounting bolts that will help to muffle the valves.
- Pistons are in neutral position. To do this, turn the crankshaft with a crank until the mark on the rear timing cover matches the mark on the pulley.
- After the marks match, the crankshaft will move a few more teeth, and the first piston will be at top dead center.
- Using a feeler gauge, measure the gaps first on the first cam, and then on the third. For this, a probe is taken, the size of which does not exceed 0,35 mm. If the probe passes without resistance, a different washer must be selected.
- Through a special groove in the upper edge, the washer is collected and removed. To see the slot, you need to move the pusher a little.
- The valve is recessed with a special device, while the pusher is held with a flat screwdriver, without inserting it into the groove, in order to prevent its arbitrary rotation.
- After fixing the pusher with pliers, the washer is removed and another, of suitable thickness, is installed in its place. On one side of each washer there is a special marking indicating the size. The replacement of the washer is completed, the screwdriver is removed, the valve is returned to its place, the gap is measured with a feeler gauge.
The ideal fit of the valve on Kalina means that the tube enters the space with little (within reason) effort. After that, you need to turn the engine one more revolution of the crankshaft pulley and make a control measurement of the gap. Thus, all gaps are checked and adjusted, with the obligatory rotation of the crankshaft before each measurement. After the operation, you need to fill in engine oil to the desired level, you will also need to replace the Kalina valve cover gasket, and then fasten the valve cover and timing with fasteners.
The correct landing is immediately noticeable: the gas distribution mechanism works smoothly, the engine does not make noise, which means that the “heart health” of the car is in order. At least for the next 50-60 kilometers, thermal clearances will not have a negative impact and additional work will not be required. And they will certainly be the result of incorrect or untimely adjustment.
| The valve will start to heat up. | Thermal expansion is not compensated by the gap and the board will start flying out of the junction. |
| There is a decrease in compression. | The answer is power reduction. |
| Heat dissipation in normal mode is not carried out. | Negatively affects the operation of the catalyst. |
| When the air-fuel mixture is burned, part of the burning composition passes into the exhaust manifold. | Thus, the plate and bevel are destroyed faster. |
Valve adjustment value
If we talk about the internal combustion engine, then we can briefly describe the cycles of its operation. This is intake, then compression, after which the combustion of fuel occurs and the fourth stroke is the release of exhaust gases. The standard Kalina 2 engine and other VAZ vehicles use 4 valves for each cylinder. Two control the exhaust, two control the intake. The principle of its operation is simple: when the camshaft rotates, both inputs open simultaneously, and after a certain time, two outputs open.
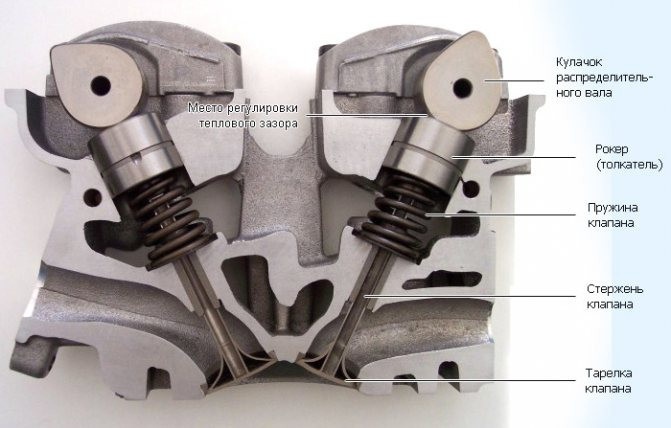
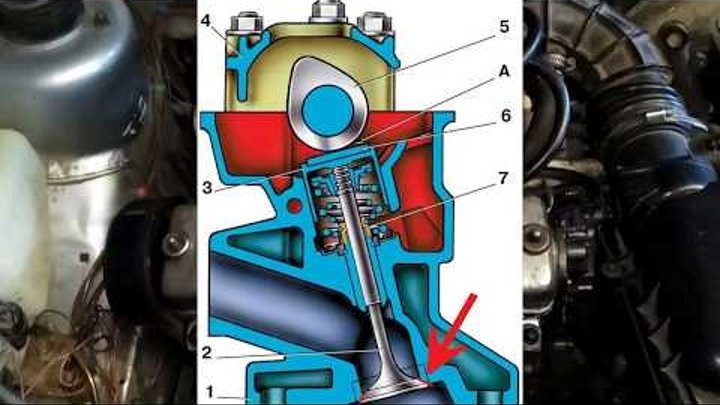
Valve mechanism device
The intake stroke means the piston is moving down. At the same time, the intake valves open, supplying a dose of a mixture of air and gasoline into the cylinder. In the next stage, the piston begins to rise and the intake valves close. Therefore, there is a compression stroke. Having reached the highest point in the cylinder, the piston is sharply thrown back, igniting the mixture with a spark plug. After the piston reaches extreme bottom dead center, the exhaust valves open. When it starts to rise up, exhaust gases are also thrown out.
Therefore, without valves, the operation of an internal combustion engine is practically impossible. Its function is directly dependent on the correct rotation of the camshaft. And to be precise, the processes in it, called pushers.
The purpose of the thermal gap
When this gap is correctly adjusted, the tappet and camshaft cam are pressed against each other as hard as possible to ensure perfect contact between the surfaces. It should be noted that all parts of an internal combustion engine are mainly made of various alloys and metals (compounds of aluminum, copper, cast iron). The pushers, camshaft and valve group itself are also metal. As you know, any metal with strong heating tends to increase in size. As a result, the gap that exists in a cold power unit differs significantly from that in a hot one. Simply put, the valves are too tight or a tight contact of the surfaces is not guaranteed.
Gap adjustment is the installation of special gaps between the valve and the piston, taking into account the expansion of metals when heated. These quantities are so small that microns are used to measure them. In this case, different values are used for exhaust and intake.