How to adjust drive belts
Content
Modern cars rely heavily on the use of a drive belt. The drive belt drives the alternator, air conditioner, power steering and, in some cases, the water pump. Proper operation of the drive belt is important in vehicle maintenance.
As the drive belt ages, stress from drive components such as the power steering pump and alternator can cause the belt to stretch. As the belt stretches, it may begin to slip if left unattended.
Not all types of drive belts can be adjusted. Vehicles equipped with an automatic belt tensioner adjust themselves over time and do not require adjustment.
This article shows the process of adjusting the drive belts on a rotary belt adjuster.
- A warning: Cracked or severely worn drive belts must be replaced. Only belts that are in good working order should be adjusted. Checking the condition of the drive belt Signs of wear on the drive belt.
Part 1 of 3: Check Drive Belt Tension
Necessary materials
- Flat screwdriver
- Measuring tape or ruler
- Set of socket and wrenches
Step 1: Find a point of tension. First, you need to find the longest length of belt in order to get the most accurate results when checking drive belt tension.
Using a tape measure or ruler, locate the center point on the longest length of the drive belt.
Step 2: Check belt tension.. Now that you have found the center point of the belt to measure, you can check the belt tension.
Press the belt with your finger and measure how far the belt can move. Most manufacturers recommend ½ to 1 inch of travel.
- Functions: Please refer to your owner's manual for the exact specifications of your vehicle.
Alternatively, you can check the belt tension by twisting it; if it is more than half twisted, the belt is too loose.
Part 2 of 3: Adjust Drive Belt Tension
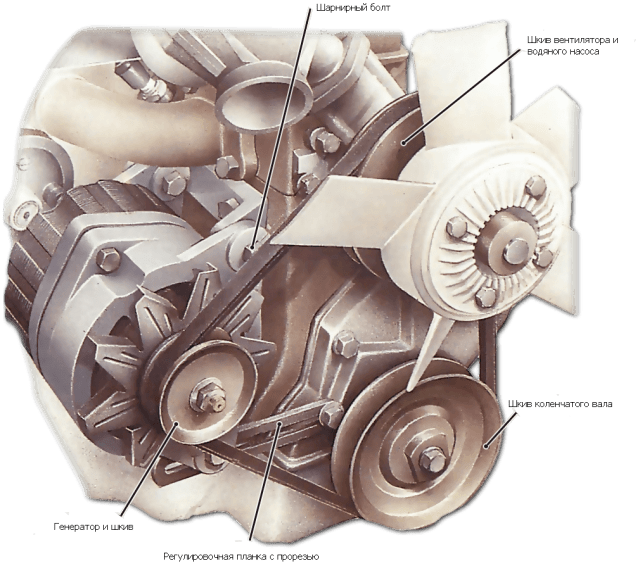
Step 1: Loosen the Adjustment Points. The first step is to find the drive belt pivot bolt. It is usually located opposite the adjusting bolt installed on the generator. The hinge bolt will be slightly loose. Do not unscrew the bolt all the way
Next, locate the adjusting stop bolt and adjusting bolt. Loosen the belt adjustment bolt.
Step 2: Adjust drive belt tension.. After loosening the drive belt pivot bolt and adjusting screw locking bolt, slowly tighten the adjusting bolt to the desired tension.
- Attention: Tightening the adjusting bolt tightens the belt, and loosening the adjusting bolt loosens the belt.
Tighten the bolt to the correct tension on the belt, remembering that the belt will tighten a little once you have everything in place. If the generator is having trouble moving, use a flat head screwdriver to carefully pry the generator up.
- Attention: Be careful not to break any parts of the generator or pry plastic parts.
Part 3 of 3. Recheck the drive belt tension and secure the alternator
Step 1: Tighten all bolts. The first step is to tighten the drive belt adjuster retainer. The bolt should be tight, but be careful not to overtighten it.
Next, tighten the swivel bolt. This will also stretch the belt a little.
Now that everything is tightened up, check your work and make sure everything is secure.
Step 2: Check belt tension.. When everything is tight, check the belt tension with a tape measure or ruler. The belt must not be more than half twisted and must have the recommended amount of deflection.
Finally, start the engine and check that the belt does not squeal or make unusual noises.
Adjusting your vehicle's drive belt is part of vehicle maintenance during regular service intervals. A properly adjusted belt not only prolongs belt life, but also eliminates squeaking noises that may have been present before.
If at some point you feel uncomfortable doing this maintenance yourself or you feel that it is necessary to replace the drive belt, seek help from qualified AvtoTachki specialists.