How to repair and set up a VAZ 2101 distributor with your own hands
Content
The uninterrupted operation of the VAZ 2101 engine largely depends on the breaker-distributor (distributor). At first glance, this element of the ignition system may seem too complicated and accurate, but in fact there is nothing supernatural in its design.
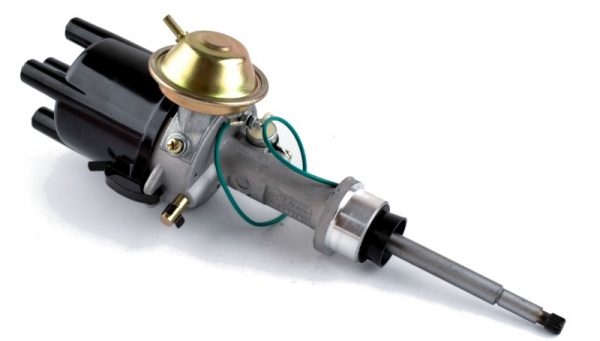
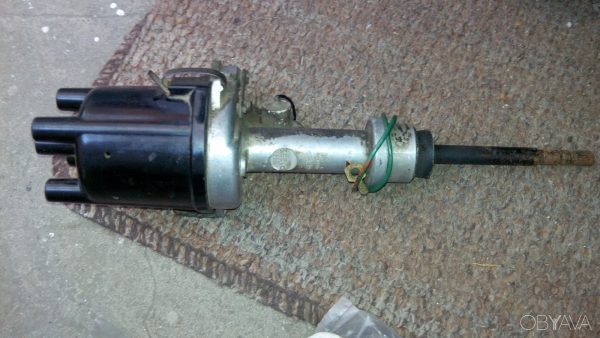
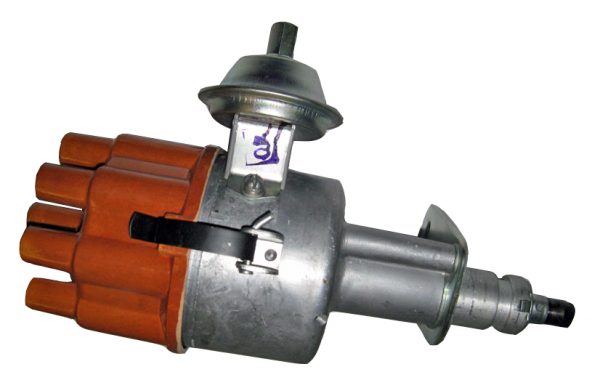
Breaker-distributor VAZ 2101
The name "distributor" itself comes from the French word trembler, which translates as a vibrator, breaker or switch. Considering that the part we are considering is an integral part of the ignition system, from this we can already conclude that it is used to interrupt the constant supply of current, more precisely, to create an electrical impulse. The functions of the distributor also include the distribution of current through the candles and the automatic adjustment of the ignition timing (UOZ).
What kind of breakers-distributors were used on the VAZ 2101
There are two types of distributors: contact and non-contact. Until the early 1980s, "penny" were equipped with contact devices such as R-125B. A feature of this model was the cam-type current interruption mechanism, as well as the absence of the vacuum ignition timing regulator familiar to us. Its function was performed by a manual octane corrector. Later, contact distributors equipped with a vacuum regulator began to be installed on the VAZ 2101. Such models were produced and produced to this day under the catalog number 30.3706.
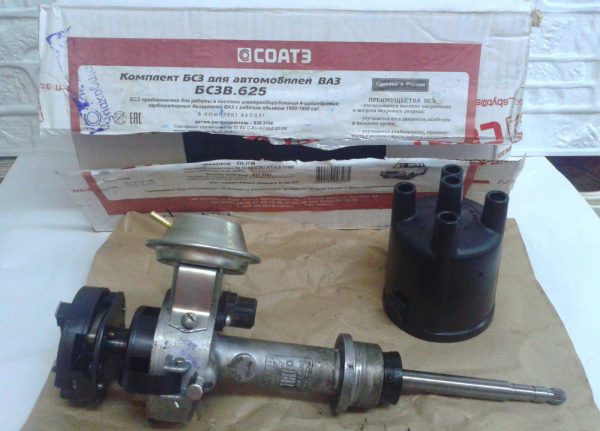
In the nineties, contactless devices replaced contactless devices. Their design did not differ in anything, except for the impulse formation mechanism. The cam mechanism, due to its unreliability, was replaced by a Hall sensor - a device whose principle of operation is based on the effect of a potential difference on a conductor placed in an electromagnetic field. Similar sensors are still used today in various automotive engine systems.
Contact distributor VAZ 2101
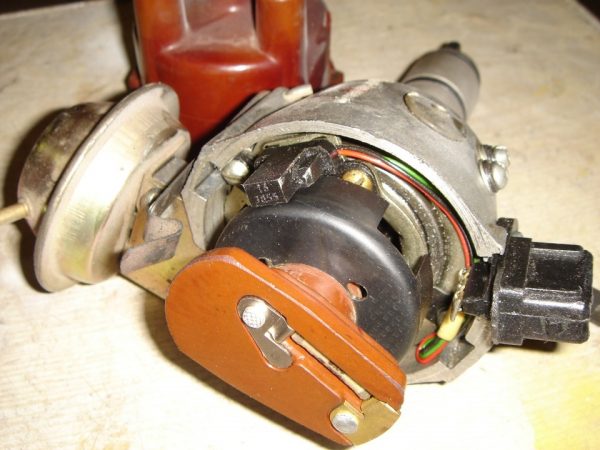
Consider the design of the "penny" distributor-breaker using the example of model 30.3706.
Устройство
Structurally, the distributor 30.3706 consists of many parts assembled in a compact case, closed with a lid with contacts for high-voltage wires.
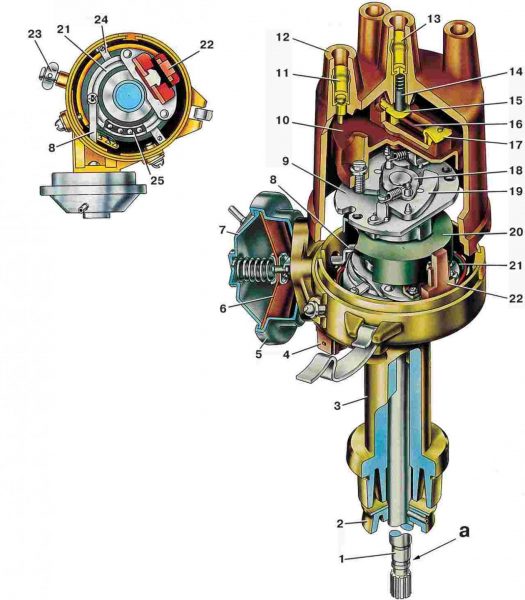
Consider the main ones:
- frame. It is made of aluminum alloy. In its upper part there is a breaker mechanism, as well as vacuum and centrifugal regulators. In the center of the housing there is a ceramic-metal bushing that acts as a thrust bearing. An oiler is provided in the sidewall, through which the sleeve is lubricated;
 The body of the distributor is made of aluminum alloy
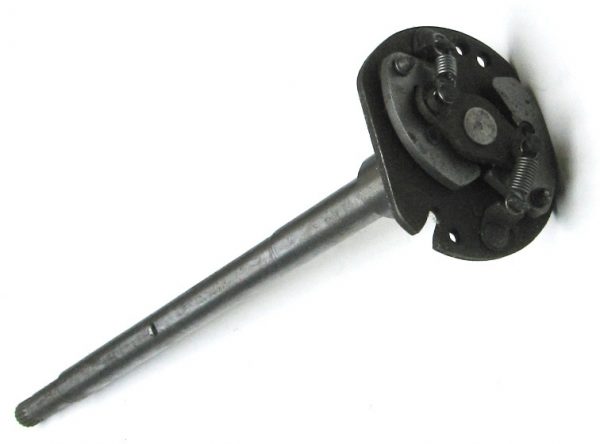
 - shaft. The distributor rotor is cast from steel. In the lower part, it has splines, due to which it is driven from the drive gear of the auxiliary mechanisms of the power plant. The main task of the shaft is to transmit torque to the ignition angle regulators and the runner;The lower part of the distributor shaft has splines
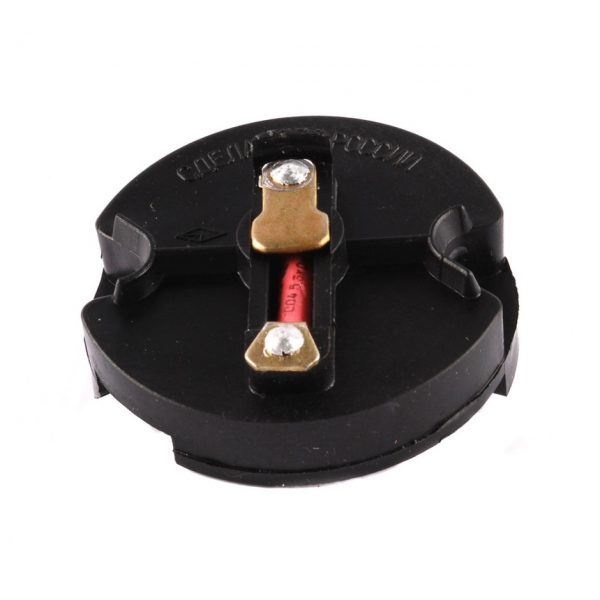
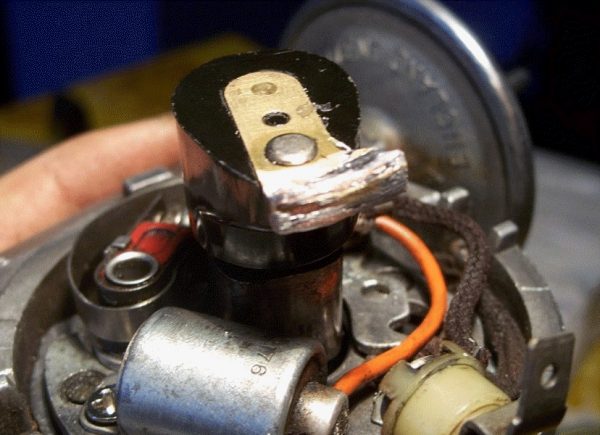
- moving contact (slider). Mounted on the top end of the shaft. Rotating, it transmits voltage to the side electrodes located inside the cover. The slider is made in the form of a plastic circle with two contacts, between which a resistor is installed. The task of the latter is to suppress radio interference arising from the closing and opening of contacts;The slider resistor is used to prevent radio interference
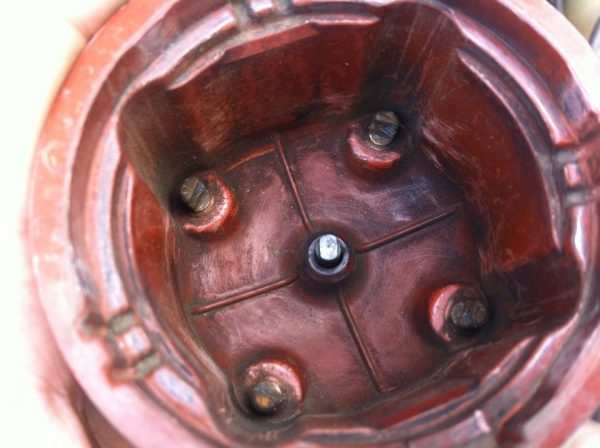
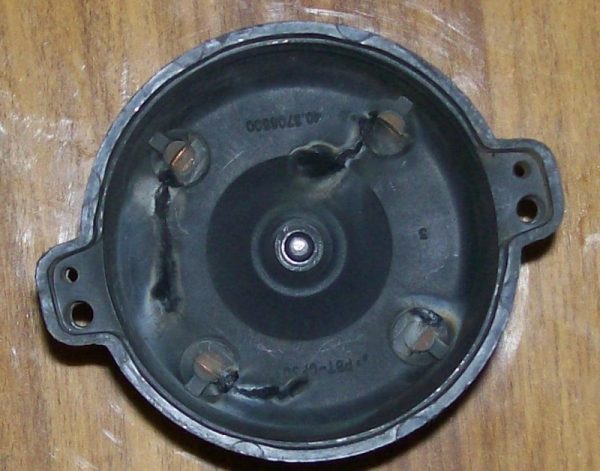
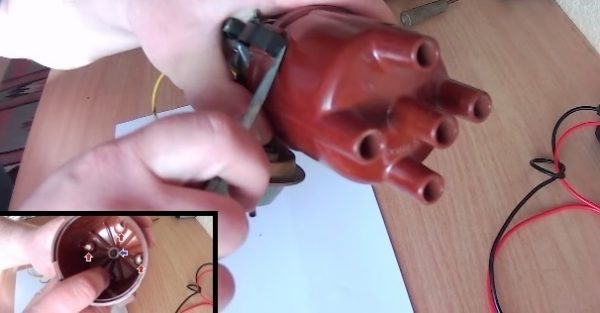
- dielectric contact cover. The cover of the breaker-distributor is made of durable plastic. It has five contacts: one central and four lateral. The central contact is made of graphite. For this reason, it is often referred to as "coal". Side contacts - copper-graphite;Contacts are located on the inside of the cover
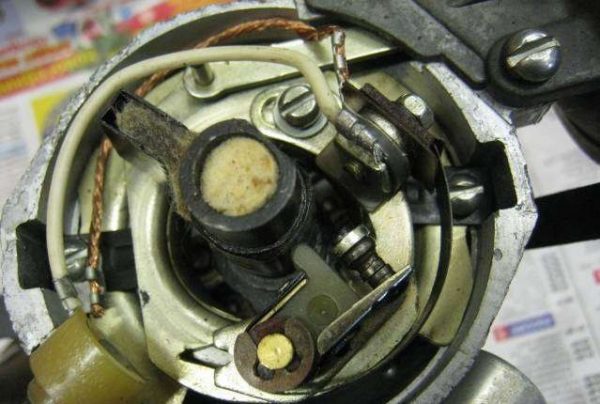
- breaker. The main element of the interrupter design is the contact mechanism. Its task is to briefly open the low-voltage circuit of the ignition system. It is he who generates the electrical impulse. The contacts are opened with the help of a tetrahedral cam rotating around its axis, which is a figured thickening of the shaft. The breaker mechanism consists of two contacts: stationary and movable. The latter is mounted on a spring-loaded lever. In the rest position, the contacts are closed. But when the shaft of the device begins to rotate, the cam of one of its faces acts on the block of the movable contact, pushing it to the side. At this point, the circuit opens. Thus, in one revolution of the shaft, the contacts open and close four times. The interrupter elements are placed on a movable plate rotating around the shaft and connected by means of a rod to the UOZ vacuum regulator. This makes it possible to change the angle value depending on the load on the engine;Breaker contacts open the electrical circuit
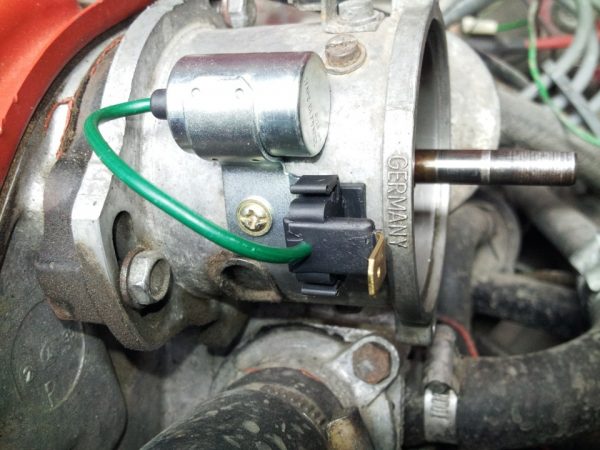
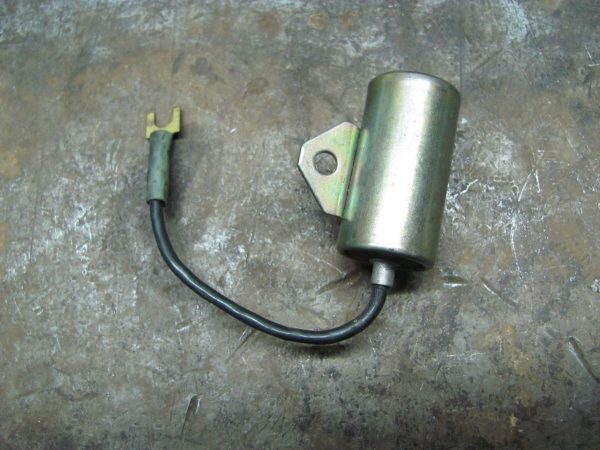
- capacitor. Serves to prevent sparking between contacts. It is connected in parallel to the contacts and fixed on the distributor body;Capacitor prevents sparking at the contacts
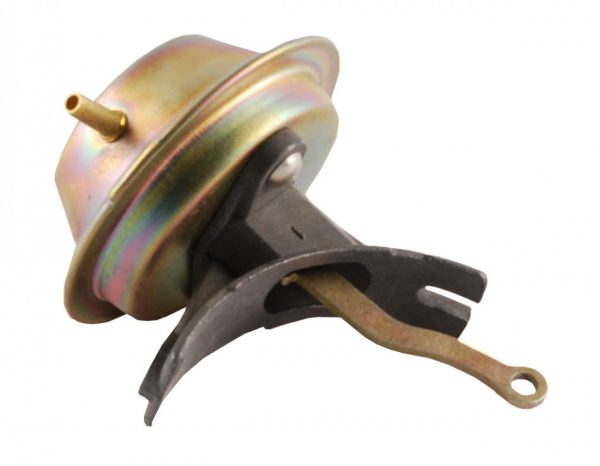
- UOZ vacuum regulator. Increases or decreases the angle based on the load the motor is experiencing, providing automatic adjustment of the SPD. "Vacuum" taken out of the body of the distributor and attached to it with screws. Its design consists of a tank with a membrane and a vacuum hose connecting the device to the first chamber of the carburetor. When a vacuum is created in it, caused by the movement of the pistons, it is transmitted through the hose to the reservoir and creates a vacuum there. It causes the membrane to bend, and it, in turn, pushes the rod, which shifts the rotating breaker plate clockwise. So the ignition angle increases with increasing load. When the load is reduced, the plate springs back;The main element of the vacuum regulator is a membrane located inside the tank
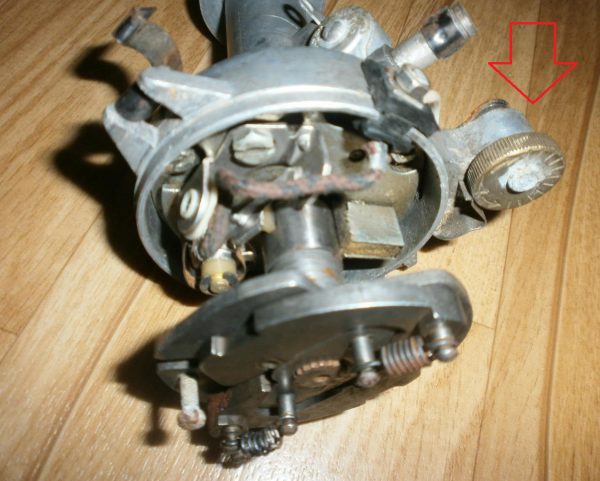
- centrifugal regulator UOZ. Changes the ignition timing in accordance with the number of revolutions of the crankshaft. The design of the centrifugal governor is made up of a base and a leading plate, a moving sleeve, small weights and springs. The base plate is soldered to a movable sleeve, which is mounted on the distributor shaft. On its upper plane there are two axles on which weights are mounted. The drive plate is put on the end of the shaft. The plates are connected by springs of different stiffness. At the moment of increasing the engine speed, the speed of rotation of the distributor shaft also increases. In this case, a centrifugal force arises, which overcomes the resistance of the springs. The loads scroll around the axes and rest with their protruding sides against the base plate, rotating it clockwise, again, increasing the UOS;The centrifugal regulator is used to change the UOZ depending on the number of revolutions of the crankshaft
- octane corrector. It would be useful to consider the design of a distributor with an octane corrector. Such devices have long been discontinued, but they are still found in classic VAZs. As we have already said, there was no vacuum regulator in the R-125B distributor. His role was played by the so-called octane corrector. The principle of operation of this mechanism, in principle, is no different from the "vacuum", however, here the function of the reservoir, membrane and hose, setting the movable plate in motion by means of a rod, was performed by an eccentric, which had to be rotated manually. The need for such an adjustment arose every time when gasoline with a different octane number was poured into the car's tank.The octane corrector is used to change the UOS manually


How does the contact distributor "penny" work
When the ignition is turned on, the current from the battery begins to flow to the contacts of the breaker. The starter, turning the crankshaft, makes the engine work. Together with the crankshaft, the distributor shaft also rotates, breaking and closing the low voltage circuit with its cam. The current pulse generated by the interrupter goes to the ignition coil, where its voltage increases thousands of times and is fed to the main electrode of the distributor cap. From there, with the help of a slider, it “carries” along the side contacts, and from them it goes to the candles through high voltage wires. This is how sparking occurs on the electrodes of the candles.
From the moment the power unit is started, the generator replaces the battery, generating electric current instead. But in the process of sparking, everything remains the same.
Contactless distributor
The device of the breaker-distributor VAZ 2101 of the non-contact type is similar to the contact one. The only difference is that the mechanical interrupter is replaced by a Hall sensor. This decision was made by the designers due to the frequent failure of the contact mechanism and the need for constant adjustment of the contact gap.
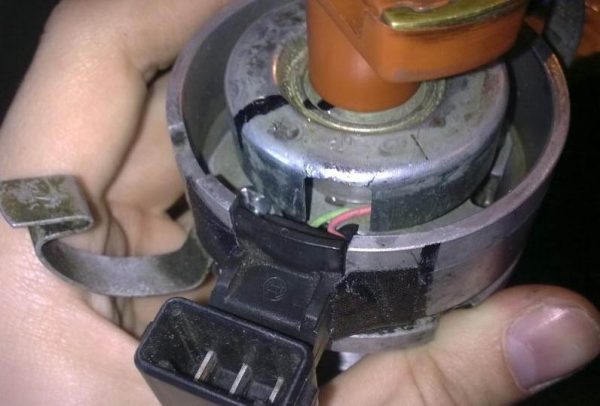
Tramblers with a Hall sensor are used in non-contact type ignition systems. The design of the sensor consists of a permanent magnet and a round screen with cutouts mounted on the breaker-distributor shaft. During the rotation of the shaft, the cutouts of the screen alternately pass through the groove of the magnet, which causes changes in its field. The sensor itself does not generate an electrical impulse, but only counts the number of revolutions of the distributor shaft and transmits the information received to the switch, which converts each signal into a pulsating current.
Distributor malfunctions, their signs and causes
Given the fact that the designs of contact and non-contact type distributors are almost the same, their malfunctions are also identical. The most common breakdowns of the breaker-distributor include:
- failure of the cover contacts;
- burning or runaway amount;
- changing the distance between the contacts of the breaker (only for contact distributors);
- breakage of the Hall sensor (only for non-contact devices);
- capacitor failure;
- damage or wear of the sliding plate bearing.
Let's consider malfunctions in more detail in the context of their symptoms and causes.
Cover contact failure
Given that the cover contacts are made of relatively soft materials, their wear is inevitable. In addition, they often burn out, because a current of several tens of thousands of volts passes through them.
Signs of wear or burning of the cover contacts are:
- "triple" of the power plant;
- complicated engine start;
- reduction in power characteristics;
- unstable idle.
Podgoranie or amount of fugitive contact
The situation is similar with the runner. And although its distributing contact is made of metal, it also wears out over time. Wear leads to an increase in the gap between the contacts of the slider and the cover, which, in turn, provokes the formation of an electric spark. As a result, we observe the same symptoms of engine malfunction.
Changing the gap between contacts
The contact gap in the VAZ 2101 distributor breaker should be 0,35–0,45 mm. If it goes out of this range, malfunctions occur in the ignition system, which affects the operation of the power unit: the engine does not develop the necessary power, the car twitches, fuel consumption increases. Problems with the gap in the breaker occur quite often. Owners of cars with a contact ignition system have to adjust the contacts at least once a month. The main reason for such problems is the constant mechanical stress to which the breaker is subject.
Hall sensor failure
If problems arise with the electromagnetic sensor, interruptions also begin in the operation of the motor: it starts with difficulty, periodically stalls, the car twitches during acceleration, the speed floats. If the sensor breaks down at all, you are unlikely to be able to start the engine. It rarely goes out of order. The main sign of his "death" is the absence of voltage on the central high voltage wire coming out of the ignition coil.
Capacitor failure
As for the capacitor, it also rarely fails. But when this happens, the breaker contacts begin to burn. How it ends, you already know.
Bearing breakage
The bearing serves to ensure uniform rotation of the movable plate around the shaft. In the event of a malfunction (biting, jamming, backlash), the ignition timing regulators will not work. This can cause detonation, increased fuel consumption, overheating of the power plant. It is possible to determine whether the bearing of the movable plate is working only after disassembling the distributor.
Contact distributor repair
Repair of the breaker-distributor or its diagnostics is best done by first removing the device from the engine. Firstly, it will be much more convenient, and secondly, you will get the opportunity to assess the general condition of the distributor.
Dismantling the breaker-distributor VAZ 2101
To remove the distributor from the engine, you will need two wrenches: 7 and 13 mm. The dismantling procedure is as follows:
- Disconnect the negative terminal from the battery.
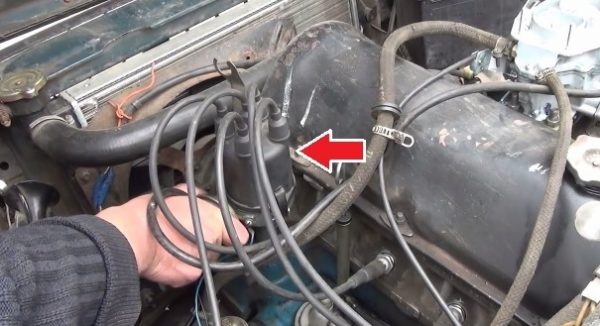
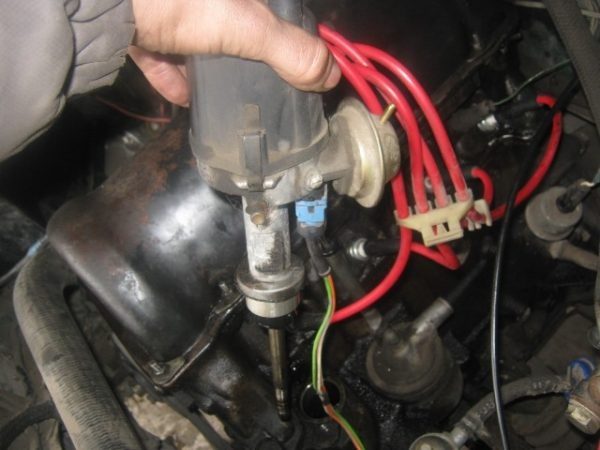
- We find a distributor. It is located on the power plant cylinder block on the left side.The distributor is installed on the left side of the engine
- Carefully remove the high-voltage wires from the cover contacts with your hand.
- Disconnect the rubber tube from the vacuum regulator reservoir.Hose can be easily removed by hand
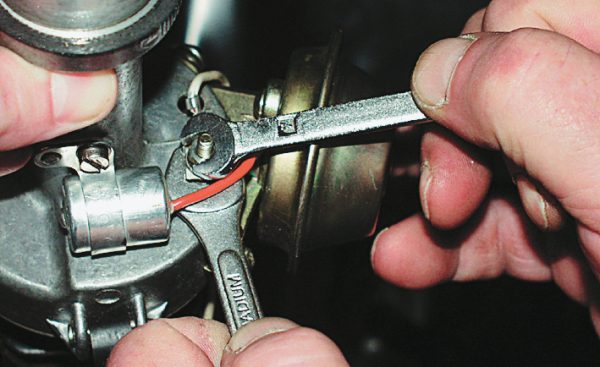
- Using a 7 mm wrench, unscrew the nut that secures the low-voltage wire terminal.The wire terminal is fastened with a nut
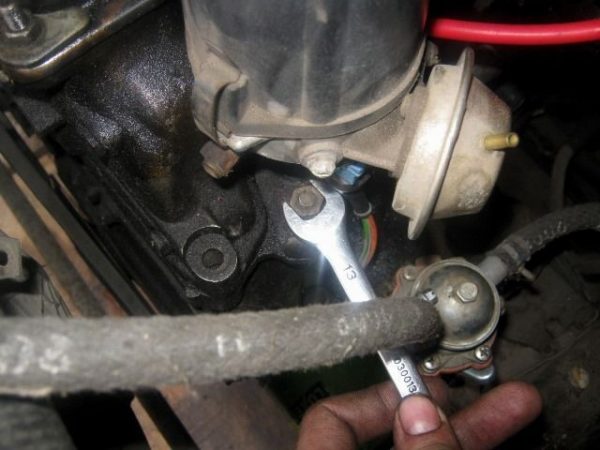
- Using a 13 mm wrench, loosen the nut holding the distributor breaker.To unscrew the nut, you need a 13 mm wrench
- We remove the distributor from its mounting hole along with the o-ring, which acts as an oil seal.When dismantling the distributor, do not lose the sealing ring
- We wipe the lower part of the shaft with a clean rag, removing traces of oil from it.
Disassembly of the distributor, troubleshooting and replacement of failed nodes
At this stage, we need the following tools and materials:
- a hammer;
- thin punch or awl;
- wrench 7 mm;
- slotted screwdriver;
- fine sandpaper;
- multimeter;
- medical syringe for 20 cubes (optional);
- anti-rust liquid (WD-40 or equivalent);
- pencil and piece of paper (to make a list of parts that will need to be replaced).
The procedure for disassembling and repairing the distributor is as follows:
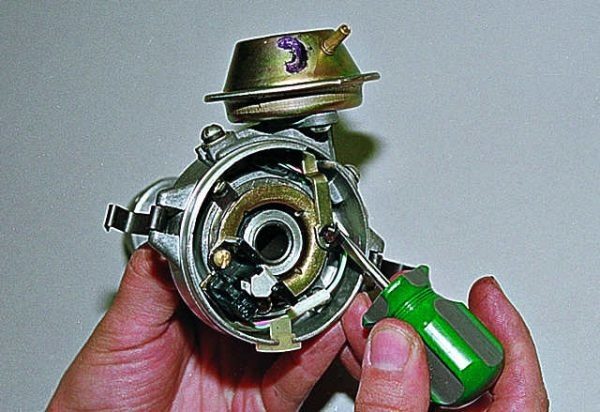
- Detach the device cover from the case. To do this, you need to bend the two metal latches with your hand or with a screwdriver.
- We examine the cover from the outside and inside. There should not be any cracks or chips on it. We pay special attention to the condition of the electrodes. In case of detecting slight traces of burning, we eliminate them with sandpaper. If the contacts are badly burnt, or the cover has mechanical damage, we add it to the list of replacement parts.If the contacts are badly burned or worn, the cover must be replaced.
- We evaluate the state of the runner. If it has signs of wear, we add it to the list. Otherwise, clean the slider with sandpaper.
- We turn on the multimeter, transfer it to the ohmmeter mode (up to 20 kOhm). We measure the value of the resistance of the slider resistor. If it goes beyond 4-6 kOhm, we add the resistor to the list of future purchases.Resistance should be within 4-6 kOhm
- Unscrew the two screws fixing the slider with a screwdriver. We take it off.Loosen the screws securing the slider
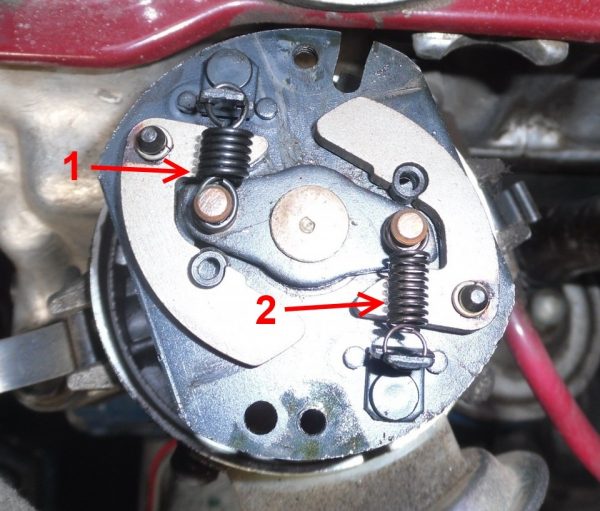
- We examine the weights of the mechanism of the centrifugal regulator. We check the condition of the springs by moving the weights in different directions. In no case should the springs be stretched and dangle. If they hang out, we make an appropriate entry in our list.Stretched springs must be replaced.
- Using a hammer and a thin drift (you can use an awl), we knock out the pin that secures the shaft coupling. We remove the clutch.To remove the shaft, you need to knock out the pin
- We examine the splines of the distributor shaft. If signs of wear or mechanical damage are found, the shaft definitely needs to be replaced, so we “take it on a pencil” as well.
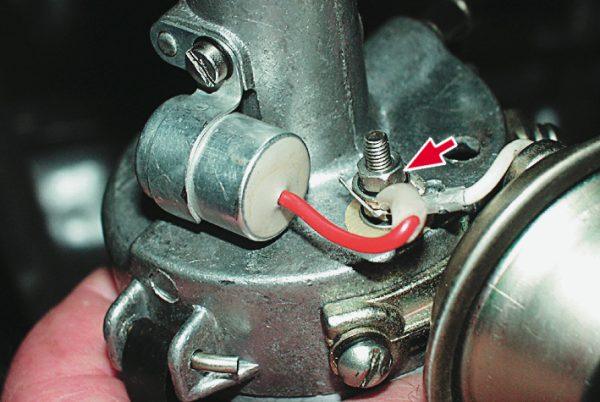
- Using a 7 mm wrench, loosen the nut securing the capacitor wire. Disconnect the wire.
- We unscrew the screw that secures the capacitor. We take it off.The capacitor is attached to the body with a screw, the wire with a nut
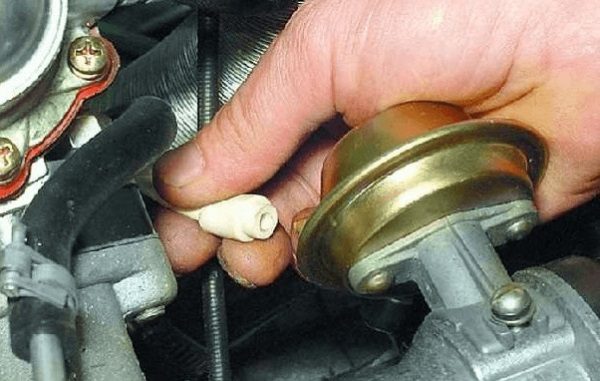
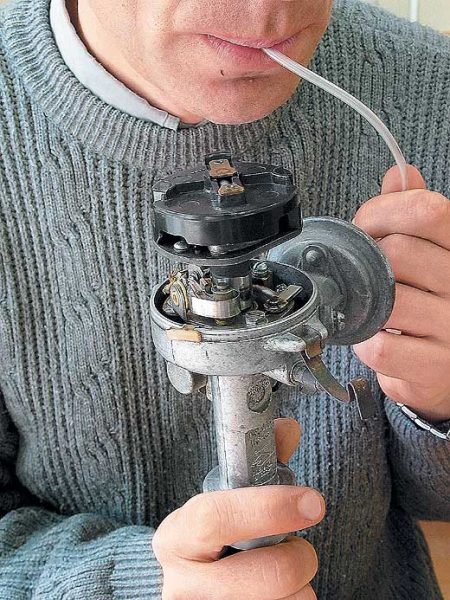
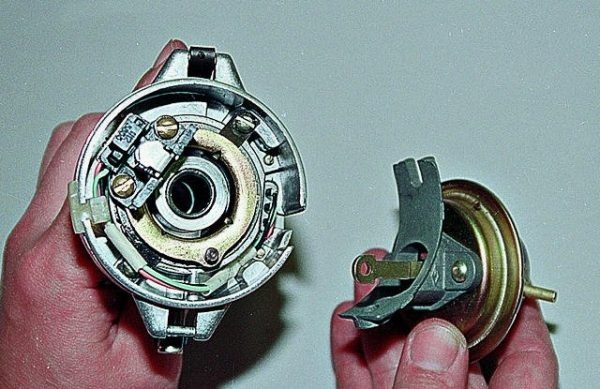
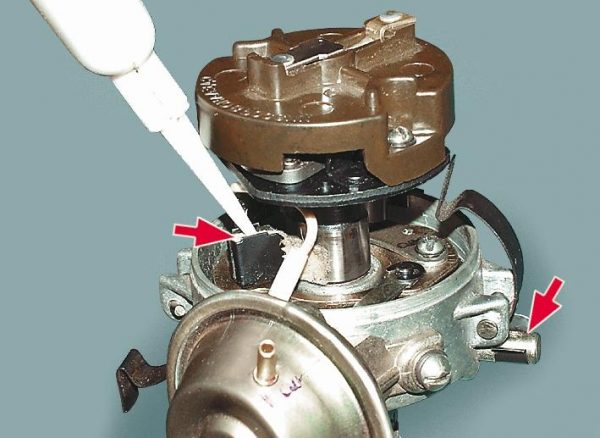
- We make diagnostics of the UOZ vacuum regulator. To do this, disconnect the second end of the hose from the carburetor fitting, which comes from the "vacuum box". We again put one of the ends of the hose on the fitting of the vacuum regulator reservoir. We put the other end on the tip of the syringe and, pulling out its piston, create a vacuum in the hose and tank. If there is no syringe at hand, a vacuum can be created by mouth, after cleaning the end of the hose from dirt. When creating a vacuum, the movable distributor plate must rotate. If this does not happen, most likely the membrane in the tank has failed. In this case, we add the tank to our list.When creating a vacuum in the hose, the movable plate must rotate
- Remove the thrust washer from the axle. Disconnect the traction.The plate must be moved off the axis
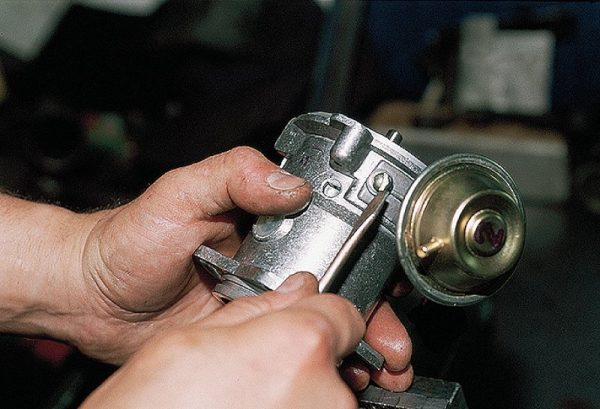
- We unscrew the tank mounting screws (2 pcs.) With a flat screwdriver.The vacuum regulator is attached to the distributor body with two screws.
- Disconnect the reservoir.When the screws are unscrewed, the tank will easily detach.
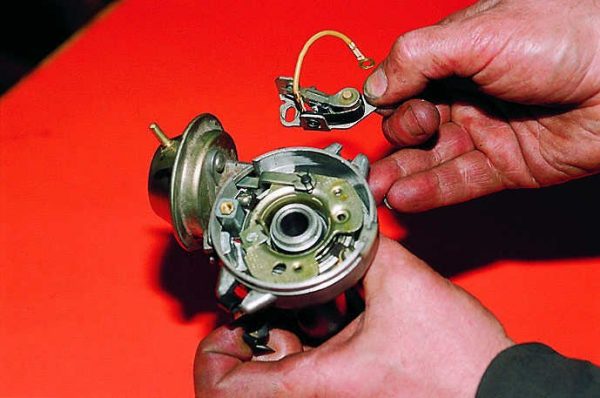
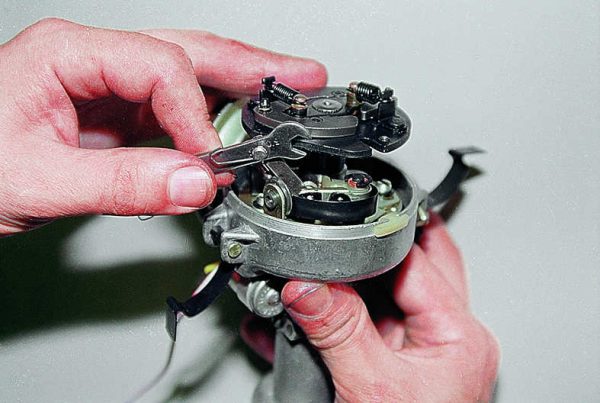
- We unscrew the nuts (2 pcs.) Fixing the breaker contacts. To do this, use a 7 mm key and a screwdriver, which we hold the screws on the back side. We dismantle the contacts. We examine them and assess the condition. If they are very burnt, we add the contacts to the list.After unscrewing the two nuts, remove the contact block
- Unscrew the screws that secure the plate with a slotted screwdriver. We take it off.The plate is fixed with two screws
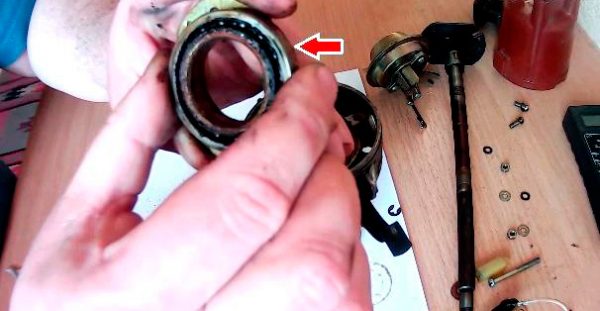
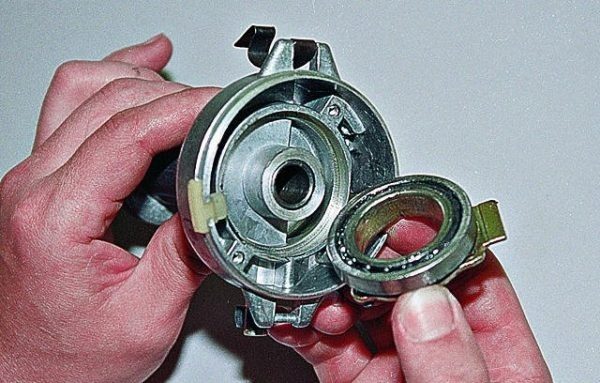
- We remove the movable plate assembly with the bearing from the housing.The bearing is removed together with the retaining spring
- We check the bearing for play and jamming by staggering and turning the inner ring. If these defects are detected, we prepare it for replacement.
- We purchase parts according to our list. We assemble the distributor in the reverse order, changing the failed elements to new ones. The cover and the slider do not need to be installed yet, since we will still have to set the gap between the contacts.


Video: disassembly of the distributor

Contactless distributor repair
Diagnostics and repair of a non-contact type distributor is carried out by analogy with the above instructions. The only exception is the process of checking and replacing the Hall sensor.
It is necessary to diagnose the sensor without removing the distributor from the engine. If you suspect that the Hall sensor is not working, check it and, if necessary, replace it in the following order:
- Disconnect the central armored wire from the corresponding electrode on the cover of the distributor.
- Insert a known-good spark plug into the wire cap and place it on the engine (body) of the car so that its skirt has reliable contact with the ground.
- Have an assistant turn on the ignition and crank the starter for a few seconds. With a working Hall sensor, a spark will occur on the electrodes of the candle. If there is no spark, continue with the diagnosis.
- Disconnect the sensor connector from the device body.
- Turn on the ignition and close terminals 2 and 3 in the connector. At the moment of closing, a spark should appear on the electrodes of the candle. If this does not happen, continue the diagnosis.
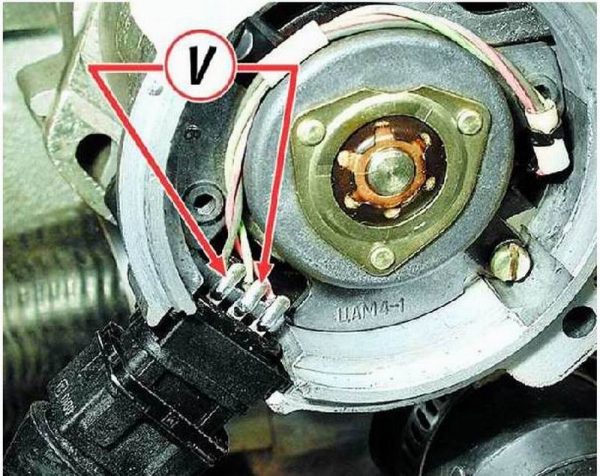
- Switch the multimeter switch to the voltage measurement mode in the range up to 20 V. With the motor turned off, connect the instrument's leads to contacts 2 and 3 of the sensor.The multimeter probes must be connected to pins 2 and 3 of the Hall sensor connector
- Turn on the ignition and take the instrument readings. They should be in the range of 0,4–11 V. If there is no voltage, the sensor is clearly faulty and must be replaced.
- Perform the work provided for in paragraphs. 1–8 instructions for dismantling the distributor, as well as p.p. 1-14 instructions for disassembling the device.
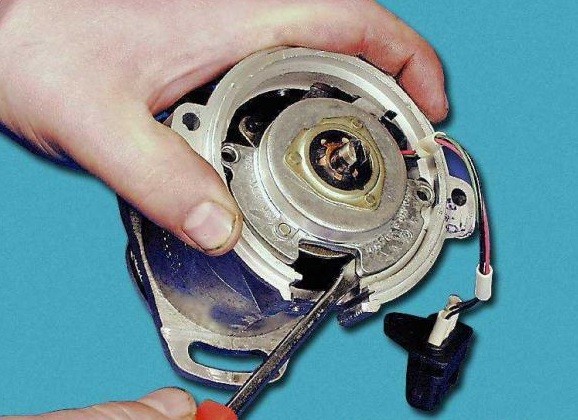
- Loosen the screws securing the Hall sensor with a flat screwdriver.Hall sensor fixed with two screws
- Remove the sensor from the housing.When the screws are unscrewed, the sensor must be pry off with a screwdriver
- Replace the sensor and assemble the device in the reverse order.

Installing the distributor and adjusting the contact gap
When installing the breaker-distributor, it is important to install it so that the UOZ is close to ideal.
Mounting the breaker-distributor
The installation process is identical for contact and non-contact distributors.
Required tools and tools:
- key 38 mm;
- key 13 mm;
- control lamp.
The order of installation work is as follows:
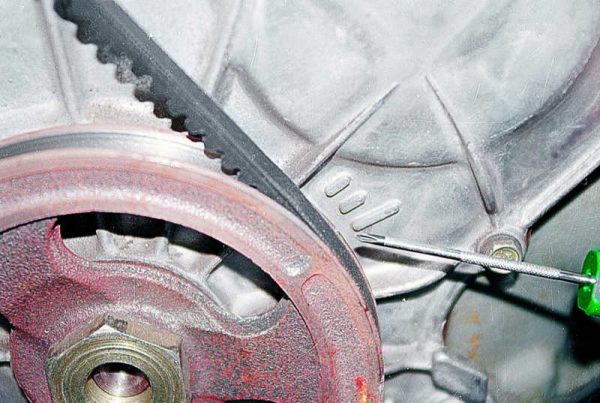
- Using a 38 mm wrench, we scroll the crankshaft by the pulley fastening nut to the right until the mark on the pulley matches the middle mark on the timing cover.The mark on the pulley must line up with the center mark on the timing cover.
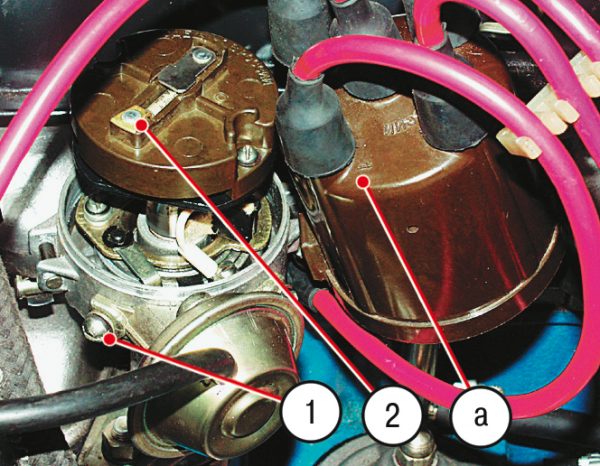
- We install the distributor in the cylinder block. We set the slider so that its lateral contact is directed clearly to the first cylinder.The slider must be positioned so that its contact bolt (2) is located exactly under the contact of the armored wire of the first cylinder (a)
- We connect all previously disconnected wires to the distributor, with the exception of high-voltage ones.
- We connect a hose to the tank of the vacuum regulator.
- We turn on the ignition.
- We connect one probe of the control lamp to the contact bolt of the distributor, and the second to the "mass" of the car.
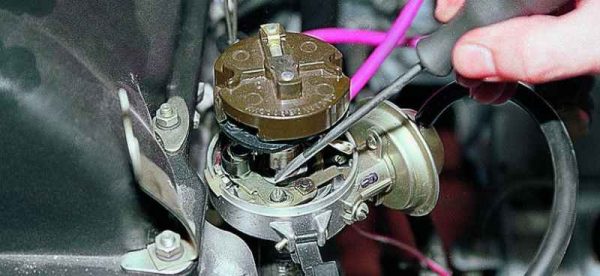
- We scroll the distributor housing to the left with our hands until the control lamp lights up.The distributor must be turned counterclockwise until the lamp lights up
- We fix the device in this position with a 13 mm wrench and a nut.

Breaker contact adjustment
The stability of the power unit, its power characteristics and fuel consumption depend on how accurately the contact gap is set.
To adjust the gap you will need:
- wrench 38 mm;
- slotted screwdriver;
- flat probe 0,4 mm thick.
Contact adjustment is carried out in the following order:
- If the cover and distributor slider are not removed, remove them in accordance with the instructions above.
- Using a 38 mm wrench, turn the engine crankshaft until the cam on the distributor shaft opens the contacts to the maximum distance.
- Using a 0,4 mm feeler gauge, measure the gap. As already mentioned, it should be 0,35–0,45 mm.The gap should be 0,35–0,45 mm
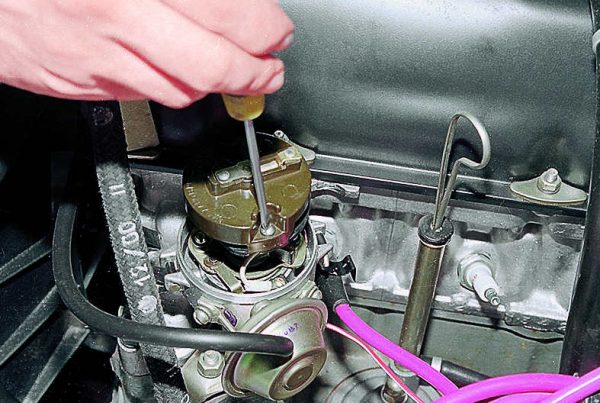
- If the gap does not correspond to the specified parameters, use a slotted screwdriver to slightly loosen the screws securing the contact group rack.To set the gap, you need to move the rack in the right direction
- We shift the stand with a screwdriver in the direction of increasing or decreasing the gap. We re-measure. If everything is correct, fix the rack by tightening the screws.
- We assemble the breaker-distributor. We connect high-voltage wires to it.
If you are dealing with a contactless distributor, no adjustment of the contacts is necessary.
Distributor lubrication
In order for the breaker-distributor to serve as long as possible and not fail at the most inopportune moment, it must be looked after. It is recommended to visually inspect it at least once a quarter, remove dirt from the device, and also lubricate it.
At the beginning of the article, we talked about the fact that there is a special oiler in the distributor housing. It is needed in order to lubricate the shaft support sleeve. Without lubrication, it will quickly fail and contribute to shaft wear.
To lubricate the bushing, it is necessary to remove the cover of the distributor, turn the oiler so that its hole opens, and drop 5–6 drops of clean engine oil into it. This can be done using a special plastic oiler or a medical syringe without a needle.
Video: distributor lubricant

Systematically maintain the distributor of your "penny", repair it in time, and it will serve for a very long time.

