How to clean a lambda probe
Content
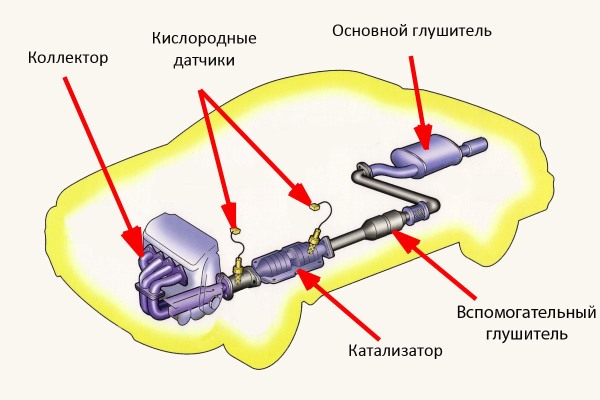
The oxygen sensor (aka lambda probe) should determine the concentration of free oxygen in the exhaust gases of the internal combustion engine. This happens thanks to the O2 analyzer that is built into it. When the sensor is clogged with non-combustible soot, the data given by it will be incorrect.
If lambda problems are detected at an early stage, restoring the oxygen sensor will help fix them. Do-it-yourself cleaning of the lambda probe allows you to return it to normal operation and extend its life. But this is not true in all cases, and the effectiveness depends on the means used and the method of use. If you want to know if cleaning the lambda probe helps with various malfunctions, how to clean it from soot and how - read the article to the end.
The estimated resource of the lambda probe is about 100-150 thousand km, but due to aggressive fuel additives, low-quality gasoline, oil burnout and other problems, it is often reduced to 40-80 thousand. Because of this, the ECU cannot dose gasoline correctly, the mixture becomes lean or rich, the engine starts to run unevenly and loses traction, the “Check engine” error appears on the panel.
Common Oxygen Sensor Problems
breakdown of the lambda probe, according to the manufacturers, cannot be eliminated, and in case of failure it is necessary to change it to a new one or put a snag. However, in practice, if you notice the problem of functioning in time, you can slightly extend its life. And not only due to cleaning, but also by changing the quality of the fuel. If we are talking about pollution, then you can clean the lambda probe so that it starts to give correct readings.
It is better to revive the lambda only after preliminary diagnostics and verification, because it is possible that this will only be a waste of time.
Focusing on the cause, based on the preliminary data when checking the oxygen sensor, it will be possible to roughly say whether there is any point in cleaning.
| Signs of LZ breakdown | Why is this happening | How does the car behave? |
|---|---|---|
| Hull depressurization | Natural wear and overheating of the sensor | Problems with XX, an enriched mixture enters the internal combustion engine, fuel consumption increases, a strong smell from the exhaust |
| Sensor overheating | It happens with incorrect ignition: with a broken coil or wires, incorrectly matched or dirty candles | Problems with XX, combustion products burn out in the exhaust tract, engine tripping, loss of traction, shots in the muffler, pops in the intake are possible |
| Housing blockage | It occurs due to refueling with low-quality gasoline or the accumulation of deposits due to high mileage of the car | Unstable operation of the internal combustion engine, loss of traction, increased fuel consumption, strong smell from the exhaust pipe |
| Damaged wiring | The wiring rots, breaks in the cold, shorts to ground, etc. | Unstable operation of the engine at idle, a slight loss of engine response and traction, an increase in gas mileage |
| Destruction of the ceramic part of the LZ | After hitting the sensor, for example, after an accident, touching an obstacle with exhaust parts, or careless repair of the exhaust tract | Unstable operation at idle, tripling, increased consumption, loss of traction |
As you can see, all kinds of oxygen sensor problems show up as the same symptoms. This is due to the fact that if the lambda transmits incorrect data on the composition of the mixture to the ECU, the “brains” begin to incorrectly dose fuel and regulate the ignition timing. If there is no signal from the sensor at all, the ECU puts the internal combustion engine into emergency operation mode with “averaged” parameters.
If the diagnostics did not reveal mechanical problems with the sensor (broken parts, deformations, cracks), but only elementary contamination of its heating part or the sensitive element itself, you can try to restore it. But before you clean the oxygen sensor from carbon deposits, you need to make sure that its wiring is working (maybe it will be enough to eliminate the open circuit, clean the contacts or replace the chip), as well as the normal operation of the ignition system.
Is it possible to clean the lambda?
Restoring the operation of the oxygen sensor in garage conditions is possible if we are talking about its contamination with deposits from the products of combustion of fuel. It is useless to clean a physically broken sensor, it must be changed. If you find just a dirty lambda probe, decarbonizing will bring it back to life. Is it possible to clean the lambda probe is not worth worrying about. Since this sensor is designed to work in an aggressive environment of hot gases, it is not afraid of heat, washing and some caustic chemicals. Only in order to choose the means by which cleaning can be performed more safely, it will be necessary to determine the type of sensor.
Before cleaning the lambda sensor from carbon deposits, determine its type. There are two basic types:
Left zirconia, right titanium
- Zirconia. Galvanic type sensors that generate voltage during operation (from 0 to 1 volt). These sensors are cheaper, unpretentious, but differ in low accuracy.
- Titanium. Resistive type sensors that change the resistance of the measuring element during operation. A voltage is applied to this element, which decreases due to resistance (varies within 0,1-5 volts), thereby signaling the composition of the mixture. Such sensors are more accurate, gentler and more expensive.
It is possible to distinguish a zirconium lambda probe (oxygen sensor) from a titanium one visually, according to two criteria:
- Size. Titanium oxygen sensors are more compact and have smaller threads.
- Wires. The sensors differ in the colors of the braid: the presence of red and yellow wires is guaranteed to indicate titanium.
Cleaning lambda from pollution is carried out by active chemical additions, such as acids and organic solvents. Zirconium sensors, being less sensitive, can be cleaned with aggressive concentrated acids and solvents, while titanium sensors require more gentle handling. It is possible to remove carbon deposits on the lambda of the second type only with a more dilute acid or an organic solvent.
How can you clean a lambda probe
When choosing how to clean the lambda probe from carbon deposits, you must immediately discard potentially aggressive properties that destroy the sensor. Depending on the type of sensor, these include:
- for zirconium oxide (ZrO2) - hydrofluoric acid (hydrogen fluoride solution HF), concentrated sulfuric acid (more than 70% H2SO4) and alkalis;
- for titanium oxide (TiO2) - sulfuric acid (H2SO4), hydrogen peroxide (H2O2), ammonia (NH3), it is also undesirable to expose the sensor to heating in the presence of chlorine (for example, in hydrochloric acid HCl), magnesium, calcium, ceramics can react with them.
It is also necessary to use substances that are chemically active and aggressive in relation to carbon deposits, but neutral - in relation to the sensor itself. There are 3 options for how to clean carbon deposits on an oxygen sensor:
Orthophosphoric acid for lambda probe cleaning
- inorganic acids (sulfuric, hydrochloric, orthophosphoric);
- organic acids (acetic);
- organic solvents (light hydrocarbons, dimexide).
Rђ RІRѕS, cleaning the lambda probe with acetic acid or attempts to remove deposits with mortar citric acid will completely useless. Read below to learn how to clean the lambda probe sensor with various chemicals.
Do-it-yourself lambda probe cleaning
so that cleaning the lambda probe at home does not take you much time, you can look in the table at the expected result and the time spent when using one or another tool. This will help determine how and how to clean the oxygen sensor with your own hands.
| Means | Experience the Power of Effective Results | Cleanup Time |
|---|---|---|
| Carb cleaner (carburetor and throttle cleaner), organic solvents (kerosene, acetone, etc.) | Will go for prevention, does not cope well with soot | Dense deposits are almost never cleaned, but a quick flush allows you to wash off small deposits at an early stage. |
| Dimexide | Average efficiency | Washes away light deposits in 10-30 minutes, weak against heavy deposits |
| organic acids | They wash off not very heavy pollution, but for a relatively long time, they are ineffective against dense soot | |
| Orthophosphoric acid | Removes deposits well | Relatively long, from 10-30 minutes to a day |
| Sulfuric acid | From 30 minutes to several hours | |
| Hydrochloric acid |
Correctly clean the oxygen sensor will not work without such equipment:
How to clean a lambda probe - video with cleaning procedure
- glass vessels for 100-500 ml;
- hair dryer capable of producing a temperature of 60-80 degrees;
- soft brush.
Before cleaning the lambda probe sensor, it is advisable to warm it up to a temperature slightly below 100 degrees. That's what a hair dryer is for. It is undesirable to use open fire, because overheating is detrimental to the sensor. If you go too far with the temperature, such a cleaning of the lambda with your own hands will end with the purchase of a new part!
Phosphoric acid cleaning
Cleaning a zirconium lambda probe using a rust converter
Cleaning the lambda with phosphoric acid is a popular and fairly effective practice. This acid is moderately aggressive, therefore it is able to decompose carbon deposits and other deposits without damaging the sensor itself. Concentrated (pure) acid is suitable for zirconium probes, while dilute acid is suitable for titanium probes.
It can be used not only in its pure form (hard to find), but also contained in technical chemicals (soldering acid, acid flux, rust converter). Before cleaning the oxygen sensor with such acid, it must be warmed up (see above).
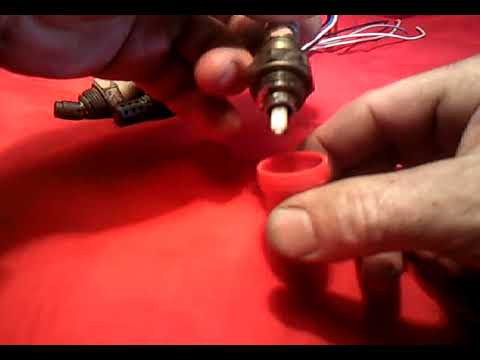
Cleaning the lambda probe with a rust converter, soldering or pure phosphoric acid consists of the following steps:
- Fill a glass jar with enough acid to submerge the lambda sensor by carving.
- Submerge sensor working end into acid, leaving its outer part above the surface of the liquid, and fix in this position.
- Soak the sensor in acid from 10-30 minutes (if the deposit is small) up to 2-3 hours (heavy pollution), then you can see if the acid has washed away the carbon deposits.
- To speed up the procedure, you can heat the liquid container using a hair dryer or gas burner and a water bath.
Burning carbon deposits on the oxygen sensor after cleaning with acid
The second way to clean the lambda probe with acid is with fire:
- Dip the sensor with the working part in acid.
- Briefly bring it to the flame, so that the acid begins to heat up and evaporate, and the reaction accelerates.
- Periodically soak the sensor in acid to renew the reagent film.
- After wetting, heat it again over the burner.
- When the deposits come off, rinse the part with clean water.
The answer to the question of whether lambda can be cleaned with phosphoric acid depends in practice on the degree of contamination. The chances of washing off light deposits are quite high, and durable petrified plaque will not be washed off so easily. Or you have to soak for a very long time (up to a day), or apply forced heating.
Cleaning with carburetor cleaner
Cleaning the lambda with a carburetor and throttle cleaner is a common procedure, but not as effective as with acid. The same applies to volatile organic solvents such as gasoline, acetone, which wash off the lightest dirt. Carbcleaner is better in this regard due to its aerosol base and pressure, which knocks down dirt particles, but the answer to the question of whether it is possible to clean the lambda probe of carburetor cleaners is often negative. Only small deposits are normally washed off, and this is just pampering.
Such treatment can be periodically used for preventive purposes, washing away light deposits from it when they have just begun to form.
Cleaning the lambda probe with sulfuric acid
Cleaning the lambda probe with sulfuric acid is a more dangerous, but very effective way to remove large carbon deposits from the sensor surface. Before you clean the lambda probe at home, you need to get it also in a concentration of 30-50%. The electrolyte for batteries is well suited, which has just the right concentration and is sold in car dealerships.
Using such an acid lambda probe cleaner, you can even succeed in combating contaminants that are not removed by other means. The cleaning process is as follows:
- Draw acid into the vessel to a level that allows you to immerse the sensor along the thread.
- Immerse the sensor and fix it vertically.
- Soak the lambda probe in acid for 10-30 minutes, stirring it occasionally.
- With persistent pollution - increase the exposure time to 2-3 hours.
- After cleaning, rinse and wipe the sensor.
You can speed up the process by heating, but avoid overheating and evaporating the acid.
Hydrochloric acid works in a similar way, but it is also more aggressive, therefore it is used in a weaker concentration and requires increased care when handling. Hydrochloric acid is found, for example, in some sink cleaners.
The answer to the question whether it is possible to clean the lambda probe with sulfuric acid or hydrochloric acid is positive only for zirconium oxygen sensors. Hydrochloric acid is contraindicated for titanium DC (titanium oxide reacts with chlorine), and sulfuric acid is permissible only in low concentrations (about 10%)where it is not very effective.
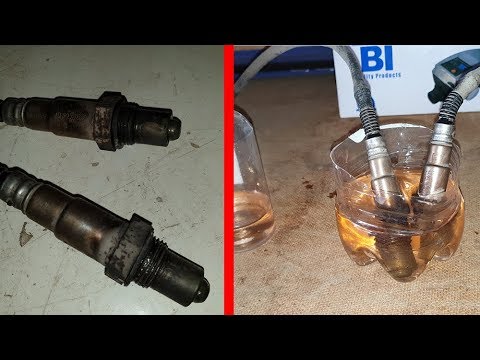
Cleaning the lambda probe with dimexide
A gentle way is to clean the oxygen sensor with dimexide, a dimethyl sulfoxide medicine that has the properties of a powerful organic solvent. It does not react with zirconium and titanium oxides, therefore it is suitable for both types of DC, while washing away some of the carbon deposits as well.
Cleaning the lambda probe with dimexide begins with the preparation of the cleaner, which begins to crystallize at a temperature of +18℃. in order to liquefy it, you need to take a bottle of the drug and heat it up in a "water bath".
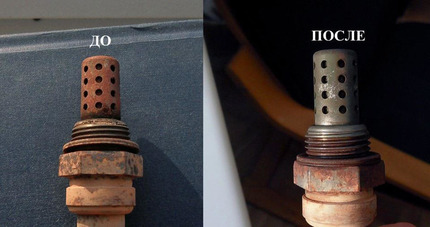
The result of cleaning with dimexide after 20 minutes
it is correct to clean the lambda probe with dimexide in the same way as when using acids, only it should be heated periodically. It is necessary to dip the working part of the oxygen sensor into the vessel with the preparation and keep it in it, stirring occasionally. Cleaning lambda with dimexide requires heating not so much to speed up the process as to avoid crystallization!
Usually half an hour to an hour of exposure is enough. It is useless to keep the sensor in the cleaner for a long time, what has not dissolved in an hour is unlikely to leave in a day.
How not to clean the lambda probe on a car
a basic recommendation on how not to clean the lambda probe with your own hands - without following the instructions regarding the compatibility of acids with the sensor material. But also do not do the following:
- Rapid heating and cooling. Due to temperature changes, the ceramic part of the sensor (the same zirconium or titanium oxide) may crack. That's why do not overheat the sensor, and then dip it in a cold cleaner. If we speed up the process by heating, then the acid should be warm, and bringing it to the fire should be short-term (a matter of seconds), and not close.
- Remove carbon deposits mechanically. Abrasive agents damage the working surface of the sensor, so after cleaning with emery or a file, it can be discarded.
- Try to clean by tapping. If you knock hard with it, the chances of knocking off soot are small, but the risk of breaking ceramics is very high.
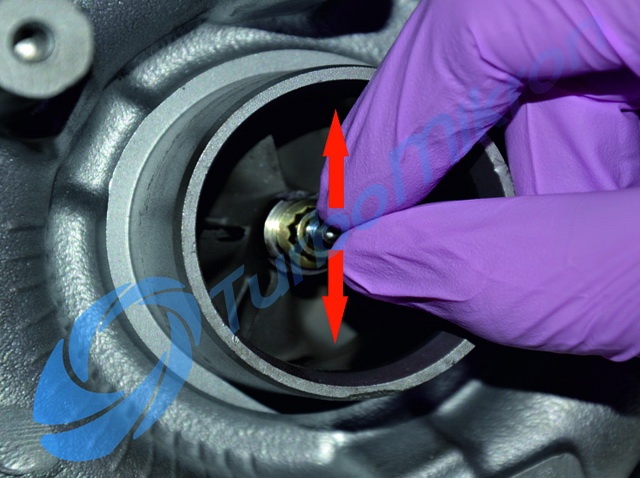
How to determine the cleaning efficiency of the lambda probe?
The result of cleaning the lambda probe
Cleaning the lambda probe is not a panacea for all its problems. Chemically active additives can only remove deposits and deposits, the crust of which prevents the sensor from detecting oxygen in the exhaust gases.
Whether cleaning the lambda probe helps depends on how persistent the pollution was, and on the absence of other problems with the fuel system and the ignition system.
If the DC is leaky, cannot compare readings with “reference” air, the ceramic part is broken, cracked from overheating - nothing will change after cleaning. The result will be absent even if the carbon deposits are removed only from the iron protection, since the sensor itself is inside.
How to check the lambda probe after cleaning
in order to check the lambda probe after cleaning it, it is advisable to connect to the ECU via OBD-2 and perform a complete error reset. After that, you need to start the engine, let it run, ride the car and count the errors again. If the procedure is successful, the Check Engine light will turn off and the lambda errors will not reappear.
You can check the sensor without an OBD-2 scanner with a multimeter. To do this, find the signal wire in its pinout and perform the following procedures.
- Start the internal combustion engine and warm it up, in order for the DC to reach operating temperature.
- Turn on the multimeter in DC voltage measurement mode.
- Connect to the lambda signal wire (according to the pinout) without disconnecting the chip with the “+” probe, and with the “-” probe to ground.
- View the readings: in operation, they should fluctuate from 0,2 to 0,9 volts, changing at least 8 times in 10 seconds.
Graphs of the voltage of the oxygen sensor in the norm and in case of breakdown
If the readings float - the sensor is working, everything is fine. If they do not change, for example, they keep at a level of about 0,4-0,5 volts all the time, the sensor will have to be changed. Unchanging threshold values (about 0,1-0,2 or 0,8-1 volts) may indicate both a breakdown of the oxygen sensor and other malfunctions leading to incorrect mixture formation.
Is there any benefit to cleaning the oxygen sensor?
Finally, you can indirectly determine the cleaning efficiency by driving a car a little. If normal operation of the oxygen sensor is restored, idle will become smoother, ICE thrust and throttle response will return to normal, and fuel consumption will decrease.
But it is not always possible to immediately understand whether cleaning the lambda probe helped: reviews indicate that without resetting the computer, sometimes you need to travel a day or two before the effect appears.